


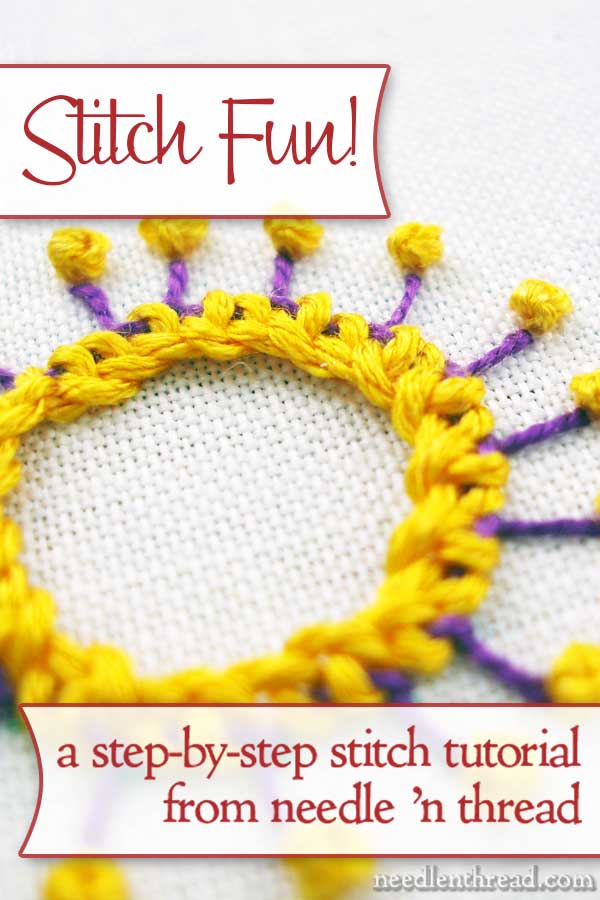
You can never have too many options for stitching hand embroidered flowers! Today’s embroidered flower-looking-thing doesn’t necessarily have to be a flower – you can work it on curves or lines as well. But worked in the round like this, it makes an airy, light flower that’s a lot of fun.
So, for today’s Stitch Play, we’re going to stitch an Inside-Out Buttonhole Wheel Flower. You can work through the whole process shown here, or you can stop at different stages for the effect you want. This is the complete element that I’ll show you today:
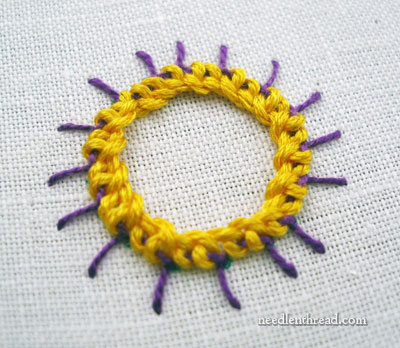
Normally, when you think of buttonhole wheels, the “spokes” go towards the inside. On this little embroidered flower, though, the spokes go to the outside. The buttonhole stitch is then overstitched with a detached buttonhole stitch (which is worked over the previous stitch, but not through the fabric), and then I touched the tips off with French Knots, just for the fun of it.
If you happen to be embroidering a bright sun floating up in an embroidered sky, this technique would work great for that, too!
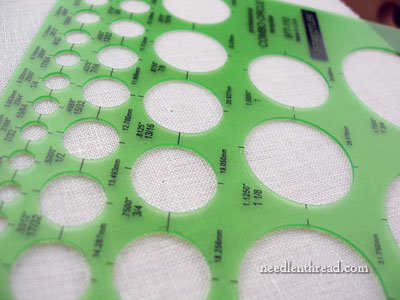
If you’re hesitant to embroider circular elements because you’re afraid your circle will be off, you might consider investing in a set of plastic circle templates, like these made by Staedtler. You can find them in office supply stores or the art sections of hobby stores. They have all different sizes of circles on them, making them quite handy for marking the outline of a circle on your fabric. I generally just “dot” the circle in, rather than draw a solid line.
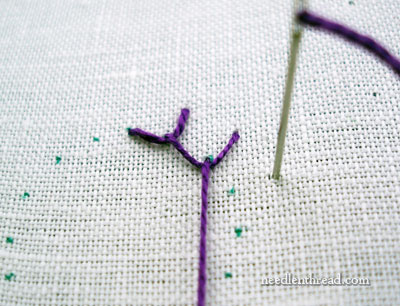
Starting on the line of your circle, work the buttonhole stitch around the circle, with the “twist” of the buttonhole stitch along the marked line, and the spokes stretching out about a quarter inch or more. The spokes can actually stretch out as long as you want them to, as long as you remember that, if the spokes are made very long and aren’t secured somehow, they will be looser and more prone to snag or catch on things.
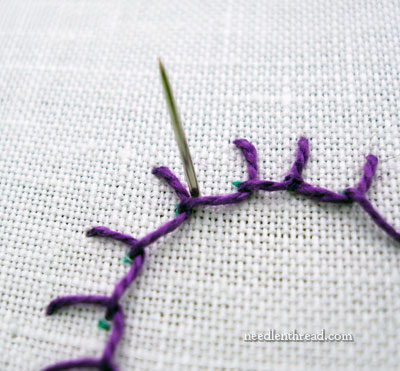
Work all the way around the circle, until you come back to your starting point. Make sure that you hold your working thread with even tension as you work around the circle, pulling the working thread in the direction that you are moving around the circle, so that the buttonhole stitch remains intact.
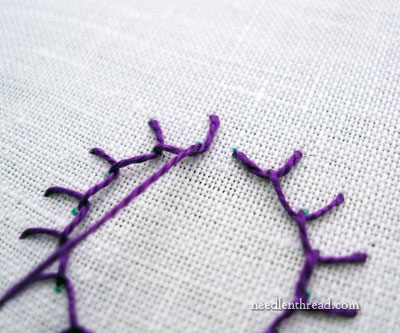
Take the last buttonhole stitch right up against the beginning of the first buttonhole stitch, to close the circle.
To end off the thread and secure the last stitch, take a small anchor stitch over the “elbow” of the last buttonhole stitch, right down next to the beginning of the very first stitch in the circle.
This will create an almost-invisible join, but even if the join is slightly visible, that’s ok, because it won’t be noticeable after you finish the next layer!
Thread your needle with a new color. In this sample, I started with purple #5 perle cotton and then I switched to a stranded silk in bright yellow. For the yellow layer, I used all strands, to make a nice, thick stitch. You can use any number of strands or any thickness of thread, really. But the finer the thread on this second layer, the more buttonhole stitches you’ll have to work, to provide enough noticeable coverage. I like a thicker thread for this layer.
You can begin this detached buttonhole layer anywhere on your circle of buttonhole stitches.
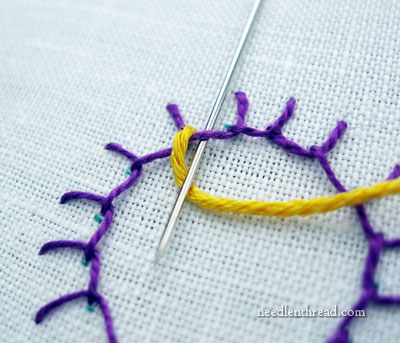
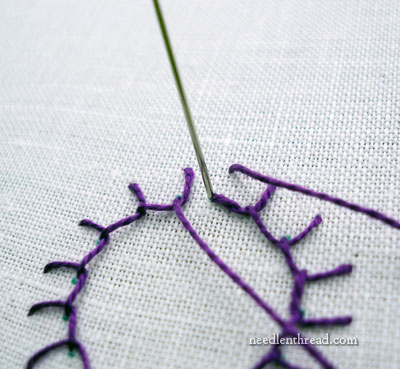
At this point, we’re buttonholing over the twist of the previous layer of buttonhole stitches, along the inside line of the circle. Pass the needle under the thread of the first buttonhole layer and over the working thread and pull through. Make sure you don’t pick up any fabric.
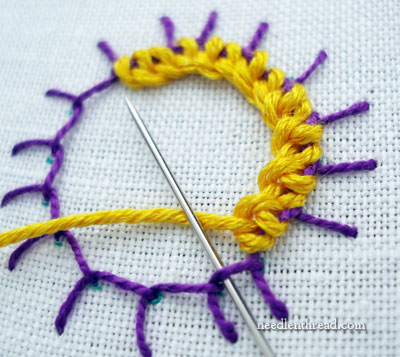
Continue this all around the circle, taking as many buttonhole stitches in each section as will fit. In the sample, I used two buttonhole stitches between most spokes, but in some sections, I only used one.
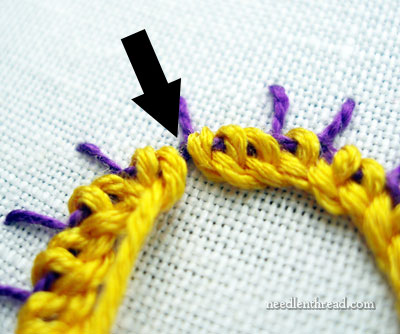
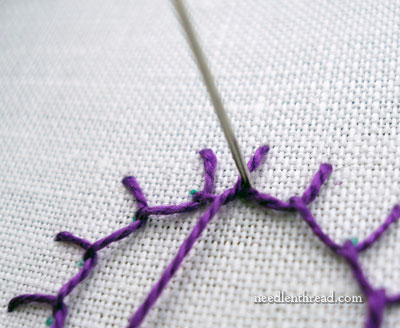
When you get to this point, where the beginning and the end of the yellow layer meet up…
… just anchor your last stitch by taking your needle down into the middle of the first stitch.
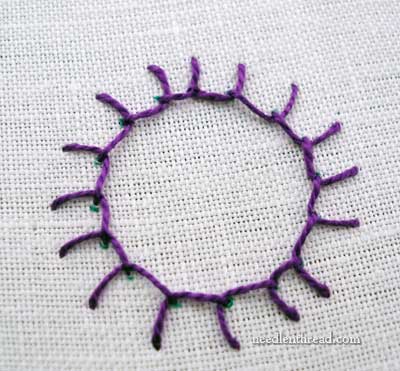
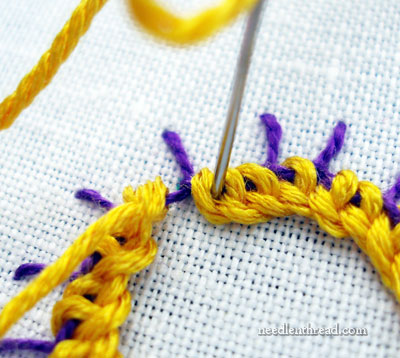
You could leave your spindly-petaled flower like this.
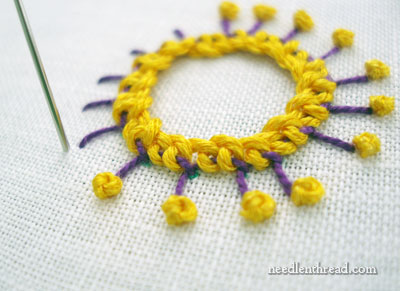
Or you could keep embellishing it, by touching the tips of the spindles with nice plump French knots.
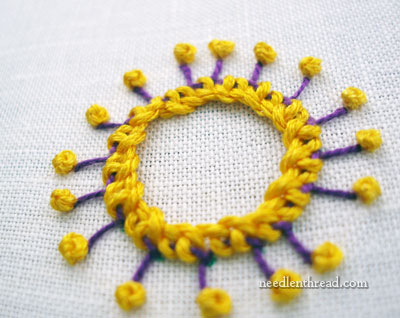
And there we have an airy, light flower, with lots of possibilities for color combinations! You definitely need one of these in your embroidered garden!
Stitch Play is a new series on Needle ‘n Thread, in which we explore different stitches, techniques, and combinations in photo tutorials. If you have a stitch or technique you’d like to see worked out in Stitch Play, feel free to leave a comment below and let me know! I’ll see if I can work something up for you!
So sweet and spikey! I love it!
awww! This is so darn cute! I never thought of constructing a buttonhole wheel flower ‘backwards’…I really like this stitchplay series.
Thank you…gives one unlimited choices!
Couldn’t the wheels also be used with shisha discs? Think of a designs where all of the flower centers have the little reflective centers. Nice and cheery.
I used to do similar circular elements back in the 70`s–when /shisha-mirror work was popular…might have to take that up again! 🙂
Love the new “Stitch Play”. The break down is great. Would love to see the bullion stitch done and see it used as rosettes as they were used by the Phillipines in childrens dresses. Absolutely beautiful.
Wonderful stitch play! I love this one and can hardly wait to try it!!
Oh, I like this one!
I am left handed, so I usually get confused since I have to work in reverse. Oftentimes, if I copy the picture, and ‘flip’ it, then I get a better idea of how to work it. But that’s not working for me this time with the inside buttonhole stitching. It’s not coming out right. If anyone has any better suggestions for me, I’d appreciate it. Thank you!
Hi, Lori – have you invested in a left handed stitch dictionary? I’ve found that it’s very helpful with my lefty students to show them the diagrams in a good left handed stitch dictionary. Yvette Stanton’s Left Handed Embroiderer’s Companion is the best, bar none. You can find a review for it under Books here in the website. Hope that helps! ~MC
No, Mary, I don’t have such a book. I read your review and that one looks like it’ll be just what I need. Thank you!
WOW Mary–Provencal colors no less! Thanks for sharing another great idea for a CQ block. It will make a great addition the session on “buds & blooms”–with attribution of course!
Glad you like it, Suzette! I think it’s a fun one! ~MC
Hi Mary,
I love this new feature ‘stitch play’ and would like to start practicing some of the stitches. I am wondering what fabric you are using? Is it linen? Is that what you would recommend for practicing?
Hi, Tania! Yes, it’s linen. Linen is my go-to fabric, even for practice. It is just a nicer fabric for doing any kind of stitching on. If you don’t want to invest in linen off the bat, then you can always work on a high count muslin or Kona cotton. Just make sure that you are using the right needle in relation to the thread that you use, because it will make all the difference in getting through the fabric!
MC
Gorgeous! Beautiful! Thank you so much for showing us these lovely techniques!
Celestina
cute and fun! Thanks Mary.
Thanks Mary for the “Sun” ‘flower’. Just love it so where can I play with it?? Love this new series. Susan
I love this little airy thingy … would add so much more fun and visual interest in any work. Thank you. I do so enjoy your website and all the information that you pass along. Thank you!
Thanks, Marty! I like this one, too, because it’s so airy and light. I find I like “open” flowers like this when trying to convey a sunny, light impression. Thanks for your comment! ~MC
What a fun stitch and cheery flower! Thanks for sharing. I’d like to see something done with the Chinese or Pekin knot. I’ve tried using a picture to teach myself how to do it but am not sure it’s correct. Thanks!
Hi, Caria – I’ll see if I can work something up for you! That’s a fun stitch, and it can be used in so many ways – individually, as a filling, or in lines. I’ll try to come up with something fun for you! ~MC
Dear Mary –
Thank you so much for developing this Stitch Play series – I am loving it! And let me compliment you on your excellent photography – it’s the next best thing to seeing your stitches in person. I can tell you have put a lot of effort (and probably a great investment in equipment!) to put forth such high quality photographs. Thank you!
I hope you have a blessed Easter,
Tomi Jane
What a great idea Stitch Play is, I love to see the different stitches and their variations. I am going right now to practice my couching techniques. Thanks so much, Barbara
Mary
As always you have come up with something new, creative and fun!!!
I don’t know how you find something new to entertain us every day! But you do and I thank You and so appreciate your emails.
Robin Marks
I loved the couching with the fancy stitches. Gives it a whole different look.
Thanks for this series.
Louise
Hi Mary,
I really look forward to my daily ‘fix’ from ‘N’n’T’
I’m really enjoying your stitch Play series.
I’m thinking of compiling a sample book to keep – can you tell me what fabric you’re using?
Many Thanks,Cheryl.
PS – As for your organizing project…I’m now on a mission – I’ve just returned from the wood merchant with new shelving to convert TWO wardrobes into neat organized sewing storage!!!! LOL
Hi, Cheryl – I’m using linen. It’s around 40 thread count, though it isn’t an even weave. Most higher count linens will work well for a surface embroidery sampler. I’d look for anywhere from 32 – 40 threads per inch or thereabouts… You want a linen with “plump” threads that fill the whole weave, rather than skinny threads that leave lots of open space.
Hope that helps!
MC
Mary,
When embroidering on felted wool, I use the couching stitch for “holding down” the wool stems on flowers. I’m going to try two stitches close together, for a different stem look. May try the herringbone as well.
Thanks so much for the great ideas! (You’re thinking outside the box….. or hoop!)
Annette
I love your Stitch Play on couching-very creative alternative ways to hold down those threads. I will definitely use these variations in the future. I tried the Turkish Rug stitch I found on your site and love it! I have a little kitty silhouette I will use it on. Thank you for sharing.
DEAR MARY,
I AM SO HAPPY THAT YOU HAVE COME TO TEACH COUCHING! I NEED TO KNOW MORE ABOUT HOW YOU DO THIS WORK, HOW YOU MANAGE THE STRANDS TO PUT THE STICH ON, HOW IST IT. IS IT POSSIBLE TO HAVE A VIDEO ABOUT IT?
PLEASE!
CELESTINA
I love couching stitch! I came to know it as a filling stitch while looking at Uzbek suzanis for sale on eBay. In suzanis (large embroidered wall hangings) it’s not lines which are embroidered in couching but large *areas* are filled in Bokhara couching stitch. In that couching stitch, the same thread (floche silk) is being used for both functions and the way in which the tie-down stitches are positioned forms a secondary motif, say a zig-zag or oblique parallele lines, and this adds fascination to the embroidery and variety to the monochrome embroidered surface. There are other varieties of couching, also based on how the tie-down stitch is positioned.
I truly love and appreciate your time and effort. It is inspiring and dazzling. I like this Stitch Play because of the design prompts or suggestions. Once you play, other ideas can bloom! Thank you.