


The raised buttonhole band is a raised band of embroidery created by working the buttonhole stitch over a foundation of straight stitches. Like the raised stem stitch or the raised chain stitch band, the raised buttonhole band works well for adding texture to your embroidery.
The raised buttonhole band can be worked on straight lines or on curves. The key to a neat and attractive finish for this stitch is even spacing in the foundation stitches.
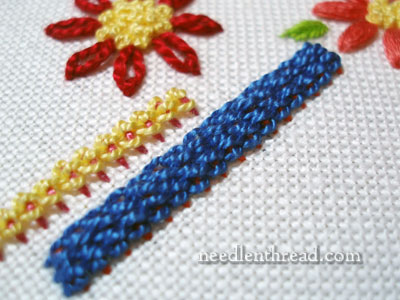
Raised Buttonhole Band on a Curve
When you’re working up a straight line, it’s easy enough to equally space the foundation stitches, but when you’re working a curve, it becomes more difficult. On a curve, the foundation stitches need to be fanned out, so that they are closer together on the inside of the curve and farther apart on the outside of the curve. As long you take care to keep the spacing equal between the stitches, the curved band will look terrific.
Tips for Working the Raised Buttonhole Band
A few points to keep in mind when working the stitch:
1. When it’s time to work the buttonhole filling on the foundation stitches, switch to a tapestry needle. The blunt tip of the tapestry needle will help you avoid snagging the previously worked stitches.
2. Work from the top, towards you, for every row. If switch directions from row to row, working top to bottom then bottom to top, the buttonhole edge will change its orientation from left to right, and this will mar the look of the finished band.
3. If you’re going to run out of thread, change threads at the end of a line of buttonhole stitches. If you think you don’t have enough thread to fill the next line, go ahead and start a new thread. Changing the thread in the middle of a line can be done, but the change in thread will often be visible and mar the look of the finished band.
4. Fill from left to right, when working from the top down towards you. Even though this will require you to pass your needle over the previously filled rows, it is easier to pack the rows towards the left, towards the twist of the buttonhole.
Left Handed Stitchers
Left-handed stitchers would work the stitch from the bottom up, filling the foundation from the right to the left, and packing the stitched lines of buttonhole stitch towards the right.
Raised Buttonhole Band Video
Here’s the video. I hope you enjoy it!
If you’re keen to try out other fun hand embroidery stitches, feel free to check out the rest of my collection of embroidery how-to videos here on Needle ‘n Thread!
Looking for inspiration & information on hand embroidery?
There are all kinds of reasons to sign up for the Needle ‘n Thread daily newsletter! Check them out and sign up today!
If you like what you see on Needle ’n Thread, if you want to be a part of keeping the website thriving (and free of annoying network advertising), why not become a patron on Patreon? Check out my Patreon page here, where I’ll occasionally add special needlework bonuses for patrons.
If you shop on Amazon, you can support Needle ’n Thread without any extra expense to you by visiting my Amazon Recommendations page here, where you’ll find books and sundries for the needleworker available on Amazon.
This would be a great decorative stitch that could be applied to many different embroidery projects, as well as weights of thread. Really like the texture of it, and a big thank you for adding the directions on how to stitch it for left-handers!
Dear Mary, Thank you for such an excellent video. You make it look so easy! There are two suggestions I would like to make which would improve the video for me. First, I would like, at the end, to see the back of the work. Second, I would love to see a few examples in which the stitch has been used: a crewel-work article icorporating it, a section of a crazy quilt using it, etc. (I hope these are places in which it would actually be appropriate to use the stitch!!!) More work for you, I know, to find suitable photos, but seeing the stitch in a context would help me understand how the stitch can be used. Does that make sense? Thank you for this and the other equally excellent videos you have shared.
Barbara
Hi, Barbara –
Thanks for your suggestions! I appreciate your taking the time to make them. Here’s my take on the points – just so you know that I’m not ignoring your suggestions!
Where I can, I do show the stitches in context of some particular work (i.e. – the vertical fly stitch video comes to mind; many of the video pages – detached chain, fishbone stitch, stem stitch, woven picot come to mind – have photos of the stitches in context). Given the vast quantity of embroidery stitches (there are some 400+ stitches), it would be quite a feat to get them all into particular projects, all worked by one person. A life-long feat! Maybe, by the time my life is over, I will have samples of all the stitches in context of larger embroidery works…
And of course, using other people’s work or photos is out of the question, without written permission from each person. And there again, we have that whole question of efficiency and time: tracking down photos, getting the legalities worked out, etc. – too much time involved in keeping track of that kind of stuff.
Regarding the back of the stitch, if you follow the movement of the stitch on the front, you should be able to visualize what the back looks like. I don’t show the back during the videos for a couple reasons:
1. Just a point of efficiency, again; logistically, it presents a problem. The frame I work on for the videos is very large, mounted on trestles, surrounded by four large, low studio lights, and overhung (about 8″ above the fabric) by a heavy camera on a boom. Flipping the frame would require me to move all the equipment to be able to access the back. But I don’t think it’s worth it, to go through all that, for the following reason:
2. The back of the stitch is not really important, when you know how the front is worked. The back of embroidery is usually only studied in historical context, when researchers are trying to determine something about an unknown stitch or an unknown technique, when they can’t figure out how the front was worked or they want to verify how it was worked, or when they are trying to determine something about a particular embroidered work as a whole. We know how these stitches are worked, so the back doesn’t really matter. Does that make sense?
And last but not least – I try to keep the videos as short as possible – my goal is 3 minutes or less, though this isn’t always possible. There’s a reason for keeping them short: when looking at a how-to video in order to learn a stitch, most people just want to learn the stitch. Going into more detail than is necessary wastes people’s time; most folks are less inclined to make use of over-detailed, long videos. So whenever the back is of particular interest (because something “weird” is supposed to happen on the back, or there’s some sort of technique involved on the back to get the front to do what it’s supposed to do – which is not common at all), this is something I would cover in the supplementary information provided on the website.
I’ll do my best to provide supplementary photos on the individual stitch pages on the website, to help round out the information about the stitch. And as I develop more embroidery projects and incorporate other stitches in them, I do update the pages with photos to keep the content fresh, so hopefully, over time, you’ll see more and more samples of stitches in context.
In the meantime, though, I hope that the small stitched samples will help folks learn how to do the particular embroidery stitch by showing what that stitch itself should look like when completed.
Thanks again for your suggestions! I really appreciate them – I do strive to improve my content to help people as much as possible. But sometimes, some things are just beyond my scope, at least right now!
~MC
I am loving your stitch tutorials! Especially the fact that you describe how to do the stitches as well as offer the video. I don’t know how many others are out there who do not view videos on the computer because of bandwith issues, but appreciate having both formats available!
Thank you for a truly inspirational website showcasing the most incredible works in progress!
Dear Mary
Thanks so much for this video I was looking for a stitch on a project I’m currently doing, just used this stitch as part of my project it looks lovely really pleased with it . Thanks so much for your hard work on Needlenthread.
Regards Anita Simmance
Dear Mary,
Thank you for showing so many wonderful stitching projects and having great videos. They are extremely helpful.
I have one question though. A lot of the videos and demonstrations show you using only one strand of floss. Do you ever stitch with 2 strands of floss. When you do that do you “railroad” your threads? Or am I just coming from a cross stitch world?
In any case, you have helped me with so many ideas for projects. I just hope that one day when I grow up I will be half as good as you.
Thank you, Nick
Hi, Nick – in surface embroidery, you don’t generally have the opportunity to railroad the floss. This works well, like you said, in cross stitch, and it also works when you satin stitch with two strands of floss (though I prefer to use a laying tool when working with multiple strands of floss for satin stitch, and for other stitches when necessary). In the videos, I usually use perle cotton and the like because it is easier to see. You can work most stitches with any type of embroidery thread, though.
Thanks for the question!
-MC
Este ponto é lindissimo e parece ser muito fácil de fazer com sua explicação………obrigada !!!
Vejo sempre seus videos.
Gostei muito dos vídeos, bem explicados . Trabalho com bordados e gostaria de receber sempre novidades ! Obrigada .
Thanks so much for your instructions and video tutorial on this stitch. I’m using it on my current embroidery project and I love how it looks. I’m using big, chunky size 3 perle cotton for the buttonhole stitching part, and that’s working out very nicely.