


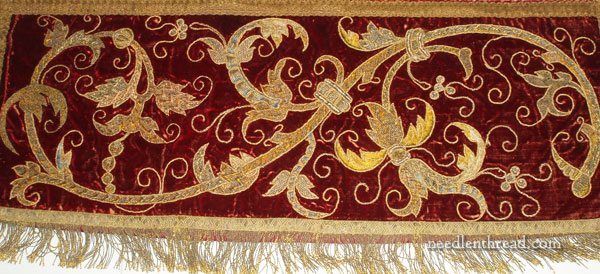
Remember the goldwork on velvet embroidery we were looking at the other day? Besides the actual stitchery, I found the finishing fascinating.
As I explained earlier, the piece is finished into a kind of panel, small “valance”, or something similar, that hung off a larger piece, and was cut from the larger piece. It was cut intact, as far as the panel itself goes, so that the trim is still around the outside, and the back fabric and inside “interfacing” are all included.
Imagine an unconnected pocket 27″ wide and 10″ deep, with fringe at the lower end of it, and an open cut along the top part of it, and you have the right idea of the construction of the piece as I have it now.
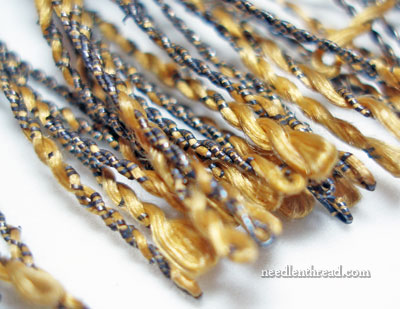
This is the fringe. It is made from real metal thread with a silk core, twisted together. It is a beautiful fringe, in its own way. Sure, it’s lost some (ok, a lot) of its former glory – the gold threads are certainly no longer gold but practically black, and much of the gold has disintegrated – but the twist of the silk core when viewed up close is still incredibly pretty. When the piece was in its prime, the silk core would not have been visible, of course, so once again, here’s a good example of an old piece showing us a different kind of beauty.
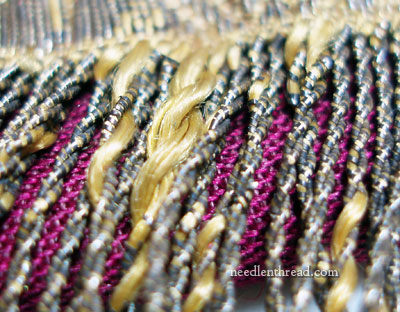
Here, you can see the top edge of the fringe, a tiny bit of the ribbon over the top of the fringe, and behind the fringe, the color of the silk that lines the very back of the piece. The fabric on the back of the piece is in good shape.
I’m contemplating taking the ribbon from the edge of the piece and seeing just how the fringe was made. I haven’t had the guts to do that yet, though. Should I? Shouldn’t I? Tough decision!
What struck me as really intriguing when I saw it was the fabric that lines the inside of the piece, sandwiched between the embroidered front panel and the silk on the very back.
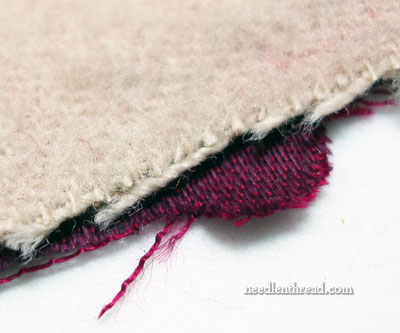
There, you can see the fabric up close. Felted woven wool. It’s thick. It’s heavy. And it’s inside this panel!
If you took the Nesting Place online class with me last fall or this past spring, you might recognize the look of this fabric. It’s very similar to the Scottish felt that we used in that class for the inside of the needlebook we made, though it seems a little heavier. For those of you who aren’t familiar with Scottish felt, below, you can see the edge of the needlebook insert made from the stuff:
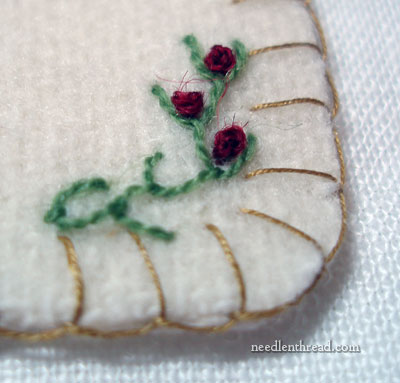
It’s a fairly thick, woven, felted wool, wonderful for stitching on. The new piece above is cut a little neater, and you can see the woven structure if you look closely at the photo.
In structure, it’s the same stuff lining the inside of the goldwork panel.
So the goldwork panel, if lying down on a table with the silk backing against the table, is made up of these layers, starting from the silk backing and climbing upwards:
1. Silk backing
2. A thick layer of woven, felted wool
3. A layer of heavy linen that feels almost like buckram
4. A layer of silk velvet
5. A layer of finer linen on which the embroidery is done, cut away after the embroidery is complete
6. Dense goldwork and silk embroidery, and gold ribbon edging around the whole, with one side of gold fringe
I think I mentioned in an earlier article that the whole piece is sort of heavy. Well, now we know why!
If you’d like the back story on this piece, you can find earlier articles and other pictures on this piece of embroidery here:
Goldwork on Velvet – The First Explorations
Goldwork on Velvet: Behind the Embroidery
Mary–Thanks for sharing “the rest of the story” regarding the construction of your treasure! We now have a time-tested list of “sandwich ingredients” to consult for future adventures with silk velvet.
If it looks like you can lift the ribbon without doing much damage, go for it I say! It would be interesting to see if the fringe had a plain woven top, or if it was hand-twisted and stitched down as it was made.
It’s amazing how many layers this has – no wonder it’s heavy.
Thank you for such a wonderful and detailed account of the “insides” of a piece. They truly make a difference on how a piece hangs.
One question on the “sandwiched” wool felt. I’ve come across opposing ways describing how this layer was used, and am wondering how this piece was done. Is it “floating” on the inside? Meaning, in some of the old books, they discuss making hangings with the felt being caught in a seam at the top edge, and then hanging free, not being attached in the seams at the sides and bottom. This allows each layer to “Hang” without causing pulls, sags, etc over the years.
Other sources have the face piece with the embroidery loosely “tacked” at intervals to the inner layer. The thinking seems to be that periodic tacking keeps the layers aligned, but still allows for changes in each fabric over time to hang out. Are you able to tell how this was done on your piece?
Also, do you have a source for the Scottish wool felt?
Thank you again for a great series!
Thank you so much for showing this to us is such detail, Mary.
I was curious about this piece because of its size and shape. At first I thought it might be a maniple, but realized that was not feasible. I went to some of my vestment and altar resources and discovered that it is the right size and shape to be a lecturn or pulpit frontal. They can be layered with this piece being layered over a piece of damask silk or linen with the fall starting at the top of the pulpit and covering just the first 10-15 inches with the damask piece going clear to the floor. Could it be that the piece that was cut away was the backing to the fall that is left in your possession?
Mary, I have so enjoyed having a close up look at this piece – so interesting. Here is something I learned from an old piece of goldwork.
A few years ago a friend gave me a gold worked satin collar cut from a dress that was probably made in the late 1800’s early 1900’s. Looking inside you could see where the satin was backed with a very light weight cotton flannel and the gold work was done through the two layers, Then the piece was finished as a regular collar.
I most often work on a linen twill or even weave linen and have used muslin as a backing for my work, but the light weight flannel backing laid so nicely and had great “hand”. I decided to give it a try. The result was wonderful and I will never use muslin again.
Give it a try on a small piece and see what you think.
Thanks, Paula! I definitely will! I like the idea…. And with goldwork, I can see the “cushion” of the flannel helping to buffer the finishing of the gold threads on the back and so forth. I’ll try it out! ~MC
I’ve been following your exploration of this piece, and I must say this is an amazing work. It reminds me of a 17th c. valance I’ve seen in one of my books. The design could certainly be from that era, and the quality and style of workmanship follows as well. It feels very continental or Italian – For some reason (nothing strictly logical- perhaps the asymmetrical design?)it looks likes one of a pair- perhaps the side piece of either a canopy valance or possibly a table/altar end…though if it really old, as a table end, it would show more brush by wear marks on the corners and higher surfaces. Whatever it is, it’s a treasure. I’d only take it apart very carefully and examine it in a way it could be reassembled/conserved. Simply gorgeous!
Dear Mary
Thanks for sharing more information on the gold panel work, imagine putting this together, all those layers, or sewing through all those layers and the fringe so beautiful.
Regards Anita Simmance