


Needle weaving in hand embroidery involves all kinds of stitches. Woven picot, woven wheel, various interlaced stitches – these are both examples of stitches that involve “needle weaving.” In drawn thread and whitework embroidery, needle weaving is used to create decorative woven bars in drawn thread areas. So the whole idea of needle weaving is fairly prevalent across the whole surface embroidery spectrum.
For today’s Stitch Play, we’re going to look at the most basic needle weaving technique, the woven filling. This is such a simple technique and easy to use wherever you want a filled embroidered area that looks woven.
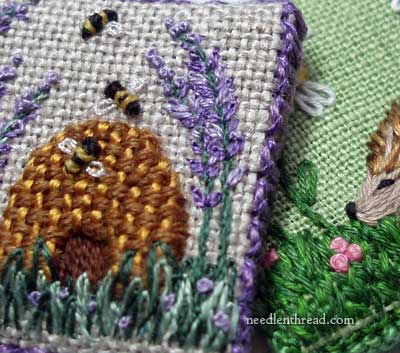
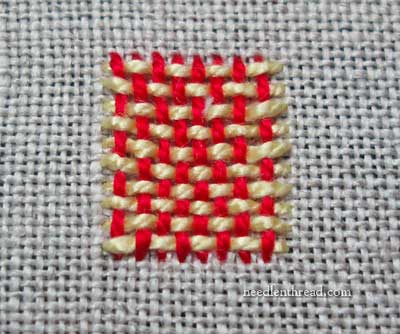
In the photo above, the beehive on the left of the photo is worked in a woven filling. Although today’s Stitch Play tutorial demonstrates a very “square” approach to woven filling, you can use woven filling to fill all kinds of shapes in embroidery. So feel free to think beyond square when determining where you can use this stitch!
For this tutorial, I’m stitching on Montrose 1750 linen, which is a natural colored linen with approximately 26 threads per inch, and for thread, I’m using perle cotton #5 in two colors, with a #3 crewel needle for the vertical bars, and then switching to a #20 tapestry needle for the weaving.
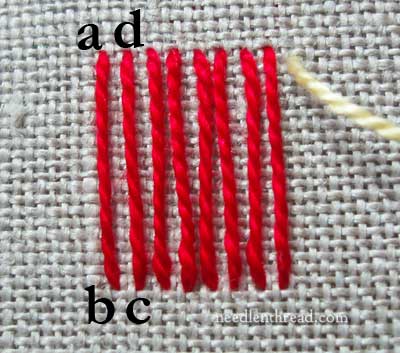
First, you lay your vertical “bars” (these would be like the warp threads in weaving), which are the foundation for the woven filling. When you stitch these bars, begin at a in the photo above, take your needle down at b, then step right next door to c to bring your needle up for the next stitch, and take it down at d, always stepping sideways to start the next stitch. In this way, you avoid building up long, unsecured stitches on the back of your fabric.
How far your space your vertical stitches is up to you – it depends on the look you want to achieve. If you want a very open, airy filling, place these stitches far apart, and then weave your horizontal stitches equally as far apart. If you want a solid woven filling, you can make the vertical stitches right next to each other (this will create a very dense woven filling) or you can work them with a thread-width space between them, which will create a very uniform, filled area.
How dense the filling is also depends upon the thread you use to weave the filling. In the beehive photo at the top of the page, I used a single strand of silk about the size of a #8 perle for the warp (vertical) thread, and for the filling, I used several strands of wool, which created a solid, thicker filling, with the wool spreading out and filling up the whole woven area.
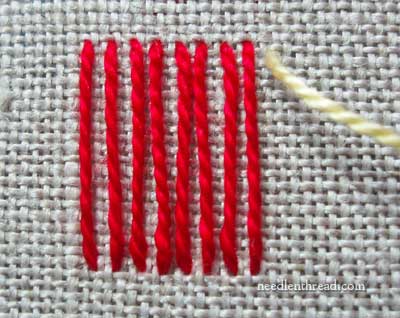
Once your vertical threads are in place, bring your needle up at the top right of your design area. (Left-handed stitchers can come up at the top left, but it doesn’t really matter either way, because the weaving passes back and forth from both directions). Here, I’m only filling a square, so my design area edge is straight down the right and left side of the vertical stitches.
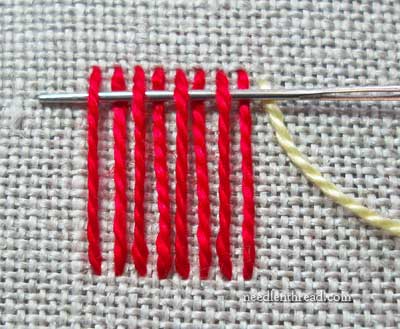
Pass your tapestry needle over the first thread, under the second, over the third, and so forth, alternating an over-under sequence until you reach the other side of your design area. If your design area is very wide, you may have to pull your working thread through part way across and then continue the over-under weaving sequence until you reach the edge.
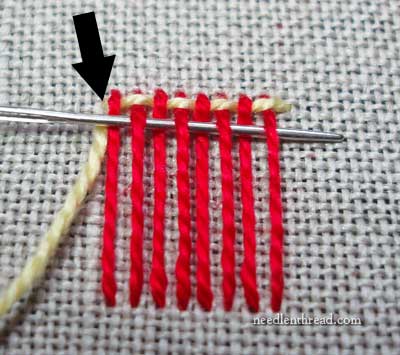
Once you reach the opposite edge of your design area, take the weaving thread to the back of the fabric, ensuring that you are directly across from where you began the weaving stitch. The arrow points to where I took my thread down into the fabric.
Then, step down a little ways (again, how far depends on how dense you want your filling), and come up in the fabric to begin a return pass from left to right.
When you return on this pass, you’ll go over and under the alternating threads from your first pass.
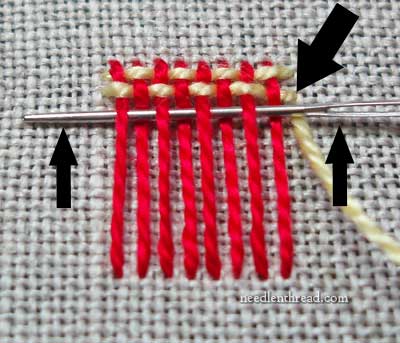
For the next row, pass back from right to left. Continue working in this manner to fill the area, always ending your thread at the end of each woven row by going down in the fabric opposite to where that particular woven stitch began. As you move from row to row, alternate the over-under sequence with the previous row.
When you have your needle in place for your next row of weaving, it is helpful to push up slightly on your needle and straighten the row above. The upward arrows in the photo above indicate this movement. With the needle in place for the next pass, and holding onto the eye and the tip of the needle to keep the needle horizontal, pushing up on it will help situate the previous row. If you are trying to create a very dense filling, this is a useful way to pack the filling, too.

Fill up the whole design shape this way. The last pass can seem rather tight. Before you take it, hold your embroidery away from you a bit to see if it is necessary to take one more pass. If the lower edge of the woven filling looks sparse compared to the rest of it, take one more pass.
Here are some suggestions for getting variety out of the stitch:
1. Mix the thread types: use a different type thread for the vertical and for the horizontal. This will give the filling more texture.
2. Play with color: use contrasts for a bolder, more colorful filling, or use the same color for a solid filling that has a little texture to it.
3. Play with shades of color: use very close shades of color to create a solid fill that has a little bit of color depth to it. For example, using a medium green and a medium light green that are very close to each other in value will give the impression of a solid fill with slight texture, that has a little depth to the color.
Hope you have fun with it!
You can find other articles in the Stitch Play series listed here. The articles explore various stitches and stitch combinations with step-by-step photos. They’re fun ways to play around with embroidery stitches – and after all, embroidery is supposed to be fun! So feel free to check out the other Stitch Play articles and have a bit of fun with your embroidery!
Thank you for the wonderful lesson. Is the lovely little beehive piece you show at the beginning available as kit or pattern?
Hi, Margaret – thanks for asking! It’s pretty cute, isn’t it? Yes, it will be available as a pattern and tutorial in the near-ish future! MC
Mary,
I really appreciate that you tell us which fabric you’re using, it’s fiber and count, the type, size and color of thread, the type and size of needle. The right mix of fabric, thread and needle are so important to getting the best effect with embroidery and you are so generous in letting us learn from your experience.
I am very much a beginner at this art and have just begun a sampler based on your “spot sampler” to experiment with fabric, threads, needles and stitches.
Thanks,
Ann
you’re killing me with all the cute wildlife teasers! I love this stitch. It’s such a great easy filler
How fun! Thanks for sharing that Mary.
Thank you Mary ! I really must try this !!
hugs
Chris richards
xxx
bellissimo, lu userò presto in qualche ricamo!!!!grazie
Dear Mary,
Thank you so much for ALL the stitch tutorials. I MUST MUST MUST make that little Beehive and Lavender thing for my sister who collects Bee things, does beautiful needlework herself, and has a son who has a beekeeping business! Thank you for the hint of good things to come!
Locked up thumb or no, I’ve got to make that 🙂
Cathy in PA
This is a beautiful stitch and your photography leaves no questions to be asked about the stitch itself. My one question is: How do you determine what stitch to use on a pattern when it’s not specified? Do you only get that from experience?
Thanks for the best embroidery sit on the web.
Dear Mary
Thanks so much for the tutorial on the woven filling stitch in the stitch play series. Every time you demonstrate a stitch I want to use it in some form of embroidery, but LOL! I must focus on the project in hand!
Regards Anita Simmance
huhh, has the same concept of daiperwork in the illuminating of medieval books. i love it!
in fact, if you took that woven background fill and added rows of spaced x’s in a contrasting colour, you WOULD have a piece of diaperwork.
now that i think on it, a person could take an example of medieval illumination and actually turn it into a piece of embroidery. thanks for the inspiration!
Thank you so much for replying Mary! I will definitely try that with each thread color. I think the other thing that was not working is that I was trying to do this one cotton fabric. Perhaps this only works on evenweave fabric that has a definite weave? The weave helps to hold the thread in it’s place and keep it from moving side to side? Thanks again! I appreciate it so much! I had sent a message to Hazel Blomkamp to ask her since it was in her book, but she never responded. I really appreciate you taking the time to do so!
Would you do a video on this or picture tutorial on how to weave with multiple colors in a shape both weft and warp please? I can’t figure out how to change colors yet secure the threads to stay taut. For instance let’s say you are working with four colors weft: red, white, blue, and yellow, repeat across the shape. Then warp: red, white, blue and yellow, repeat across shape. Example on the cover of Hazel Blomkamp Crewel Intentions. Thank you so very much!!!!
Hi, Mary Ann – I usually just anchor the working thread away from the stitching area, by bringing it up to the front outside the design area, and taking a straight stitch to the back, and then bringing it up to the front again (like working a running stitch and ending on the front) – this helps anchor the thread, but I can also easily un-stitch it to continue with the same thread.