


After much musing, pondering, testing, head scratching, flubbing about, and whatnot, I’m moving forward on this embroidery project that I’m calling The Hungarian Redwork Runner.
I thought of titling the project “Rectangular Center Table Cloth with Red Embroidery in a Hungarian Design,” but that just seemed a bit much. For the sake of brevity, I’m sticking with Hungarian Redwork Runner. Technically, though, just to clarify, this is not really the typical Hungarian red embroidery that you would see on hand embroidered textiles from that country. I’ll be using a different thread and different stitches. But the design is from Hungary, and the embroidery will be red, so I think the name works ok!
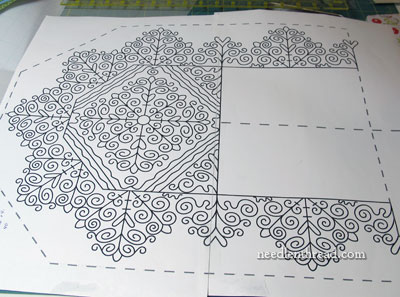
I’ve decided to stick with this version of the embroidery design, minus the squigglies along the inside edge that look a lot like inchworms.
Originally, I planned on enlarging the design, so that, from edge-to-edge across the embroidery, the design itself would be 16″ wide, making the whole embroidered area about 40″ long.
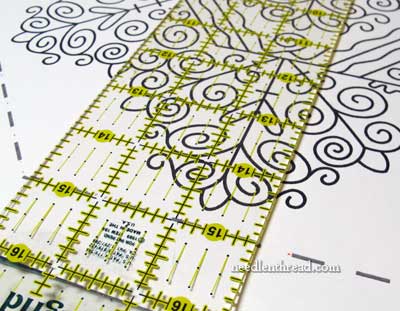
Instead, I’ve enlarged the design so that it is only 15″ wide, from the dashed line edges in the pattern (you can find the pattern here, available as a PDF). This makes the embroidered area about 14.5″ wide.
At this width, the length of the runner (between the dashed line edges) ends up being 36″.
The finished runner will be slightly larger, since a small hem will come into play. I haven’t decided on the edge treatment yet, and I haven’t decided whether or not I will cut the corners on the cloth yet. There’s a part of me that wants a small, drawn-thread strip along the hem area, but if the corners are angled, this isn’t entirely possible. So I’m pondering that one still.
Measuring & Cutting the Ground Fabric
In any case, I can still set up the design at this point and stitch the whole thing, making the finishing decision later, as long as I have enough fabric on the edges to handle any contingency.
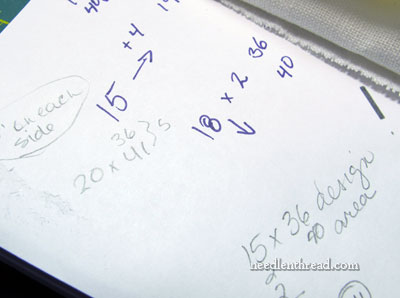
The fabric must be cut larger than the finished design area, as is the case in any embroidery project. When framing a project, I always figure about 3″ on all sides around the design area. Sometimes, if the fabric is scarce or precious, I might go as low as 2″ on each side around the design area.
On a project like this that isn’t going to be framed, though, I generally just take into account the maximum possible hem allowance that I’ll want (I want a narrow hem), plus a little extra. In this case, I figured 2″ all around, plus a little extra for shrinkage, so I added 5″ to my dimensions, cutting the fabric at 20″ x 41″.
Upcoming Project Steps
Next time we visit this project, we’ll look at fabric preparations. It’s not just a matter of cutting the fabric and stitching away – there’s some prep work that needs to be done, to make sure everything lines up well and to make certain there are no surprises when we finish the project. Then, I’ll show you some stitching samples that helped me make my thread decisions, and finally, we’ll transfer the design and set it up for stitching.
Enjoy the Process!
This part of the whole embroidery project process can sometimes seem rather daunting, can’t it? I always look at the set up as part of the whole journey – and in fact, it’s the Most Important Part. If the set-up is off, you can pretty much bet the finished product is going to be off, too. So it’s ok to take time over the set-up, to change your mind, to consider options, to work test samples if need be – to go slowly. At the same time, don’t let this part of the process create a Wall that seems insurmountable. Think of it as fun – as a challenge! And conquer it in little pieces. It always helps to break big things down into manageable chunks.
Follow Along
If you’d like to watch this whole project develop from start to finish, here are the related articles so far, in chronological order:
The Original Hungarian Redwork Design – with information about authentic Hungarian redwork embroidery
First Design Alterations (straight edges and design repeats)
More Design Alterations – also, some talk about threads and stitches
Clover Transfer Mesh – one idea for design transfer
Questions?
If you have any questions or anything about setting up an embroidery project like this, feel free to ask below!
Dear Mary
Thanks for your article and I agree there is a lot preparation work in embroidery and this project being so large and with repeated patterns it certainly requires an accurate assessment, good luck. What transfer method did/are you going to use is it the mesh method? I look forward to your blogs and process of this embroidery project.
Regards Anita Simmance
maybe you could call it Hungarian Style Redwork, or Hungarian Redwork inspired.
Set up is definitely important, in any stitching. I’m currently working on “Nature’s Vision” (http://www.crossstitchworld.com/cross-stitch-detail.php?RecordID=337). Before threading my needle with floss, I took the time to make a running stitch gridwork on my material which matches the grid on the pattern. It’s saved many instances of frogging (“rip it, rip it”). It took some time, but it was well worth it, and will be standard practice for any major pieces to come.
That is such a good idea. I wish I had thought of it back in the days when I used to do quite a bit of cross stitch. Two projects I did would have been ideal candidates for this: they are street scenes of towns that haven’t changed much in a hundred years or so and are quite delightful. I must find them, maybe give them some frames …
but at almost 3 feet long, those running stitches would have been mighty helpful.
Oh Mary,
I love going on a stitching journey with you. I loved following the medallion and I can not wait to see all the different steps for this one.
You are so right about the preparation being important. I am always in so much of a hurry to get on to the exciting bit that I skip a bit on the prep. I might be better at this if I have some nice shiny tools to play with … so.. what tools do you use for making sure the project is set up correctly (I notice lots of things with right angles on)?
I love the design, by the way. It makes me feel Christmas is on the way!