


For the Hungarian Redwork project I’m currently tackling, I knew right away that the transfer was going to cause some difficulty. There are so very many different ways that we can transfer embroidery designs to fabric, and just like everyone else, I have my favorite methods. But they don’t necessarily work for Every Single Project.
To be truly content with needlework, I find that flexibility is an essential ingredient in my approach to things. Doing things Only One Way never gets me very far. I learn a lot when I troubleshoot different methods and techniques, whether in actual stitching or in the various peripheral activities that go on around stitching, like project set-ups, design transfers, finishing, and so forth.
So with the Hungarian Redwork project, I decided to try a different method of embroidery design transfer. It involves a product manufactured by Clover, called transfer mesh.
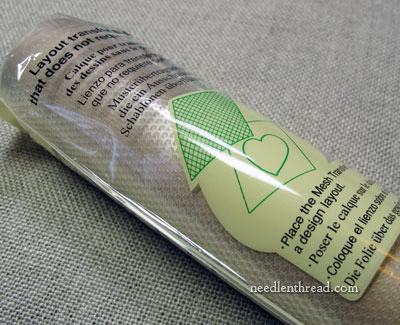
Clover transfer mesh has been around for a while. It’s used in quilting more than hand embroidery, and understandably, because in quilting, the designs are generally larger and bolder, without a lot of little details.

Transfer mesh is a thin sheet of plastic, about 12″ x 16″. It is perforated with evenly spaced little holes. They are not tiny holes – just relatively small holes. For hand embroidery design transfers, it would be nice if the holes were slightly smaller and closer together, but I don’t know if the concept would work as well if they were, because I think it would be more difficult to draw the design on the plastic sheet and get a pen or pencil into holes much smaller.
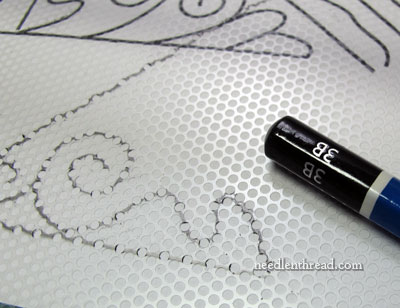
The transfer mesh has a slick, shiny side to it, and a matte, rougher side to it. The directions indicate that the matte side should be used for pencil, while the shiny side should be used for pen. When using a pencil, a softer lead works better, so I tested this with a 3B pencil.
This is what you do: Lay the transfer mesh on top of your pattern, and trace the design onto the mesh using the pencil (or, if you’re working on the shiny side, you can use a pen). You can see in the photo above that the design lines are broken up by the little holes.
Then, you lay the transfer mesh onto your fabric, aligning the placement of the design and trace over the design you drew on the transfer mesh, using whatever type of pen or pencil you wish to mark your fabric. You can use chalk pencils, regular pencils, pens, water soluble pens, or whatever!
I stay away from water-soluble pens and the like, personally, because they are iffy. The manufacturers claim that the marks from water soluble pens will disappear with water, but in fact, this isn’t always the case. Initially, they may disappear, but they are notorious for returning later. Sometimes, they return in their full-fledged blue form, and other times, they show up as yellow lines, in my experience. I prefer not to take that risk!
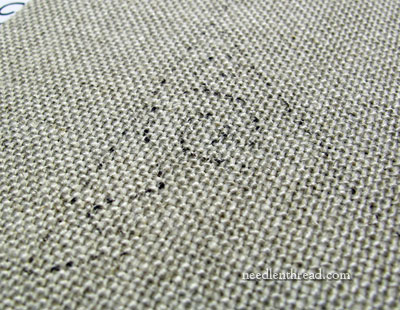
In any case, with this Hungarian redwork project, the design lines will be completely covered with stitching. I could use a regular pencil to transfer the lines, or my Bohin ceramic pencil, or a chalk pencil – there are lots of options. But one thing I want to achieve with this method is being able to easily see the design after tracing through the mesh.
For design transfer, I often use micron art pens, which are available in the drawing section of art and hobby stores. They’re made by Sakura, and they come in various sizes. The pens are permanent (guaranteed so on paper, though, not necessarily on fabric), archival, and ideal for creating very fine lines.
Because the pens are not guaranteed permanent on fabric, I suggest if you use them, you test them first. I always use either black or sepia, and after doing my design transfer, I iron the fabric again before I begin stitching. I’ve never had a problem with the black or sepia running when I’ve done this, so I’ve had very good luck with these pens.
Using a size “01” in the Sakura micron pens, I traced over the transfer mesh. I ended up with the sketchy line that you see in the photo above. It’s not “perfect” – but it is adequate. I can see it clearly.
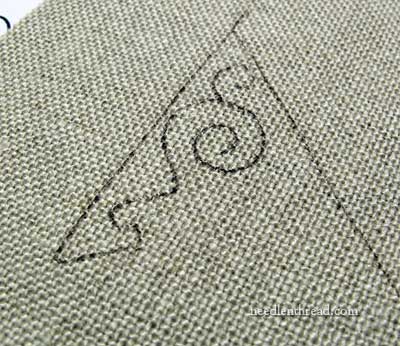
Still, since the lines are going to be covered with the stitching, and since I like to be able to see my lines very clearly as I stitch, I drew over the sketchy line with the pen one more time and ended up with a very clear, accurate transfer for my test sample.
I am pleased with it, and I may very well transfer the whole design in this way. We shall see!
The mesh is washable after use, so you can clean the design from it and re-use the mesh over and over again. If I use the mesh, I’ll trace the design for the ends of the table runner first and transfer the ends to the fabric, and then wash the mesh and trace the repeat design for the sides onto the mesh, and then onto the fabric. The design is, after all, a collection of repeats, so breaking it down into the repeated segments and transferring each repeated segment several times to the fabric will minimize the amount of tracing onto the mesh.
On the other hand, if I had four sheets of the transfer mesh, I could lay out the whole design and do it in one fell swoop! But at $8 – $10 per sheet, I’m not too keen on that approach.
Dritz, by the way, makes a similar product (I haven’t tried theirs). It is 10″ x 18″.
Pros & Cons of Clover Transfer Mesh
Pros:
1. Clover transfer mesh works well with bold, open designs that are not too detailed.
2. The transfer mesh makes transferring designs to darker fabrics (that are not easily see-through) a lot easier and more accurate.
3. It is faster than the prick-and-pounce method of design transfer.
Cons:
1. It’s a bumpy ride! Practice using the mesh first, before trying to transfer a design onto a good piece of fabric. I find it helps to hold pens and pencils at an angle, to minimize catching the tips in the little holes. Practice first!
2. It is useless on very detailed designs. The holes are too large to adequately transfer details.
3. The 12″ x 16″ is an ok size for smaller designs, but if you needed to work something large, it would be nice if the mesh were available in larger sizes. Otherwise, you need two pieces, or you need to work in pieces. This can be tricky when lining up a whole design.
4. It comes rolled on a tube, and it holds the “curl” of the tube quite stubbornly, which can make transferring a bit tricky. I put the mesh under my cutting mat for several days, and that helped.
5. For a sheet of plastic with holes in it, I find it a little expensive.
6. It is surprisingly difficult to come by in local stores. Given the relative popularity of Clover products, I’m surprised it isn’t available in any of my local hobby, craft, or fabric stores (chain stores), or in specialty quilt shops and the like in my area. I had to order mine online, which increased the price because of shipping.
So, what think you? What’s your favorite, fail-safe, all-around method for design transfer? Have you ever used Clover Transfer Mesh? If so, what’s your take? If you haven’t used it, what do you think of the concept? Is it something you would try? Can you think of any other readily available product that could be used the same way, that might be more cost effective? Any ideas, suggestions, tips, comments, or input on Clover transfer mesh? Have your say below!
Mary,
I’ve not ever done this, but I’ve seen it done and it looks like a great solution to the “holes too large” issue. Tulle netting fabric is rather stiff, has smaller holes and is fairly inexpensive and can be found in nice wide or long pieces, depending on your needs. Laying it over a design and tracing in the same manner as the Clover product does work. The only drawback is that it isn’t as rigid as a sheet of plastic, but it could be taped down to hold it in place and then it could be used in exactly the same manner as the Clover plastic. I have some leftover from a prom dress alteration I’ve been saving for “some day”, and I think I might give it a whirl.
Hi, Pamela – Yep, I too have thought of using tulle the same way, and I intend to experiment with it. I’ve read about using it for this type of transfer. I think the main difference is that there’s no drawing surface with tulle. But I’m going to try it! MC
You could always spray it with starch to stiffen it a bit.
Oh Marymentor THANKS SO MUCH for this installment!! Transferring patterns to my varied and sundry types of fabric has, of late, become the “bane of my existence”, or worse, running through my head at night !! You can bet I”m saving this for future reference. I have no doubt that others run into the same quandaries ! Much Grass……Judy (It’s Spanish It’s Spanish ! ha ha )
Hi Mary,
I recently struggled getting a design onto purple fabric, and resorted to water soluble ‘film’, the stuff people use to make machine embroidered lace. I drew the pattern on the film, then tacked it in place where my embroidery had to go. It worked fine and was indeed gone after wetting the embroidery.
I am thinking of window screen mesh fabric from the hardware store.
I was wondering the same thing. Tulle sounds interesting, too.
G’Day Mary,
I hadn’t heard of this mesh. It certainly seems a tool that’s worth being aware of. Thanks for your rundown. Very helpful.
I’m thinking it may be handy for transferring to fabric with a pile, like velvet types or those with irregular raised self patterns that can be effectively embroidered. Keeping in mind, of course, the openness and simplicity of the design.
I reckon it’s got neat photographic potential too. Different play and colour of light behind it would produce interesting backdrops, for smaller things of course. It can be as simple or extravagant as needed. A prop for abstract pictures too, and, well, lots of imaginative takes. Your 2nd photo there could be titled…umm, “Spot the difference”? “A different spot-light”? Or even “Bogus Gridlocked Bubblewrap Brought to light.” Duh, whoops, thought I was writing a news item heading there.
Cheers Mary, Kath.
You might consider using the method of Don Linn, who is an exquisite quilter and uses netting in a similar method. The exact process escapes me although I have watched his exacting process completely. He admits to being very detail oriented and wanting a perfect rendition of his design before he begins stitching his quilting design onto the quilt. http://www.mrquilt.com/aboutme/
The Clover Mesh seems like a nice eco-friendly option for designs that are suited to it. I’d never heard of it before – thanks for sharing, as always, Mary!
Have you ever tried to transfer designs with perforated paper (the kind you can stitch on)? I wonder if that would be a similar, cheaper way to accomplish pattern transfers without too much detail. I haven’t looked for perforated paper in stores in a long time, so I wouldn’t know if it’s more or less readily available than Clover Mesh. But it doesn’t come rolled up, and you could try taping together pieces of perforated paper for a larger design.
Hi, Cindy – well, the perforated paper wouldn’t be reusable, so that would be a drawback. Also, it is pretty expensive, for the amount you get. Plus, if you want finer holes, you really have to pay a lot more! The higher counts of perforated paper are only available in France, and a small sheet runs about $4 or more, by the time you pay shipping…. MC
Interesting! I wonder if you could use fine tulle fabric in a similar fashion? Then you could get the hole size most appropriate for your application.
Hi, Jennifer – I’ve read about using tulle this way, and I’m planning on trying it, too. We shall see! MC
I am working on a counted cross stitch pattern.It is taking me hours, along with many errors which have to be ripped out and redone. Can this mesh be used for counted cross stich?
carol gross
Hi, Carol – no, I don’t think it would work for counted cross stitch. It’s not something you stitch through – its just for drawing lines, which you don’t normally do with counted cross stitch. MC
I am a fan of the old fashioned pricking and pouncing method. Yes it takes longer but in the case of the runner where there are repeats the pricking could be used more than once for the sides. Looks much easier to line up than the mesh sheet. Besides I save all my pricking and have used some more than once.
Hi Mary,
Didn’t know about this one. It appeals to me for when I am doing redwork. I usually have a redwork project going all the time as they are mindless and I can throw them in a bag to take anywhere I go. I can’t stand to have my hands idle even when my husband is driving to church. Gotta keep stitchen! I put this on my Amazon wish list. I really appreciate your reviews.
Interesting product. It looks a bit like sequin waste (aka punchinella — and according to some aka laser mesh). I’ve got some of that, but with much larger holes otherwise I’d be inclined to test that.
I’m very much an embroider-as-you-go person and when I read about the ordeal some go through trying to find some really good and easy methods for pattern transfers I’m kind of glad I don’t follow patterns very often…
I have a pkg of this, bought on sale and have never used it. Looks like it works pretty good. Will have to try. I’m sure I bought it for Quilting.
Lors de ses cours de “piqué-libre”, Fanny VIOLLET nous avait fait connaître cette méthode en utilisant du tulle et un crayon feutre bleu à patchwork effaçable à l’eau . Cela fonctionne bien.
Bien cordialement,
MFP
Hi Mary,
I use plastic canvas mesh for transferring designs for crazy quilt seam embellishing. I use Frixion Erasable Gel Pens that have a very fine point http://www.amazon.com/Pilot-FriXion-Erasable-8-Pack-31569/dp/B004DOMK2U/ref=sr_1_4?ie=UTF8&qid=1351792077&sr=8-4&keywords=frixion+erasable+gel+pen+by+pilot
and are heat erasable (iron, hair dryer, etc.). The mesh sheets come in different sizes and are very inexpensive.
Hi Bev
I LOVE your idea for the plastic canvas mesh!! That would be sooo easy for me …. Definitely going to try that one!
So far, I’ve tried, prick & pounce, Solvy, tulle, iron-on transfer pencil on paper, air disappearing ink pen, tacking over my tracing, & the ‘see thru’ type of interfacing (brain block atm) tacked over the pattern. However I love the sound of the canvas mesh & the fly screen mesh equally & best of all … so far. All ready to give them both a try next time I can get some of each! 🙂
Thanks & Cheers,
Wendy 🙂
Hi Mary,
I use a product called Transfer-Eze. By MJP Designs http://www.RulerKorrall.com. I have been using it for redwork. Having to go through specific holes in the fabric like linen or cross stitch not sure if it would work. You can print the design onto it using your copier, peel it off the backing paper and then stick it on your fabric and then start stitching. It washes away. It is terrific, no more tracing. Just follow the directions for printing and washing, easy. I did try the Sulky version of this product and was not pleased. It made my needle sticky and hard to stitch through.
Hi, Krystyna – thanks for your comment! Yes, in fact, I reviewed transfer-eze here on Needle ‘n Thread a while back, when it first started to take off. There are two points against against transfer-eze with this project, in my mind. 1. The design must be laid out exactly on the grain of the fabric, and this isn’t always manageable with transfer-eze. While it might not make that much of a difference on a flour sack towel or a pillow case, it would definitely make a bit difference here, because of the seam treatment. 2. Although I like transfer eze for some types of stitching (for example, flour sack towels), I don’t like it for this type of project, on fine linen. If anything does go amuck with it, it would be a greater waste – and I have seen some mishaps with the stuff, so I don’t want to risk that.
I spent much of the day today playing with transfer possibilities, and I think I’ve come to a conclusion…. I’ll share it down the road!
MC
Have you tried Transfereze? You transfer your pattern to it on the copier. Peel oft the backing and adher to your ground. It’s dissolvable. Works great as long as you are working with a washable ground
Put the mesh in the sun(difficut if it is snowy winter)use a hair dryer then lay it under the cutting mat.
Don’t hold the dryer too close never seeing the stuff, it could melt.
MM
Hi Mary
This looks great but totally useless on linen!!
http://pinterest.com/pin/11399805277473554/
I have tried the Clover Transfer Mesh for quilting projects and as Mary says for larger tracings without much detail it certainly makes it much quicker and easier, but because the holes are spaced so far apart it isn’t accurate enough for finer detail. It has its place as a handy tool though.
I bought a roll of bridal veil to use to transfer patterns onto monk’s cloth when I was doing rug hooking. Now, some people use plastic screening for their patterns. I think either of these would be a good medium to use when transferring designs. With the veiling, I would use pencil to trace the design; with the screening, I would use a marker. When using a marker, I would put waxed paper or something over my original design so it would not be damaged.
Of course, nothing beats a good ole sunny window: tape up your pattern, tape up your fabric, and trace. A light box works, too. If the pattern was in a book, it could be traced onto tracing paper first. There’s a method of scribbling a pencil on the back of the tracing paper, laying it down on your fabric, and tracing the design again from the front side of the tracing paper. I’ve only used this method on scrapbook paper, but it should work if your fabric is smooth enough. They make tracing paper in a dark and a light to use to trace patterns onto paper. That would have to be tried on a scrap of fabric to be sure it would wash out. I can never exactly stitch on my drawn lines!
I found something that works even better than mesh or just about any other transfer method. I recently turned a milestone age and as such, my family decided that my old Singer sewing machine needed replacing with something a bit better. While looking at their gadget wall, I explained that my true love was embroidery – real embroidery, not the kind some machine could do but hand embroidery and asked why she sold Pilot pens with the various transfer pens and pencils. She said that six months previously an older lady came in looking for them and explained that you could transfer what you wanted on any kind of fabric and when you were done, if there was any ink still showing all you had to do was iron it! Tammy, the store owner, has a side business using those dastardly embroidery sewing machines and uses these pens exclusively on just about any kind of fabric you care to name and has never had a problem. The back of the package even states that if the pen is exposed to temperatures above 140 degrees F,the ink will be colorless when writing. So you might want to try them for yourself – look for Pilot’s Frixion Ball Erasable Gel pens. Of course, they only work on lighter colored fabrics as they only come in black, blue, red and green.
I can’t tell you how much I enjoy your blogs and look forward to them every morning. Now if only I could win one of those give-aways!
Karen Hilinski
Tried these today and didn’t work that well either. I can’t see that well, and it just doesn’t show up enough for me. Plus it won’t come off the mat as I tried erasing and washing. It says to not use heat on the mats so can’t use the iron as that takes Frixon marks away on fabric.
It might be too thick, but I wonder if you could use plastic canvas this way. I may have to give it a try.
Tulle sounds like a good idea too. For a small enough design you could probably hold it tight in an embroidery hoop.
I was looking at the Dritz version of this at a Joann store last night, wondering if it could be re-used. I passed on it, but after reading this, I may go back next week – it’s on sale 40% off until Nov. 12 (all the Dritz quilting products are).
Has anyone tried using TULLE fabric? The fine meshy fabric used for bridal veils and 1950s style dress linings. I learned about this technique some time ago but can’t remember where. It is supposed to work very well for detailed designs. Same idea as the clover mesh. I haven’t tried it yet.
I don’t think it would work… Bridal tulle is very fine and flexible. Regular tulle may work, but because it is very “holey” I think it may warp as you try to draw over it. Worth a try, but make sure you get the stiff coarse type and not the fine bridal tulle.
I agree – I was at the fabric store the other day looking at tulle, and the only way I think it would work is if it is hooped up with the ground fabric at the same time, or somehow stretched and sewn onto the ground fabric and then removed. Even then, I don’t think it would be worth the hassle – too many other (easier) ways to transfer a design! ~MC
Hello everyone!
The concept actually is brillant. But I agree that the wholes are not close enought together for a detailed design. My first thought was trying out Stramin. Stramin (German word) is this unflexible canvas used in tapestry. It is also available in different counts and almost every size. I will try this out.
Happy Friday! Connie
That is exactly what I need! Not the mesh… a size 01 micro pen. I was staring at a transfer job last night trying to work out what to do and ended up grabbing a large felt tip to draw the outline (will be hidden on the reverse), but because it was a large pen I need to ensure I stitch on the inside of the line. A micro pen would be perfect. I have a white ceramic pencil but haven’t invested in a darker colour because I don’t usually work with light fabrics.
Re: Clover Transfer Mesh.
Hi Mary,
I have major problems transferring patterns as my hands shake so badly that I can barely even write my own name, so transferring patterns is the most difficult aspect of needlework for me. The next difficult part is actually getting the needle into the fabric! lol
Initial Idea: I considered using tuile, but discounted it when I remembered that I’d tried it before & it wasn’t quite stiff enough for me as I’ve tried it before & although it may be fine for others, it wasn’t brilliant for me, especially as my hands press a lot harder than others. However, it occurred to me that it might be worth buying the ‘thicker’ & cheaper nylon tuile, as it’s stiffer than the quality tuile & would be too scratchy for a pretty veil but probably good for petticoats & tutu’s as it would stand out … but OUCH … scratchy! I then thought that using a spray starch, or dipping the tuile in some home-made starch (not sure if the softer tuile would absorb the starch better for this, so making it easier to use than the other cheap tuile). I’d probably then give it a quick rub over with the iron while it’s almost dry.
Second Idea:
It’s possible to buy mesh used for insect screen doors & windows. It comes in either a very fine wire mesh, or a nylon mesh. I think the wire is finer, but that’s here in Australia. It could be worth just getting a small sample & try it, as long as the edges are carefully covered over so not to catch on the fabric. It comes in a darkish colour, so it would probably need to use either a white pen for the transfer on the mesh, or a bright colour. The other benefit of it is that you can buy it in large sizes too! It’s a case of suck it & see me thinks. 🙂
I don’t think it would be as bumpy to use as the Clover mesh, but I wonder if the holes might be too small for the pen to go through, unless it was held vertically. I guess it’s worth a try … & it’s cheap & is bought off the roll at the h’ware store; even in a small town! 🙂
I also wonder if there’s a machine use in an industry that can be used to cut slightly smaller holes in another type of polythene (or a piece of paper that’s covered in a double sided laminate that wouldn’t roll up as permanently. All we’d need then is someone who can think of a machine or gadget that would punch the holes in quickly & as easily accessible as easy to use! 🙂 There must be a child’s toy out there that does something like that …. or a craft gadget … or a piece of craft thin metallic ‘something’ that already has it done …. like a type of gold, silver, red, blue, ‘something’ that I’ve seen in craft stores …. but I think it only comes about 4″ wide … & on a roll.
Let’s hope this helps to jog someones memory for some better ideas as well as I think we all wrestle with finding the best way to transfer every pattern each project requires.
I wish each & every member of the Group the very best wishes for the season.
Mary, I wish you a Very Special Thank You for giving us all so much of yourself. You’ve made it such a wonderful year again with all your hard work & generosity by sharing your knowledge, hints & tips … as well as sharing your ‘trial & errors’ with us too, then showing us how to correct them … as these are often just as valuable to learn as your usual perfection first off!
Cheers,
Wendy M. (from Australia)
What about screening? It comes in rolls at Lowe’s or Home Depot and is relatively stiff but still flexible…You can buy really wide screening.
I was thinking the same thing. Get so screen at Home Depot so going to try it.
I bought this and was interested in your article. I wanted to use it to transfer quilt designs and honestly find it useless. I tried chalk as I don’t want it permanent on the mat or fabric and could not get it to work. Oh well, thanks for the article.
It works “ok” with blue transfer eons and the like, but I don’t like using those. It also works “ok” with ceramic lead fabric pencils (Bohin makes one of these). But I find the holes a little too large and too spaced for any kind of detailed design.
Hi Mary!
I had a few ideas to run past everyone.
1) Has anyone ever tried printing or tracing the non-plastic side of freezer paper, ironing the paper to the fabric, then used a sewing machine with a light grey thread to trace the lines? If the lines will be covered up with stitching, then the stitching from the machine (or even hand basting) wouldn’t be a problem. You would need to tear away the paper before you embroidered.
2) At home centers they sell landscaping fabric. I am not sure what colors would be available, but it is designed to allow water to flow through it, so perhaps ink from your tracing pen would also go through.
3) There is a technique used in home decor to transfer artwork on upholstery from slip covers and pillows that uses freezer paper a little differently. You cut the paper to a size appropriate for your printer (Some people then attach the freezer paper to a regular piece of paper. I’m not sure if this is necessary.) Then you print a reverse image on the SHINY side of the paper. Lightly dampen your fabric. As soon as the image is printed, you place it ink side down on your slightly damp fabric and rub it with a credit card or the back of a spoon until the image transfers. You can reuse the “transfer paper” for your next project. I think an ironing might be prudent to set the ink. I read about this process at: http://home-frosting.blogspot.com/2011/08/transfer-using-freezer-paper.html
I am looking forward to trying one of these on my next project. Right now I am working on a blackwork project.
Thanks for sharing your talents!
In the UK, embroiders of my generation (older) have often pre stitched lines by hand, prior to embroidering if the design needs it. I thought nobody did this anymore but me!
Hello Mary,
Just read your article here when I was looking for transferring stencil for free motion quilting pattern. I have the clover transfer mesh and I was thinking how to transfer that to my quilting. I read that you use the permanent pen, I am wondering whether I can use this pen too to transfer the clover transfer mesh to my quilt top. Will it go away when I wash the quilt after I finish quilting it? Please advise
Thank you in advance
Clean window screen would work as well I think. If you used water soluble pen to draw on the screen and onto fabric and then went over design in permanent ink, screen could be re-used.
I realize this is an old article and you may never see this comment, but I had to try. I just read the article on the clover mesh. I was looking for ways to transfer patterns as I am very new at this. Would the netting material we used for “can-cans”, (now I’m showing my age) work for transfers? I realize, it wouldn’t be reusable, but if it was a design you would use frequently that shouldn’t be a problem as long as it would work in the first place. AND it would have the benefit of being fine enough that it would work on details projects as well as the larger ones. Thanks for this great site, it’s a big help for beginners and advanced as well.
I already had clovers transfer mesh when I read your review, which echoed my own thoughts. But just today I wondered why I hadn’t thought of using a piece mono canvas with a pencil in the same way. Less expensive and easier on curves. Win win !