


Yesterday, we looked at the beginnings of a new embroidery project that I’ll be writing about here on Needle ‘n Thread over the next few… well, probably months rather than weeks! The project is called Mission Rose, and we’ll be working through it together intermittently, covering techniques and tips and mistakes and fixes and all that kind of stuff.
With the design for Mission Rose hammered out, and the ground fabric choices made and the fabrics prepped, it’s time to look at design transfer methods and framing up. I’ll also do my best to answer some questions that came in after yesterday’s article covering the start of the piece and ground fabric choices.
The topics of design transfer and framing up are open to interpretation. Keep in mind that this is just how I do these things. You might have a better way that works for you, and that’s just fine. In situations of embroidery design transfer, and in questions of embroidery frames, there’s no “only one right way,” so I’m sharing with you what I’m doing with this particular project, but feel free to pursue your own tack on these things, if it works better for you!
I decided to use a light box and a pencil for the initial embroidery design transfer, tracing the design onto the silk ground fabric.
The Silk Ground Fabric: More Info
This particular silk is not a slippery, drapey silk that slides away with the slightest provocation. It is a silk dupioni, a little thicker than some similar silks found on the US market in chain fabric stores. It has a definite crispness to it and good body.
So the silk is thickish, not thin. It has body and is crisp. It holds its shape when rumpled into a pile. It doesn’t slither. And there’s nothing at all “stretchy” about it, unless you’re pulling on the bias, and then there’s a little stretch, just as there is on any fabric.
Where can you find it? That’s a bit more difficult to say. Mine came straight from Japan, from (what I’m told) is a higher end fabric store. I’d check with locally owned fine fabric stores that carry higher end bridal fabrics and the like. You’ll probably find something similar in stores like these. Chain fabric stores like JoAnn’s and similar don’t often carry high quality silks. In any case, you’ll need a piece about 10″ x 14″, so even if it is expensive by the yard, it shouldn’t break the bank – you won’t need a whole yard!
I’m pretty sure I’ve said this before, and I’m pretty sure I’ll say it again: get the best fabric you can afford. Don’t skimp on quality with your ground fabric. Good ground fabric makes a huge difference in the outcome of a project. And if you’re going to spend oodles of hours of your valuable time on your project, then it is worth putting a little extra into your supplies, to assure you are working with good quality supplies.
The Design Transfer
So, considering that the silk isn’t the type to ooze away off the table while you’re working, tracing works well with it if you can get a light underneath it. I have a cheap little light box that I use for these things.
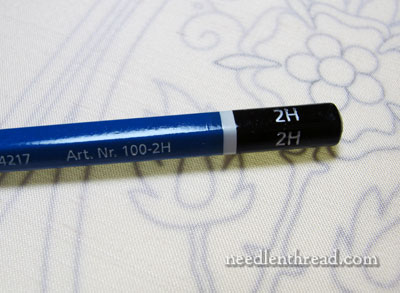
I used a 2H pencil for the initial tracing. The lead is hard, so the resulting line is very light.

I taped the printed design onto the light box, and then I taped the ground fabric over the design, making sure that I lined up the lines of the design so that they were “square” with the grain of the fabric. This is very easy to do with silk dupioni, because there’s a definite, visible linear-ness to the weave.
When tracing with a pencil like this, try not to sketch too much. Short strokes are fine, but short, hairy strokes that thicken up your lines should be avoided. You want to keep your lines as thin and crisp as possible.
The photo above shows the initial design transfer.
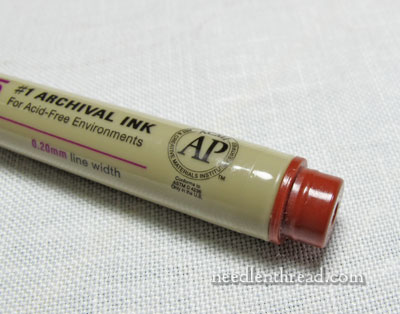
Now, the pencil design transfer would have been fine on its own, but I decided to trace over the pencil lines with a micron art pen.
I used a brown micron pen, with a .20mm tip. With the Sakura micron pens, this tip is their finest, and it is marked on the cap as size 005.
You might wonder – and rightly so – why I didn’t just trace with the pen to start with. I wasn’t really planning on using the pen at first, but I wanted to make sure that the design was quite visible, especially when taking photos, so that’s why I went over it with the pen. Also, I like to have a very sharp, darker line when I’m working on a long-term project. Pencil can sometimes smudge or fade away (though we are going to take some specific measures to avoid that, which we’ll talk about later).
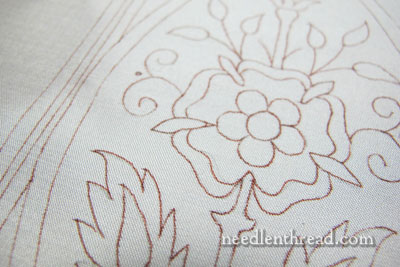
You can see that the lines are quite a bit darker! But they will all be covered, so there’s nothing to worry about. If this were whitework, I’d be worried!
A note on this pen with this project: these pens are not guaranteed to be colorfast on fabric, and I’ve heard that the brown will bleed if you wet the fabric. Since this is not the type of project that will be washed, this doesn’t cause me too much concern. If you have concerns about the pen running – if you think your project could somehow get wet – don’t use the brown. Just use a pencil.
That being said, I’ve never had a problem using the sepia or black micron pens, even on projects that I damp stretch.
The Embroidery Frame
For the frame, I’m using a set of Evertite Stretcher Bars, 10″ x 12″ (my fabric is actually 12″ x 14″).
I like these stretcher bars because they are adjustable, even after you’ve mounted the fabric on the frame. I’ve used them before with silk, and they’ve worked well.
Other possible choices for good frames that would work well with this project include smaller Millenium frames and smaller slate frames.
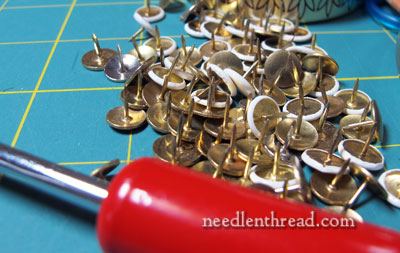
Incidentally, shops that sell stretcher bar frames often sell specific tacks to use with the stretcher bars. While I think these E-Z Tack-It Tools are absolutely wonderful when using stretcher bars, I really can’t see spending money on specialty tacks. I buy inexpensive brass thumbtacks from the hardware store, getting more than twice as many for less than half the price. They work just as well. In fact, I think they work better than the tacks sold for stretcher bars – the shaft isn’t as thick and the tacks seem to pass into the wood more easily.
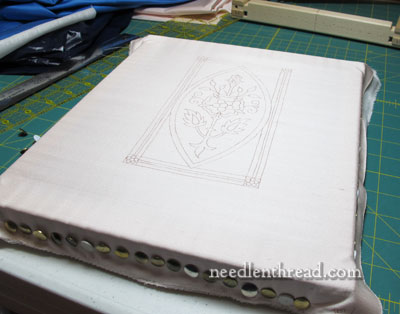
I stretched both the linen backing fabric and the silk ground fabric onto the frame at the same time. If you aren’t used to doing this, it can take some work – you might have to untack and re-tack to get it just right. You want the linen and the silk to be equally taut on the frame, so that there’s no puckering of either. In the photo above, the piece is framed up and ready to go.
You’ll notice that I center the piece right to left, but that I put the top edge of the piece closer to the top of the frame. This gives me a little more room at the base of the design to test threads and stitches if I need to, outside the design area.
With the piece framed up, you might be tempted to think it’s ready for stitching, but it’s not – so next time, we’ll cover one more step in preparing this piece for the actual embroidery.
Then we’ll talk about thread colors and choices!
Coming Up Later This Week on Needle ‘n Thread
Tomorrow, I really, really want to show you a beautiful little stitch combination that you might find handy for your embroidery projects.
Later in the week, for those of you who have difficulty seeing detail when working fine embroidery, we’ll look at a product that will help you out. It’s a special tool that I’m very excited about. I hear from many folks who say they can’t do detailed needlework anymore because they can’t see well enough. Having lived with eyesight problems all my life, I’m pretty thrilled to find a real solution to this difficulty!
See you tomorrow!
Hallo Mary. Ik wil heel graag meedoen, maar zoek naar patroon. Waar kan ik dat vinden?
Riet.
Hello, Riet! Het patroon is nog niet beschikbaar. Het zal binnenkort beschikbaar zijn! 🙂 Mary
After following the links to older articles about frames I tried to source out the Millenium stretching frame – looks like Needle Needs may be out of business 🙁 – the links to the website are not responding and the telephone call to a number found in a cache directory is left unanswered…
Such a shame when beautiful products are disappearing only because small businesses are closing.
🙁 I just tried to access their website, too, and it won’t come up. I hope this is just a glitch! Here’s hoping they haven’t given it up for good! ~MC
Have been searching using every google-trick known to me, eventually this page http://www.needleneeds.co.uk/store/ opened, but lots of products are shown ‘awaiting stock’. Tried to buy available products and an error message keeps popping up. Most of the links don’t open, showing ‘an internal error or misconfiguration’ message. Have just emailed them, hopefully somebody will come back with some information.
Mary, out of curiosity, why dif you choose the Evertite frames over the Millenium in thid case?
– Jen
Hi, Jen – I only have one “small” Millenium frame, and it’s not very small. It’s 20″ wide. And I only have one short set of their side twisty things – and it’s being used on my large Millenium frame right now. So I didn’t want to take all that apart, and have that frame tied up for the next couple months while this is project is underway.
Also, the Evertites are a lot lighter, and since this project is relatively ‘small’, I like having it on a smaller, lighter frame.
I’d love to have a second set of smaller side things for the Millenium frame… but it looks as if Needle Needs is having some problems, so I don’t know if it’s even possible to get them anymore. Their website is not accessible. Hopefully that will straighten out, though!
~MC
I have eventually managed to contact NeedleNeeds and order stretchers and bars in various sizes for combining the Millenium frames. I waited almost 3 months for the order to be delivered – they were experiencing problems with some parts produced by another supplier who went out of business. When I received the frame, I felt that it was worth every second of the time I waited as it is of a superb quality, highly recommend.
Thank you for the step-by-step process, Mary. I’m enjoying it immensely, and after following your website for a year now, I’m really beginning to understand some things now! 🙂
Hi Mary,
Quick question, When stitching over the traced lines is there a tip you have for making sure you are indeed covering the lines. My last piece using Appleton wool on linen I can see tiny dots here and there that escaped covering. One of those things you notice at the end of a project and wish you did better.
Weeeelllllllllll…. Most of the time, I think problems like this occur because of lighting or vision. If you aren’t seeing that your lines aren’t covered up as you’re stitching, then it’s probably because your lighting isn’t bright enough, or you might need magnification. For most of the techniques I’ll be using in this piece, a split stitch line over the design lines will be worked, or the design lines will be covered with couching or gold threads. -MC
Dear Marymentor
I”m at a loss. This looks like you are transferring your pattern on to a white fabric.
But you said it would be done on a blue silk ?
OK So I”m missing something obvious. It wouldn’t be the first time !! 😀
Thanks…Judy
Hi, Judy – Actually, the ground fabric is a pale, pale pink. The blue is for appliquéing on a little bit later, as part of the frame. Unfortunately, the photos don’t pick up the pink too much, because it is really, really pale. Hopefully, once some colors are on there for contrast, you’ll be able to see it a bit better. ~MC
I have only worked on cotton with a batiste as a lining. Do you need a lining because of the amount of stitches? Thank you for showing how you stitch the edges. I stitched the lining and background fabric together before hooping. I think that might be a no, no.
I am also very interested in this lesson plan starting from the beginning to the end. With each paragraph I am saying…” oh that makes more sense to me now”, or “that is why she said that”. As a beginner you just don’t have any idea what you don’t know. It great to find out the why as well as the how. Last but not least I only have vision in one eye so I am excited to hear some of the tricks of the trade.
Hi, Bernadette – the lining is not so much because of the amount of stitches – the type of embroidery I’ll be doing on this, as far as floss is concerned, is not really heavy enough to warrant a lining on this silk. But when I get to the goldwork threads, the lining adds more support for those heavier threads that have to be sunk to the back of the fabric. Hope that helps! ~MC
hola Mary ..que tremenda explicacion,con aportes casi caseros..trucos muy accesibles
consejos de amiga,,,cuesta por ubicacion,,el material que acosejas,,danos permiso para usar alternativas ,,usaremos el mejor aqui,,no podemos
quedarnos sin aprovechar tu consejos
un abrazo
lidas
G’day Mary, the framing & the tack-it tool is of great interest at the moment. I don’t have the tool but do buy the tacks from the hardware and are good, unless they sell your husband the upholstery tacks, which while being decorative are way too long and thick in the shank!
Thanks for all. Cheers, Kath.
I have a question for you Mary. I recently got myself a light box to trace patterns. Anything else I have read suggest using an HB pencil while you suggest a 2H.
Is there a reason for this or does it not matter much what hardness of pencil is used.
thanks
I always shoot for a light, fine line when using pencil. I use anything from HB to 2H, depending on the project. The higher the number before the H the lighter the line you’ll get, but anything higher than 2H on fabric, I find difficult to draw with. Anything too soft, and the lines smudge easily and the graphite gets picked up by the thread. Sometimes, I just use a regular mechanical pencil, which is a regular #2 lead, too, so anything in those ranges works. There’s no hard and fast rule that says it must be this particular weight of lead, as long as it’s not too soft to be smudgy, or too hard that it’s not visible or requires too much pressure to write with, to be visible.-MC
Dear Mary,
I always love to see your work and I’m looking forward to how this new project of yours will progress as well but I’m curious what you intend to do with this piece once it’s finished? Is it for church like the Medallion? I think it would make a lovely wall hanging in itself too. I’m always curious about what you do with your pieces once you finish them.
Thanks Mary keep up the good work!
Hi, Mattie – I’m just thinking in terms of a framed piece for this. I was thinking it would make a neat box top, for a long box that opens on the short end. Or even a book cover, if it were a bit wider… But my initial plan is really just a framed piece. -MC
Hi Mary,
Just wanted to share that instead of using a stretcher bar frame I use a simple wooden frame that painters use. Here in Barcelona they are really cheap (5 euros max). I use a staple gun to stretch and keep the fabric in place and nice and taut on the frame. They come with wedges that you stick into the corners and hammer in. That way as you go along you can adjust the tension. When I finish embroidering I use a flat head screwdriver to take the staples out and then I reuse the frame over and over and over again. I have a ton of them in all different sizes. I wish I could share a picture.
Oh, and just a question for you which I hope isn´t too off topic:
I´m doing some goldwork right now and I´m using transparent nylon thread to sew on small pieces of gold purl. I´m also going to be adding on little pearls and I´m thinking of using the transparent thread for that too. I like the way you can´t see the thread when all is done.
Do you have any experience with using this kind of thread for this purpose? Am I going to run into problems later? The only thing I can think of is that the thread might give over time and cause the pieces to wiggle around – definitely do not want that happening… but it shouldn´t really happen right?
Well, any thoughts on this quandary of mine are very much welcome.
Thanks a million!!
Candice
There’s a source online for decently priced silk, including dupioni, Dharma Trading Company (http://www.dharmatrading.com/fabric/silk/dupion.html). Depending on budget, it can be considered somewhat expensive: $12.15 a yard for up to 9 yards of dupion silk.
They even have some linens, though I cannot vouch for the quality of their linens. I hope this helps you, or your followers, in looking for a decent supply of silk if nothing is available locally.
An absolute delight to look at your website – thank you so much for sharing!
Você vende os livros?
Hi, Heloisa – I don’t have an ebook for this project, I’m afraid. But there are others in my shop – the Marian Medallion project has a lot of goldwork in it, for example.