


The whole idea of Stitch Fun is to explore some of the more obscures stitches or to explore more obscure – but fun! – ways of using common stitches.
Today’s Stitch Fun is a more obscure way of using a fairly well-known stitch, the Palestrina stitch.
Palestrina stitch is one of my all-time favorite embroidery stitches. It creates an interesting line with texture to it, thanks to the knots formed by the stitch. It’s also lots of fun to work. It’s got a great “stitch rhythm,” and once you get going with it, it works up quickly into a really attractive line.
If you haven’t added Palestrina stitch to your embroidery repertoire, I encourage you to try it out! For even more fun and more texture, you can even try beaded Palestrina stitch.
What we’re going to look at today is the notion of using a common stitch (Palestrina stitch) as a joining stitch. We’ll be joining two folded edges of linen together.
So imagine that you have embroidered two sides of anything – say, the front and back of an ornament, for example – on linen. Or maybe you’re joining the embroidered front of a needlebook with the inside lining. Whatever the case, you can use Palestrina stitch (and several other line stitches, but this one works particularly well) to create an interesting edge that holds the two pieces together securely.
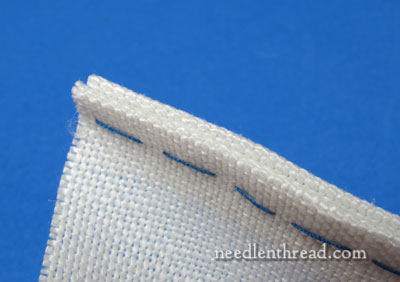
In the photo above, I have two pieces of linen, with hems turned in, basted together.
A “perle” thread – whether perle cotton, perle silk (like Soie Perlee), buttonhole silk, or any ropey, non-divisible thread – works well for this, although a good thickness of regular floss works well, too (all six strands works great!). I like the ropey, non-divisible threads because they increase the texture of the line and produce really nice-looking, tight knots.
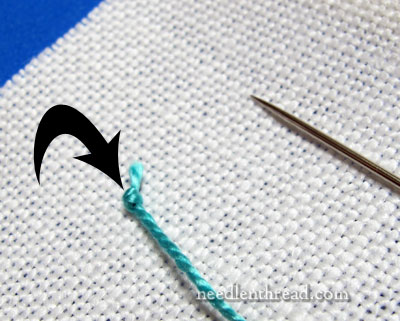
Knot the end of your embroidery thread, because you’ll be pulling that to the inside seam, where it will be hidden. Make your knot tight and small, and cut the tail after the knot relatively close to the knot, but not too close that the tail could slip through and undo the knot.
In finishing, I always find that knots are an asset, and they rarely hinder a good, smooth finish to whatever product you’re making. Normally, you’ve got some kind of padding or something between the pieces you’re sewing together, so the knot generally just sinks in and fits into the thickness of the whole thing.
If you’re wary of using a knot, you can always secure the thread by taking some tiny, invisible stitches inside the turned over parts of your fabric. I rarely bother doing that, unless the thing I’m finishing is very fine and has little or no substance to the “inside” of it. So if I’m afraid the knot will show up through the fabric, I’ll use tacking stitches inside the fabric turn-overs. Otherwise, I use a knot.
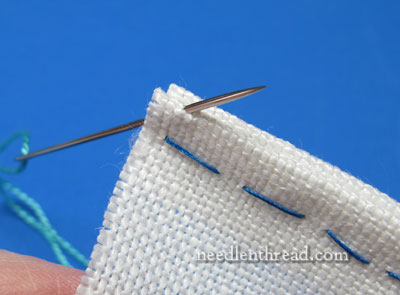
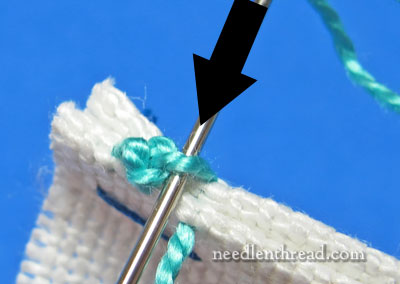
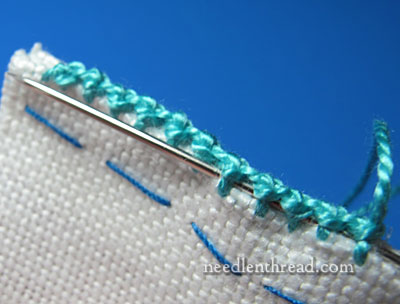
Working from left to right, begin by bringing your needle to the front of the front piece of fabric, just barely on the front side of the fold.
Cross over to the back piece of fabric, and insert your needle into the back and the front piece of fabric, picking up only the top of the folds of both, and keeping your needle perpendicular to the fabric, as shown in the photo above.
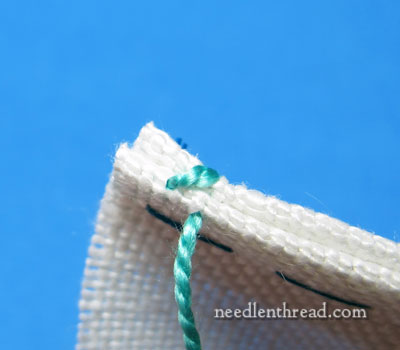
You’ll end up with a stitch that slants across both pieces of fabric, with your thread emerging on the front side of the front piece of fabric.
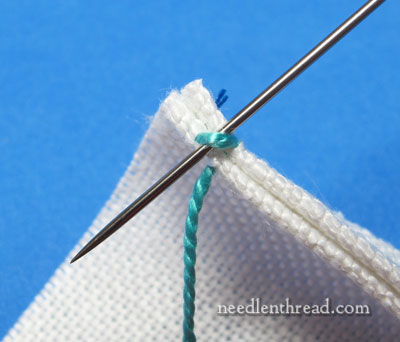
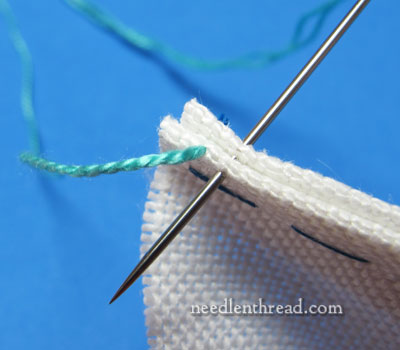
Now pass your needle underneath the slanted stitch from back to front, without picking up any fabric. Do not pass under the working thread (the loose thread still in your needle), but just under the stitch.
You’ll end up with a loop catching over the slanted stitch, and these two “arms” (like an inverted “v”) over both pieces of fabric.
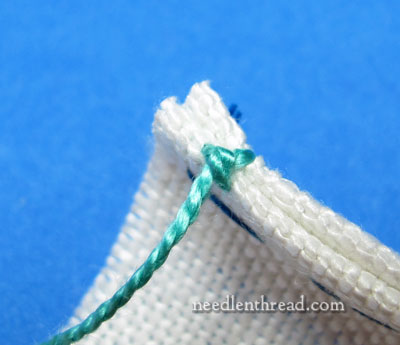
Now pass your needle underneath the slanted stitch again, so that it comes up between the two “arms”, and pass over the working thread. Don’t pick up any fabric.

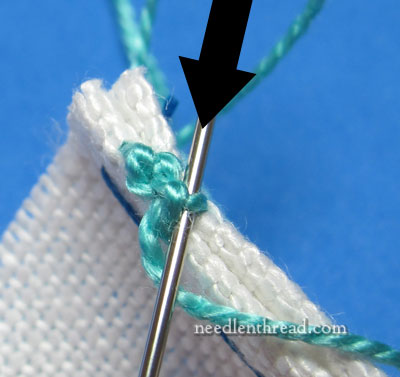
Pull through to tighten the knot, and then move forward for the next stitch, taking your needle from back to front through both folds of fabric, and keeping the needle perpendicular to the fabric folds.
Try to keep your stitches equally spaced, and make sure that, with this particular movement of the stitch, you’re picking up the same amount of fabric, so that the resulting “teeth” of the stitch on the front and back of your finished piece are even. You’ll see what I mean be “teeth” below!
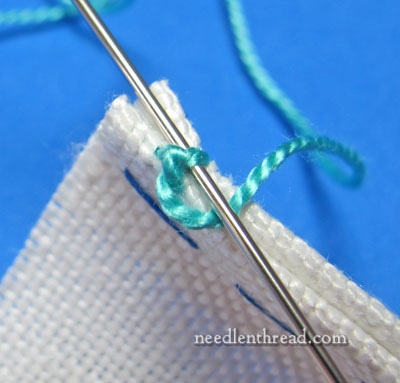
To continue with the stitch, pass the needle underneath the resulting slanted stitch, from back to front, just like before, without picking up any fabric or passing over the working thread.
Then pass under the slanted stitch again, coming out between the two “arms” and passing over the working thread, just as before, and then pull through so that the knot forms around the stitch.
Continue in this manner all the way down your seam!
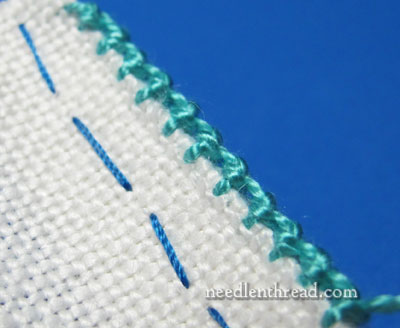
Here are the “teeth” of the stitch showing on the front of the linen. You can see why it is important to try to keep these stitches even, because they really show up if you’re using a contrasting color of thread.
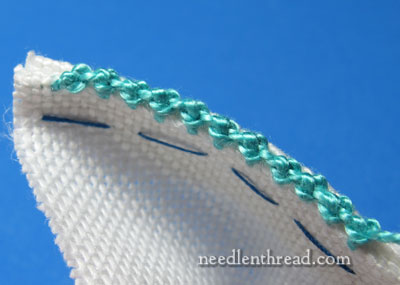
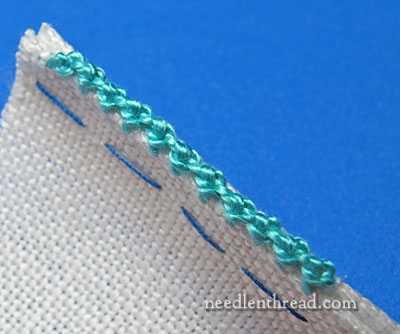
And here’s the Palestrina stitch edge along the top of the two pieces of linen. It forms a nice knotted line, perfect for a finished edge, while doing the important job of holding the two pieces of fabric firmly together.

To finish your thread, insert the needle into the fabric down inside the seams.
Pick up little bits of the inside seams of the fabric and emerge down your line between some of the stitches.
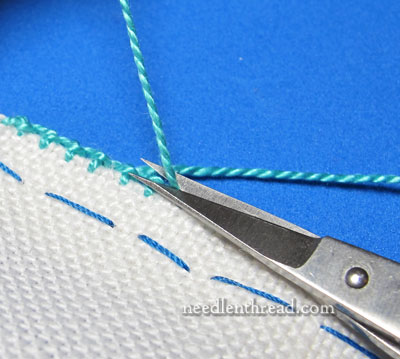
Pull the working thread and snip it close.
And there’s the seam with the finished thread – it’s hidden and secure.
You could dress the line up further by adding beads to the Palestrina stitch if you want to. Beads are always nice along an edge. If you’re using DMC’s perle cotton #5 (which is what I’m using here), make sure your beads are large and that they have a large enough hole for the thread to pass through. If you want to use smaller, more delicate beads, you’ll have to use a finer thread.
So, there’s a nice edge finishing technique for you, with a fun stitch. Try playing around with other stitches that might make nice edges, and you’ll probably find that there are many that will work for finishing the edges of your embroidered items!
Stitch Fun is a series of tutorials on Needle ‘n Thread that explores stitches, stitch combinations, and different ways to use stitches. You can find all the tutorials in this series listed in the Stitch Fun Index.
I think this is it! I was looking for a stitch like this, probably exactly like this for month’s now. I saw it on a few finished Hungarian embroidered items as hemming, and had no idea how was made. Thank you very much for the clear instructions.
What a beautiful stitch! I can’t wait to try it.
I’m new to your blog, but thank you for such clear, precise, informative posts.
Gracias:muchas gracias es maravilloso todo lo que nos compartes tambien yo lo he compartido,me gusta mucho este nuevo punto o puntada.
Dear Mary
I love the Palestrina stitch I’ve used it many times on my projects and I think it is so versatile I’ve used beads with it and it looks so lovely, livens up the stitch. Thanks for the tutorial.
Regards Anita Simmance
Mary – this is a beautiful edge!! Thanks for sharing it.
Hi Mary!
Thanks for this idea. I have some finishing to do this week and I bet I can use palestrina stitch to join edges on a couple of the small items. I’ll let you know how it goes and will hopefully have a few pictures, too.
Sharlotte
Thank you for the idea, Mary! I always look for new ways of decorating the edge or joining two pieces of fabric. And if you can do both at the same time…
It’s like decorative sewing :o) and it’s amazing how it may look effective and intricate, even though it may be quite “simple” in fact… Who knows how many stitches can be used like that!
Beautiful! 🙂
Dear Mary,
One traditional way old-time quilters in West Virginia finished quilts was to fold the raw edges of top and backing to the inside and whipstitch the seam. Now my stash of #3 perle is begging to embellish (at least) a wall hanging with a fancy stitch.
As always, thank you for the inspiration.
Easter Blessings to you and yours.
Hi Mary,
This is just the “Cat’s Meow” Love it. Couldn’t help admire the fabric. Please share what you used fabric wise. It is simply luscious.
My daughter-in-law saw the Easter Eggs and loved them. I think she may try her hand at the process.
Blessings this Easter Tide
Lorraine Connelly-upstate NY
Thanks mary! I cannot believe this …… Just yesterday I was practising Palestrina and mountmelick stitch after watching your “how to” videos!! So now i feel you’ve given this idea specially for me!! Thanks again!
This stitch looks great. I’m curious, can you now open the two pieces of linen? In other words, is this just an edge or can you use it to decoratively join 2 pieces of linen?
Thanks again for a great article.
I can’t wait to try this with and without the beads! Thanks so much for your wonderful instructions.
I think adding beads sounds like fun. At what point in the stitch would you add a bead?
Hi, Carolyn – yes, adding beads is always fun! You can find several links up there in the article (wherever it meantions adding a bead) to a photo tutorial of beaded Palestrina stitch.
MC
thank you for the reference.
that is about how I thought it would be done.
Hi Mary
I love your site and have completely fallen in love with your work. I try to stitch things by following ur tips. However, I don’t find most of type of linen/fabric that you use. Can you provide some information as in from where can I source them as am located in Mumbai, India.
bellissima idea…non avevo mai pensato ad un punto palestrina come rifinitura…..
Mary – thank you for this – it looks like a wonderfully beautiful and useful stitch! I love your Stitch Fun posts so very much. And your clear photos and easy to understand instructions are so appreciated.
Bless you, Mary!
Tomi Jane
I’ve never tried Palestina stitch, although I’ve seen your posts about it. Now you have made it too tempting not to try!
Merci beaucoup pour cet exemple .Je vais m’ essaayer a ce pooint avec des perles .
s’ est superbe
Dgen
ME HA ENCANTADO ESTE PUNTO, YO LO UTILIZABA PARA BORDAR, PERO NUNCA SE ME HABÍA OCURIDO PARA UNIR DOS TELAS Y DE UNA VEZ CON DECORACION.
ME ENCANTA TODO LO QUE ENSEÑA
MIL FELICIDADES.
This is the perfect joining stitch for some felted ‘pods’ I am making…I am using perle #5. It is going well. Wonderfully clear instructions (as usual)!
Thank you.
I sew a lot I would love to learn to do this stitch.
Could you use Palestrina stitch to join a piece of needlepoint on 18 count with ultra sued as the backing?
I think you could, Carole, if you turn the edges in first. You probably wouldn’t be able to sew over the raw edges with it and expect coverage. But if you can turn the edges in and miter or cut the corners to get a good close on the corners, too, then you should be able to get a good finish on the outer edge with the Palestrina stitch.
Fiquei encantada com o trabalho e a explicação foi perfeita ,obrigada. faço bordados e sempre tenho mais para aprender……….
lovely stitch, amazing instructions, thank you
Fabulous! Thanks so much for the clear details
le point de palestrina je le trouve mieux avec les perles
Very easy . Thanks!
Mary me encanta ese nudo palestrina gracias por tus enseñanza
Oh my goodness ! This is a beautiful stitch. Thank you for sharing.
I love to work this as a pretty edge stitch. I use linen thread – I’m usually working on linen. I haven’t ever used it as a joining stitch but only because I hadn’t thought to! but I certainly will keep it in mind. Thank you Mary for this idea. When I work Palestrina knot as an edge stitch I leave a thread or two more space than shown here in your joining stitch and it gives a delightful tiny crocheted-stitch look to the edge.
Thanks for easy instructions. I love to handsew and your stitches will add a nice edging to my projects.
This is an interesting way to join. Your instructions were very clear. Thank YOU!
I’m going to give this a try.
looks interesting. I make doll shoes and will try this for the top edge. should look good. thanks
Thank you!
I love this. But am I the only one who can’t figure out which direction the needle is going in picture 8?
Also, pro tip, please number the instructions, which will make them easier to follow. Thank you!
Lovely stitch, clear instructions, thanks for a great tutorial!
What a great stitch. I’m thinking it could be used with appliqueing instead of buttonhole stitch. What do you think. Will it work?
It can be, but it would be very textured, compared to the buttonhole stitch.