


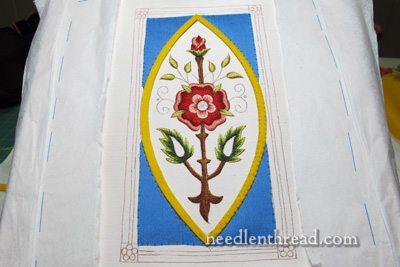
The other day, we looked at the finished blue silk appliqué on the Mission Rose, and I introduced you to another color of fabric that would be added to the piece next – a yellow felt.
The felt is the foundation for the goldwork frame on the piece.
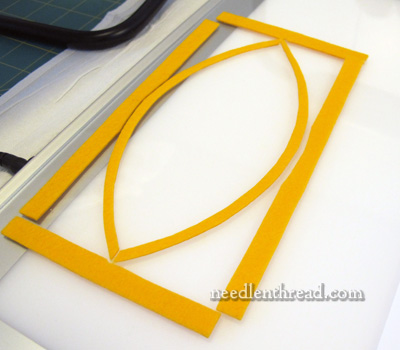
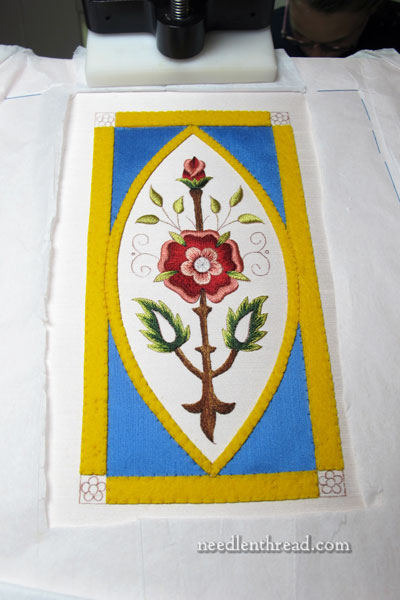
Here’s the felt, cut out and ready to be sewn onto the Mission Rose ground fabric.
Whenever I use felt padding for goldwork, it’s always 100% wool felt. Why? Several reasons: it’s a lot easier to cut cleanly, for one. It’s not as fuzzy as acrylic craft felt or blends. Good wool felt is generally consistent in thickness across the whole slab. In short, it’s just much nicer to work with.
Wool felt is slightly more expensive, but when you’re putting this kind of time into a project and using these types of materials, the difference for the wool felt is really a negligible expense, especially when balanced against the difference between working with it or with lesser-quality acrylic or blends out there.
Here’s the marquise-shaped frame, with the right side sewn down and the left side in place, ready to sew.
Cutting Shapes for the Goldwork Foundation
Goldwork embroiderers have their own preferred ways of cutting out the felt shapes for goldwork foundations. So you’ll find different methods explained in books or kits. This is just the way I do it, because I think it’s easy and because it always gives a clean cut.
1. Invert your pattern. Normally, if you’re tracing with a light box and your pattern is printed on a piece of paper or vellum, it’s simply a matter of turning your pattern paper over.
2. Trace the inverted pattern onto the paper side of paper-backed lightweight fusible web or interfacing (“Wonder Under”). Make sure it is the lightest weight fusible web possible.
3. Iron the fusible web onto the felt. The paper pattern side is uppermost, with the fusible web underneath it, and then the felt.
4. Once it’s good and stuck, cut out your felt pieces along the pattern lines.
5. Peel the paper off, revealing the interfacing stuck on the felt. The interfacing-side goes down on the ground fabric, and the plain side of the felt goes up.
The advantages of this method:
1. It makes the pattern transfer part of the process very easy – eliminating drawing on the felt with a Sharpie or the like.
2. It makes the cutting part of the process very neat – the edges of the felt come out sharp and precise.
3. It makes holding the felt in place on your ground fabric a little easier – the interfacing creates a non-slip surface.
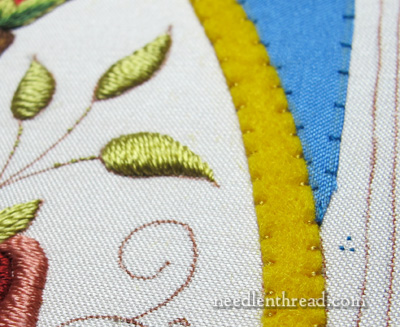
To sew down the felt, use a gold-colored sewing thread. Lay the shape onto the embroidery piece, exactly where it should be. Start your thread with a waste knot and a few little anchor stitches either in your ground fabric where it will be covered up, or straight through the felt and the ground fabric, but you have to make sure you don’t shift the shape while working the waste knot.
Sew down the the corners or, if there aren’t any real corners, sew down the ends and halfway points of the felt piece – just enough to tack the piece into place.
Then, stitching from just outside the felt edge to a tiny way into the felt, work around the shape, securing it to the ground fabric.
One outside edge finished…
…and all the edges finished!
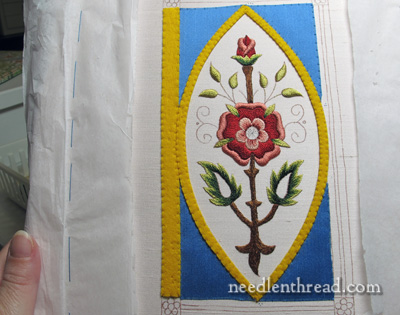
Suddenly, the frame looks much thicker, doesn’t it?
Next time we meet over this project, you’ll see the beginnings of the goldwork! Can’t wait!
Questions? Comments? Suggestions? Feel free to leave a comment below!
If you’d like to follow along with the Mission Rose project from beginning to end, you can find all the articles relating to it – including pattern, materials, and all the nitty gritty details – listed in chronological order on the Mission Rose Project Index.
I love watching projects like this gradually come together. Right now the poor rose is somewhat overwhelmed by that fierce yellow fighting the bright blue – it is holding up its hands in horror! But when you imagine the sharp yellow toned down to the softer colour of gold thread and more gold in the central part to echo it, then the rose will once more be the rightful star of the show.
Certainly agree about using wool felt. And thanks, Mary for the tip about using Wonder Under (or Bondaweb here in UK). Good one!
Beautiful… can’t wait to see finished product.
Hi
I’m intrigued to know what you are doing with the “curlyqueues” at the side of the rose! Loving the piece and am looking forward to seeing you do the goldwork. I really would like to start goldwork as someone gave me a jar of the threads! but haven’t had the courage yet. Regards Carol
Ah, take courage, Carol! If you know how to couch, you can do goldwork!
The curlicues are coming up soon….
I wondered about the curly cues as well, they suddenly seem lost in the whole plan.
This just gets more amazing every time you show it to us. I’m so eager to see the finished piece but I have also learned so much with each your posts. Thank you so much for sharing thismwithnus,
Fantastic Marry , can,t wait till the finishing is out 🙂
go on you’re really creative
Everything you’ve done so far is exquisite. I am learning a lot by watching you put this project together. However, I have a question. Why did you trace the lines that are now hidden by the gold felt rather than just trace the outline?
Hi, Sandy –
Good question! Fact is, I wasn’t 100% sure at first how I would work the outer frame – whether it would be solid gold, or broken up. I’ve decided on solid…. And so the felt covers the lines now, though I will be working a kind of line down the middle still, over the felt. -MC
Hello Mary,
Hope you enjoyed your vacation. Since you told me how you manage to keep the postings flowing, I could see that were away.
Mission Rose. It is so hard to tell about colour and intensity balance until the project is completed and then it is a bit too late. Since the felt has gone down for the border, the blue is already looking less vivid and dominant. I think that it will all work out just fine. If, on completion, the blue is not integrated, you can always lay Jap Gold down in a wandering pattern like the Quilters stitch their backgrounds. But your stitching is impeccable and as a whole, I think that it will work well. Good luck and all good wishes Ann B.
Hi, Ann – well, as nice as a vacation sounds, I haven’t been away from home since January! Might have to rectify that in the next few months at some point! Yes, the blue will tone down quite a bit with the addition of the gold. Not really planning on vermicelli work over the blue, but I do have a different plan…. -MC
Mary,
I just want to confirm that you are using the paper-backed light wieght fusible web as a stabilizer for the felt only. You are not actually fusing it to the embroidery – just hand appliqueing it to the project.
That’s correct. No fusing to the actual ground fabric – it is sewn on. -MC
Nice!
Where is it destined to live out its days after its completion?
I agree with tracing you pattern onto another substance before attaching it to the felt. I use freezer paper instead of wonder under. There is just enough wax on the freezer paper to get it to stick when you iron it onto the felt but it doesn’t leave any marks behind when you remove it.
True! Freezer paper works (and if you buy it in printer-sized sheets, you can actually run it through your printer for the design, rather than tracing it). But I find that, when pulling the freezer paper off, it often will pull up the felt a little and make it a little hairier than I like. But I’ve used it before, and it does the job!
Mary,
I have found that cutting the felt a little smaller than the area I am stitching, say — inside the lines rather than on the line, keeps the shape from growing larger than I originally designed. It also keeps the felt from developing a pucker as I stitch it into place.
Kimberly in TN
Absolutely! I cut on the inside of the line, just along it. Here, the size hasn’t actually grown – but it looks like it has, because it’s filled in. Good point! -MC
I have been following the build up of Mission Rose it is beginning to look quite beautiful getting v excited just can’t wait for you to start the Goldwork.
Thanks of the ebook I bought the other day the patterns are so cute and the directions for working them so clear the Christmas presents for my craft friends are now sorted well they will be when I have worked them, Keep up the good work.
Beb.
If you can please give more info about the needles you use, type, size, etc. There are so many available it’s very confusing. I prefer to use the smallest needle possible but does it make a difference?
Hi, Jeanne – the needle should be suited to the thread you’re using and the type of fabric you’re working on. So for this type of work – tacking on the felt – since I’m using a sewing weight thread and piercing through three layers of fabric (felt, silk ground, linen backing), a small sharp needle works best. A regular “sharp” sewing needle is fine, but I just use my embroidery (crewel) needles, in a size 9 or 10, because those are what I’m working with, anyway. -MC
I am enjoying this project so much. I had my doubts about the “Little King” rosebud at the top but it looks great. I wondered about the big blue areas around the side. And then when I saw the bright yellow felt, I was completely confused. But seeing it all together, seeing the potential – yep, it’s going to be a beauty.
Thanks for the one photo with your finger showing. That’s a reminder that this isn’t a huge piece. It’s so grand looking I keep expecting something the size of a table top.
Wow – it is all coming together, isn’t it? That gold work is going to look really fabulous.
Your techniques, skill and patience in working your pieces never ceases to astound me.
Dear Mary
I really like this project more and more, It looks really fantastic how do you get your stitches so even it is amazing, it makes me want to follow you on this project.. I can’t wait to see what type of gold you are going to use on the felt I’m sure we will be pleasantly surprised.
Regards Anita Simmance
Mary, I see that you are using the System 4 frame. Are you also using the curved extender bar too? What other System 4 accesories have you found helpful?
I’ve got my eye on that tracing light pad too.
Hi, Wendy – I’m using the NWS4 clamp and table / lap frame. The extender is actually part of the table / lap frame – it’s the curved vertical bar that holds the clamp. So if you have the lap frame, you have the extender bar, too. I like the floor frame, too, and I do have an extra extender for the floor frame, only because I acquired that before I acquired the table frame. As it turns out, since I always work at a table, anyway, I like the table stand with the frame clamp better than the floor stand – but if I need to work somewhere with a floor stand, then the floor stand is great, too. Just depends on how you situate yourself, I guess! I’m not a q-snap user (I have used them, but they aren’t a preference), so I don’t have their q-snap attachment, and I don’t really use scroll frames, so I don’t have that, either. So I can’t really give an opinion on either of those.
Yes, the lightpad is WONDERFUL. It has made design transfer for the past couple months so easy. One of the best investments I’ve made!
~MC
I think your mission rose is exquisite and one of the most beautiful needlework that I have seen. It was fun watching it all come together. However, the felt and the fabric ruin the piece. It would have been better using stitching. The blue is too bright and gaudy and the gold wool felt is wrong for the piece. I am sorry to have this opinion. Your work is meticulous and exquisite. But I dislike these choices.
Your Mission Rose already looks lovely. I can hardly wait to see the finished project. It is very interesting to see your step by step progress explained in such detail. Thank you for sharing.
Absolutely striking. I can only imagine how much more beautiful it is in person. Thank you for sharing!
Hi Mary, thank you for another informative tutorial.
Marian (NZ)
Hi Mary, I am one of those stitchers who is not sold on the blue silk yet. I am still waiting to see the finished piece to see how the blue will look with the rose. I am of the old school, where you use one of the colors you used the least of in your work for the matting to accent your piece. I am holding my breath to see how it all works out. I hope, for your sake, that it does.
Looks beautiful!!
Hey , Mary, this sounds really neat!
I too love working with wool felt .
I trace my designs in reverse on freezer paper the iron on onto the felt. Then i cut the shape outon the drawn lines. Peel off the freezer paper ,and viola! A perfect cut!
Thanks so much for your beautiful embroidery , inspiring!
Silly me!
I did not read the comments before i posted my comment about freezer paper.
Excuse me please!
Mary so glad the yellow you showed us the other day turned out to be felt! For a moment there I thought you were considering using it instead of blue silk (which I love by the way)
That method is a brilliant idea. Looking forward to seeing the Goldwork too.
Take care, have fun – 🙂
I am very impressed! When I first saw the blue I thought NO!! she cannot do that. But how wrong I was. With the gold frame the rose is what the viewer sees and is enhanced by the blue and the gold supporting it. Well done.
Mary…I’m enjoying seeing this project come together SOOOOO MUCH.
Thank you for sharing. Your work is amazing. You must live with deadlines your whole life keeping us topped up with such good ideas and inspiration .
THANK YOU.
Thanks so much for your generosity in sharing your professional work. It’s coming to life beautifully. Am keen to see further developments. Jen
Mary
I really love the blue now that the gold
is sewn on they look great and frame up the project perfectly. This is soooo beautiful!!!!
Robin Marks
Ahhhh! With the addition of the yellow, I’m beginning to see future balance; this piece is finally starting to grow on me! Thanks for the instructions on doing the felt. Did you cut with scissors, a rolling cutter or perhaps with an exacto type knife?
Scissors!