


In case you have time off this weekend – and between Fourth of July celebrations for those of us in the States – maybe you can squeeze in some Stitch Fun! This stitch is particularly fun, because it’s fluffy.
When it comes to creating a fluffy finish with your embroidery stitches, there are a few options for stitches that work well. Probably the best known of these is Turkey Work, also known as Ghiordes knot.
Victorian Tufting is another method of working up some fluff on your embroidered surfaces. And in a sense, it’s a little easier than Turkey work, because if you already know one basic embroidery stitch, then you already know how to work Victorian Tufting.
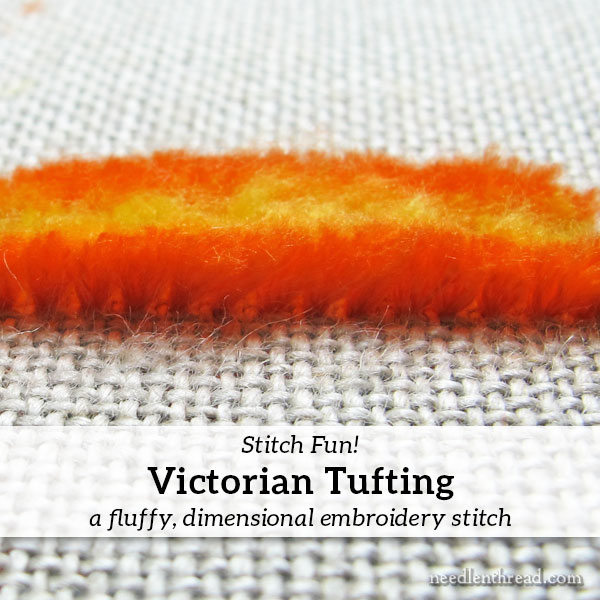
This is Victorian Tufting, or Victorian tufted stitch, before it’s been fluffed up a bit.
Ah – don’t you just love fluffy stitches? They’re so cute and hairy!
For this sample, I’m using regular 6-stranded cotton – all six strands in the needle at once – in three different colors so that you can see the layers. I’m working on a natural-colored, even weave linen, but Victorian tufting can be worked on plain weave fabric as well.
The simple stitch used to work Victorian tufting is herringbone stitch. Herringbone stitch is one of those “top 20” stitches. By the time you’ve learned 20 embroidery stitches, chances are, herringbone will be on the list!
If you don’t know how to work the herringbone stitch, feel free to check out out my herringbone stitch video tutorial. You’ll find it’s a simple stitch to learn.
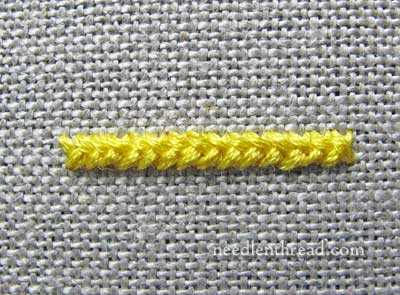
The herringbone stitch used for Victorian tufting is closed. “Closed” simply means that there is no space between the stitches. The stitches are worked side by side really close together, so that the ends and beginnings of the stitches share holes in the fabric.
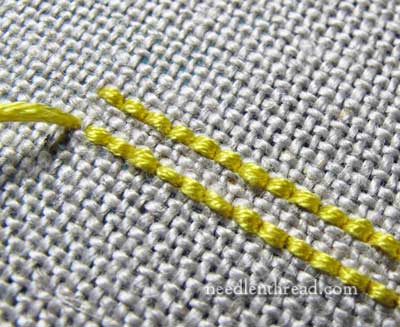
On the back of the fabric, this closeness of the stitches will form two backstitched lines.
By the way, if you’ve been hanging around on Needle ‘n Thread for a little while, this whole concept of closed herringbone stitch and backstitch lines might sound familiar. Recently, I wrote about shadow work embroidery, and showed you the front and back of some shadow work monograms. Shadow work is just herringbone stitch, worked close together, and it’s the same stitch used to create Victorian tufting.
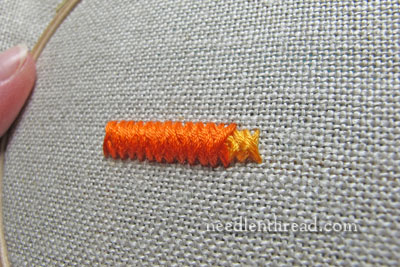
So, to work Victorian tufting, you’ll start with one line of closed herringbone stitch, as shown. You’ll want to make this first band of herringbone stitch quite narrow.
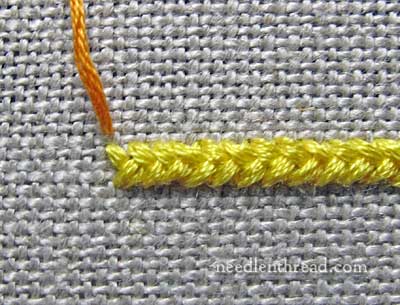
After stitching one layer of herringbone stitch, bring a new thread up just above the edge of the first layer of herringbone, to stitch a second layer right over the first layer. Leave just a tiny space between the top and bottom edges of the first band of herringbone and top and bottom edges of the second band of herringbone.
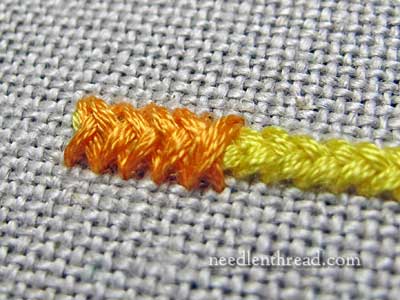
The second layer of herringbone is worked right over the first band. You can see in the photo above that it is covering up the first band quite well, making a nice padded line.
If you look at the band from the side, you can see the first band of herringbone stitch (in yellow) peeking out under the second.
You could stop at this point, but your tufting would be sparse. It looks better with three layers of herringbone.
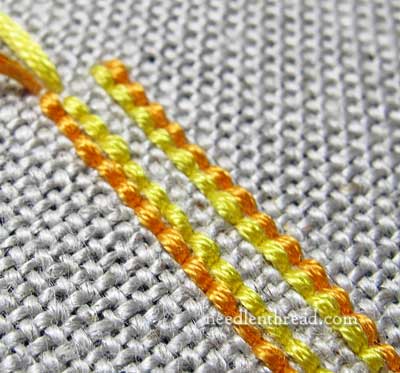
Notice that the backstitch lines on the back of the fabric are right up next to each other.
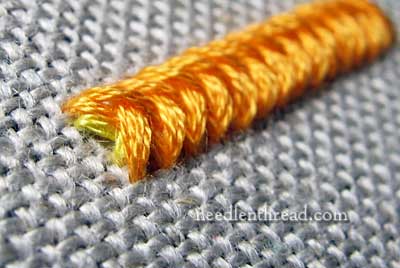
Now it’s time to start the third layer. Bring your needle up just outside the top edge of the second layer. Notice that I’ve left a little bit of space there on the fabric, but not a lot! It’s just one fabric thread. If you’re working on plain weave fabric (like cotton muslin or the like), leave just a few fabric threads between the second layer of herringbone and the new layer.
And here’s the third layer, almost complete.
Three layers will give a good amount of fluff to the filled area. You can work four layers if you wish, but normally, Victorian tufting is worked with three layers, and if more area needs to be filled, you would work another line of three layers next to this line.
If you were to continue working layer upon layer of herringbone stitch to fill up a wider space, the thread waste would be significant, because those top layer stitches would get longer and longer, just to be trimmed away when all is said and done.
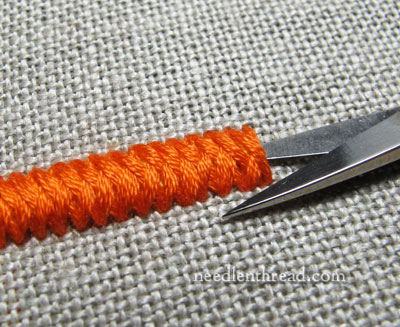
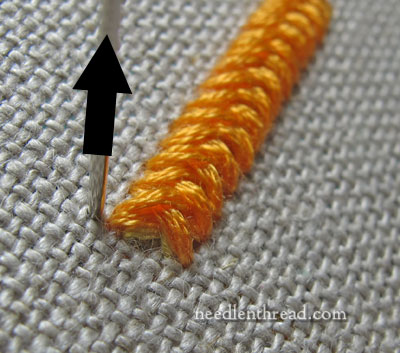
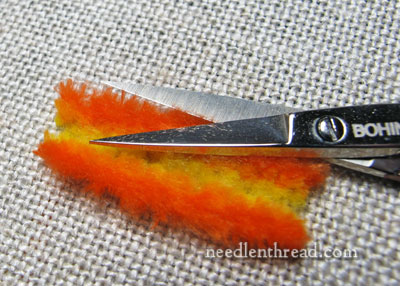
Once the layering is complete, take a small, sharp pair of embroidery scissors and slide the blade into the herringbone stitch, under all the layers. Turn the scissors so that you are cutting straight down the middle of the band through all layers.
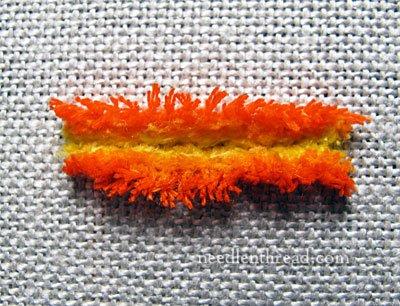
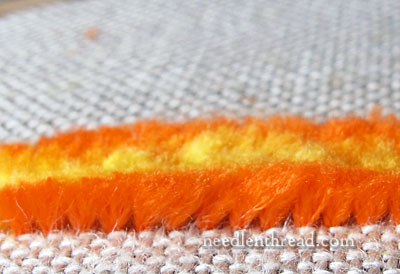
Here’s how the tufting will look right after begin cut. Depending on the look you want, you can leave it like this, or you can trim it up a bit without further fluffing, or you can fluff the stitches to create a thick, soft, velvety pile.
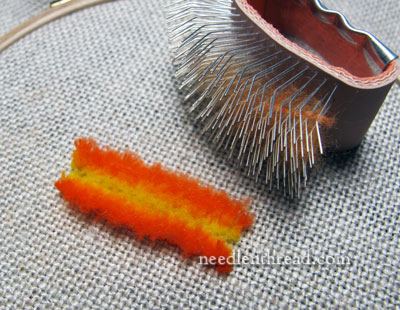
To fluff a stitch like this into a pile, you can run your needle through it and just work the stitches with your needle until the threads separate and fluff. Or you can invest in a handy little pile brush (I wrote about this pile brush here when discussing Turkey Work), and do the job a whole lot faster.
You can trim and shape the fluffy stuff with sharp scissors. Just remember to trim in small bits – it’s easy to take more off if you need to, but putting more on is impossible.
See the tufts?
So that’s Victorian tufting – a relatively easy way to fill an embroidered area with fluffy pile!
There’s one more fluffy stitch that I like, but it’s a little more complex. We’ll look at it down the road.
In the meantime, try Victorian Tufting, and add some fluff to your embroidery!
Stitch Fun is a regular series on Needle ‘n Thread, where we explore more obscure embroidery stitches, embroidery stitch combinations, or fun techniques just for the fun of it. If you’d like to view the other stitch tutorials in this series, feel free to check out the Stitch Fun Index, where you’ll find them all listed for your convenience.
Dear Mary
I’ve not heard of the Victorian tufting before it looks and an interesting stitch I love the thread colours, would be a great stitch for fluffy animals or insects. I do love the fun stitch series it’s such well fun!! I hope you are having a great July 4 celebrations and I hope the weather is great in Kansas enjoy yourselves happy holidays.
Regards Anita Simmance
What a great stitch! Love your Stitch Fun section! I’ve been working on a quilt piece about children playing in the outdoors/woods and this stitch will make some great caterpillars!
Mary, looking at the back side of the work in the center of the article, the top stitches show the yellow and yellow-orange threads lining up stitch for stitch, albeit with one thread in between. The yellow and yellow-orange on the bottom are shown so that the stitches are shifted left to right by one thread, while still maintaining the one thread difference between the yellow and yellow-orange.
The stitch itself looks fantastic, but I want to make sure that I am seeing the back correctly.
Hi, Patricia – they don’t line up exactly perfectly, though they can if you want them to. Some instructions will say that they have to be perfectly aligned, but in fact, it doesn’t make a difference when the stitch is fluffed. – MC
Oh my goodness, this looks so fun. I want to make everything fluffy now!
Oh Mary, that rocks! I hate working turkey stitch on smocking but this looks like just the ticket. Herringbone works up really well on pleats and I can’t wait to try it out and see if it works as well when it’s tufted as I think it’s going to!
Claire
Thank you Mary for another informative tutorial. I had never heard of this stitch before and is another I will have to try.
Marian (NZ)
I love this as a way to do shaded tufted work – the Victorians had/documented some great kooky techniques. I really must get a copy of Barbara Morris’ “Victorian Embroidery” to see more kookiness, tho I don’t know if this technique in particular is in there. This is a much better tutorial than would be there (I have seen an extract on Google books).
There’s a variation of this ‘Imitation Fur’ technique in Caulfield’s Dictionary of Needlework from 1887 (items 271 and 276 in the Supplement) which show it worked on canvas in close parallel rows of wool. (The description given doesn’t make sense, but the engraving does.) As the upper layers give longer tufts than the inner one, the result of cutting and combing the rows is a strip of fur fabric with a ridged effect.
I’ve now posted the how-to’s for this version on my blog:
http://suetortoise.wordpress.com/embroidery-and-crafts/techniques/victorian-fun-fur/
Love this! I adore Turkey work but had never heard of Victorian tufting. I will have to try this. Is it as stable as Turkey work? Or does it need to be done on something that won’t be handled? I have done the Turkey work on some wool embroidered blankets that have been handled and used quite a bit with no adverse effects. Wondering if this would be the same.
Hi, Martha – It’s pretty stable! The “backstitch” locks it in. I haven’t really over-handled it, but it doesn’t seem to tug out, even with vigorous brushing with the pile brush. Might be something to test, though, before using it on washable items… Glad you like it! I love Turkey work, too! Well, I love fluff in general! 🙂
This is completely new to me – I haven’t found it in any of my several hundred books. Boo hiss.
I don’t mind where I learn stuff, as long as I can keep learning, so thank you yet again Mary.
I rather like tufting too, especially for some botanicals. It really looks good on thistles.
I’ve been looking for a fuzzy filling like this to use for flower centers on a dresser scarf I embroidered. The flowers are a little large so i wanted something kind of dramatic. This may do the trick. Thanks
it is really fun!:))))) Thank you very much!
Mary-
I am researching a quilt I saw at the LaConnor Museum in LaConnor, Washington. It was entitled Yarn Starflower Quilt. I was immediately intrigued because I had never seen a quilt like it before. After researching on the internet I found a few more examples, mostly under the label “Amish Stumpwork.” I have researched stump work but I am not finding any examples as close to what you have shown on the Victorian tufting. The star patterns are made using a metal template which the yarn/thread is laced across, multiple times and with multiple colors. Then the tin star/flower is cut free and the yarn is then trimmed and brushed to give it the chenille affect. My questions are: is it stump work at all, is victorian tufting a type of stump work, do they use the herringbone stitch to do this style of embroidery. I have pictures i can email to you if you would like more information. Thanks!
Hi, Angie!
Victorian tufting is a stitch that can be used in stumpwork. Stumpwrork is essentially three dimensional embroidery that employs all kinds of stitches, so it does fit in that category. I hope that helps answer your question!
So glad I came across this step by step! What size and type (special?) needles can be used, and to what thread types and thickness? How do you adjust for various cotton base material, canvas, etc? Please refer me to any source or material that already answers these questions. Thanks!!!
No special needles, just regular floss, and it can be worked on any fabric….
I love turkey stitch and this one just goes that one step further. Love it. Your tutorial makes it so easy to follow.
Can this be done in a small circle, like a dime sized circle?
I’d probably use turkey work in a small circle like that – Victorian tufting would build up too thickly too quickly – you wouldn’t be able to get in the layers comfortably in such a small space. Plus, this works better in a larger, linear area. Still, you could always try it. If it doesn’t work, you can turkey work.
Thank You for teaching.
Cool!! That makes 4 fluffy stitches. One is Elizabethan/ Jacobean in origin (thanks to Allison Cole!), turkey work, this one, and happy_jasu (on Instagram and YouTube calls it the Tassel Flower Stitch (but I’d be more likely to call it tbe Thistle stitch– because that’swhat it makes!. In fact the only real stitching makes up the green involucral bracts, and it’s done with “a corded, detached buttonhole” stitch– the look is sorta like the burden stitch that you used on one of the strawberries.
Hi
I love all your work
Can you tell me please how to stop tufting stitches from pulling out of the fabric.
I have tried and tried but have not been successful and get very frustrated to the point of giving up but I love the look of the fluffy!
Thank you so much
Toni
Hmmmm… Well, the backstitches of the closed herringbone should lock the stitches slightly in place, but it is a surface embroidery stitch, not really meant to be tugged on. If you’re trying to make sure the stitch is so secure that it can’t possible pull out by pulling on the stitches, you probably won’t be successful. To help make sure that the stitches are pretty secure, though, make sure your fabric is a tight enough weave to hold onto the stitches (a more open weave, like cross stitch fabric and the like, would be more likely to result in loose stitches), and make sure your backstitches for the herringbone are small and touching, that there’s no space between them. This will help lock them a bit better.
If none of that works for you, maybe try Turkeywork (also called ghiordes knot). You can find it here: https://needlenthread.wpengine.com/2009/04/turkey-work-embroidery-stitch-video.html It involves a definite “locking stitch” method, and you can get the same type of fuzzy from it.
Your work is exquisite,perfection!
🙂 Golly, thanks, Lynda!