


Once the inner frame on the Mission Rose was covered with gold thread, my next move was to consider how to “finish” the inside edge of the inner frame.
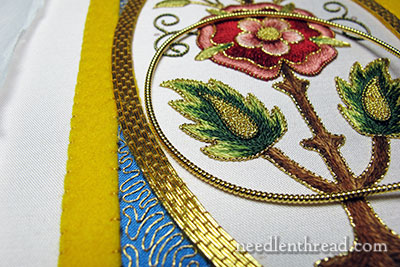
The edge I’m talking about is the edge where the thick gold pearl purl is touching, in the photo above.
First, I thought about using pearl purl and red silk combined, as we discussed last week in this tip on how to pull red silk through pearl purl with a beading needle.
But it was Too Busy. There’s already plenty of color on the inside of the project, and adding another “striped” thread in there was too much. So I settled for plain old gold.
I suppose that’s like saying Paris settled for plain old Helen. There’s nothing really “plain old” about gold! It can stand on its own two feet (metaphorically speaking), without any excuses!
You’ll notice that the pearl purl in the photo above looks Huge. And it is, if you compare it to the passing thread next to it. This is a #3 pearl purl, which is a Big goldwork thread.
But remember, it has to snuggle up next to this felt padding and the gold passing thread and cover up that felt.
Stretching Pearl Purl
Start by cutting a piece just slightly longer than the length you need. Grip the ends of that piece (I do this by slipping my fingernails between the last little beads of the purl on each end), and very gently and very barely, give the piece of pearl purl a tiny, minute bit of a stretch.
I’m really emphasizing the little bit of a stretch here for a reason. If you stretch the pearl purl too far, it’s not going to bounce back. And when you’re dealing with a thread that retails around $13 or $14 for a yard, there’s no point in making it unusable for your purposes!
So, a Very. Gently. Barely-There. Stretch. You want to pull it just enough to barely separate the coils – and in fact, you don’t really see the separation. It’s just enough to give some space for the couching thread, and to tame the pearl purl. Once you give it a little stretch, you notice that it is not as boingy-bouncy as it was. It stiffens up a little.
Incidentally, you can accomplish the same faint stretch by holding the end of the purl pearl in one hand (your less dominant hand) and running your finger and thumb down the length of the pearl purl, with just an ever-so-slight pressure. If you do that in one pass, you can get an even, gentle stretch.
Use Beeswax on the Couching Thread
Before couching the pearl purl, you’ll want to wax up your couching thread with beeswax by running the thread (without the needle!) on the edge of a cake of beeswax a few times, then running the thread through your fingers to clean off any extra wax and to work the wax into the thread. Then thread your needle.
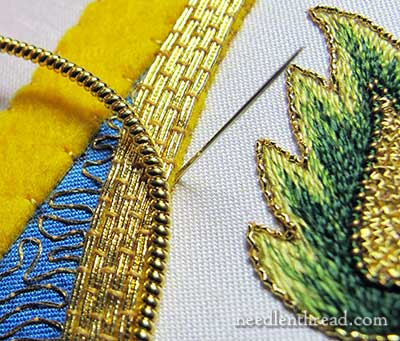
Couching the Pearl Purl
In the photo above, you can see that I’m bringing the needle out to the top of the fabric just at the very edge of the felt, in the ground fabric. I’ve pulled the pearl purl aside here, so you can see the needle coming up. It should be on the outside of the pearl purl.
Then I’m taking the needle down into the fabric right up next to the passing thread. In this case, because I have a sliver of felt still showing, I’m going into the felt and then into the ground fabric.
The couching stitch needs to be between two bumps in the pearl purl. Give the thread a little tug and the stitch should pop (literally, it sounds like a pop) through into the space between two pearls on the pearl purl.
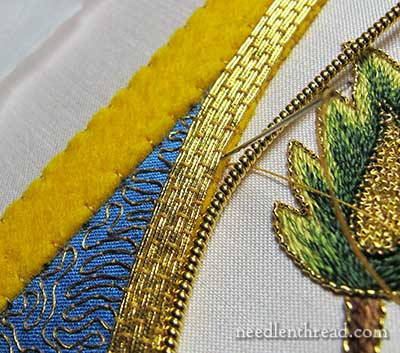
The couching stitches can be every several pearls in the line – they don’t need to be between each pearl. I skipped four or five per stitch.
Stepping back a bit, you can see the finished edge on the lower part of the frame in the photo above. The opposite edge isn’t finished yet.
The pearl purl makes a nice, clean, pretty beaded-edge finish.
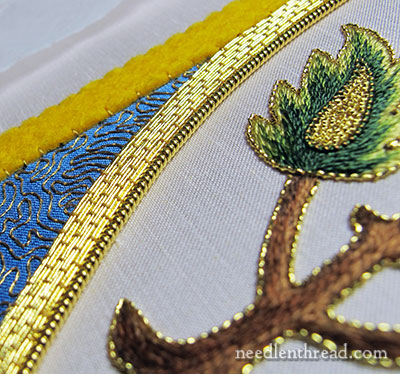
Here’s a close-up, so you have a better idea of the size of the pearl purl next to the passing thread on the frame.
You can see why a larger pearl purl is needed. Had I used a finer pearl purl, the felt would have probably still shown, and the edge wouldn’t look so completely “finished.”
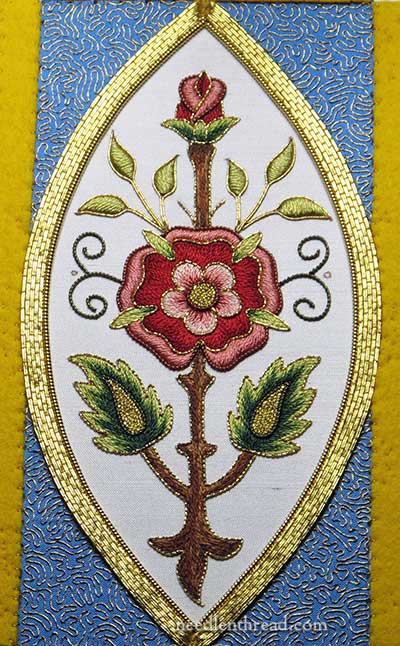
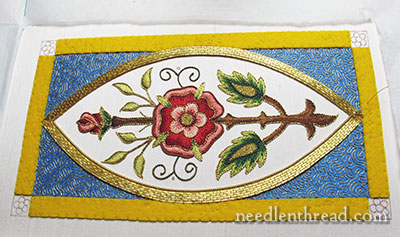
Here, the two edges are finished. This photo is not quite straight on, but it gives you an idea of what the inner frame looks like, straight on.
Notice that I cut the pearl purls and worked each side separately, rather than bending it at the tips and doing both sides with one piece. The thread was too thick to get a sharp bend at the tips without warping the coils.
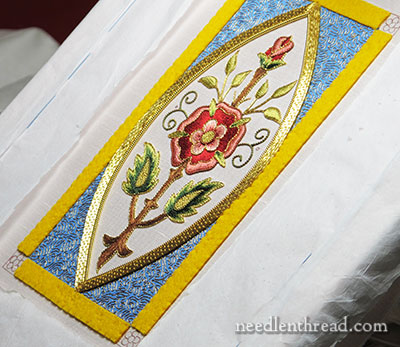
The piece photographs from the side much better, for some reason – you really get the play of the light on the gold and the silk, when viewing it from the side.
So, that’s the inside of the inner frame, finished!
I’ll do the outside of the inner frame after the outside frame is complete. I’ve been working on the outside frame – it takes heaps more time than the inside frame. I never realized how much “bigger” the outside frame is, until I started covering it up, stitch by stitch.
Any questions? Comments? Suggestions? Feel free to have your say below!
Stunning – absolutely stunning!
At first, the ‘big’ gold looked huge and too large for the space. It is a perfect edging and it pops!
Absolutely and unbelievably beautiful! You are truly a wonderful textile artist! Your Mission Rose project is an inspiration to all of us who are in the process of learning embroidery.
Thanks, and God Bless,
Karen Hancock
No questions. Just amazed at how beautiful
the Mission Rose is. Thank you.
Stunning!
Mary,
This is absolutely beautiful. I’ve really enjoyed watching the entire process. You’ve given me the confidence to add a bit of gold to my next embroidery project.
Wow! It’s really coming along. I can’t wait to see the finished product — are the little flowers in the corners going to be done in silk like the main rose?
That huge pearl purl really finishes the inside edge beautifully. I would have thought you would wrap it with some floss to give it some color, the dark rose would be lovely, but it does look beautiful the way it is.
The Marian Rose is absolutely beautiful. The embroidery is perfect. I am so glad that you kept the blue background which signifies the Mother of God and truly enhances the piece. And all that gold work. Wow!
This is an award worthy piece and I believe I am rewarded by watching you create this work. Thank you for sharing your work, stitch by stitch.
It looks beautiful!
How did you end off (or finish off, or plunge) the end of the pearl purl given that it is so large?
Jacquelyn
Hi, Jacquelyn – the ends are not plunged. You cut the pearl purl so that it ends right where you want it to stop, and you couch in the last couple coils, to secure it. In this case, the threads end right up next to the inner frame at the tips. Hope that helps! – MC
Dear Mary
The Mission Rose is beautiful, stunning it’s really taking shape and I can’t wait to see further progress especially the outside frame where the felt is and the corners, I love the Pearl Purl just one question what couching thread did you use that cost so much money would love to know. It’s looking good thanks for showing us.
Regards Anita Simmance
At first I wasn’t too interested in this piece because I knew something like this was waayyyyy down the road for me. But, every time I see what you have newly done, this piece just gets more beautiful and pleasing to the eye.
I continue to be constantly in awe of your talent! With much admiration, Deonia in Florida
Absolutely beautiful!
So nice, Mary! You are so good at finishing things and putting the little touches in that really make all the difference in the final product. I’m enjoying the progress of this project.
Beautiful! I love watching your progress on this project!
Absolutely stunning. That’s all I can say.
Mary: I am in awe of your work on the Mission
Rose. Since I have never been exposed to gold threads and it would be like ordering a “pig in a poke’, would you advise using the regular threads to make it. I realize that it would not look the sane, not be as spectacular, but would it be OK? I am 86 years young and do not wish to venture into gold threads. Maybe I am a chicken but not truly wishing to try my hand just now. Thank you for all that you give to us.
Wow, Mary. This is beautiful! Amazing how that purl really just does so much to define the rose motif. I am enjoying this Mission Rose project so much. More and more I find that I’m eagerly anticipating the next post.
Mary, this Mission Rose is absolutely stunning. I am really enjoying this series.
Makes me want to try to do it too, but I have no idea what I would do with it when I finished. Don’t let anyone tell you they are bored with this project. It is most fascinating and I can’t wait to see what you are going to do with the outer border.
Thanks for the stimulating projects!
Also pretty crazy about Gertrude McFuzz. She’s one I will try.
Dear Mary, How I envy the wonderful ideas that you come up with on every piece of work you do.
Your work is so very beautiful, I think I will try to do a piece just like yours.
Thank you for all your lovely pictures I love getting your emails
Best wishes and God keep you safe
Regards Joy
Absolutely stunning!!! You have so much talent, and this work is just breathtaking!!!
Thank you so much for sharing!
It’s just absolutely beautiful. I am speechless (for once).
Thank you for showing all the details step by step. It fascinates me how much the look has changed since the beginning. The process feels like reading a novel where the story and characters keep developing and getting better as the story goes along. You are a master, for sure.
Mary this is looking just so lovely.
I think the pearl purl emphasises the bevel look that you mentioned previously, do you plan to use the pearl purl on the outer edge of the marquise shape? Will it take away from the bevel look?
PS I LOVE the blue silk, it is so rich, it really lifts the whole piece I think.
Love to see what you are up to and love the little poems and stories you make up, makes me smile.
Thanks again for all that you share
Sandy
I’m new at embroidery. Do you have any simple patterns I might start with?
Hi, Judy – there’s a whole bunch of patterns for free here on Needle ‘n Thread, here: http://www.needlenthread.com/patterns Under tips and techniques, you can find links to all kinds of tips for beginners, too, to help get you started. -MC
Looking beautiful….
Mary, your work is just beautiful. You are so productive and your website/blog has something of content and interest every day, something I want to learn. I don’t know how you do it. I’m new to embroidery and what you do is not my mother’s embroidery! You are truly an inspiration. Thank you for what you give to your readers.
Mary
absolutely beautiful!!!!!!!