


I’ve said it before. I’ll probably say it again some day.
I Love Pearl Purl.
Pearl purl is one of my Favorite Ever Goldwork Threads. It’s a hefty thread, especially in the larger sizes (like 3 and 4), and it makes a gorgeous outline.
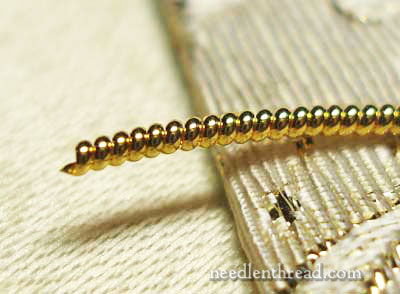
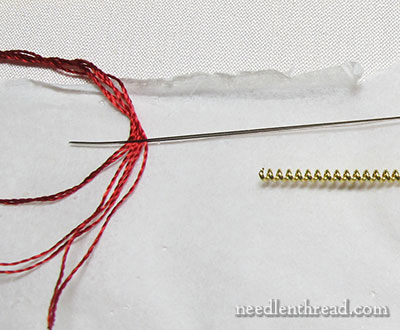
Pearl purl is a very solid metal thread, as it’s simply a coil of solid metal wire that, when un-stretched, looks like a line of little golden beads, like this:
I just love the stuff!
You can read more about pearl purl goldwork thread and how it is used here.
What I want to show you today is a simplification of a technique that involves stretched purl pearl wrapped with silk.
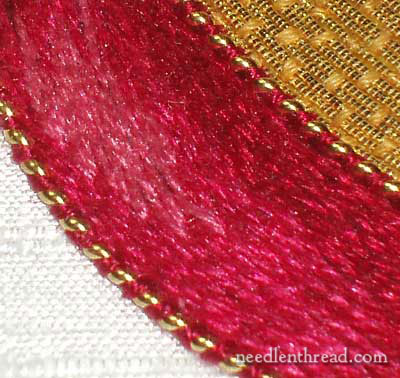
Stretched pearl purl wrapped with silk creates a beautiful edge treatment in a goldwork project!
The first time I stretched pearl purl and wrapped it with silk to create this alternating silk-and-gold edging was when working on this Golden Pomegranate goldwork project designed by Margaret Cobleigh.
You can see the tutorial for wrapping pearl purl with silk here.
I also used the technique in the Marian Medallion Project, and wrote up a few tips on it in that article, too.
Shortcut for Wrapping Pearl Purl with Silk
Today, I want to show you a Shortcut.
This particular shortcut produces almost the same result with the silk and pearl purl, but it does so a little faster and with a little less frustration.
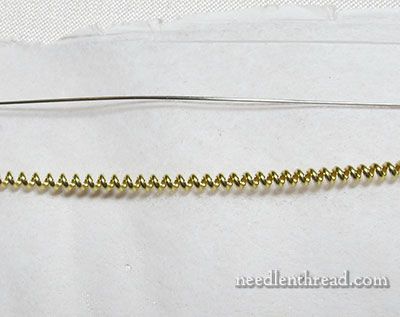
Here’s a short length of pearl purl #3, stretched to about 3.5″ long.
Normally, to get the silk inside the pearl purl, you twist the silk thread around the stretched pearl purl, making sure that the twist works into each “valley” on the pearl purl.
Instead, I propose using a beading needle, like the thin wire needle you see in the photo above.
This is the same beading needle I used when embroidering eggs. It’s a very long needle made up of two tiny pieces of wire joined at each end into a tip, so that the eye travels all the way down the middle of the needle.
First, I cut a length of #3 pearl purl and stretched it so that it was less than double its length – it’s stretched, but not too far. It retains its coily look without looking super-stretched out. Once the pearl purl was stretched, I trimmed it down to the length I needed, so that I wouldn’t have to trim it once the silk was through.
For the #3 pearl purl, I need a fairly thick bunch of silk, so I’m using all six strands of Soie de Paris here, threaded into the beading needle.
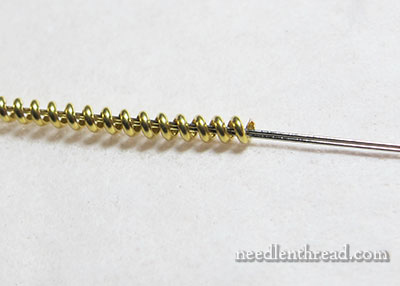
The beading needle passes right through the center of the pearl purl coil and out the other end.
If your pearl purl is too long when stretched to accommodate even a long beading needle, you can always thread the silk through before stretching the pearl purl. You just have to be careful when stretching the pearl purl that you don’t damage the silk. And you might end up having to unwrap the silk from the very ends of the pearl purl to trim the metal thread down to size. You need the tails of silk sticking out of the end of the metal thread, so don’t trim the silk, too! Just the metal thread.
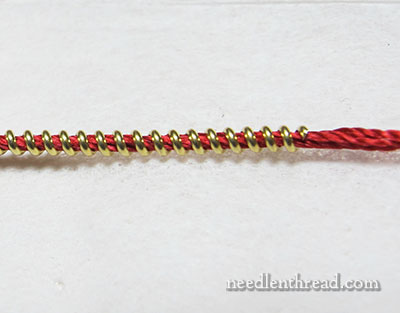
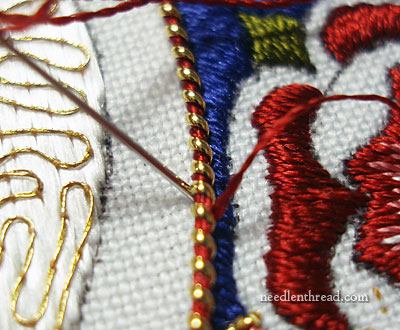
Here’s the silk, passing through the pearl purl. It’s ready to couch into place.

Using one strand of the same silk you threaded the pearl purl with, couch the pearl purl into place, couching every few coils. If you want to wax the couching thread, use the lightest coating of beeswax possible. The more wax you coat the thread with, the darker the thread will be, and it will not blend in as well with the silk threaded through the purl.
When you’re finished couching, sink the ends of the threaded silk into the fabric on each end of the pearl purl.
Now, there is a slight difference between wrapping the silk around the pearl purl and threading it through the pearl purl. When you wrap the silk, you can wrap in a direction that emphasizes the twist of the thread, so that you end up with a more “twisted” look between the coils of the pearl purl.
But that type of wrapping can be somewhat frustrating, because while you wrap the pearl purl, as you continue down the length, it unwraps from the top again if you’re not careful.
In any case, I found the beading needle to be a handy way to speed up the process of adding silk to pearl purl.
And incidentally, although it looks like this is couched on the outside frame of the Mission Rose project (it was, initially!), it’s since been removed… to reappear somewhere else.
So many thoughts on this: I tend to like the wrap around version better than the pulled through. I like the direction of the thread at an angle to echo the diagonal look of the gold. But I bet if I stood back 4 feet, I wouldn’t know the difference. Those close up photos of yours have spoiled me.
And it’s been awhile since I’ve read your article on purl but I thought you attached it directly to the fabric by stitching it on with the thread color you wanted, one wrap at a time. You know – couching it on going through the fabric for each open area on the purl. I had no idea you wrapped it first then couched it on. My memory isn’t what it used to be.
Hi, Irene – You can do that as well! It is a different look, though, when finished, when couching in each “valley” – I did that in this project: https://needlenthread.wpengine.com/2010/03/goldwork-embroidery-pearl-purl.html
You’re right – up close, the twist of the thread is quite noticeable, and I also think it looks better when twisted with the gold, as long as you’re twisting in a way that accentuates the twist. Otherwise, with certain threads, when you twist it into the gold, it just ends up falling into the center anyway, and looking like it passes through the gold straight. From farther away, it’s difficult to discern a difference.
~MC
“…to reappear somewhere else.” You have peaked my curiosity yet again! Your website and a cup of coffee are the best ways to spend a mid-morning break. I get so many ideas, and a way to accomplish those ideas by learning from you. I can’t say it enough, Mary – thank you for all your hard work. And now, back to a small project of purificators, corporals and hand towels for All Saints!
Thanks, Tracy! I’m glad you enjoy NNT with your morning coffee. In fact, this morning, I’m joining you… only mine’s tea. Ummm…. you don’t have much time before All Saints! Get busy!! 🙂
One word: genius
and another: Thanks!
Wow – using a beading needle. What a great idea Mary. Thanks.
Wow. I like this look so much that I’m trying to think which canvas I can use it on! Thanks Mary!
Dear Mary
Yes I agree I love pearl purl as well, I like this new way of using the beading needle and wrapping thread coiled pearl purl but I also like the look of the twisted thread on the pearl purl as well both give a different effect but both are nice. I’m guessing perhaps you are putting the pearl purl on the inside to hide the slight bit of felt that is showing there anyway lovely choice if you are.
Regards Anita Simmance
Wow! What a great idea. Thanks for your wonderful site. I enjoy reading about Mission Rose and your other projects
I love reading your blog, and look forward to the day when I have time to try some of your marvelous ideas! I know you don’t quilt, but would it be possible to add some gold work, like the pearl purl, to a crazy quilt project? I have made a couple of vests for my nieces with CQ fronts, and think this might be a lovely embellishment. Any thoughts?
Hi, Joyce – well, the problem is that real metal threads can’t be laundered, so if you were making something purely decorative in the CQ area, that would work, but if you’re making something wearable or usable that would require laundering, it wouldn’t. Hope that helps! – MC
Clever! Why are the cleverest ideas so obvious when someone else shows you.
how neat would this look as the outline of a golden palace… or ooh! the half-bare branches of a golden and brown tree?
I think that you have answered my question about resources for various surface embroidery techniques for vestment repair/restoration. Many thanks to you for all of the inspiration which I receive from your blog. I just ordered a tambour set from Lacis!
Where can the gold thread be bought?
Tanja Berlin in Canada is probably the best North American source.
That is soooooooo beautiful, just WOW!