


Stretched pearl purl wound with a thickness of colored silk and couched down with the same color of silk is perhaps one of my favorite goldwork techniques. It’s a great way to combine silk and gold to make a striking, eye-catching twist that’s just really pretty.
I’m using this technique on the Medallion Project, and you can see it here along the edge of the “cinquefoil” that forms the center of the the whole medallion.
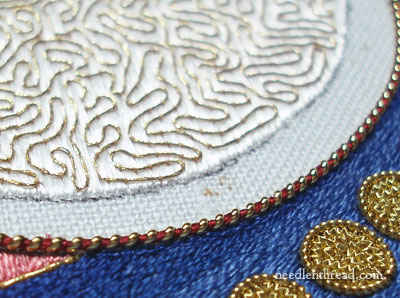
That blank area of linen that’s showing in the photo will be filled with Japanese gold thread, which is couched in double lines to fill the space. Sometimes, when you couch goldwork threads (take, for example, the smooth passing thread in this goldwork embroidery project), you couch them over a yellow ground of felt. But on this project, I don’t want to raise this area at all, so I’m couching the Japanese gold thread right onto the linen, with no padding.
When you’re using a felt padding, the felt hides a multitude of imperfections. It’s a great place to anchor your stitches, and they’ll never be seen once the gold thread is couched over the felt. Working with the bare linen, though, I wanted to be pretty careful about what stitches I anchored in this blank area that would be filled with Japanese gold.
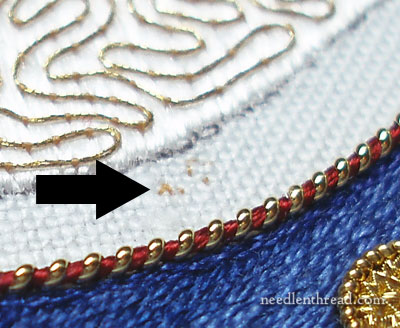
The gold colored silk threads I used to couch the vermicelli goldwork on the background of the cinquefoil were anchored in this area, as were many of the flat silk background threads. You can see them in the photo above.
But to couch the stretched pearl purl, I’d be using red silk, and I didn’t want to anchor the red silk threads in this area, because the red silk anchor stitches could very well show up behind the Japanese gold.
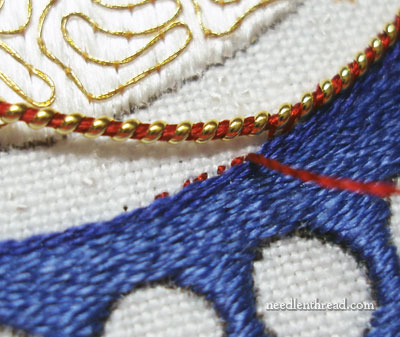
I could have started each red silk thread on the back, by turning the work over and weaving the thread in and out of the back of the stitches already worked. But in my mind, there’s nothing worse than having to turn your work over every time you need to start and end a thread! This is why I love the waste knot and anchor stitches technique for starting and ending threads – you can start and end your threads right on the front of your work without ever turning the whole frame over, as long as you can cover up the anchor stitches somehow.
Here’s my cover-up job when I couched the stretched pearl purl outline around the cinquefoil shape in the middle of the medallion:

In the photo above, the arrow is pointing to the waste knot, which I will cut after taking three or four tiny anchor stitches into the fabric to secure my thread. To make sure the red anchor stitches would be completely covered up, I had to place them in the path of the stretched pearl purl, and work them right up close to the edge of the blue.
You can see here all the anchor stitches which will shortly be completely covered with the stretched pearl purl, and my new working thread ready to start couching the pearl purl.
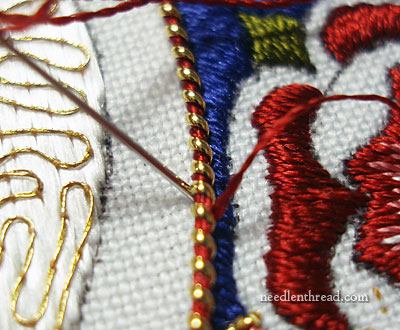
This technique for starting and ending my red silk couching threads worked out really well – none of my red anchor stitches were visible along this line, or within the linen space reserved for the Japanese gold.
So, the next time you don’t want to risk your anchor stitches showing behind any other stitches (for example, if you’re anchoring dark threads in an area that will be stitched in light colors), find a close-by place on your project where you can “tuck in” your anchor stitches so that they won’t interfere at all with other stitching. It’s worth taking time to determine the best place to hide your anchor stitches, because 1. you don’t want them to interfere with other stitching, but 2. you don’t want to have to flip your frame every time you start or end a thread!
More on the Medallion later – I’ve taken a short hiatus (sometimes, a project can get a little too intense, so stepping back for a bit can be a good idea!) and am just getting back into the swing of it. The goldwork on the cinquefoil should be finished soon (perhaps today!), and the onto the roses.
If you’d like to follow this project from beginning to end in step-by-step fashion, you’ll find all the articles relating to this project listed in the Medallion Project index.
If you’d like access to all the tips and techniques discussed in the Medallion Project, conveniently collected in one document, interlinked, referenced, and indexed, why not add the Marian Medallion Project e-book to your library? It’s packed full of all kinds of embroidery tips for undertaking a project like this, all in a convenient electronic format for easy searching.
Ooh, St. Margaret is such a beautiful pattern. I like many of Perkins’ fabrics, and I’ve used several different ones in vestment making, which is the purpose for which I took up embroidery. I’m sure it will be a very lovely chasuble. And thanks for showing us in pictures how to anchor stitches in a line.
Hi, Josh – yes, I like M. Perkins fabrics very much. Even though this one is not 100% silk, it’s still a fabric with good body, and the white is not a glaring white. Glaring white from synthetic fabrics generally end up looking pretty cheap on vestments, but this “barely white” fabric keeps the look of silk. And the fact that it’s a blend makes it a little more affordable, at around $85/yard, as opposed to $100+/yard when this type of fabric is 100% silk. The repeat on this particular fabric is rather large, so the crown part of the design will run down the center of the back of the chasuble with the roses off to the side, so that the medallion will be situated right under one of the crowns and the roses will really show up. The whole placement of the design of the fabric in relation to the design of the embroidery is often overlooked by amateurs in vestment-making, so I’m glad that the seamstress in this case is a tried-and-true professional with lots of experience. She immediately saw the potential of incorporating the placement of the embroidery with the design in the fabric. I’ll see if I can get any photos of the finished piece once the vestment set is complete. Not guaranteed, but I’ll try, anyway! ~MC
oh, Mary, my heart just skipped a beat. We have to see the finished vestment. I can’t bear it if we can’t. Please do find a way to get a picture of that.
Lovely, Mary! Will you be able to show us the medallion on the finished garment? Would love to see it as it is intended to be seen! Thank you for the tip on hiding threads. I am still just a beginner with embroidery and thought turning the hoop over to start and end threads was the only way to do it! LOL So much to learn, and having you to instruct us all makes it so easy and so fun! Can’t wait to see the finished medallion!!!
Hi, Peggy – I don’t know yet if I’ll have photos of the absolute finished chasuble. This depends. I generally turn the piece over once it’s finished, and can’t always be guaranteed a photo op with the whole finished piece. But we’ll see – I’ll try, anyway! Glad you liked the tip! ~MC
Thank you for those explanations, Mary! I can’t decide which is more impressive. Your stitching or your photography. I just love everything you do!
I totally agree with Debbie M on the needlework and photography.
I seem to recall you usually put stretched purl/silk on after stitching the areas on each side. Is there a reason you are putting it on before doing the couching part on this?
Hi, Gail – I wanted to make sure the outline was exactly on that line, so I worked it first. It’s really important that the outline areas here are precise, because they delineate the whole design area. I’ll be filling with the gold from the inside out to the outer edge. It does create some logistical considerations as I go but it’s working out pretty well. ~MC
Hi Mary,
Thank you so much for sharing this little tip, and the great photos! It’s exciting to know which fabric was selected for your beautiful design.
When couching the stretched pearl purl wrapped with the colored thread, what intervals do you use for stitching? Do you stitch every valley, or every other? Does it depend on the size of the pearl purl being used? Do you try to be careful not to pull the thread too tight when taking the stitch over the wrapped cord?
I noted from previous articles when you used stretch pearl purl without the wrapped silk, the stitching placement varied depending on the project. Some were stitched in every valley, some skipped and stitched every other valley.
Any extra little hints would be so helpful!
Hi, Carrie –
On this piece, the couching is done in every valley, to keep the filling equal. No, I don’t think it matters what size pearl purl – though that would effect how thick the thread filling would be. Yes, I try not to pull too tightly to choke the silk wrap in the purl, but it has to be firmly stitched on, to keep it … well, firmly stitched on.
Yes, it depends on the look you’re trying to achieve.
Hope that helps!
MC
Stunning. Are you making the chausible too or is that another craftsman? And if so do you communicate with them about progress,fabric, things in both commissions that relate? Just kind of interested in how this works.
Oh and as always – stunning. I learn something every day coming here. Anastasia
Hi, Anastasia – No, I am not making the chasuble. I hand this over when I’m finished, and the rest is up to the person doing the construction of the vestment set. I did have a say in the choice of fabrics and galloons on the vestment, to make sure that everything coordinates.
MC
I’m curious…since the Medallion project is a commision piece for an ordination does the priest/pastor get to decide what will go on the vestment or colors that are used?
Hi, Wendi – yes, more or less – or at least, he decides the “theme.” He wanted a “Marian” theme. Colors, etc., were left to me. ~MC
So – effectively you’re coverering the ‘dips’ in the stretched pearl purl twice – once by twisting around red silk (around the purl) and once by couching it on in every dip?
Well, yes, in a sense, but not entirely. When you “twist” the silk around the stretched purl, what really ends up happening is the silk is basically “strung” through the twisted coils, because it straightens out inside them. So it’s more like the gold is twisted around a straight bunch of silk. This bunch of silk is three strands. The silk used to couch is one strand. So it doesn’t end up being a double thickness of silk, but actually 4 strands altogether. Hope that makes sense…
MC
Yes – it does. I didn’t think about the number of strands. Thanks 🙂 !
I loved silk-wrapped stretched pearl purl. It’s shiny and soft all at the same time.
I do hope this is commissioned for a priest’s ordination. What a blessed way to begin his ministry. mary, this is exquisite and i’m so so happy its for such a noble purpose.