


We’ve been talking a lot about tambour embroidery recently, and since I promised a tutorial for you, here’s a video on the basic stitch!
The very best way to get familiar with tambour embroidery is just to do it – that is, sit down with a hook, a piece of fabric in a hoop, and some thread, and try it. Work your way through the basic movements of the stitch, until you understand how it works. Start by stitching in one direction – the direction that’s most comfortable for you – and keep practicing in that direction, until you have the movement of the hook down.
From that point, it’s just a matter of practice. And more practice. And even more practice!
Practice until you’re comfortable with the hook. Practice until you can stitch in all directions with it. The more you practice, the more the stitch makes sense, and the easier it becomes to stitch in all directions.
To get you started, then, I’ve worked up a how-to video for the basic chain stitch with the tambour hook.
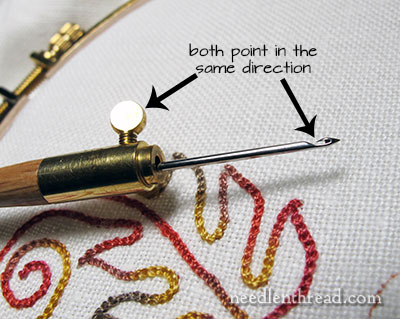
Before you start, make sure you set up your tambour hook correctly. The knob on the handle and the opening of the hook should both point in same direction. Wherever the knob is, you want to line up the opening of the hook on the same side, right in line with the knob.
Why? Because you can’t see the opening of the hook when you work, but you can always see the knob. And you need to know where the opening of the hook is, the whole time you’re working. The knob will tell you!
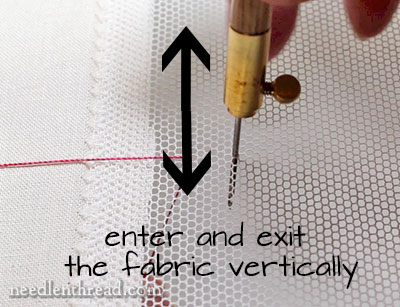
While you practice, develop the necessary habit of entering and exiting the fabric vertically. Entering and exiting the fabric at an angle can cause the hook to snag on the fabric.
Tambour Embroidery Video
The video below starts with the thread anchored on the side of the fabric. You can anchor the thread different ways – for example, in this article, you can see how I used waste knots to anchor my threads.
The video begins somewhat far away from the stitching, and then part way through, I zoom in on the stitch and slow the video down, so you can see the movements of the stitch in slow time.
Here’s the video for the basic chain stitch with the tambour hook:
For email subscribers, you can find the tambour video here:
Tambour Embroidery How-To Video: Basic Chain Stitch
Later on, I’ll share some more tips to help you get comfortable with the tambour hook, including information on how to turn and stitch in the opposite direction, how to stitch sharp corners and points, and so forth.
In the meantime, though, if you’re keen to learn how to wield a tambour hook, start by practicing the basic stitch!
You can find more information on tambour embroidery in the Tambour Embroidery Index here on Needle ‘n Thread.
Enjoy the video!
If you’re looking for other how-to videos for a whole range of hand embroidery stitches, you’ll find plenty of how-to videos for hand embroidery right here on Needle ‘n Thread!
Looking for inspiration & information on hand embroidery?
There are all kinds of reasons to sign up for the Needle ‘n Thread daily newsletter! Check them out and sign up today!
If you like what you see on Needle ’n Thread, if you want to be a part of keeping the website thriving (and free of annoying network advertising), why not become a patron on Patreon? Check out my Patreon page here, where I’ll occasionally add special needlework bonuses for patrons.
If you shop on Amazon, you can support Needle ’n Thread without any extra expense to you by visiting my Amazon Recommendations page here, where you’ll find books and sundries for the needleworker available on Amazon.
Thank you for that great video,,,,using see-through material is genius!!!! 🙂
Hi, Mary,
Thank you for the great video! I am looking forward to trying this after completing all the Thanksgiving and Christmas preparations (i.e. In the new year!)
Happy Stitching!
Lauri
merci pour le vidéo, super facile à comprendre.. Thanks a lot
Hi Mary, it was really helpful seeing this technique as a video demo, as it was so much easier to understand than a diagram sequence. It was good that the net allowed us to see clearly what happening underneath the fabric. Watching the speeded up version makes me see why tambour embroidery must get so addictive, it has a nice working rhythm. Thank you for researching and demonstrating this somewhat obscure technique. I can see you starting a fresh enthusiasm for tambour work in the needlework world! 🙂
Dear Mary
Oh this so great I want to start practicing the Tambour stitch now, what a great video you really explain how to embroider the Tambour stitch and the see through fabric is great because you can see what’s going on underneath the fabric. Thank you, thank you for the video, for showing us how it’s done and explaining in such detail how to use the needle. I can’t wait to start.
Regards Anita Simmance
Thank you very much, I have waited and surched sooo long for a video like this. It is excellent, as always. Best greetings
Rita
I saw this Tambour embroidery some time ago and bought a hook, that’s when the trouble started and I thought how hard is this, I couldn’t make it work for me and the bits of information I did find were not sinking into my brain, now with your tutorial I will have another go. I have spent a few days trying to find where I put the dashed thing (somewhere safe so I wouldn’t forget). But with patience I found it and will now practice the correct way……..Thank you so much once again Mary
Thanks so much for the video. I really want to try this. I found a tambour hook in a stash my sister gave me. I didn’t know what it was. Boy am I ever ready. Loved all the articles you so generously brought us.
fabulous demo.
Thanks! That looks kinda fun… I’ve never seen how it was done…
You do SO MUCH for the world of embroidery, Mary, and THANK YOU for doing so! I have been talking about wanting to do tambour for so long — bought the books, acquired the tools — NOW I HAVE A “How To” Video! The time is right!!
Aloha Mary,
Excellent tutorial. You are very kind to spend the time to do these for us. It is really appreciated.
Beautiful netting too. Is it cotton? From Lacis?
Again, many thanks for all your efforts.
ji
Mary, thank you very much for the video. This is all making me crazy because I want to stitch but am packing to move house and it will be awhile before I can stitch. Before I leave the San Francisco Bay Area I must get to Lacis and Needle in a Haystack for a last small shopping and looking orgy. Any suggestions for good needlework shops in the Sun City AZ area? Thanks in advance, Charlotte
Dear Mary,
I thank you very much for the tambour embroidery tutorial video!
Maybe in the future you would like to introduce some beading techniques with tambour hook too?
Best regards,
Liina
from Estonia
Wow! Still waiting for my hook to arrive, but my fingers are already itching. It took about 5 weeks of stitching traditional chainstitch to complete the first embroidery. It will be interesting to see how long the second will take using the hook. Thanks for the cool video.
Hello Mary,
Thank you for this video, and all your work!! I can tell you the difference wjth the french ‘point de Beauvais’ : you turn thread and hook in clockwise, and for ‘Beauvais’, I turn thread and hook anti-clockwise. I use a 80 hook, and an old DMC thread ref. NV40, who is like a ‘big’ machine thread…
In his book on Luneville embroidery, Bruno Faure says that when working from left to right or from top to bottom, you should wrap the thread (and turn the hook) in clockwise direction. When working from right to left, or from bottom to top you turn in anti-clockwise direction. After the stitch is done, the hook is turned forward in the opposite direction (e.g anti-clockwise when working from left to right).
I don’t know why, but after learning to do this I became a lot more proficient with this stitch (perhaps because you do not need to wrap the thread so far around?)
Yes…if you notice, I’m stitching from left to right and wrapping the thread and turning the hook clockwise (on the initial turn). As it works out, if you’re right handed, it’s really the only way that makes sense and works out comfortably. If you try to move the hook the opposite way on the initial turn, it just doesn’t feel natural. And if you try to wind the thread the opposite way, you’re more likely to snag it. Fukuyama says the thread should go one and a half times around the hook, and in some circumstances, it’s easier to wind it that far, because it pulls out of the way better. But it’s not always necessary – one good circle will do it, and it seems it’s best to learn that way at first, because it gives you a system to follow. And then once you’ve got the principles down, you can make adjustments that work better or are more comfortable or natural for you. That’s my take, anyway…. MC
Oh, thank you, Mary. Such a very clear video. So helpful. It will make learning this new form of embroidery easy as all your tutorials do!
Hi Mary,
Thank you so much for the video! Your tambour articles have been fascinating from the beginning. I have it on pretty good authority that I will be getting a set of hooks for the holidays. 😉 Can’t wait to give this a go.
This video si fantastic. Thanks a lot for sharing tour knowledge and passion. Marie-Suzanne
i’m in love with this technique , please if you know where i can buy this needle online , i will appreciate a lot
Hedgehog Handworks carries it, as does Lacis – both have online shops. Hope that helps! ~MC
As always nicely explained and done…thank you
Amei o seu vídeo! não conhecia o trabalho. Quero fazer o bordado, onde posso comprar a agulha? Agradeço a sua bondade de ensinar com clareza o bordado.
Obrigado.
Mary, thank you for the awesome video and all the previous posts. I am so,excited to try Tambour Embroidery that I have ordered a loom and coton a broder.
The see-through material is great. Can you tell us what that material is and how you attached it to the material to its left?
Thank you again.
🙂
That’s actually tomorrow’s blog post!
Mary –
Thank you for this fantastically video-ed tutorial! I am fascinated by this tambour embroidery you are introducing many of us to. Did I read that you bought a new camera lens for this tambour video? It’s awesome! I’m really looking forward to any future videos of this technique.
And do I ever love the netting you are using – so beautiful, even before it is embroidered!
Tomi Jane in MN
Thank-you so much, I have played with tambour but have never managed to get it working well, I keep dropping the thread half way through and the whole lot unravels.
I am hopeful that I can now get this technique mastered.
One question, my tambour hook has a latch, have you ever tried one of these, or do you have any comments on the pros and cons of tambour hooks with latches?
Lisa
One of the universal truths of many hobbies is that one needs special stuff, oh I know in theory one can knit with any pair of pointy sticks and any yarn like material …. But the process is so much more enjoyable, the outcome more predictable and the result usually more satisfying if one has choice in tools and materials. My bookbinding is very much kitchen table stuff, oh I have a nipping press, and have made a wee clamping press – but the bulk of my tools and materials are those found around the house. Tambour bead embroidery is at the other end of the tool spectrum, starting with a special hooked needle in a special holder – and extending into frames that are able to tension larger pieces of fabric than your average embroidery hoop – not to mention the stands so one can work with both hands free. So far I have invested in several needles and holders, several frames, one set of supports, and a few different fabrics and threads. Those seemed the essentials, the things I needed to be able to tambour. Until now … I worked with materials from my stash, like many I had a selection or is that accumulation of threads and other things that I had acquired over my life as I stitched and sewed, I also had a small selection of beads … acquired when became interested in beads and knitting together.
Using a net to illustrate the entry and exit of the hook into the fabric is an absolutely brilliant idea. I am a needlework instructor. I was wondering how I could represent the movement in a photograph or a video.
Bom dia, Sou brasileira e estou com grande dificuldade de encontrar essa agulha aui no Brasil. Goostaria de comprá-la .Você poderia me indicar onde comprá-la?
Hello, Lisania – I don’t know where you can buy it in Brazil. Here in the States, it is available through Lacis.com (www.lacis.com) and Hedgehog Handworks (www.hedgehoghandworks.com)
Mary, re: Tambour embroidery.. What applications are suitable for tambour stitches considering the ease of removal. An errant ring prong, hangnail, etc could possibly pull one or more stitches out of the embroidery. Thank you.
Hi, Laura – Tambour embroidery is used in all kinds of applications, from household linens and decor to clothing (especially couture clothing). When the ends are secure – and assuming you’re using a fairly stable, strong thread – it stands up well to wear and tear.
Hi, thanks for the helpful & amazing video.i have a question. Is the tambour embroidery the same as Maggam/Aari work, I mean is that another name of maggam work or they both are different? For the tembour embroidery which thread you are using + can a simple embroidery floss be used for this work? is the needle used for this have sharp hook and can a tambour work be only done on thin fabrics?
OK, it’s time for the stupid question…How do you finish the last loop?
You can do it two different ways, Ginny – you can take the needle out of the last loop, leaving the loop on the top, and then bring the hook up from underneath and pull that last loop to the back. Then cut the working thread and pull the end through the loop on the back and cinch the loop around the thread end.
Or, you can make the last loop and then pull one extra loop through it. Enlarge this extra loop, so that you have about two inches of working thread, cut the thread on the side that leaves you two inches of working thread, and then thread the end of the working thread through a needle and finish the loop just like you would a chain stitch, by tacking down right over the last loop.
Either way works!
Is the tambour stitch the same stitch that the Mongolians use to make their chain stitched embroideries?
Hi Mary, thank you for the video on tambour embroidery. I’ve not been successful with it though. I keep snagging and catching the cloth rather than the thread. For beginners purpose, what type of fabric would you suggest I use? Tks.
Thanks you make it so easy
I recently got one of these and have been practicing. My main problem is that the hook gets caught in the top loop instead of going through it. Any tips?
I.want learn this work
Where i can bought and the name of the fabric that you used in the tutorial please?
Hi Carmen – in this tutorial, I used cotton tulle. I bought it from lacis.com in California, but you can find it in different places online, or sometimes in fabric shops.
Just purchased my tambour needles can’t wait to try this technique. Working on a pond scene and this stitch looks like what I was looking for to do the water.
Hi Mary,
I have just started my tambour journey, and your video of the basic stitch is excellent, as all of your videos are.
Would you share what fabric you used in the video, as I think the holes in it are perfect for getting the “feel” of the stitch, when pulling the hook up and through, without the dreaded snagging that happens to start off with.
Many thanks as always.
Marysia.
Oh gosh Mary,
Typical of me, posted and then found that you had already answered the question.
I have been trying to look for a tambour or kantan hook, but I cannot find any stores near me that sell them. I also need it pretty soon, so unfortunately buying it online will not work. Is there any way I could make a tambour hook myself? Like with a needle or wire or something? Thanks!
Well, in a pinch, you could use a really fine crochet hook, but the fabric you’re working on would have to be a really loose weave. Clover makes a version of a tambour hook – you might be able to find it in the needlecraft aisle of the big box craft stores. It’s got a little latch on it, though, so you have to work it backwards – coming up into the fabric rather than going down. But maybe you could snip the latch off, if you found one?
Wow I love this idea…were do I buy this needle?
Hi, Jakkie – You can find them at http://www.lacis.com – just search the online catalog for “tambour”
Hello Mary! 🙂
I have been hesitating on investing in a Tambour because there seems to be a lot of confusion on defining what some similar tools can do. I have often heard the Tambour mentioned in the same conversations as the Kantan, and Punch Needle when discussing any embroidery done with a pen-like needle. I hope you can clarify to some degree, and perhaps this question can stand for others wondering the same. I follow an artist that uses the Kantan. In those conversations she recommends buying extra needles as she says they are quite fragile. Reviews of the item also state that some needles are broken right from the package. These needles are also just under $10 to replace. I have read that Kantan is a branding of the Tambour tool. Is this the only difference? I have also been told a Punch Needle is the same, but then told the Punch Needle creates one long stitch which can easily be pulled out. I guess I would like some guidance and any insight you have on the differences, and similarities of these tools. I hesitate to purchase the Kantan as I want to invest in something that isn’t prone to be broken upon arrival, or through careful use. I’m not bothered about beading, but I do like the ease of stitching in this fashion. I would like a reliable tool that will allow me to embroider directly into the fabric, which results in a permanent stitch that will not fall out. I would truly appreciate your insight! I have so many ideas I’m anxious to get started on, and I thank you greatly for any help. <3
The Kantan needle is a latch hook configuration. You go up from the back of the fabric to the front. The handle and needle are on the back of the fabric and the needle is pushed up onto the front of the fabric where the thread is looped into the latch hook, and, as the hook is pulled back to the back, the latch closes until released as the hook is moved forward and pushed to the front. So it is not the same as a tambour hook, which is worked from the top of the frame & fabric. The punch needle is does just what you said – it pushes a piece of thread into the fabric and leaves a loop. You can pull a line of punch needle loops straight out by pulling on the thread. It is used from the top of the fabric to create a “pile” of loops on the back of the fabric. On the top, you’ll see what look like straight stitches or running stitches close together. On the back, you’ll see what looks like a rug pile. It is used either way. Today, it’s commonly marketed as some kind of really fast tool for straight stitching, but if you look at the back, you’ll see loops, and yes, the loops can pull out until the thread is secured. Tambour embroidery essentially creates a chain stitch. You can also create straight stitches with it by lengthening the chain stitch or increasing the tension on it. Tambour is also used to do intricate beading (and sequin) work on couture pieces. With the tambour hook, you’re pushing the hook to the back from the top of the fabric and wrapping the thread around it, to pull a loop through. You can kind of think of it as a sewing machine movement, reversed. There is no latch on a tambour hook, and the stitching does not result in piles on the back – it just results in a straight stitch on the back. You can’t always tell the difference between a hand embroidered chain stitch and a tambour chain stitch, unless you look at the beginning or end of any section of color, where the threads might travel differently. If you are planning to do finer work and more detailed embroidery, I’d go with the tambour hook, personally.
What an excellent demonstration. Thank you so much for taking the time to do it, so many tutorials are too quick!
This was very helpful. As a beginner I got a tambour needle and material as close to the above. It didn’t take too long to get the hang of it and see it flow. The only thing is… what do you do with it? Apply it to fabric? How? And if this goes directly to fabric, how do you see theough so all is aligned? Or isthat part of the mastery? Hope this makes sense…
Yes, that’s part of the mastery of tambour embroidery. You don’t see what’s going on down below while you’re stitching on the top of the fabric. It’s a common and quick way to add chain stitch (especially) to the top of fabric on clothing, for example.
do u have a video that covers other tambour stitches? would love to have a link to it if u do
fascinating stuff! will be learning slowly. I am 74! but very glad you’re demonstrating!
What a find this video is so great. I am very excited to try this form f embroidery.
My daughter recently purchased pants that are embroidered with the tambour stitching. I am delighted to find your video about this new to me stitch. Have several antique pieces with this stitch and never knew what it was. Thank you.
I was taught to embroider at the age of 8, this was done to teach me the principals of eye to hand recognition after having experienced a blow to the head. many months to master the tent stich, but I succeeded. That was 67 years ago. I still do some work now and then. Tambour technique seems intriguing.