


I finished the Mission Rose! But as usual, not exactly when I thought I would.
Last night at 5:30, I put the last stitches in. And then I sat back and breathed a big sigh of relief.
And then I realized it was dark. And too late to take good photos.
Today, I’ll show you how I treated the corners on the piece and added the last goldwork thread to outline the inner part of the outer frame. And Monday, I’ll show you the complete finished piece, good photos or not!
First, let’s talk about the corners.
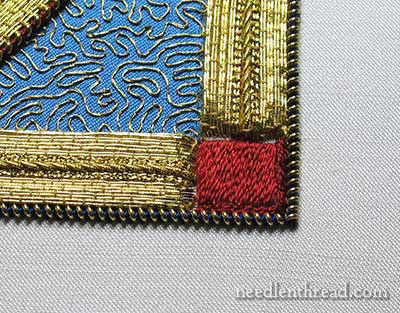
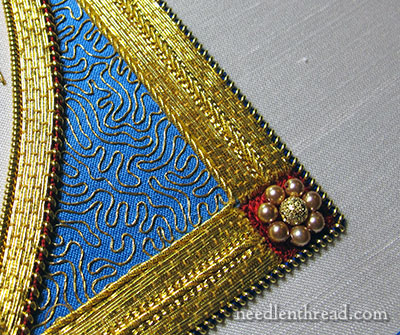
We already saw that I filled the corner areas with silk, in long and short stitch, in red.
Once the goldwork outer frame was completely finished, I went back to the corners, and, using two strands of Soie de Paris in the darkest red on the rose (4624), I stitched a narrow slanting satin stitch frame around the red long and short stitch in the corners.
The purpose of this was to completely fill in the corner area with red, and to give the corners a little bit of a shadow to them, so that the red background looks like it is sunk in a little bit. The dark red ended up looking like a mitered frame all around the brighter red. And that was fine.
A stem stitch outline in a dark color will often produce the same result – adding a little shadow inside an area – but the stem stitch added too much texture, so I worked in satin stitch instead, keeping the stitches as flat as possible.
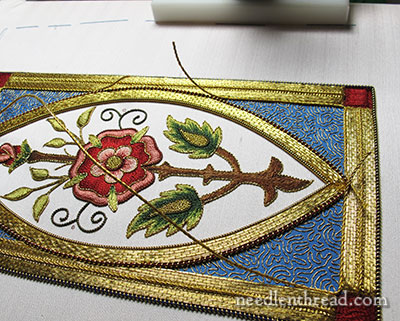
Once the corners were completely filled in – and you can see the effect of the shadow a little better in the photo above – I outlined the inner edge of the outer frame using the same #2 gold twist that I used down the middle of the outer frame.
In the photo above, the twist is sewn down, but the ends are waiting to be plunged to the back.
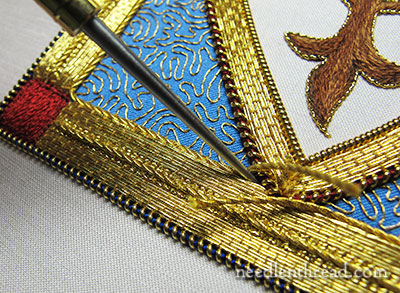
The gold twist is quite a heavy goldwork thread. It isn’t huge, but it isn’t small, either. Picture three gold passing threads (about size 5) twisted together, and you’ll have a good idea of the thickness of the thread.
So, to make the plunging easier, and to keep me from pulling any of the other goldwork threads out of place or out of shape too much, I used a stiletto (it’s actually my favorite laying tool, which has a very sharp tip) to create a large enough hole for the twist to pass through relatively easily.
Heck, there was nothing easy about it, even with the hole! I used a plunging lasso, and still managed to break the eye of a hefty chenille needle at one point.
After much growling, grunting, and gnashing of teeth, I finally managed to get all the ends plunged without upsetting the surrounding gold threads.
(Who said needlework is a gentle art?)
And then, back to the corners!
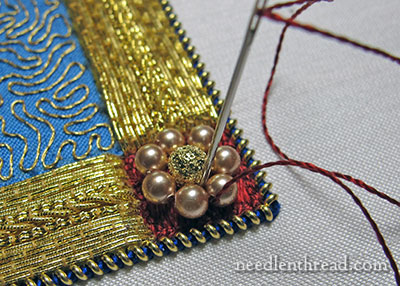
For the corners, I decided to create the little corner flowers on the original pattern with beads.
For the center of the flowers, I bought these 4mm gold-plated brass stardust beads from Fire Mountain Gems.
I wanted gold centers, and I wanted the gold to echo the chip work gold in the middle of the rose. Smooth round gold beads wouldn’t do it. And so I searched high and low (and bought several different kinds of beads), and finally settled on these.
For the bead petals, I used 3mm round pearls that are a rosy pink. These are called “cream rose” on the website, but the color on the website and the color in person are quite different.
I ordered a whole slew of colors – from white to cream to pink and so on, hoping for a color that would work well with the background fabric of the Mission Rose. This color was perfect. It’s a slightly darker shade of the background pink.
To attach the beads, the gold bead was placed first in the center of the square corner, and then, using red silk to match the background, I strung seven of the small 3mm pearl beads onto the silk, taking the silk to the back of the fabric so that a loop of beads was formed around the gold bead, and then I went back with the silk and couched the silk thread between each bead to fix the whole flower in place.
So there you have the corner treatment of the Mission Rose!
On Monday, I’ll show you the finished Mission Rose, along with a comparison and some final notes on embroidery projects and designs.
If you’d like to see the Mission Rose project develop step-by-step, feel free to visit the Mission Rose Project Index, where all the articles relating to this project are listed in chronological order.
Whew! Finally finished and absolutely beautiful! Have you picked out the frame yet? The gold center bead does look good with the smooth outer beads on the red. I love it!
Congadulations on finishing the Mission Rose, Mrs. Corbet!
Corners look amazing!
Can not wait to see the whole thing!
Sarah 🙂
Mary…the little flower is absolutely a delight! It is just the perfect touch to the whole project! Nice job!
You’ve created an absolute jewel, Mary! It was fascinating following your progress these past months. Please, before you wrap up this series, give us details on how this piece will be framed and displayed in your home, especially what steps you can take now to help make sure it will be best preserved and protected for generations to come.
Just so you know, if I’d accomplished something like this I’d be so insanely proud, I’d be out in the street in front of my house stopping traffic to take a look!
Wow, Mary! It is breathtakingly beautiful! Thank you for sharing all that you do.
Lovely! Another delightful goldwork project from start to finish. Thanks for taking us along on the journey.
THis is truly one of the more interesting and beautiful pieces of embroidery I have ever seen. Your process is truly inspirational and rewarding to read. You truly have a gift from God, and whatever else controls our universe. Thank you for sharing and I would love to see this piece in person. Although just looking at it one time would never be enough.
Congratulations on finishing! What I first saw the picture of the pearl flower on the corner, I involuntarily said aloud, “OH! I LOVE IT!” It’s always nice to hear when you’ve hit a winning combination! 😀 It’s beautiful, Mary!
STUNNING!!!!
Wow. Every time I see it I’m surprised and impressed with how beautiful. Each little detail adds so much! I had totally forgotten about the flower.
wow mary, this is amazing, what are you planning to do with it??? selling, keep it???
Gasp. So exquisite. I love it Mary!
Just exquisite, Mary! Congratulations!
I REALLY like what you did in the corners of the Mission Rose banner! It really completes the design in a stunning way. Can’t wait to see a picture of the whole completed project.
Cheers!
Beautiful!! A work of art! I love seeing your pieces, they all make itch to start a big project. Really enjoyed youre previous articles about history, monograms, and resources! So, im really glad you mentioned about how the outlining in stem (or satin in this case) stitch makes the area look recessed. Every time you share a little nugget of technique i mentally file it away for possible future use. Those nuggets of golden information are hard to find.
Thanks, and awesome work!!!
Veronica
The Mission Rose is absolutely gorgeous! I’ve been following your progress on it. The blue thread is genius. The contrast it provides is perfect & the flowers in the corners are beautiful. Thank you for sharing your project with us & especially for sharing the steps it took to reach the finish line. Just beautiful and breathtaking to look at, Mary.
Dear Mary
Ha I have experienced the grunting and groaning of plunging gold work so I felt for you. I only just caught your post just now as I thought you wasn’t going to write anything today, what a surprise! it looks beautiful I love the beads and the gold bead centre it really compliments the rest of the gold work, well done I bet that is a relief, can’t wait for Monday to see the complete project.
Regards Anita Simmance
Congratulations, Mary! Gorgeous. I love, love those beads in the corner. Thank you so much, I’ve enjoyed this every step of the way.
Hi Mary! What an unexpected motif in the corners, but I love it!=)
I do sympathise about the photos and light problem. I too am having trouble being able to share decent photos owing to very short daylight hours and then not much light! Some days it seems hardly light at all, and we’re nowhere near the ‘dark for two months a year’ zone! Roll on spring…
G’day Mary,
All the little finishing touches are certainly THE finishing touches. They make the difference between a lovely finish and a very, very satisfying, aesthetically beautiful whole. You have the fine line between too little and too much all sewn up. An off the scale accomplishment. Although I haven’t seen the complete finished picture, I can ‘see’ it and am so pleased you’re keeping this one.
Cheers, Kath.
The beaded flowers in the corners are inspired. Great job.
WOW! Your work is amazing. I have really enjoyed the journey from start to finish – the agonising over choices, the unpicking and re-stitching, the ‘thought-processes’ involved in its creation. Thank you so much for sharing all of it. You are such an inspiration (as always, after reading your morning newsletter, I just can’t wait to get my morning chores completed and get stuck into my own embroidery!)
Such beautiful work–I love these updates, and I’m waiting eagerly for Monday’s post. Thank you, Mary!
Whew! This has been a long journey – it seemed to be such a harder slog than the Medallion…I must admit that I was never a big fan of this design overall, and there were times I wondered just where it was going. But in the end, it looks like you pulled the rabbit out of the hat!
I do like the the finishing beaded corners and the gold work is simply spectacular(as usual)- the whole thing sort of just ‘fell into place’ for me, and it is a piece you can be justifiably proud of. Thank you so much for taking us along on the process; I’ve learned a lot about design in general with this one, and how a piece can utterly change with the addition or subtraction of a single element.
So, Congratulations are in order! I’m looking forward to seeing the total reveal on Monday – and also the framing. I’d also like to see its placement – it’s become an intriguing little jewel and I’d love to see its final home!
Mary —
WOW!~ I love The Mission Rose. Are you looking at selling the pattern or putting together a kit so others can make it as well? I’m new to watching your projects, but have used your suggestions to visit shops and purchase certain projects. Would appreciate knowing if your pattern, or a kit with all the supplies will be available!
Fabulous finish to a fabulous project. This has definately inspired me to add some gold work to my next project, I’m really glad this one is getting framed. It truly deserves a place of honor in your home.
Congratulations! It is stunning. I love what you did with the corners. Perfect touch. Can’t wait for the final unveiling.
Both pretty and elegant – and skillfully done! Love it.
I love the little flower 🙂 What a wonderful touch.
Well, Mary! I echo the comments of the other folk’s responses. This is truly beautiful. Those flowers just round out the whole piece.
I have so enjoyed the journey with you. Thank you.
Ooh, so lovely! Really pretty and fabulous beads. Looking forward to Monday’s reveal.
I found your blog about halfway thru the project. I have really enjoyed following along and admiring your work. Thank you so much for sharing it with us.
Ang
Dear Mary, Wow what an excellent achievement. This is what I like about your blog, you sharing every little detail from start to finish, even the blunders and then explaining why you changed it.
If you don’t mind, I would like to share this fantastic Mission Rose on my embroidery page on Facebook. It is so beautiful I just have to show it to everybody.
Looking forward to your next project.
Kind regards,
Elza Bester, Cape Town.
Mary, could you give the dimensions of the Mission Rose? It is difficult to get an idea of its size from the photos. Thanks for your great website and the invaluable inspiration and information it provides.
I love the Mission Rose piece. It has the look of an beautiful stained glass window. I have enjoyed the journey. Diane
Well done Mary, words fail to really express the delight, joy and pure enjoyment this piece has brought to so many. You never fail to deliver. In your hands a work of ART.
As to the breakdown of items used. I don’t think non stitchery people really realise the cost of product that goes into even a smaller piece such as this. Not to mention the hours of work.
I would as you say be ‘keeping this myself’.
Of course one thing you know now is that if you were offered a commission for a similar piece just what the asking price should be.
As for the framing up, I too wonder what type of frame you will decide on?
This I hope becomes a family heirloom and in a hundred years it will look as good as the day you finished it. I am only sorry I won’t be around to see it and say. ‘I saw this (albeit by the internet transmission)the day it was completed.
Mary exult in your accomplishment and the acknowledegement of your talent. You deserve it.
To all of your readers I heard on the radio a little saying for all those who wish to do well.
‘if you fail to prepare, then prepare to fail’.
You Mary have with your step by step articles, shown the importance of this.
My heartfelt thanks for all your endeavours and encouragement to those of us who at least try.
Peace and happiness to you and yours.
Sincere and kind regards.
MM
AUSTRALIA
Mary, Congratulations on completing a totally exciting project. I have been wondering for a long time how you would finish the corners and love the red with the large beads. Very unusual.
Also glad to hear that you are keeping this one for yourself.
Congratulations on your finish, it looks superb!