


Last time we visited the Mission Rose project, I was almost finished with the goldwork on the central rose. Well, I haven’t moved ahead as much as I’d like, as Life keeps interrupting in unpredictable ways.
Still, I always figure Some Progress is better than No Progress. No matter how little, progress is always progress, and it keeps us moving towards an eventual completion, right? 15 minutes here or there, squeezed in whenever you can, might be all the time you have to work on something, but those short bouts of stitching add up!
(Yes, I’m just trying to make myself feel better for not having more to show you!)
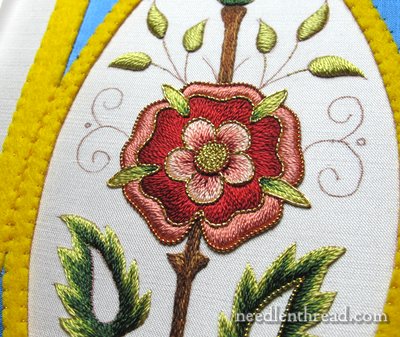
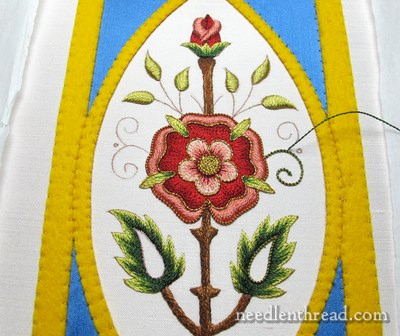
As far as progress goes, I’ve finished all the goldwork on the central rose. The center area is filled with gold chip work, using gilt wire check (bright check purl) #10. Tiny chips of the thread are cut from the main piece and sewn down like beads to fill the center. Again, this is exactly what I did in the center of the goldwork & silk Tudor-style rose last year.
Originally, I planned to explore “heaping” the check purl in the center, like in the original piece:
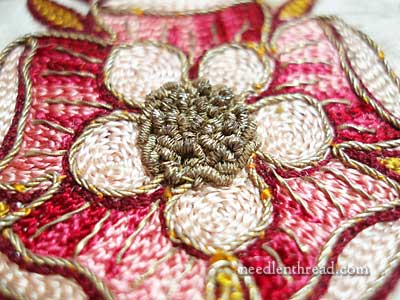
Do you see how the chips of metal threads are randomly sewn, kind of heaped over each other like a little mass of goldwork worms? The outer edge of the center circle in the photo above is worked in a technique called s-ing, which is a lot like working stem stitch with chips of gold purl. Then, inside that, the chips of purl are sewn very randomly, with some overlapping each other, causing the center to heap up.
I started to work the chips in a heaped way like this, but I really didn’t like the result. It looked messy, it caused the center to stand out more than I wanted it to, and it didn’t cover the fabric as well. Since I had started and ended many of my threads in that center area, it was really necessary to cover the fabric well.
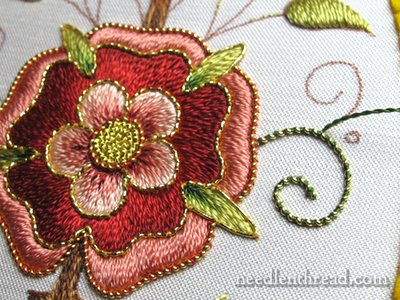
Once the goldwork on the rose was completed, I was going to move back to the large leaves. But then I had a hankering to begin the curlicues and see if my plan for them would work out. I’m using pearl purl (size “super”), stretched and wound with the medium green used in the leaves on the project, and couched down with the same green. I love using pearl purl in this way! And I believe I will keep the curlicues like this, as the technique is echoed throughout the project and it helps tie the piece together.
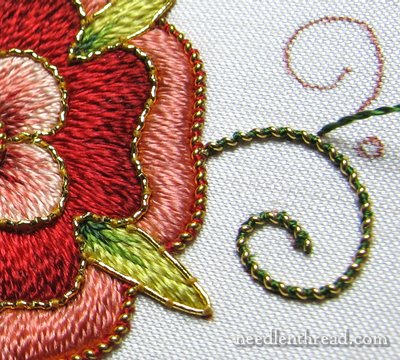
Here’s the curled stem up close. I started couching the thread at the outer tip and worked towards the rose. The thread coming up on the little “branch” curl above is the couching thread for that curl. You can read about stretching and wrapping pearl purl and couching it down in this article, if you want more information on the technique.
Do you know what I’m looking forward to most on this project? Covering up that garish yellow felt with beautiful gold threads!
Forge on, forge on!
If you’d like to follow the Mission Rose Project from beginning to end, you’ll find all the information and articles in this series located in the Mission Rose Project Index. They’re listed in chronological order, so that you can watch the whole project unfold, from what inspired the project, to creating the pattern, to selecting materials and stitching.
I love the curlicues! This is looking beautiful, Mary. The gold work on the rose makes everything pop. I think you chose wisely with the center of the rose.
Ah! the goldwork really enhances the large rose – very nice. I also like the stretched and wrapped pearl purl on the curlicues.
Hi Mary
I’m new to embroidery type stitching and I am having a problem finding out how to do embroidery letters on a cross stitch I’m doing for a wedding. It needs scrolling writing of some sort, and I’m not sure how to do this. Do I draw the letters onto the linen and stich over or do I do something else?
Are you able to point me in a direction to find out how to do this?
Any help would be greatly appreciated.
Kind regards
Maree
Hi, Maree – with cross stitch, you’ll need to chart out the letters first and then follow the graph of the letters. Try graph paper and work out the letters on graph paper first and then stitch them from there. -MC
http://patternmakercharts.blogspot.com/
Try looking at some of these. There are many many alphabets. Surely one will work for you. Some are charted, some are not. Click a box with an active link, then scroll down.
oooooH! For a while there, I had serious doubts as to this piece. But since you put down that yellow felt, I’ve felt better about it. Like I sort of know where this is going now. It’s looking better and better each time you post your progress…BTW – did you ever show the complete original rose? Curious minds want to know!
Hi, Elisabeth – glad you’re liking it better! You can see the original rose on the Index page (linked to in the article) and in some of the earlier articles listed there. Here’s a direct link: https://needlenthread.wpengine.com/2013/07/mission-rose-large-rose-finished.html
Oh, that’s worked out so well! The flatter centre seems more in keeping with the rest of the design than a raised centre would be. It makes a nice contrast to the padding on the outer part of the petals, too. And the green and gold is spot on for those curlicues.
Now, I wonder what you’ll decide to do with the inside of the leaves?
Dear Mary
The Mission Rose is certainly coming together the goldwork, it really enhances the overall piece I love it. I particularly like the goldwork on the green curlicues they really stand out now and compliment the rose. I can’t wait to see the goldwork on the yellow felt, I’m sure that once that is in progress it will enhance the overall picture of the project. Thanks for sharing this with us.
Regards Anita Simmance
Love the finishing touch on the middle, Mary! It looks really great. And I was wondering what you were going to do with the curlicues — I love them also. You do such beautiful work.
Love the pearl purl wound with green! Such a great idea.
Mary,I love this piece you are working on. It is turning out so beautiful. The pearl purl curlicues are such a rich detail. You hand sew beautifully, by the way.
Mary, it’s coming along nicely. I love the tendrils of purl purl stretched and wrapped with the green. It’s so neat and tidy. These things are not meant to be rushed. They are better when they are taken slow and savored. I am anxious to see how you cover that yellow up, too.
It’s looking really good, Mary! The curliques look great, I love that technique with the stretched and couched purl. If only I could produce a whipped stitch that came out that evenly! I just ripped something like that out not two hours ago, but now I am wondering if I should try again! It is a nice effect…
Mary, this is looking fantastic. The curlicues are great, the rose is gorgeous, and the big leaves are … well, the big leaves.
Actually I would love you to do me a huge favour if you can: I’d like to see a close up of the centre of the rose. I can see how the piled up chips didn’t really do it for you, but I can’t really see what you have done instead. If possible a photo from above would be best. The one on the Tudor Rose project from last year is still a little difficult for me to ‘read’ – apologies for this, I am a total novice when it comes to gold work.
Mary, its beautiful.
I’m eagerly charting your progress.
Is the original check purl finer than #10, hence less ‘heaping’? I understand finer metal wyres used to be available.
Hi, Megan – Actually, the #10 is slightly finer than the original check purl on this piece. But it still looked to “heaped” in the context of my interpretation. Hence, the plain old chip work filling! ~MC