


Last time we looked at the Mission Rose project, I was working on the outer frame.
I still am.
And I’m still pushing for that Christmas finish!
A few readers asked about finishing the twist that I’m using down the middle of the outer frame. It is obviously a much heavier thread than the passing threads and check threads surrounding it. So how do you finish twist at the end of a line? Do you plunge it? And if you do, how?
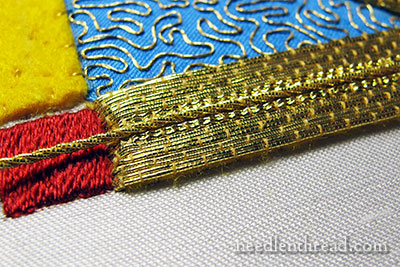
Here’s the area in question, where the twist comes to the end of the gold part of the frame. I’ve already plunged all the threads around it.
Now, twist is decidedly heavier, it’s true, than the other threads. And when working with really heavy threads in goldwork, it’s not always possible to plunge them.
If you consider, for example, the Grecian twist I used to outline the medallion in the Marian Medallion project, there’s no way a thread like that would comfortably plunge. It is simply too heavy. So I showed you how the Grecian twist was finished, by butting up the two ends together and oversewing them with gold colored silk, to secure them.
Grecian twist is about three times heavier than the twist I’m using here on the Mission Rose. I’m using a #2 twist, which you can find through Berlin Embroidery.
Although the twist is somewhat heavy compared to the other threads, I didn’t think it was too heavy to plunge. And so – I plunged!
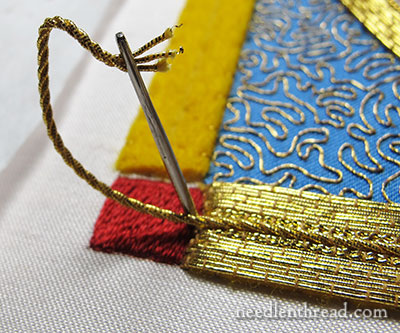
I used a large crewel needle (size 1). A large chenille needle (size 18) would probably work even better in this case, as it has a longer eye, but I didn’t have on hand.
I squished the very ends of the twist, so that they were more or less parallel to each other, and maneuvered them into the eye of the needle, while the needle was situated in the fabric where I wanted the thread to plunge.
A pair of tweezers can be quite handy in a situation like this. They can help pull the end of the thread into the eye, and they can also help hold onto the thread or the needle when you’re working in a tight space.
Once the thread was in the eye, it was a matter of getting that thick thread through the fabric. You can prep the fabric by inserting the large needle (empty) into the place you want the thread plunged and pulling through and wiggling the eye around a bit to open the hole. You can also (carefully) use a stiletto to open the hole further. I just wiggled the needle about.
When it was time to pull the twist through, I pulled the needle until the eye was sunk into the fabric with the twist part way through, and then I just gently rocked the needle back and forth, until the twist pulled through. It takes a little bit of time and persuasion, but if you’re careful and slow – and you have a good grip on the needle – rocking back and forth while you’re pulling it through will help the larger thread pass through the fabric.
Pliers can come in handy in tough spots like this, too. Sounds brutal, doesn’t it? I didn’t need pliers for this bit – it’s really not that thick of a thread.
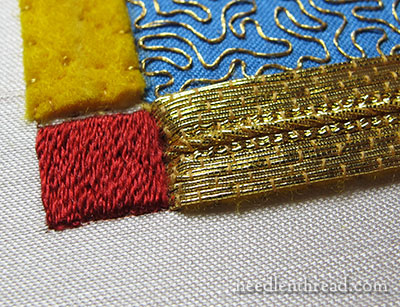
Here’s the end, plunged. I still need to go back over it with my mellor and nudge some of those threads around. One of the passing threads is crossed over another, right on the edge. The mellor is the tool used to nudge goldwork threads – it’s easier on the threads than tweezers, and I should be able to nudge that crossed thread into place without a problem.
Funny, I never saw the crossed threads until I was editing photos! See – taking photos of your work can be really, really helpful!
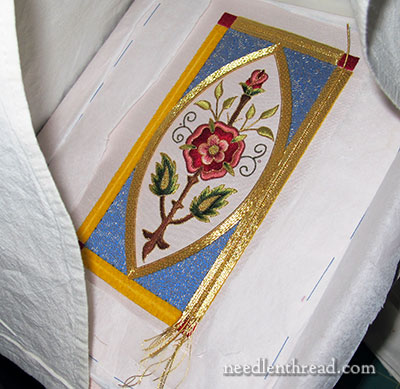
Here’s a parting shot of the Mission Rose on the frame, under its canopy. I keep it covered with a large clean cotton towel when I’m not working on it. At this point when I took the photo, I had two sides finished. I’m on the third side now, and I’m So Excited!
Just a note about the photo directly above: it’s one of the few photos where you can see that the background fabric behind the rose is actually pale pink.
Well, you know what I’m doing this weekend! And we’re expecting a goodly little snow & ice storm over the weekend, which gives me a great excuse to stay home and stitch! And bake. And stitch. And clean. And stitch. And wrap Christmas presents. And stitch. And do laundry. And stitch…
Tomorrow, I’ll announce the winner of the Beam ‘n Read light give-away – if you haven’t signed up for that, today’s your last chance!
Hope you have a terrific weekend – keep warm and safe, or cool and safe, depending on which side of the globe you’re on!
If you’d like to see what the Mission Rose project is all about, you can read the whole backstory on this project and follow its development by visiting the Mission Rose Project Index, where all the articles relating to it are arranged chronologically.
Good morning, Mrs. Corbet! I sent you those pictures last night, I’m not sure if they would have gotten to you yet.
I’m same as you. I’ve a whole lot to do for Christmas! We still have to bake EVERYTHING, too. And I’ll have to wrap Christmas presents. And finish making a few! Do you actually WRAP your Christmas presents? Or do you just put them in gift bags with tissue paper? Because with me, if it’s wrappable, I’m going to WRAP it. I’ve just always thought that it’s so much more fun to tear off wrapping paper than to lift something out of a bag!
And then I know that I’ll end up helping with cleaning the house. (sigh)
Hopefully I will not end up with the laundry, TOO. That would be bad. 8-o
Anyway, if you got the pictures I am super excited and would like to know what you think. If not, then I hope that they are on their way to you!
I just know that you’re going to finish the Mission Rose by Christmas! You can do it, Mrs. Corbet! I’m counting on you!
Hi, Sarah! I did get them! I just sent you an email!
I wrap. I’m a wrapper, and bags are only for the utmost emergency, or something that can’t be wrapped. I like bows on my packages, too. And curling ribbon! I suppose I just like the look of pretty packages under the tree.
Oh gosh, don’t count on me too much for the finish by Christmas! I don’t want to let you down – but I’m working on it! So we’ll see!
~MC
Hi Mary–It’s interesting to hear your thoughts on plunging. I recently finished an EGA correspondence course project that used the Grecian twist, and the instructions said to plunge it. I got out my largest tapestry needle (size 11) and made a HUGE hole in the ground fabric. I was afraid that it wouldn’t close up again, but it did.
Then the instructions said to oversew the plunged end with a smaller gold to cover up the unsightly mess (my words) that the plunging left behind.
I wonder if next time it might be easier to just tack the end down on the front of the fabric so it doesn’t untwist and then oversew.
Anyway, your project looks lovely. Hope you get it done for Christmas.
Hi, Carol – In certain circumstances, I’ve plunged the Grecian twist, too, but only when it could be done discreetly. Otherwise, I’d devise ways to end it, so that the end is somehow covered or worked into other stitching. When I’ve plunged it, I’ve tacked the Grecian twist right at the edge of where I wanted to end it, then unravelled the twists and plunged them separately into the same hole. It required quite a bit of manipulation, but it did work, and much more cleanly than trying to take the whole twist through. The key, though, was making sure the exposed part of the cord didn’t twist. So there are different ways of doing it. When working it in a circle as I did on the Medallion, though, the only discreet way to end the twist without marring the circular frame was to oversew the ends where they met. So – as with most techniques in embroidery, there are different ways to do it – I think it depends mostly on the circumstances of the design, the type of ground fabric, and things like that, whether you plunge it or oversew it. ~MC
Hi Mary:
I really like the Mission rose project Mary. I printed out the pattern and was surprised at how small it is. It always look bigger in the photos. However, it looks to be a perfect size for a bible cover minus the outer frame, just using the marquis shaped center. I’m going to make it for another granddaughter’s confirmation gift. Fortunately, her confirmation is still six years away, but i plan to put it in my rotation to work on as it comes up. I ordered a tambour hook a few weeks back so maybe i’ll try using tambour embroidery for the marquis shaped border….thanks ever so much for all the information you give us and have a Merry Christmas with your family.
What are going to do with the Mission Rose once it is completed?
Hi, Sharyn – glad you like it! The Bible cover sounds like a great idea. And you have plenty of time! 🙂 I’m planning to frame the Mission Rose when it’s finished. I’ll probably take it to the guy who does my professional framing. He’s really good at it! – MC
How do you find a professional framer who knows how to frame up your embroidery, Mary? Seems like it would be a chancy business going to a local JoAnne’s, Michaels, or Amsterdam Art. Is there some kind of professional framers resource where there is a list by state? I’ve asked around in my EGA chapter guild before, but it seems like this is top-secret information. I think the local professional has stopped doing it in general except for a small group of clients that have been grand-mothered(?) along.
I finally learned to stretch my finished embroideries over acid-free board, ladder-stitch the backs, and frame them myself, but I always suspect it’s only 75-80% professional looking. I’d love to try it once and get it done the right way to compare.
You’re right – the professional, individual framer is hard to find. I think, pretty much, they’ve gone out of business. I’ve had good success at Hobby Lobby, though. They pin the piece along the edges of foam core board, which is something I’ve done before, too, using stainless steel lace pins. They also offer museum glass, which is nice, and all archival materials, though they cost slightly more. If I want a piece laced, I’ll do the lacing myself, and then take it to them to do the rest. We also have a gallery that does professional framing, and for extra special (more time consuming, more costly materials, like goldwork), I go there. Look for an art gallery – they can usually put you in touch with someone. I do my own framing for small pieces that go in ready made frames, though – much more economical. But if I want a really nice custom frame, I’ll go to the gallery, or, as an in between level, Hobby Lobby. So it just depends…. MC
This works for me when I have/want to plunge thick threads. As you suggested, I make a hole with my largest needle. Then I take a dental floss threader and put it through the hole, leaving only part of the eye above the surface. I put the thread through the eye and pull from below. I just love those threaders. The eye is huge so it’s easy to thread, but the threader is flexible and squishes to not much wider than the thickness of the thread. They make great beading needles too and they’re cheap. I always have them in my tool box.
Margot–this is a fabulous idea! Never occured to me to use a dental floss threader for this. I carry somewith me all the time for finishing off small ends; even thought about using them as needles immediatly post-9/11. Now I have another excuse to buy another package of them.
Thanks for sharing!
I’m afraid I don’t know what you mean by a dental floss threader, but if it makes plunging threads easier I’m all for it. Can you describe it please, or better still give me a website where I might buy one … or two … or three …
You may have already answered this, but how do you handle the wrong side where you plunged the cord? Do you tack the end down, or leave it loose? I’ve plunged cord on a project before, and I tacked it down just to be safe.
Dental floss threaders are handy craft tools (do a google search for “dental floss threader” if you don’t know what they are). Besides embroidery uses, you can also use them to thread beads on your knitting yarn.
http://www.knitty.com/ISSUEspring06/FEATseducedbybeads.html
Hi, Francesca – I tacked it down, oversewing it on the back of the fabric. I like to use a plunging lasso when plunging is tight: https://needlenthread.wpengine.com/2011/07/plunging-lasso-for-sinking-embroidery-threads.html
I finally found a place online in Australia where I can buy floss threaders. Obviously they aren’t a big deal here! Maybe the orthodontists hand them out or something as they are as scarce as hen’s teeth on the web! Thanks for the tip re knitting with beads too Francesca. And just maybe the floss threaders will help me with flossing my teeth! Wouldn’t that be a novel use for them?
Dear Mary
It’s exquisite, beautiful with the gold I can’t wait to see it completed. I love the way you have chosen the outer frame gold pieces it looks so professional I love it. I can imagine It must have taken some pulling and tweaking to plunge that size gold through the fabric but the ends look great it looks better then sewing it on top of the fabric more professional, but as you say it depends on the thickness of the gold if it is plungeable or not (I just thought of a new word). I hope you have a great weekend and I am doing the same as you baking, cleaning and wrapping enjoy!
Regards Anita Simmance
Oh, I love how it glows! I would not have the nerve to do all that gold work, but it does look nice. What beautiful work you do, Mary.
Wow, Mission Rose is beautiful. You should be very, very excited,
Shelia in Oklahoma
Hi Mary,
I love the entire project. It is absolutely beautiful. I was checking back through the index at the list of supplies and couldn’t find a list of gold supplies ordered. I know many of us never really total the cost of our projects, but I was wondering if you kept a running total of this one? I think it might just scare a few of us away. Still, it is an hierloom piece and well worth any cost. Hope you have a very merry Christmas.
Jan
It sure looks like you have your weekend schedule appropriately planned!
I am one of those who keep a pair of pliers handy at all timea. You are correct about how they can be used to solve a variety of situations.
They are also a fantastic tool for those with arthritis, or deminished strength.
Mary, it sounds that your weekend tasks very well planned out,
I am one of those who use pliers on a regular basis. With atrhritis and not much strength, I need them. Besides they have the ability to solve just about any problems as Mary has said.
Just make sure that the inside of the working end of the pliers is smooth where they come they come together. IF you attempt to use gridded pliers you WILL destroy your needle before you have placed the needle in your fabric.
I use pliers fairly often too and not just for plunging gold threads. I have found the pliers with the nylon points, used by jewellery makers, are the best as they grip very well but don’t damage the needle.
Mary,
This is gorgeous looking! Your work is so pretty. I’ve really enjoyed seeing your design process and implementation.
Great job! Have a wonderful holiday and some well-deserved fun stitching time.
Thank you for all you’ve taught us this year, and I hope you have a wonderful 2014 with some of those adventures from ye olde bucket list!