


Today, a little tutorial for embroidery on gingham, or chicken scratch.
Chicken scratch is suited to any level of embroiderer, but, due to its simple nature and pleasing results, it’s an especially nice technique for beginners and even for children.
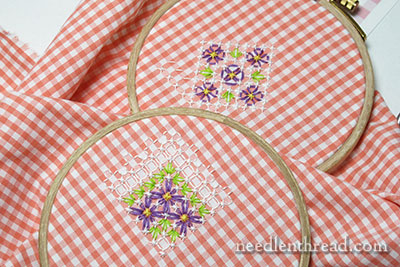
You can make up your own patterns for gingham embroidery, or you can look around online for pattern sources or inspiration from vintage aprons, household linens, and so forth. You’ll find two patterns here on Needle ‘n Thread for chicken scratch: Floral Corner #1 and Floral Corner #2, both of which can be used as corner designs, or can be easily adapted for straight edges.
Materials & Tools for Chicken Scratch Embroidery
Gingham Fabric: For adults or older youth who have their motor skills under control, any size of gingham will work, from 1/2″ down to 1/16″ micro check fabric. For younger children, 3/16″ and 1/4″ or larger gingham would be easier to handle.
Many proficient chicken-scratchers like to use homespun gingham, which has a slightly coarser appearance to it, usually has no discernible front or back, and has more equally “square” checks to it. (Most gingham cotton features slightly rectangular checks.) Homespun is nice for casual table cloths – I always associate it with picnics!
Threads: Gauge the threads to the size of the check. On 1/8″ gingham, I use coton a broder #20 in white for the foundation stitches, coton a broder #25 and cotton floche for colored lacing stitches (sometimes using two strands of either, for elements I want to accent), and coton a broder #16 for the white lacing stitches. You can substitute regular cotton floss, too – just try different weights and combinations, to see what works best. Higher numbered (finer) perle cottons (8 and 12) will work well for foundation stitches on 1/8″ gingham.
With larger checks, heavier perle cottons (3 and 5) are a good choice for foundation stitches.
Tools: You’ll need a hoop, since tensioning the stitches correctly is very important. If your stitches are too loose, they can look floppy (especially on larger checks). If your stitches are too tight, the fabric will pucker.
For needles, you’ll want crewel embroidery needles in whatever size works well with the thread you choose, and you’ll also want a tapestry needle that will fit any of the threads you’ll use for the lacing stitches.
With the threads I’ve been using on the designs I’ve been showing you, I find a #7 or #8 crewel needle works well for the foundation stitches, and a #26 tapestry needle works fine for the lacing stitches.
A pair of scissors is always a good thing to have on hand when doing any kind of embroidery, and for chicken scratch, you’ll also want a pattern, unless you’re just fiddling about for the fun of it.
Ok, let’s start!
Following the Pattern & Working in the Hoop
I work with a 4″ embroidery hoop on the 1/8″ gingham, and I always work as much of the design as will fit in the hoop before I move the hoop. So I work all the foundation stitches and all the lacing stitches that fit inside the hoop area, before moving the hoop to work another area.
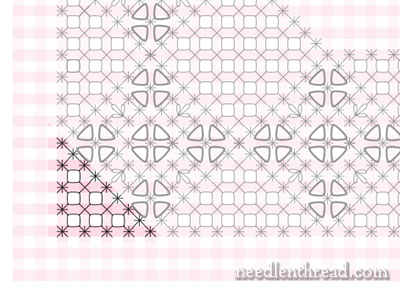
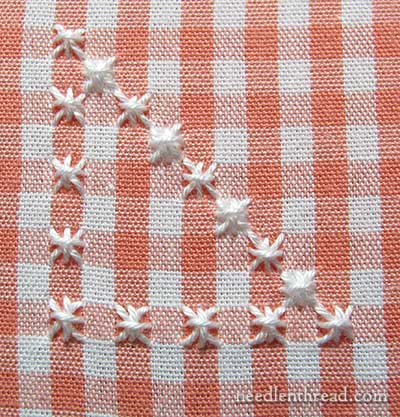
I break down my design into sections. So, using this design, I’m going to start in the corner for this tutorial (notice that the corner foundation stitch in the design is on a dark check in the fabric), and break up the sections on the pattern in a way that makes sense to me while I work them out.
First, I started with the lower corner area and worked the outline foundation double cross stitches around that small corner (highlighted in the photo above), followed by the inside foundation cross stitches.
Then, I moved on to the foundation stitches for the sections highlighted above, because that’s about all that would fit in my hoop.
After working all the foundation stitches, I then when back and laced them to make the designs.
Working the Foundation Stitches
Begin with an away waste knot, so that you don’t have a knot on the back of your fabric. (If you’re working with children, it’s easier just to let them use a knot on the back. They can graduate to the away waste knot once they’ve gotten their feet wet!)
Some chicken scratchers like to work each stitch individually. You can certainly do that, and, on larger gingham checks, I would advise working each foundation stitch completely before moving on to the next one, so that you don’t have a lot of long threads crossing often on the back.
But with small checks, I adapt the typical cross stitch method and work the stitches in layers.
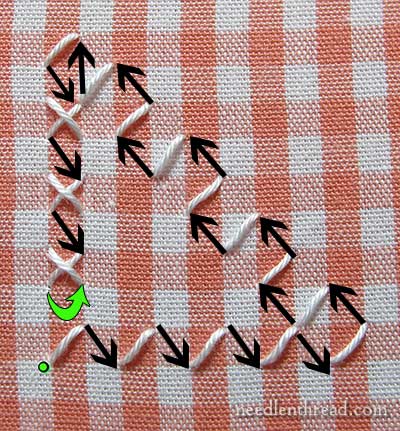
So, starting from that lower left corner, this is the direction my stitches took, to work the first layer of the double cross stitches. The green dot indicated my starting point, and the black arrows indicate the direction the thread is traveling on the back of the fabric, to make each new half cross stitch.
The green arrow indicates where I started the return journey, to cross over the stitches and turn them into cross stitches.
When I arrived at the diagonal line, I crossed over every other stitch on the return journey.
Here, you can see that the two perpendicular sides of the triangle are complete cross stitches, made on the return journey, while the hypotenuse is crossed on every other stitch.
The journeys you make to work out each section of the design are really just common sense. Follow a path that makes sense and that keeps the back of the work as neat as possible, without creating very long stitches on the back of the work while you move from area to area.
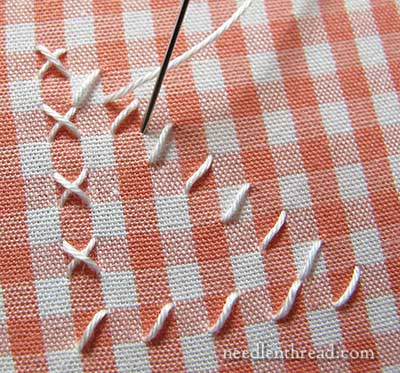
Now it’s time to turn the stitches into double cross stitches, by crossing over them with an upright cross stitch.
Work each upright cross stitch so that the top stitch is always going in the same direction, in this case, from left to right. End each upright cross stitch on the side that is closest to your next stitch, so that the jump between the two stitches is short.
Your work will look much better if all your uppermost stitches on each double cross stitch and cross stitch is oriented in the same direction. So, for this piece, all my uppermost stitches on the double cross stitch are horizontal.

Heading up the hypotenuse of the triangle, I’m crossing the half cross stitches that were left behind on the second journey above, and working the upright cross stitch over them, all in the same pass.
By the time I reach the last stitch (right above the first stitch on the left side of the triangle), all my stitches are now double cross stitches, and the uppermost stitch on each double cross stitch has the same horizontal orientation.
After finishing this little outlined area, I had just enough thread left (good planning!) to work the foundation cross stitches in the middle of this area.
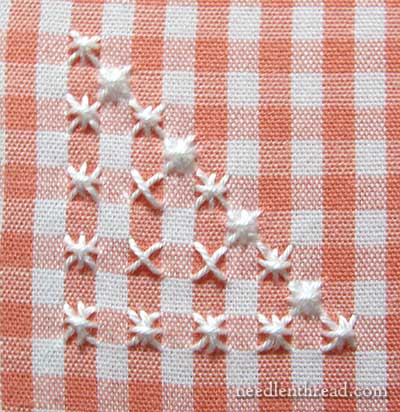
So, in go the cross stitches, working them has half cross stitches in that first row of two, starting on the left next to the last double cross stitch and returning to the left, and then stepping up to the one above and working it by itself. Notice that the uppermost stitch on the cross stitches all cross in the same direction.
So that’s how I work the foundation stitches in each section, mapping out paths that make sense, until all the foundation stitches in a particular section are worked.
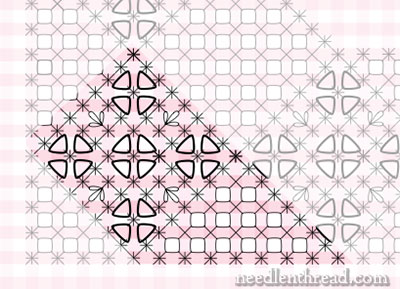
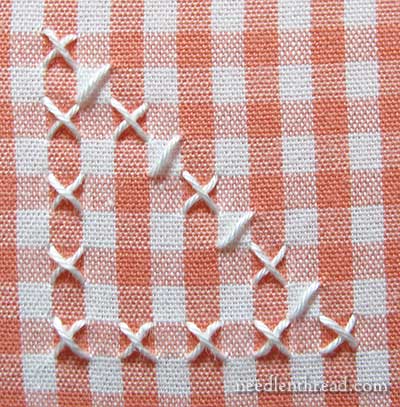
From this point, I went on to work the foundation stitches in the flowery diamond area of the design (all of which are double cross stitches), and then the foundation stitches in the other adjoining white lace area. Again, I work whatever fits in the hoop, breaking the design up in chunks that make sense.
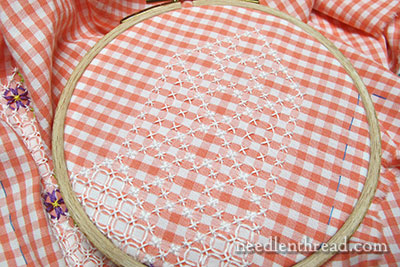
Here, you can see that all the white foundation stitches are worked for this area, which fit within the hoop.
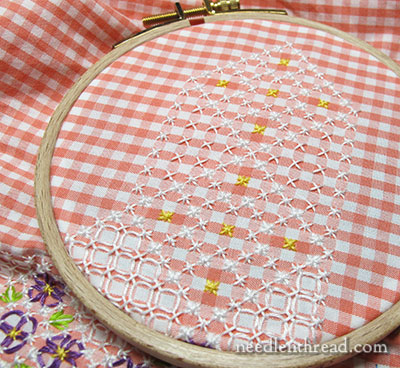
Then, I worked the yellow foundation stitches that form the centers of the flowers. These are worked in double cross stitch, too.
Working the Lacing Stitches
And now it’s time to do the lacy parts.
At this point, switch to a tapestry needle. The blunt tip of the tapestry needle works better with the lacing stitches, because it won’t catch on the foundation stitches.
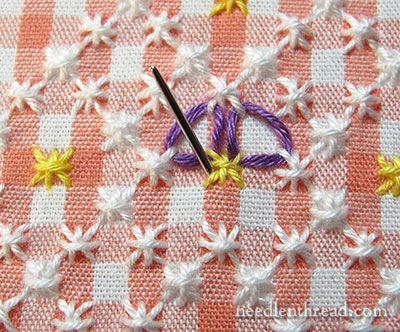
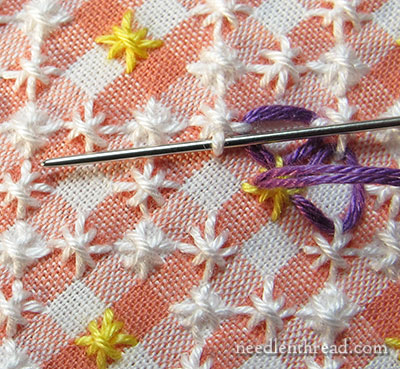
I used two strands of coton a broder 25 in purple for the flowers.
Bring the needle to the front just to the side of the corner of the yellow foundation stitch where the inside tip of the petal should be.
Pass underneath the corners of the foundation stitches that hold the petal in shape. In the pattern, you can see where these corners are, because the petal element just touches them in the pattern.
Don’t pick up any fabric as you lace under these corners. The corners of the foundation stitches will hold the shape of the petals in place.
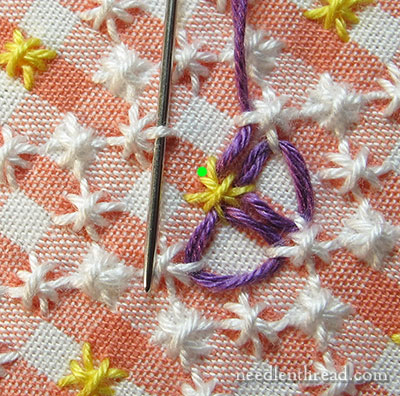
Once you’ve passed under both corners, going up under one and down under the corner across from it (as shown above), you’ll take your needle down into the fabric on the other side of the yellow corner stitch, right next to where you first emerged to make the petal (shown by the green dot in the photo above).
The green leaves are made in the same way – coming up on one side of the corner stitch where the leaf originates (the pointed part of it), passing under the corner stitch indicated in the pattern to hold the leaf shape in place, and going right back down on the other side of the corner stitch where you first emerged.
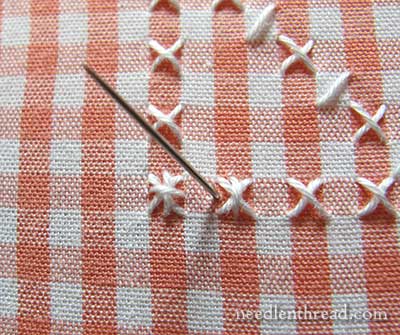
Once all the flower and leaf stitches are finished, move on to the white lacing stitches in the adjacent sections.
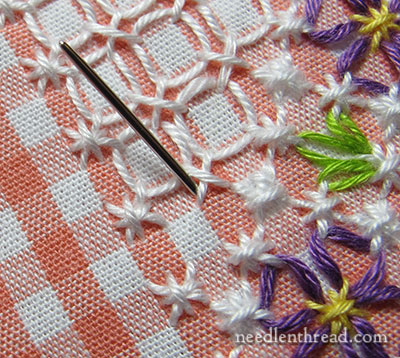
The white lacing stitches are made in the same way as the flowers, following the path to each anchor stitch, as indicated in the pattern.
Bring your needle up slightly under and next to one corner of the foundation stitch on any corner of the white square.
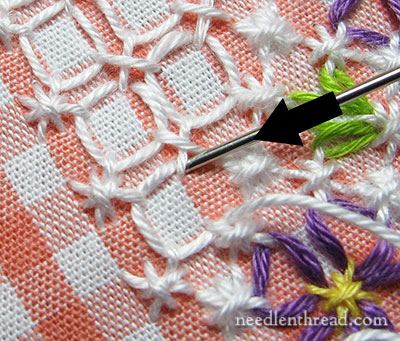
Pass the needle and thread under the three anchor stitch corners that will hold the square shape in place, and then take the needle down into the fabric underneath the first anchor stitch, where you first emerged to make the square.
If you must pass any distance across the back of the fabric to get to the beginning of the next lacy square, turn your work over and take your needle and thread underneath the backs of the stitches that are already there, so that you don’t have any long threads trailing across the back of the embroidery.
When you’re finished with a thread, turn the work over and weave the thread under the backs of the stitches already there. You can make a kind of hitch knot around the backs of the stitches, if you need to, to secure the thread.
And that is it!
The most “difficult” part to chicken scratch (and it really isn’t difficult!) is working out sensible paths to travel while working the foundation stitches. Once you’re familiar with the design elements, working any repeated areas becomes even easier, because after you work through an element once or twice, you won’t really need to refer to the pattern anymore.
I hope you find this tutorial useful and that you have the opportunity to enjoy a little light hearted stitching on gingham sometime soon!
I have a few other chicken scratch patterns on the doodle board, so I’ll trickle those out to you in the future.
In the meantime, you can find several other articles on gingham embroidery here on Needle ‘n Thread, if you’re eager to read more.
Never thought using gingham. Your instructions are so precise. I’ ready to go to the fabric store
Mary, I may not always comment on your blog posts, but I want you to know how much I enjoy reading them. I follow your blog in Bloglovin and your tutorials are awesome! Happy Easter!
Mary,
Happy celebration of Easter.
Mrs. Corbet,
Okay, now I really want to try chicken scratch sometime soon! 🙂
-Sarah
Thanks for the terrific tutorial, Mary! I had not thought to switch to a tapestry needle when doing the needle weaving portions; great idea!
Some of the previous articles on Gingham Embroidery have links that no longer work to my ebooks. Here are the new links:
Guide to Gingham Embroidery –
http://tinyurl.com/GinghamLearn
Gingham Inspirations Book One and Book Two –
http://tinyurl.com/GinghamInspire
Have a Happy Easter and thanks again for the beautiful Spring pattern!
Laurie
Dear Mary
This is so interesting it makes want to stop what I’m doing and grab some gingham and start scratching “sigh”. But I can only look on in wonder at this great tutorial on gingham Chicken Scratch design, I love it, I love the cross stitches and the lace stitching, in fact everything about it. Thanks so much for this very detailed tutorial and taking the time to share it with us.
Regards Anita Simmance
Thank you for this great tutorial! Your directions and illustrations are always so clear and easy to follow. Your generosity in sharing your work is much appreciated!
Many thanks for this, Mary! However easy such an undertaking might be, a beginner really doesn’t know where to start! I have written detailed sock knitting instructions, so I appreciate your patience and real gift for writing all this down. I’ll take a picture of the old doll dress I have with this work. I am positive the woman who made it didn’t realize she was being historically authentic. So . . . what about embellishing polka dots? Or high-end quilt prints? Or Liberty cottons? I was browsing a fabric store the other day wondering what I could do with my new tambour hook — variegated outlines on parts of a pretty camp shirt?
Dear Mary,
Thank you for this excellent detailed tutorial. Yes, gingham reminds me of picnics too, and of lunches on the farm.
Chicken scratch looks like a lot of fun. I’m even warming to the name. And your use of colour and flower design gives the work a sunny joyous feel.
Happy Easter!
What an interesting tutorial, I’d never thought of stitching on gingham. Thanks for the info!
Bom dia. Achei muito interessante a maneirade vc ensinar este lindo trabalho. Vou tentar fazer e espero conseguir. Acho muito lindo pessoas como vc passar o teu saber para outros. Deus continue te abençoando e a tua família. Um abraço.
Esta muy bien esplicado los pasos a seguir, muy hermososss,, me encancantan estos pines
I am looking for chicken scratch quilt block patterns and would appreciate assistance in locating patterns!
Than you!
Have you looked on Pinterest? I put the key words into google as well and lots came up!
Do you have a “How to do Chicken Scratch Embroidery” VHS or DVD available?
Hi, Vicky – Thamks for your question! No, I sure don’t. I don’t know of one available elsewhere, but I’ll look around a bit and see if there’s anything out there…
bonsoir,Je suis intéressée par la broderie suisse et vos indications vont me permettre de faire un ouvrage sympatique. votre tuto sur les jours est un beau cadeau. merci beaucoup.
Has video of this work?
I need a pattern for a star
I found his while looking for a 3D stitch using one inch gingham fabric. I have seen this stitch it looks like the center points of the 1 inch peek up like a pyramid. If you can help me find the stitch I would greatly appreciate it.
Pamela Faust
Mary, your information on Gingham Lace is so helpful and interesting. Thank you for all the work you do in researching and sharing “forgotten” techniques. Your tutorials are invaluable.
I have decided to use it on the front of a kurta (long Indian style tunic) I am making. I will post a picture when it’s done.
Thank you. It finally makes sense to me.
Thank you for the inspiration you have given me.
I like all….i learn
Thank you…
Me gusta mucho. ¿Tiene algún vídeo?
Un saludo,
Carmen
I have a quilt made of brown and white gingham, and an eight pointed chicken scratch star. I get lots of good comments about it and am proud of it since I don’t do any other kind of embroidery.
I have just started to do chicken scratch and am enjoying it. I was doing a place mat when I saw this on FB I will find this very useful.
Thank you
Hi Mary,
Beautiful work and very helpful tutorial! I am a first-timer and want to try this embroidery on some gingham napkins I have at home. How do I know what size gingham I have? What do 1/2 or 1/4 or 1/8 and so on mean?
Thanks, Vidya
I enjoyed the tutorial very much. Thank you very much for explaining very well.
When doing Chicken Scratch on gingham, do you ever use an iron backing to make the fabric less ‘soft’??
No.
I love your site, it’s so informative, helpful , and inspiring! I’ve begun my chicken scratch journey, bought these fantastic two for $5 “picnic cloths” from Trader Joe’s (they’re tea towels, really) and and completed multiple sets. I’m wondering if they can be used or are they simply decorative. The thread seems so flimsy, I’m concerned that there’s absolutely no way they would make it in a washing machine, even in a bag! Or that the lid thread would be pulled too hard. Do you affix the thread work with something? An interface?
Thanks so much!
Hi, Jessica – I always use smaller checked fabric for chicken scratch, because I’m not too fond of overly long thread on embroidery – precisely because it tends to be loose and can snag on things. Still, yes, chicken scratch is meant to be used!