


How do you use up your leftover fabric “scraps”?
I absolutely never throw away any scrap of linen that’s at least 2″ square, because I know I can use it for something.
Mostly, I use scraps for the background fabrics you see here on Needle ‘n Thread for stitch instructions.
And lately, I’ve been stitching up a lot of instructions and stitch samples. Lots! Yesterday alone, I took 439 photos of about 18 different stitches and stitch combinations in progress and finished.
Before I set out on this particular glut of stitch photography, I was able to come up with a whole pile of scraps perfect for this use.
This is my whole process of setting up a photo session for embroidery stitches.
I like to economize on my time, so I find it more reasonable, time-wise, to do things in batches.
For example, instead of ironing one scrap of linen, putting it in a hoop, arranging my lights, selecting threads, and so forth for just one stitch tutorial, I go in for the long haul – I set up at least two or three days’ worth of work, and I concentrate on just photographing stitches for those two or three days.
I try to look ahead, to see what I’ll need for the blog or for any other material I’m putting together. Right now, it’s the Stitch Sampler Alphabet e-book that is taking most of my time, but at the same time, I’m creating content to share here on Needle ‘n Thread. I’m also thinking ahead to another set of instructions I’ll be putting together in the near future.
So I make two or three lists of stitches I want to photograph.
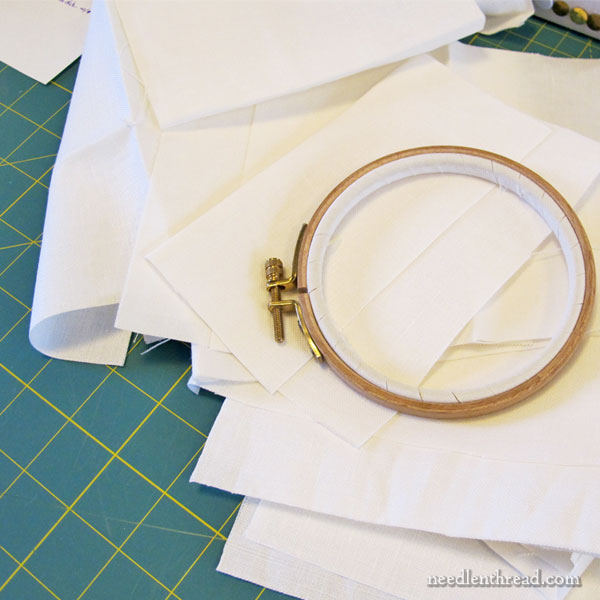
Then, I go through my “scrap box” where I’ve put scraps and any irregularly shaped, poorly cut, or leftover selvage edge pieces of white, off-white, or natural colored linen. I’ve had this box for a while, and it has some pretty good scraps in it.
One particular strip of very good white linen was 5.5″ wide with the selvage still on it. It was about two yards long. That’s a terrific “scrap”!
So I cut that piece into 5″ squares. Each of those 5.5″ squares will fit just fit comfortably in a 4″ hoop.
While cutting, I inspect the scraps to make sure they aren’t dirty, stained, or marked with anything that might show up in a close-up photo.
The scraps then enjoy a little spritz of water and a hot date with the iron, because I figure tutorials that are worked on wrinkled or floppy-loose fabric tend to look unprofessional and sloppy.
I used to go through the whole rigmarole of neatening the edges of these scraps on the sewing machine, always afraid that a stray thread from the edge would catch in my stitches on the back and muck things up while I was in the midst of a photo session. Now, I don’t do that. I just remove stray edge threads and keep an eye out for any developing strays during the process.
I gather together three or four 4″ embroidery hoops with the inner ring of the embroidery hoop bound with twill tape. This is important, because the twill tape helps to keep the fabric nice and taut during the stitching process.
Another tool that I keep close by is a screw driver, so I can really tighten up the ring of the hoop to avoid fabric slippage.
I’m pretty obsessive about the whole taut-fabric-in-the-hoop thing while I’m taking pictures.
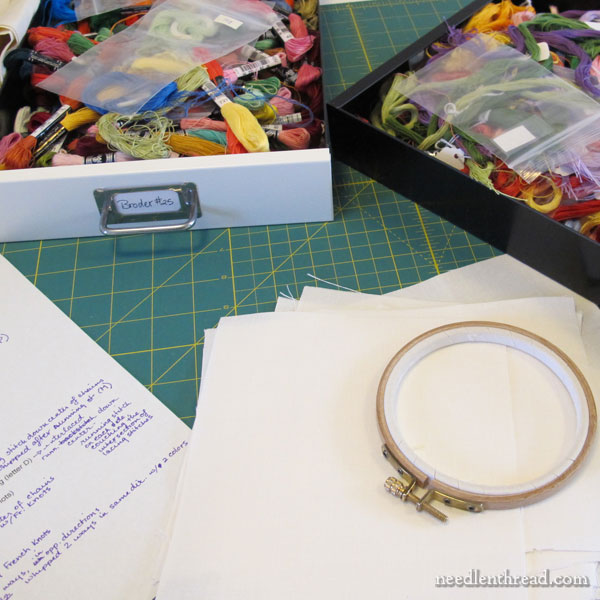
For the particular stitch photo session I’m currently engulfed in, floche and coton a broder are my threads of choice, so I have both drawers of threads on my work table within easy reach.
Some samples I’m working on require a mix of colors, so I select those colors ahead of time and set them aside, ready to go when I’m ready to stitch that particular sample.
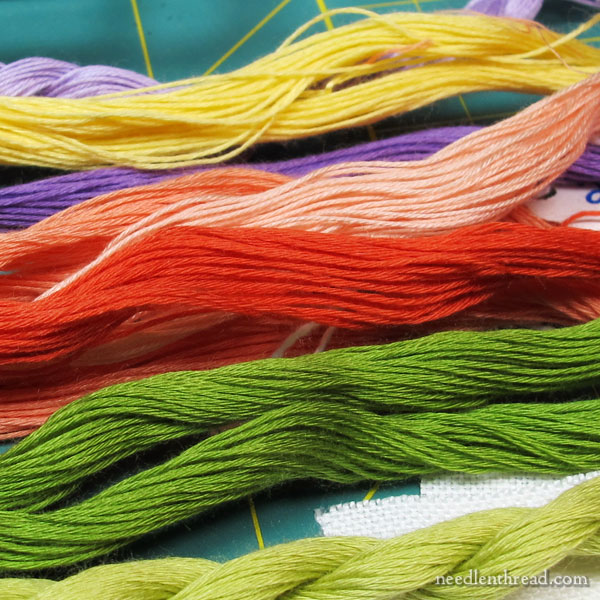
For other samples, I try to select thread colors that I know will photograph well. For example, certain blues photograph better than others. Medium blues, teals, medium and darker greens, corals (as opposed to straight-out red), medium and dark pinks (but not hot pink), medium to medium-dark purples (but not really light purples or really dark purples), darker bright yellows or golds all photograph pretty well. But really soft pastel colors are difficult to see clearly in photos, some very bright colors (like hot pink) end up looking weird, and straight reds, for some reason, are iffy.
You don’t always see the problems with thread colors until you start editing photos. And by then, if you can’t come up with a clear shot that shows the exact movement of the stitch that you’re trying to demonstrate because the color is too weird, you end up wasting a lot of time going back to re-stitch the sample.
There are a few other things on my work table during a stitch photo session.
I keep a notepad and a pen close by, so I can jot down anything I need to remember for later.
I have a pincushion full of needles of various types – crewel in several sizes, milliner for French knots and the like, and tapestry, for any laced or whipped stitches.
I have two pairs of scissors on hand.
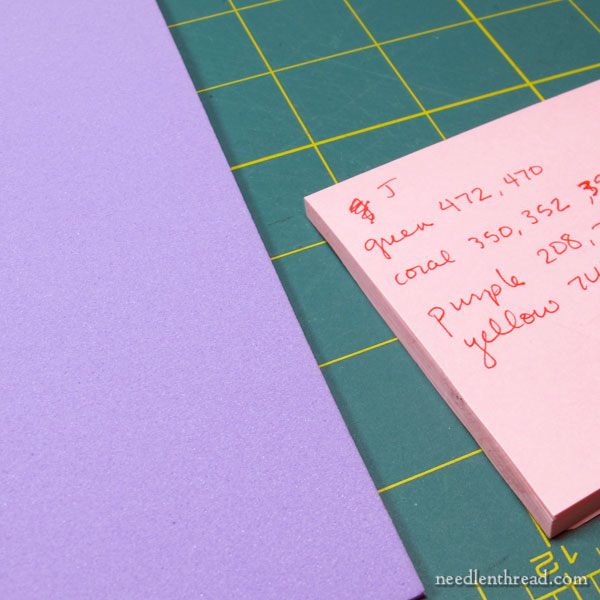
And I have that purple thing in the photo above – only it’s not always purple. Sometimes it’s green, sometimes it’s blue, sometimes it’s white – it just depends on what I’m photographing and how I’m photographing it.
I love that purple thing.
With everything set up, I’m ready to start stitching and photographing samples. I turn on an audio book or some good music, and I’m good to go for a three or four hour stretch of stitching and photographing, stitching and photographing, stitching and photographing.
It goes like this: one tiny step of a stitch – and then the camera. Then the next step of the stitch – then the camera.
As you can imagine, it takes a while to get through a stitch sequence!
And since I’m no professional photographer, I rarely get the photo right the first time. The sequence might sound like this:
(One tiny step of a stitch). Click. Click. Click-click. Click. (Dagnabbit!) CLICK. Click. Click click.
(The next tiny step of the stitch.) Click. Click. Click. Zoom. Click-click. (Riffemrackemfrickemfrackem!). Click. CLICK.
Once I’ve got all that stuff out and set up, with all my lighting arranged and supplies laid out, I’m not too keen on switching back and forth between the photo sessions and other projects.
So I suppose that’s my excuse for not updating you lately on the hummingbirds or the redwork runner. I estimate two more days (today and tomorrow) of stitch sessions. Then I can put it all away and get back to project photos.
Someday, I’ll have a space where I can set up my photography stuff and leave it up – a whole station where I can do projects like this without taking up my whole work area. But in the meantime, I do it this way.
And for now, it works for me.
So that’s what I’m up to. What are you up to with your needle and thread?
Whatever it is, I hope you have a glorious weekend doing it!
What am I up to??? Well, normally I have a few projects going at once so I can switch if my mind needs it. I try to keep a project for the go, but do not have one and as I am going to be off this morning to see my hubby in the hospital, I have been trying to find one to put together to go! Hopefully I won’t need it as I hope he will be coming home with me instead….love you blog/posts.
Just want to add well wishes to your husband. Hope he’s home with you soon and that all will be well.
Mary, I learn something from you every day. Thanks so much.
An awful lot of wonderful and helpful work, Mary, and that’s why you have a special place in your reader’s hearts.
Facinating! And we get the enjoy the fruits of your efforts, and refer back to them (sometimes several times). Thank you for sharing, that Mary. (LOVE the “Riffemrackemfrickemfrackem!”!!!!!)
Dear Mary
Your scrap fabrics and stitch photo sessions are really enlightening all that work for US you are so generous and what a good idea to use up scrap fabrics for stitch samplars,I have mine but I never know what to do with them, this is a good idea to use them for stitch samplers. I like the purple thing but what is it used for. You certainly are hard at work with all the threads, needles, scissors and of course the camera,I do hope there are not to many Riffemrackemfrickemfrackem or Dagnabbi while you are stitching click clicking, stitching and zooming and stitching. I’m in the process of embroidering a flower from Trish Burr’s Colour Confidence book it is taking a while because it is all L&S stitch which I am very slow at. I do hope you can get some best in between all this clicking and zooming. Have a good weekend.
Regards Anita Simmance
Hi Mary — I agree with Anita. That’s a lot of work you do for us, so I’ll add my thanks. My current stitch activity is your tulips and carnations, which started out as a planned pastel design and quickly switched over to vibrant colors with red as the main ingredient. It’s going slowly because there are always other non-stitch things to do, but I look forward to working on it each day whenever I find the time. Oh yes, and you’ll be happy to know that you made me purchase another book — the wee dolls book. I saw that posting and thought I’d better not read it because I could get hooked. Then I thought about it some more, read it, and ordered a copy of the book. Your fault!
OK, I read through it twice but I don’t see an explanation for the “purple thing.” 🙂 It’s a very nice color but I’m wondering how you use it. Hmmm? 🙂
I use it for a background when I need something solid colored. I use different colors, depending on what I’m doing. It doesn’t reflect light, so I don’t get a glare, etc.
I also save square or rectangular leftovers, but one thing I get more frequently are long 1 or 2 inch wide strips from trimming. I usually use fabric sections larger than I need, so I end up trimming. I take a half dozen or so of those strips and tie a knot in the middle, making it look like an octopus. Then, I toss it on the rug for my cats. 🙂 They love to “kill the scrap-to-pus”. 🙂
HOW did I never think of doing this!? You are a genius!
I currently don’t have an embroidery project going because I’ve been busy with school and the like. I’ve been browsing around for inspiration, patterns, etc. for fair projects. I’m thinking a carousel horse – or a bicycle – or both? Probably not both. So, I’m not really working on a project yet, but I do have ideas! 🙂
Hope your stitching and photographing go well!
Have a great weekend,
Sarah
I’m making two twin size quilts for my granddaughters and they have no idea about this. 35 blocks in each quilt & each quilt has 24 blocks with a photo of themselves in them. I’m embroidering with seed beads on the blocks and I haven’t embroidered since before grade school. I want to thank you Mary for all of your hard work and teaching, which is going to help make my quilts look so much better.
And I am looking forward to purchasing your Lavender Honey & Other Little Things in the near future. Beautiful work!
Any chance you’ll share photos of the quilts when you’re done with them? What a wonderful keepsake for your granddaughters!
Hi Mary — I recently finished the instructions for my first design that I will teach and sell. When I was trying to document some of the stitches, I found I needed a third hand. So I bought an Irwin 4-in-1 Vise from my local hardware store (under $20). After cleaning the jaws to remove as much grease as possible, I put tourniquet tape on the vise jaws to protect my hoop. When I needed to take the picture, I put the hoop in the vise, then shot the pictures I needed. It seemed to very well so I thought I would share. The one thing you didn’t show in your article above that I would be interested in seeing, is your lighting set up. Would you mind publishing a picture of how you did that? If you want to see my vise in action, I can send you a picture via email.
Hi, Pat – I have a hoop clamp, too – but if I’m taking video or photos where I know I need both hands free, I’ll set up fabric on a frame and work on a stand. I just hate to use larger pieces of fabric for that, unless I know I can make good use of all of it. My work lights work great for taking photos. These are the ones I use: https://needlenthread.wpengine.com/2012/12/good-craft-lighting.html
Don’t laugh but…
I thought since I was in between projects and I found a pattern I really liked. I would start planning Christmas ornaments for this year. I always tie hand made ornaments on my canned goods gift baskets. This year they will be embroidered using your Stitch Fun bullion stem stitch (what a great stitch) with threads from Lorraine at Colourcomplements. I just LOVE her hand died threads. Thank you so much for turning me on to her and for all your stitch tutorials!
If it makes you feel any better, I work on Christmas ornaments all year. In fact, after I finish a few current projects, temari balls are slated for April.
But what IS that purple thing?
It’s a flat mat – I have different colors I use for backgrounds, when I want a solid colored background that doesn’t show a pattern (like the grids on my cutting mat that’s on my work table) either behind the work, or in the background. It doesn’t glare or reflect light so it works great.
Oy, I can understand how tedious the photography process must be for you, but the rest of us certainly appreciate it!
Currently, I’m working on hand-embroidered covers for books I’m re-covering/restoring. While this sort of thing isn’t anything new for me, I’m experimenting with coloring some fill areas, so it’s taking awhile. The eight million details, steps, and considerations involved are seven million, nine-hundred and ninety-nine thousand too many to even bother with explaining!
So, as sanity-savers, I have a just-for-fun piece of embroidery loaded in the hoop, and my niece’s quilt ready for some quilting…
(Oh, and I am getting better about saving scraps. I used to save anything larger than 1″ square, because I always find a way to use those little, bitty pieces….but then I spent a month sorting and cleaning out the scrap bin and have changed my ways. Now, if it’s smaller than 2″, I toss it. That’s progress, right?)
Hi Mary,
When it comes to your lighting (Blue Spectrum), how do you think they compare to the Stella? I sort of thought I’d try saving up for a really good lighting and while I don’t think I’ll be doing any photography of my work in the same sense as you and Pat K, one never knows.
Thanks, I learn so much from you.
Jayne
I like it better. It’s a larger light and the light is brighter. The stella is good for a small task lamp. But for regular, good lighting, I prefer the BlueMax.
My current project is a small cross-stitch ornament/card, bought on clearance a few years ago. I can take that to work, unlike the sewing projects that have occupied most of my free time at home lately.
Scraps – anything larger than about 2″ wide is kept for ornaments or stitch practice. Otherwise out they go.
The purple thing – is that craft foam? You had me looking for few seconds, until I realized what you were referring to. There’s a stiletto type sewing tool called Purple Thing (Thang?) I was looking for 🙂 .
Hi, Gail – yes, it’s just a large sheet of craft foam… Great to have on hand when photographing!
Gail, the Purple Thang can be found in quilt shops and even at Joanns Fabrics since quilters use them to line up seams as they’re piecing. I have a Purple Thang, but it’s plastic and not nearly as nice as my brass stiletto.
As a quilter, scrap fabrics are my solace and refuge and sometimes my weakness instead of strength. Cottons, linens, wools and tiny pieces as well as large. Some one sent me a picture of a filing cabinet full of file folders with scraps organized by fiber and color. I thought was helpful, but I would like to know how you save those leftover pieces of floss/threads when they come pre-cut in kits and do not fit on spools. I have lots that are too much to throw out, but I don’t have a great way to ssve them, except to put them into small zip lock bags with the DMC number attached so I can use them later. Do you have a better method?
As you are doing samples of stitches, this is the perfect time to ask about stitches for left-handers. Have you ever done any? I have a book titled “A Primer of Left-handed Embroidery” dated 1974. It works but would be much improved by color.
Hi, Jean – you should look up Yvette Stanton’s Left Handed Embroiderer’s Companion – I reviewed it here: https://needlenthread.wpengine.com/2009/12/left-handed-embroiderers-companion-by.html It’s excellent!
I so admire your photography skills, especially when I try to take good photos of things that I have finished. It’s a hard thing to do right. I’m finishing a quirky project – a small piece of cream silk jacquard furnishing fabric in a texture of swirls that I’m embroidering over in Au Ver a Soie d’Alger (oh, the poor, poor things!). I’ve chosen pastel colours and stem stitched within the swirls, and satin stitched the dots! Will turn it into a soft zipped pouch. At the same time I’m going through my base fabrics to find something for Sachiko Morimoto’s Olive pillow (from ‘Stumpwork Flowers’). I’ve done the stumpwork stitched leaves – my first, and I now have a sense of achievement. All this, putting off the beaded wedding dress. Always looking forward to your next post!
Mary ~~ REALLY enjoyed reading about your process and thanks for sharing with us. I always find myself so curious about how you do all this while explaining things so well and creating a gorgeous image to boot !
bravo
chris in san francisco
Thank heavens for digital cameras!!! LOL, I understand your pain, after having to photograph paintings and trying to get the color right.
I am working on a small painting/embroidery piece which is nearing completion that I am not at all happy with and have considered just tossing, but then after all that work, so I persevere and am looking at it as a learning piece. I also had to run errands this morning so decided to try and work on a small piece from my new book (oh, you are such a bad influence on my terrible addiction for books! LOL) Trish Burr’s mini needle painting this weekend and went in search of the correct colors (thank you for your Guterman chart). Well, I found the Guterman, but the local stores did not have hardly any of the colors needed. I went to 3, and was only able to find about 5 of the many colors needed so that was disheartening. I ended up just going with what I could find and thought might make a good piece. I will cross my fingers. Hope to start it tomorrow.
Thanks for all your patience and hard work for us Mary.
Mary, you put an enormous amount of work into your photos, and this shows in the wonderful results – they are always so informative and useful. Scraps? If it’s big enough to stitch it goes into stash; if it’s not, it goes to a childcare centre for craft sessions. Current projects – I usually have a few on the go, not counting knitting (one): a large pulled fabric cloth; a middling-size heavily cross-stitched work bag; and your long-and-short stitch tutorial (just started).
Mary,
guess where this blog led me to? The year 2009, yr. video on binding the hoop! Took me a while to work out that instead of torturing the fabric I should re-bind the hoop, but it’s done now. So thanks and thanks for also re-teaching me the art of lateral thinking. You are legend!
Dearest Mary, please know how much we all appreciate your professionalism and expertize. And now we know the efforts that go into your excellent instructions. The results truly show!
I’ve been meaning to write to you to tell you that after many years of lurking here, I am now embroidering again, and it’s bringing me such joy. I went through two carpal tunnel surgeries and it took several years of recovery and — finally — an arthritis medication that works, but my fingers seem to be working well enough to pick up my stitching again. Amazingly, there is embroidery “muscle memory!” It’s such a pleasure to pull out my old tools and threads and play!
Thank you for your inspiration and your generous sharing of your knowledge.
Giuditta
Ah, Giuditta! Welcome back to the wonderful world of embroidery! I’m glad to hear you are stitching again!
Oh Mary, you just tickle me so! I read your “photo session” to my 15 year old son. He enjoyed your humor as well. I hope you truly know what a blessing you are.