


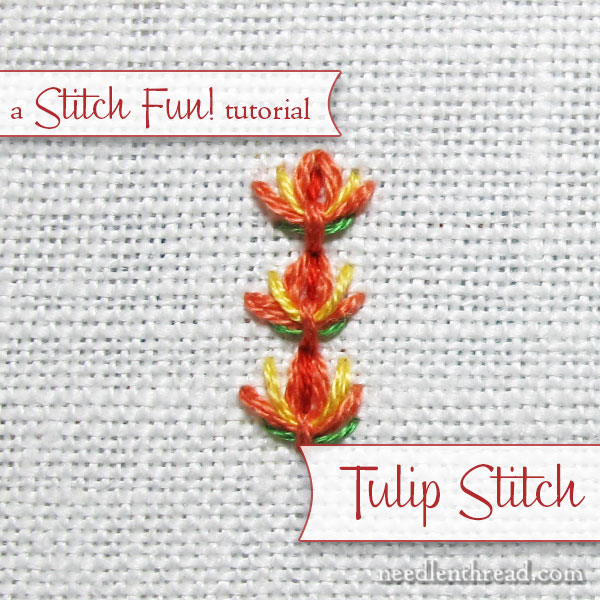
For your weekend stitching adventures, here’s a super-simple, really fun stitch with a whole lot of options for further experimentation.
The stitch is called tulip stitch – it’s a slipped, detached chain stitch, and while it can be worked singly, as a detached, lonely stitch, it also works up well into a line stitch.
Tulip stitch works well as an individual accent stitch, but it can also be worked in lines, in gentle curves, for seam treatments in crazy quilts, on lettering, in garden landscapes, as borders, and I’m sure you can come up with many more possibilities!
Ready?
In this tutorial, I’m working on linen, using stranded cotton and a #7 crewel needle.
I played with different colors of thread with this particular tutorial, but don’t limit yourself! You can mix up colors and incorporate different weights of embroidery thread, too, for a variety of results.
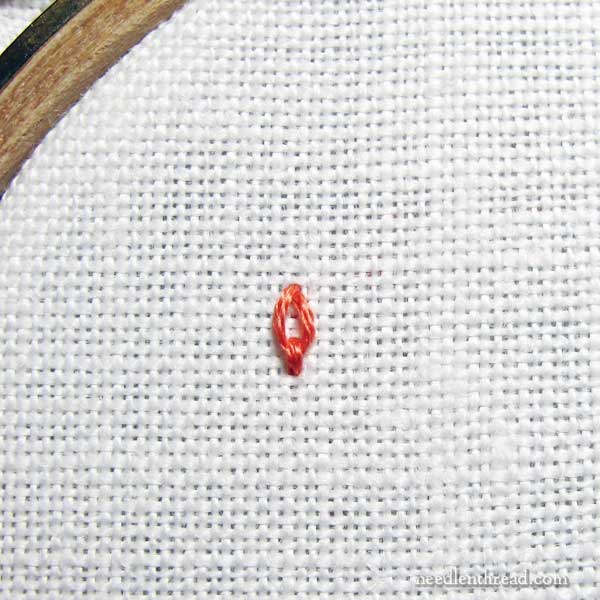
The stitch begins with a simple detached chain stitch (or daisy stitch), which I’ve worked above, using three strands of floss. You can find a video tutorial for the detached chain stitch here.
To get the tulip effect from which the stitch gets its name, the daisy stitch should be worked so that the anchor stitch is below the beginning point, or tip, of the chain stitch, as shown in the photo above. In short, you want the pointy part pointing upwards.
If you aren’t shooting for a tulip effect, it doesn’t really matter what direction the stitch is going in!
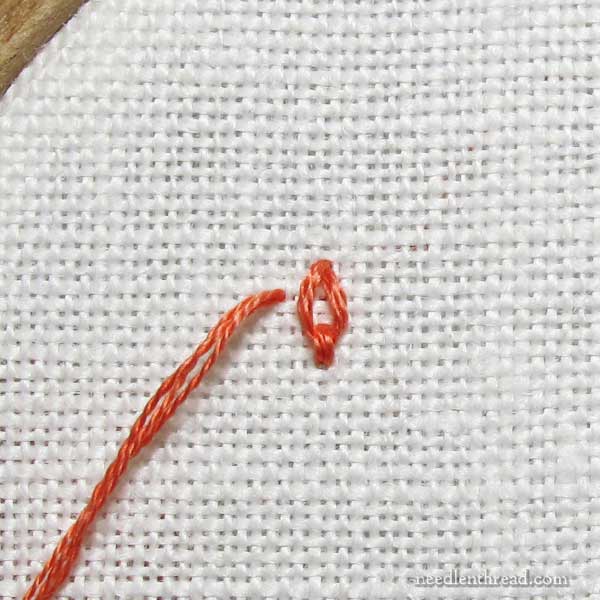
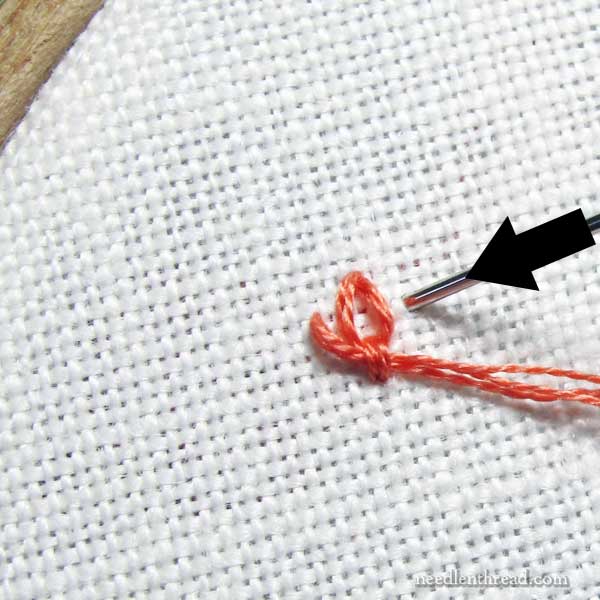
The next step here is where the “slipped” part of the name (slipped, detached chain) comes in.
When you slip a stitch, you’re just slipping in another element into an already-stitched stitch. I’ve brought the working thread up on the left of the detached chain, a little over halfway up in this case…
…and now I’m going to slip the thread underneath the anchor stitch on the detached chain, by passing the needle inside that anchor stitch without picking up any fabric.
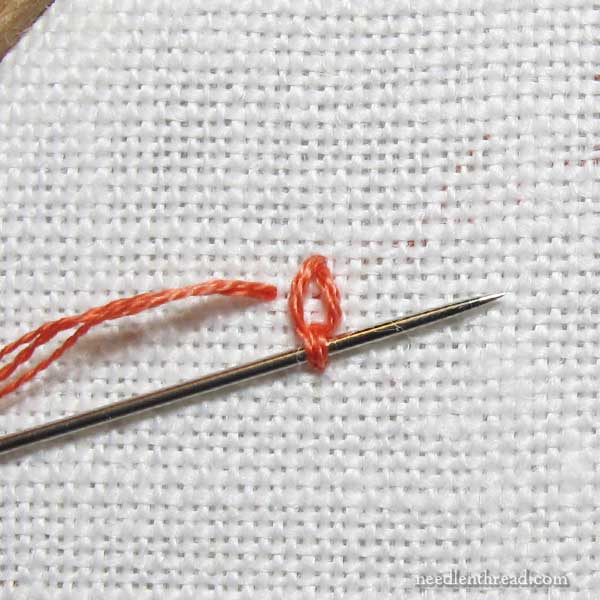
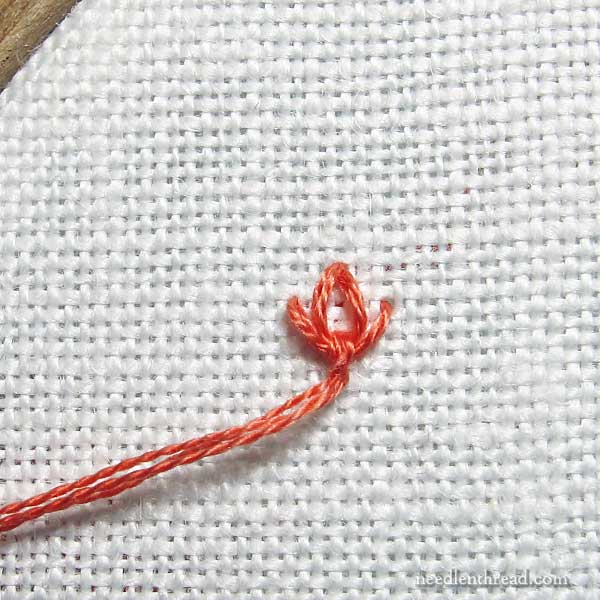
And now the needle and thread pass to the back again, just on the other side of the detached chain, directly across from where the thread just emerged.
When pulling the thread to the back, try not to put a lot of tension on the thread. You want the slipped stitch to cup around the base of the detached chain.
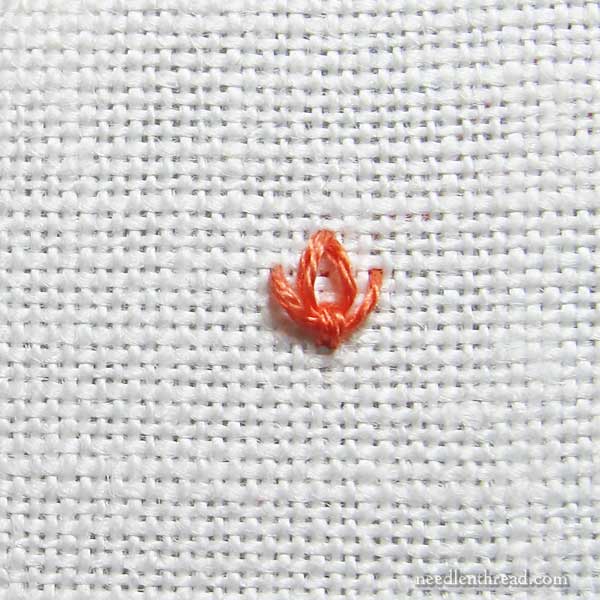
And that’s the tulip stitch in its simplest form – a very easy stitch!
This is the type of stitch you could scatter nicely in an open, airy area as an isolated stitch – much like tête de boeuf stitch (or bull’s head stitch), which is a detached chain with small slanted straight stitches on each side of it.
But let’s go ahead and take the stitch a little further, turning it into a line stitch.
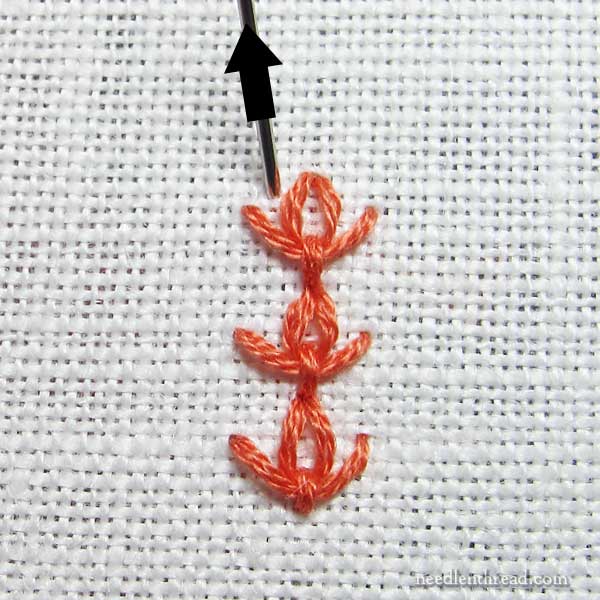
To continue the tulip stitch in a line, bring the needle and thread to the front again, coming up in the same hole shared by the base of the anchor stitch from the previous detached chain.
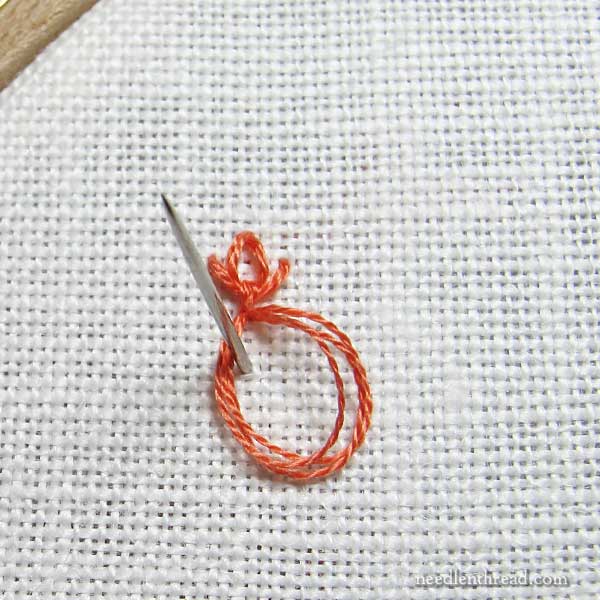
Make a new detached chain stitch. In the photo above, I’ve gone down into the same hole I just emerged from, and I’ve left a small loop on the top of the fabric. I’m bringing my needle up inside the loop, to create the chain stitch.
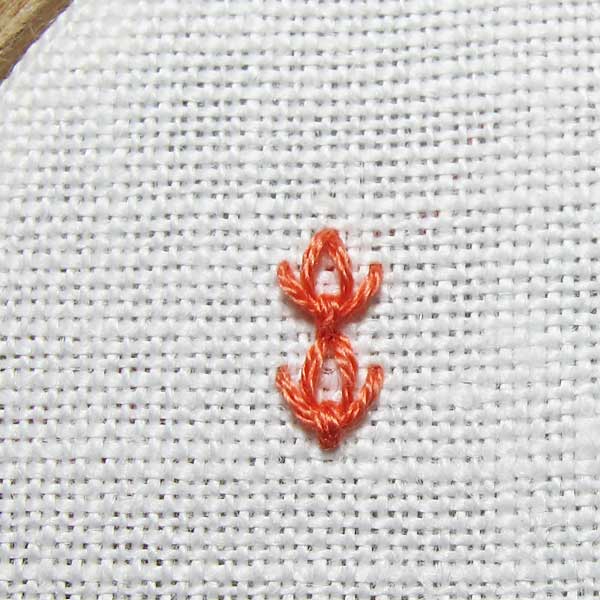
Here’s two tulip stitches worked in a line.
You might be tempted to think that the detached chain stitches are no longer detached chain stitches, since they’re worked in a line. But, in fact, each chain stitch is created separately – they aren’t interlinked at all. That’s why they’re still called detached chain stitches.
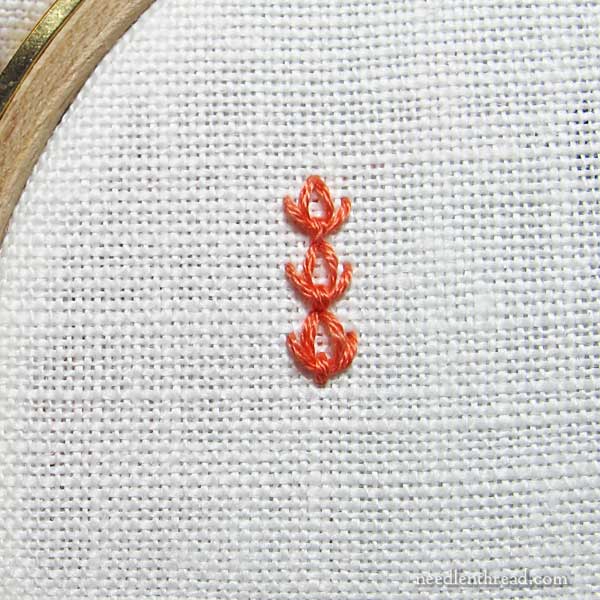
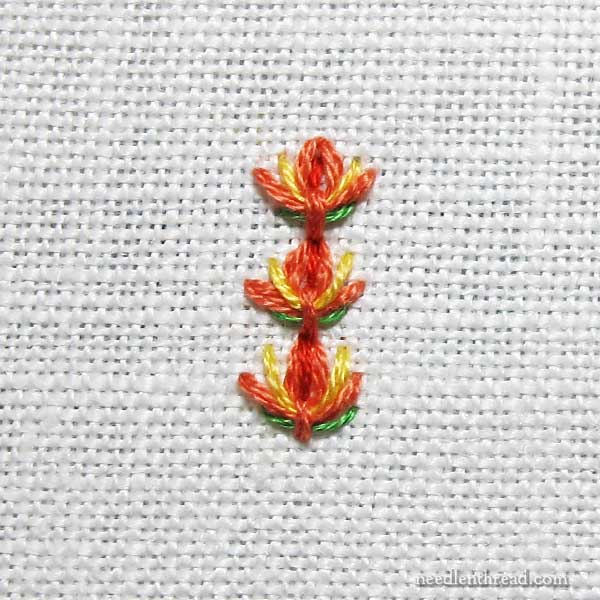
And here you have three! Cute, aren’t they?
Now, we could leave them just like this – it’s a nice looking stitch, very simple, and it makes a nice line stitch, too.
But let’s embellish it a bit more, shall we?
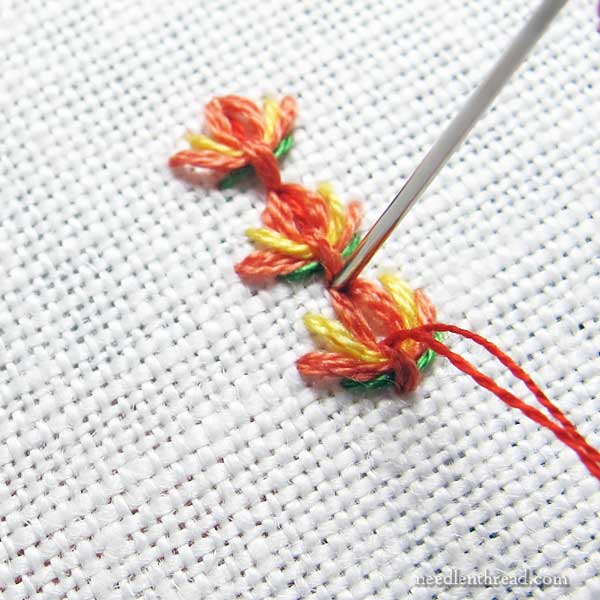
I’ve switched to a yellow thread here – three strands of yellow DMC in the needle – and I’m coming up just to the left of the chain stitch, a little higher than the first slipped stitch.
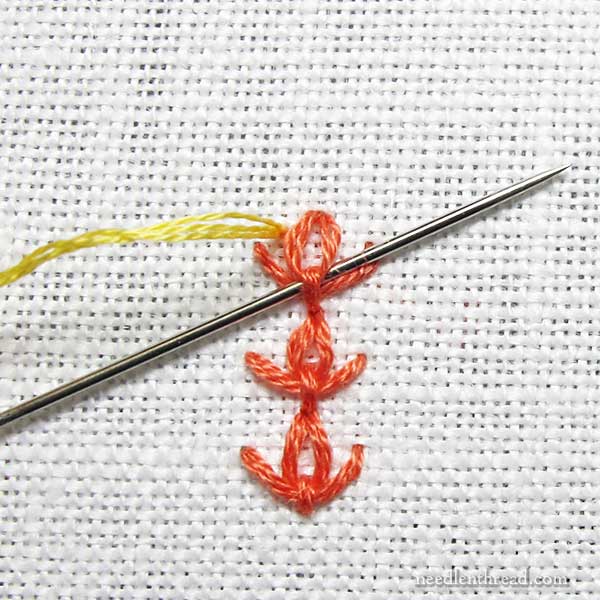
I’m just going to slip a bit of yellow in here, the same way I worked the first slip stitch, by passing under the anchor stitch and taking the needle and thread to the back opposite where I emerged.
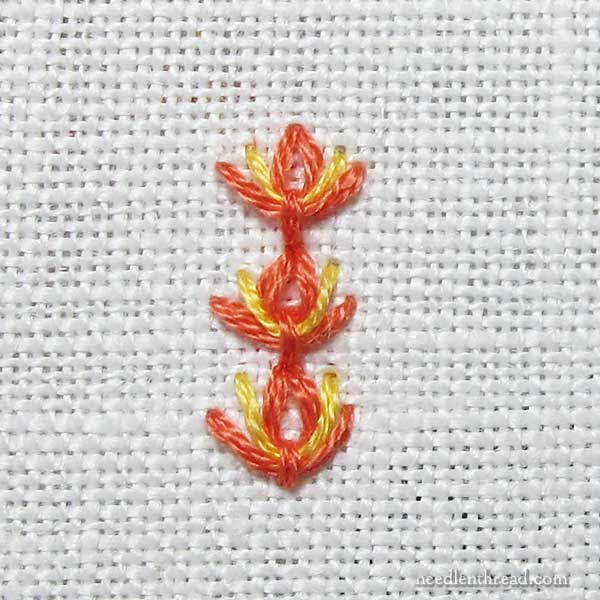
Here you have the three stitches, slipped with yellow.
And we could leave it there, but…
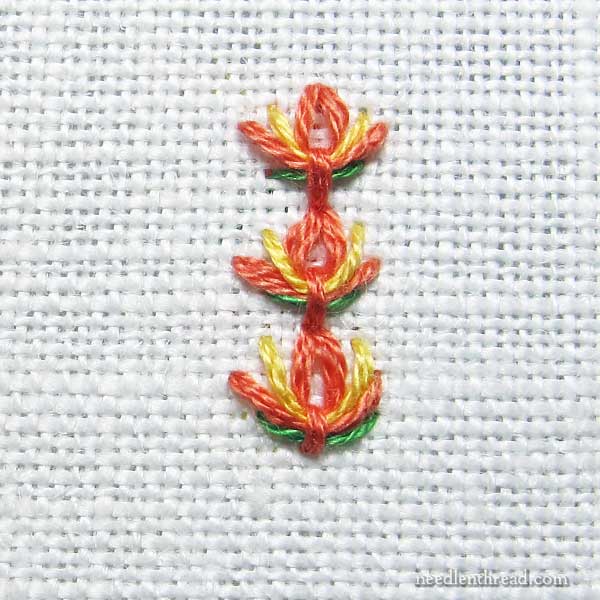
…why not add a tiny touch of green at the base of each, to give it a floral note. I used two strands of green, to keep the green slipped stitches a bit more subtle.
And, yes, we could stop there.
But I wanted a little depth of color in the middle of the tulips, so…
…I backstitched in red (two strands) in the center of each detached chain, bringing my needle to the front at the top of the anchor stitch and taking the needle and thread to the back at the tip of the tulip, and working down the line.
Perhaps this isn’t the best color combination. The red doesn’t show up that well and the yellow is a bit lost. Good excuse for me to play with the stitch a bit more!
But now it’s your turn to try it – what will you do with it?
You could enhance the flower look by working another slip of green in there, smaller, pointing downwards. You could also get really fancy and work a small bullion stitch in the middle of each chain.
You could try the stitch with a twisted chain stitch for the starter stitch, to give it a bit more of a flip at the tip of the tulip shape.
You could stray from the tulip look and tip the slipped stitches with French knots, to create a fancier, fuller border or line.
Like I said, lots of possibilities! I don’t think I’m quite finished playing with this particular stitch, come to the think of it. While writing up this tutorial, I’ve had about ten ideas that would be fun to try.
Woe is me – I think they call this problem Stitch Addiction!
Looking for more embroidery stitch tutorials?
If you’re looking for more hand embroidery stitching tutorials, you’ll find heaps of them right here on Needle ‘n Thread. In the How-to Video index, you’ll find over 75 video tutorials for embroidery stitches; and in the Stitch Fun Index, you’ll find almost an equal number of step-by-step photo tutorials for fun stitch combinations and explorations.
And I’m always happy to take requests, if you have a particular stitch or technique you’d like to see demonstrated in a tutorial. Feel free to drop me a line or to leave a comment. I’ll add it to the list and do my best to work up a demonstration for you.
Enjoy the weekend!
So fun! Thanks Mary.
Thank you Mary for this.
I can see so many uses …for me.
And I want to teach this to our Youth Guild ( the Capital Running Stitchers) as we have been doing black work and this would just to sunny and bright and colourful.
Regards, Nancy
Hi, Nancy! Oh, good! I’m glad you like it – and I think it’s a great idea to teach it to the youth guild. Hey, you’re lucky you have a youth guild! I’d love to hear more about them!
Tulip stitch – I’m Dutch, it’s spring, what better stitch to read about :-)? And it does make some lovely little tulips!
Isn’t it amazing how embroidery stitches (and combinations of stitches) turn up under different names in different places and times; I used the simple version of this stitch in one of my design but because I’d never seen it anywhere before (and because I first drew it upside down compared to yours), I called it Chinese lantern.
Does this doubling of names for identical or very similar stitches (blanket stitch/buttonhole stitch, feather stitch/Cretan stitch etc.) happen when two or more separate stitchers (or communities) come up with the same stitch but choose different names for them?
I think so. This one in particular is documented in a book from the 70’s as tulip stitch, demonstrated as an isolated stitch, if I recall correctly. And of course, the variations are plenty – so imagine if we named each variation?! 🙂
Love the tulip stitch
I await your posts, and you never fail to impress me with the wealth of
Information and historical Insights you share along with the stitch tutes,
Patterns, etc. I would like to know how you feel about re-purposing old
Embroidery kits. I buy old crewel and surface embroidery kits at thrift
Shops and garage sales. I only buy kits that are timeless, such as traditional
Crewel, or flowers and butterflies. I leave the very “dated” looking ones alone.
I take the kit home and decide if I want to keep any of the fibers. Those
I don’t want go into a plastic bag and that goes to the.thrift shop to sell for
Crafters. Then the real fun!! I re-plan the kit choosing fibers from my stash
To suit my taste or the person I wish to gift it to. Then I study the instructions and decide which stitches to use and which to change. Someone at my guild
Thinks this is ruining an old kit, where I feel I am.giving it new life!! What is
Your take on this? I am working on two at the moment. one is a Sunset
Designs kit from 1975. I sponge painted that one before stitching to give the
Background some depth, got rod of all the wool, and am having a grand time
Doing it in wools, silks, pearls, etc. The other is a 2003 kit by C. Barrani.
It was way too funky for me, but love the pony, so out went the wool and I
Am doing her in colors to match my living room, Will send you pictures as I finish them. Thanks for thinking about this topic for me. In stitches, Sue
I don’t think there’s anything at all wrong with re-designing old kits (and even new ones!) and adding your own twist to them. In fact, I think it’s quite a normal thing for stitchers to do, and it makes sense even more so with old kits, because styles and tastes change over time. We also have a whole new range of fibers and embellishments these days, compared to what was available even ten years ago. So I say go for it! Here’s an article on a reader’s work, where she used the elements of the kit, but she went her own course as far as instructions were concerned. The results are a huge improvement on the original intended design in the kit: https://needlenthread.wpengine.com/2007/12/readers-embroidery-needlework-kit-make.html
Anyway, I don’t think there’s anything at all wrong with revamping a kitted design in your own, unique interpretation!
Sue, Personally I think this makes it much more interesting, more fun, and definitely more “yours”. Doing what is “told” to you in the instructions makes a boring, “what everyone else did” piece. Redoing and revamping makes it a “creation piece” to my thinking. It’s yours, don’t let anyone tell you you can’t do what you like with it. Much more fun. (and probably much prettier too.)
A really nice, fun stitch, beautifully explained and illustrated as usual. I truly enjoy your blog and I get so many great ideas from it.
Now this is a stitch that I have never done. It is pretty to look at, easy to do and I will incorporate it somehow in one of my projects in the future. Thank you for the tutorial.
Mary – just so “cute as a ….tulip!!”. Just what I need from the New England thaw. Thank you!!
Beautiful stitch. I also can see it may be useful in what I’ve been “playing” with.
I see in Ilke’s comment she mentions the different names/same stitch. That can be confusing to us newbies. I ran across that with the feather stitch/Cretan stitch when I was working on this latest piece. Looking for ideas of stitches for effects. Had down the “Cretan” stitch, saw feather stitch in another book, thought “that looks just like what I just did”. Finally realized it was the same stitch, different name. LOL.
Dear Mary
I really like this fun stitch on the Tulip Stitch and such an easy stitch to learn, I hope your stitch addiction lasts so that you can tempt us with more interesting stitch techniques. The stitch is so pretty and springy. I’m currently looking at raised stumpwork and attaching it to eggs my juices are flowing I think this would be an interesting embroidery project so if your juices are flowing that way perhaps you could join me, I think, not sure, but I think this would be easy to attach to eggs. Thank you for the tutorial on the tulip stitch and for adding more fun stitches to our collection love it. I hope you have a great weekend.
Regards Anita Simmance
Oh I love it and will try it soon on a crazy quilt patch I have made.
What a delightful article to start my day. The directions are so clear and easy to understand.
I would like to understand more about fabrics you use. I have read your articles and others. Since I am a beginner I do not want to learn on expensive fabric. I bought some muslin but it feels loose.
Any suggestions would be great.
Thank you for this great website.
Mauri R
Hi, Mauri – there are different grades of muslin out there. If you want muslin that isn’t loosely woven, look for high quality quilting muslin that’s about 180-200 thread count.
Mary…what a great stitch! I can’t wait to try in on the crazy quilt book cover that I am sewing! Thanks
How do you come up with all these different stitches? you must be the most creative person on earth. I do so admire your abilities and imagination.
Louse B.
Hi, Louise – I didn’t make the stitch up! I found it in an old book. I just sort of added to it! 🙂
love your tulip stitch. Wait g for the tulips in the gardn to bloom awaiting a robot of Colour very soon. Spring n England. The daffodils Along the verges of the roads in the country.
oops that should have Been a riot of Colour.
Mary, Once again you have shared a nicely demonstrated stitch. When you added your different colored threads how did you anchor them. Did you use a waste knot, or an anchoring stitch of some sort? I am always trying to learn the correct way that you do these, so that when I use this stitch I know what to do. Thanks again for sharing and I look forward to your reply. Louisa
Hi,Louisa – I whipped them around the backs of the stitches already there.
Hi Mary have you ever done trapunito? I,ve never seen this technique before, but watched a poorly explained but interesting tutorial. The stitch used on the picture was a double running back St. And then it was explained the right side of the fabric would show stem St. How can that be? I,m new to embroidery that might explain it. Oh the fabric was double
Well, you threw me at double running back stitch. There’s double running stitch. There’s backstitch. And there’s double backstitch (which is used in shadow work – essentially, it’s closed herringbone stitch on the back). But I’m not sure about double running backstitch. Double running stitch would look like backstitch on both sides. Backstitch will look like backstitch on the front, and stem stitch on the back. Do you have a link to the video?
What a cute cheery stitch to greet us this Saturday (lovely sunny morn in Northern Virginia). I look forward to incorporating this line of stitching within a future worked project. Noelle
Thank you Mary. This will be a neat stitch on my 2 granddaughters crazy quilts. The beaded embroidery in 20% complete on one of the quilts. Also, thanks for the post concerning the completion of work. Looks like I may have at least one to enter into the county fair, hoping for two but getting seed started for the garden is competing for time so we’ll see. I would love to attach ribbons when I give them to them. Have a great weekend! Congrats to the winner on the April 6th giveaway!
Mary I would like to ask your permission to use a design in something that I intend to make to sell. How do I contact you to get your permission? I have great respect for your talent and don’t want to tromp all over the copyright laws by using something that you have created without your permission.
Hi, Carla – you’re welcome to drop me an email! This comment will probably show up in your email, so you can reply directly to it there.
Thank you Mary for your response to my question! First of all I,m truly a novice at embroidery, but learning and enjoy your helpful tutorials. I went back and listened to the tutorial and she definitely said double running back St. So I used google : trapunto #1 noelle petit. She has two videos. Thank you again
I really like the stitch and the possiblities of the stitches from this stitch! Wow! I’m doing a 30’s quilt with Sunbonnet Sue. This would cute on her bonnet and sleeve. Thank you, Mary!
As always Mary, your Stitch Fun is exactly that, fun. I just love this one and can see me putting it as a border around a dress or shirt that I have planned to make this spring. I am not cutting anything out yet as we are going to my husbands mother’s memorial service in Minnesota soon. She lived a long life, 97 years, but it was still hard to see her go. I have lots of embroidery planned out for the trip up and back and am also finally going to tackle bobbin lace. I have a small vintage pillow that will comfortably sit in my lap. The first project I make when we get back I am going to be doing this new stitch on. What fun!
Lindo! Estou começando a aprender bordado a mão livre e muito feliz por ter encontrado seu site.
Muito, muito obrigada!
I just love your “extended” stitches. They really get me inspired. Thank you so much for your ideas
very nice and beautifull stich i like so much thank you madam
Thank you
Sooooo helpful!