


Figure embroidery – the depiction of human figures in embroidery – is the hook that originally got me into exploring surface embroidery in earnest.
I came across a lot of it when doing research for a History of Art course in college, and it absolutely fascinated me. At the time, I already dabbled in surface embroidery, but the exquisite, artistic nature of the figure embroidery that I found in texts, in museums, and eventually in church sacristies and collections really astounded me. It was an art form I had never really noticed before, until I started studying it in earnest. And, like I said, I was hooked. It became a bit of an obsession.
Since then, I’ve collected a lot of Stuff pertaining to figure embroidery – many pieces, gleaned from antique dealers, online auctions, and the like, as well as books the at least touch on the subject (there are no books, to my knowledge, solely devoted to the subject) and pattern collections.
Technology has made the study of figure embroidery from an amateur’s perspective (i.e., my perspective) a lot easier than it used to be when I was in college. Way back then (some 25 years ago), I had a camera – you know, the kind with film? – and as for a computer… ha! I thought I was pretty advanced to have an electronic typewriter in my dorm room. And while I had access to computers, they certainly didn’t do what they do now. If I wanted to study a piece of figure embroidery up close, I used a magnifying glass.
Now, my favorite tools for getting really up close and personal with pieces of old embroidery are my camera and my computer.
This particular piece of embroidery which I acquired off eBay for practically a song is a good case in point.
When a piece of embroidery like this is listed on eBay, it’s pretty hard to know exactly what you’re getting. But from the photos in the listing, it looked like an intriguing piece worth bidding on, if it didn’t go too high. It didn’t.
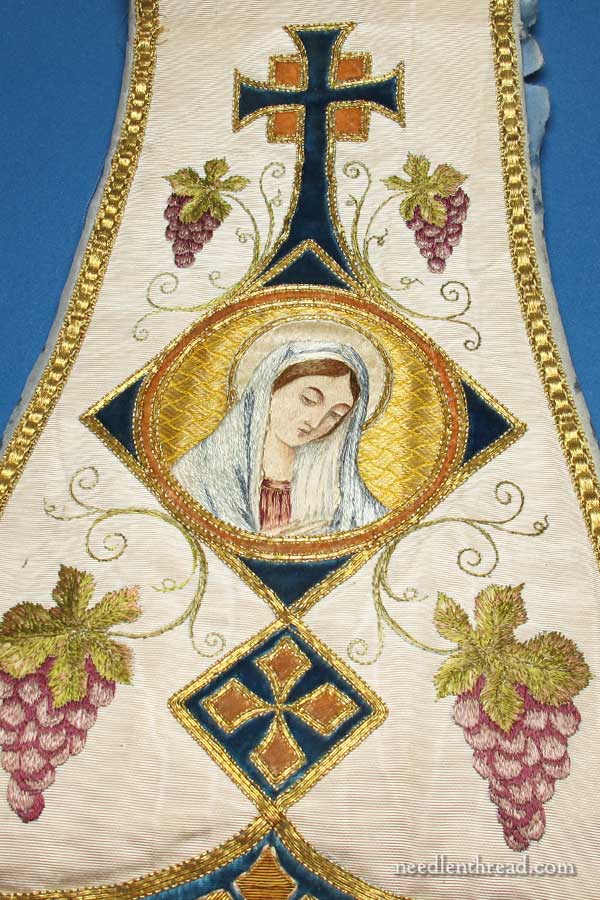
This is one half of a stole, which is a long, normally narrow liturgical vestment worn by a priest around the neck and down the front. It’s normally decorated on the ends, which is the case here. There’s another half of this stole, but unfortunately, the whole stole was cut in half by the previous owner, and folded and glued so that the decorative parts could be displayed in a case. That’s why it was inexpensive.
The ground fabric on the front of the stole is in ok condition – not great, but I’ve seen worse – but the lining is torn, faded, and rotting…and encrusted here and there with glue.
When I saw the pictures on eBay, I was especially intrigued by the figure embroidery. It looked quite fine, and considering the scale, I knew it must be extremely delicately worked.
The scale? Well, here’s some perspective:
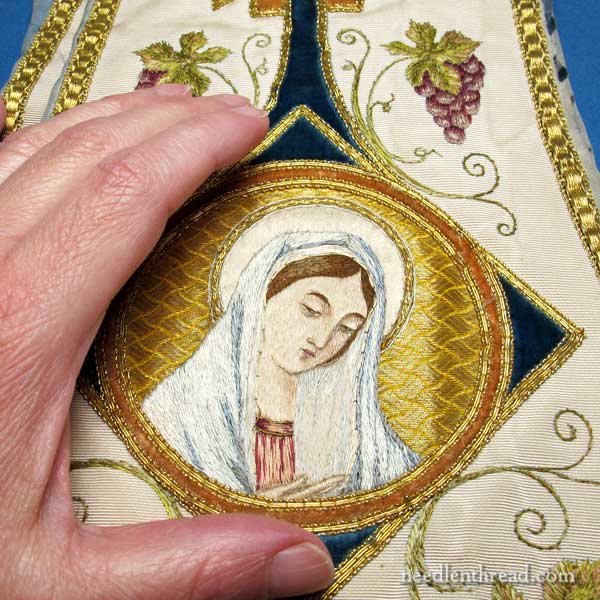
You can click on any of these photos for a larger image.
So there it is, with my hand in the photo. The diameter of the outer circular frame is less than 4″. It’s a small piece of embroidery!
Examining such a small piece of embroidery and understanding how it was worked and assembled (there’s a bit of appliqué going on in the whole piece) could be done several ways.
I could take the piece apart – but that would be a shame!
I could pore over it with a magnifying glass – which I initially did do.
But even better – I could take some good digital photos and examine them on my computer, zooming in much better than I ever could, viewing under a magnifying glass.
While examining photos won’t give me structural details, it will allow me to view the embroidery in very clear detail and come to some conclusions about it.

At first glance, with the naked eye, the piece looks entirely embroidered. Even with a magnifying glass, unless you know what you’re looking for, you might think the piece is entirely embroidered.
In fact, it’s not!
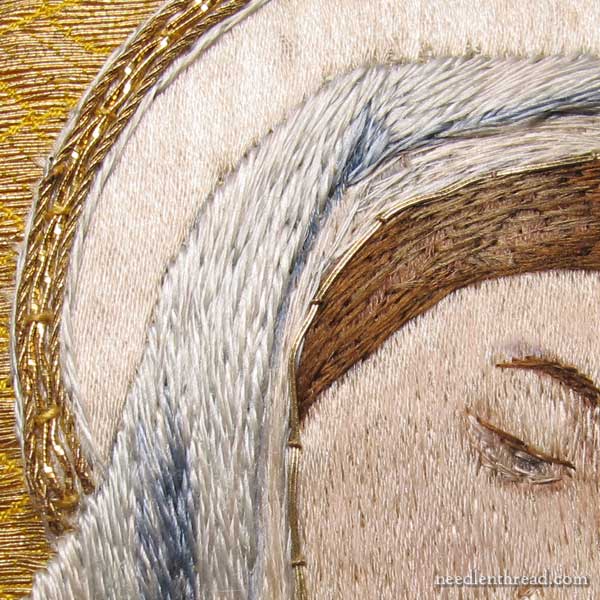
This small face – no longer than 1.25″ – is one of the best examples I’ve seen of what I call Sneaky Paint. The figure is actually painted and only touched here and there with embroidery.
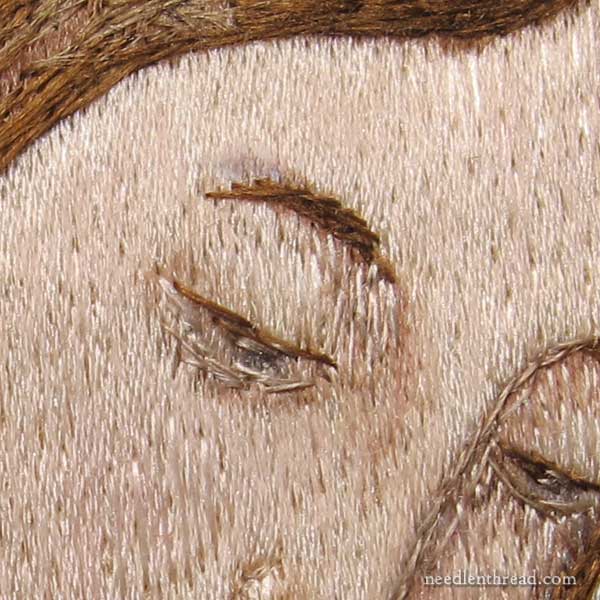
You can definitely see the stitches.
And you can see that the whole “ground” of her face looks fibrous. You can see shading around the eyes, highlights on the cheeks.
The shading around the eyes is painted. The highlights on the cheeks are stitched.
Notice the eyebrow in the photo above. The embroiderer took some liberty and changed the path of the eyebrow, which I think was a good decision. Otherwise, the eyebrow would have looked slightly arched, making the face look smug.
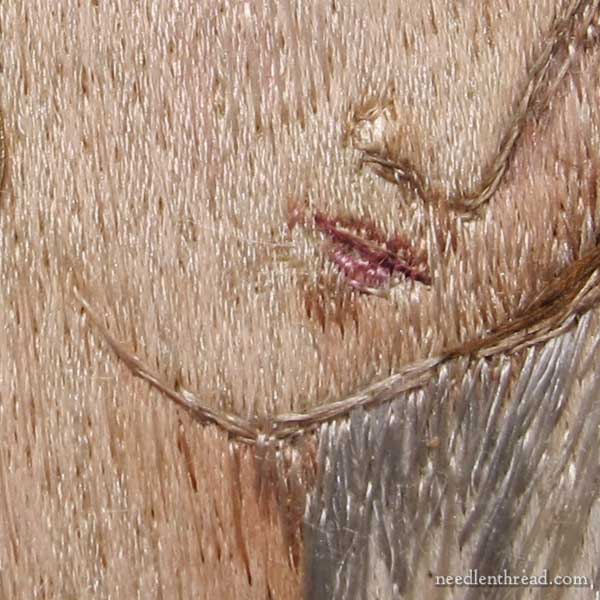
Here, you can see the delicately stitched mouth in shades of pink, and the outline of the face and the nose, along with stitching on the cheeks and the neck. You can also see the embroidery on the inside of the veil. You can tell that the embroidery is worked in flat silk.
Under a magnifying glass, you can see the threads of the fabric that give the whole piece a completely-embroidered look. In the digital photo, though, you can zoom in enough to see that the fabric threads are definitely fabric threads – they aren’t embroidered. They’re the ground fabric.
You can get a better idea of the ground fabric without any paint or embroidery on it by looking at the halo on this piece, which is just the plain ground fabric.
You can see where the embroidery splits the weave of the fabric along the top of the veil.
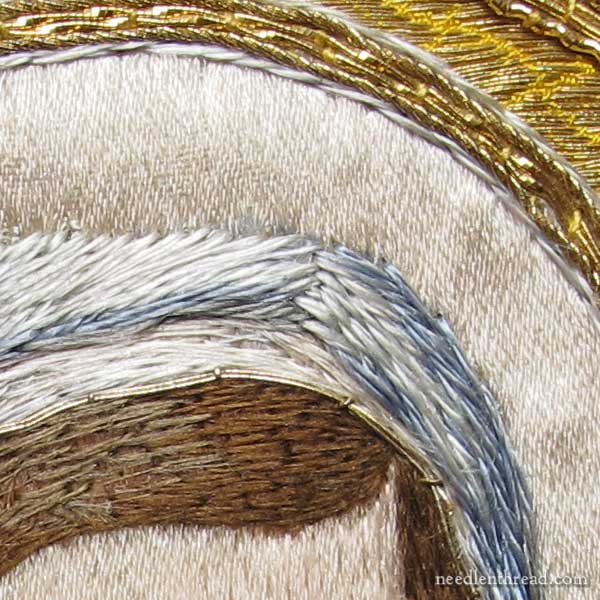
This is something you don’t really notice with the naked eye. When you zoom in on it in the digital photo, you can clearly see that it’s fabric and it has a woven pattern to it. Even with a magnifying glass, this isn’t absolutely clear.
My next point of examination is going to be the fabric itself. What fabric was used on this piece, to create such a perfect illusion of solid embroidery? I have my suspicions, but it’ll require some more photography and some fabric comparisons before I can be sure. I’ll let you know what I discover, if you’re interested!
Equipment
If you want to examine embroidery up close with a camera and you’re not really into complicated photography, don’t worry! You just need a good 10 (or greater) megapixel camera (a point and shoot is fine) with a macro mode and very good lighting.
Then it’s just a matter of loading the photos onto your computer and using the zoom button!
Like what you see?
If you enjoyed this article and you’re looking for more inspiration, information, and instruction on hand embroidery, why not sign up for my daily newsletter?
There are all kinds of reasons to have Needle ’n Thread delivered to your inbox – check them out and sign up today!
how old do you think this piece is? Was it made in U.S.A. or somewhere else?
That was fascinating, thank you. I wish I’d found your web site a long time ago, it’s such a valuable resource. You’re very generous with your knowledge and I’ve learnt lots already, thank you so much 🙂
Fascinating! Yes, I definitely want to see what else you find out.
Mary, when do you suppose this piece was done? Can you tell by the fabric, the paints used, or the thread? Thank you for sharing!
Hi, Flavia – well, I think the design style is more of a give-away. It’s very Arts & Craftsy, so I’d say anywhere from the late 1800’s to the beginning of the 1900’s in there, somewhere. Vague, I know!
This really is fascinating, thank you.
I may be wrong Mary, but I think this is part of a ‘Maniple’ worn by the priest of the Roman right when saying Mass….
“Common symbolic comments refer to the maniple’s likeness to the rope by which Christ was led and the chains which bound his hands.”
Amazingly beautiful.
Hi, Margaret – Thanks for your comment! No, it’s definitely a stole. Even though it’s wider at the base than most stoles are today, the modified “shovel” shape here is just towards the end – the rest of the length of the stole is folded up and you don’t see it in the photo, but it’s about 4.5 – 5 feet long, which is far too long for a maniple. This is a typical shape for a stole from a “Roman” style vestment set common before the 1960’s.
Thank you for sharing your knowledge. This is the first time I learnt about this particular type of embroidery.I would love to know more about your discoveries.
Linda peça! seu estudo da vida a bordadeira e conhecimento para todos. Parabéns.
Mary, are you familiar with a book by Valerie Harding, “Faces and Figures in Embroidery,” published by Banford in 1979? I believe it is still available through Amazon.
Thanks for the in-depth piece, they are always fascinating. I’d love to get more information about the fabric!
Hi Mary,
It seems that around the late 1800’s painting on silk took hold. Skies and faces were often painted than embroidery of features put in. There was I believe a formula with gelatin used to stiffen the silk before painting. I read that water colour paint was used- don’t know about thinned oil paint.
What I love about all this, is that it shows new ideas were always coming up and people were not afraid to try them.
Just guessing, but maybe the fabric is a plain weave Damask silk ?
Regards,
ji
Mary,
Needlework that is flat can be scanned with most flatbed scanners. Often the results are superior to photographs of the piece. I use scanning often to get images of my finished embroidery and needlepoint.
For needlework with some dimension, scanners such as some Epson photo scanners will give good results. But you have to have a scanner with a two lens system. For regular scanning, the dual lens system looks for dust and scratches on film and photo surfaces so the software can remove them from the final scan. One brand name for this software is Digital Ice.
The dual lens also focus the scan which means for needlework with some dimension it will focus on the various shapes of the needlework. I have not tried to scan highly dimensional needlework such as stumpwork but for pieces with beads and raised stitching scanning with a dual lens scanner is very successful.
Very cool Mary. Yes, would definitely love to hear more on this. Thanks!
I am leaning towards thinking the ground is some sort of brushed satin. It’s a tough call, certainly. Thank you Mary for sharing these pictures! Beautiful work.
A wonderful post! So much information being shown and to be learned in such a small space. Years ago when I first started doing serious embroidery I thought it was somehow cheating to add color to thread once it was applied to a ground fabric. Perhaps that stemmed from the work done on printed fabric and the embroidery just outlined the highlights which was popular in the 70’s and 80’s. Then as I started looking at work from the late Empire period up to the Victorian period I could see how, if well done, it was wonderful! When you think about it the only difference is whether the threads receive color pigments before being used or when they are embroidered on a ground fabric. I think it takes a skilled hand to add color when the work is completed. I would like to see more of your micro pictures as they have much to teach.
Good Work, Mary!!! Veeeery interesting!
Facinating! Thanks for sharing that, Mary.
I saw a book on Ebay which may still be there entitled ” The Needle and the Brush ” dated 1889 ….may be of interest .
Thanks to Churches and Convents around the world that so much of our precious embroidery history survives . Thankyou for sharing this lovely piece .
absolutely exquisite Mary!
hola Mary,,encuentro muy suave la textura y facciones ,,me instriga la idea que se tomaron suaves hebras y se tejieron fuera ,,mucho para analizar gracias por compartir
Lidia
Mary,
This is very intriguing. I am very curious to see what you discover about the fabric.
Have you ever visited the Victoria and Albert museum in London. You could spend days looking at the tapestries and embroidered pieces. Even though it’s difficult to get up close to many of the pieces it is still one of the most awesome experiences I’ve had in a long time.
WOW! I have really never seen vestments before. (our pastor wears a suit)
The skill and detail are breath taking. Thanks for sharing. I love your website and your daily gift to us with the blog.
Thank you for the fascinating analysis of techniques. Given the size of the medallion, the ‘Sneaky Paint’ method gives a superior result. I wonder why was the stole mutilated? I supposed vestments would be respectfully retired, akin to disposal of our flag. Would the gold have value as salvage like pocket watches melted for precious metal? I am looking forward to more of your detective work.
Interested in more of your investigations??? You bet.
Thank you for this much, but more will be better.
I,too,am fascinated by such intricate stitching. How to get it so perfect, closely stitched and shaded!Love your posts!
That is really fascinating. I would never have realised there was paint as well as embroidery on that piece. Do you ever do Sneaky Painting? I would love to see your tips for it.
Hi, Ros – I haven’t, but it’s something I would like to try.
hello, thanks for this interesting article.
the couched gold thread, around the face, seems strange, more roughly done than the rest of the embrodery. could it be added after the principal work?
Hi, Isabelle – I think it is part of the original. It’s an old piece, and the gold threads are a little loose and tarnished.
Dear Ms. Corbett,
Please do let us know what you find out about the fabric. I have noticed a similar fabric underlying the church embroideries at my monastery. As soon as I can figure out how to upload the photo’s to Flickr, I shall send you a link.
Very interesting. Thank you.