


Of all the different embroidered elements on Late Harvest, the grapes were the Wow Factor that really sucked me into this project!
Made from bunches of flat back topaz crystals attached to the surface of the project with a clever combination of detached buttonhole cinched with a whip stitch, the grapes add a massive amount of sparkle and texture to the project.
Lately – and I admit it freely! – I’m a sucker for bling, and these grapes definitely feed my growing penchant for adding a bit of blingy brightness to my embroidery projects.
So, needless to say, I was super eager to get on with the grapes. Alas, it wasn’t smooth going at first! Initially, in fact, it was pretty hard going – most of which has to do with the leaf that I showed you last week and the fact that I switched up the recommended order of work.
I’ll explain…
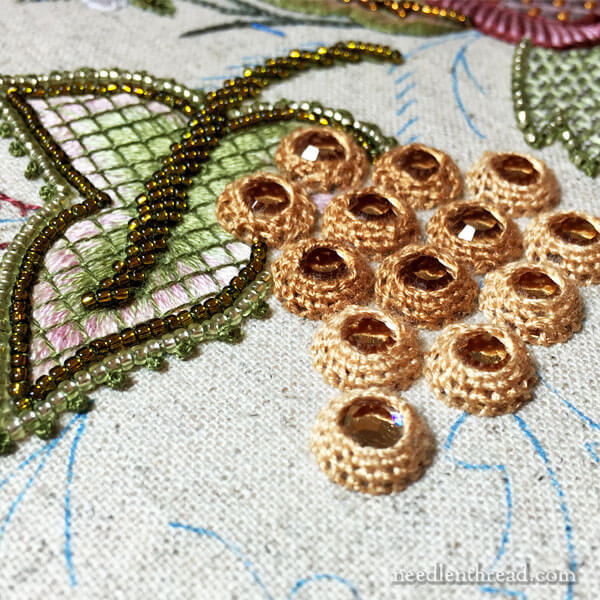
Here’s the first bunch of grapes on Late Harvest, embroidered into place.
To embroider the flat back crystals onto the fabric, the crystal is first attached to the fabric by criss-crossing a sewing thread over the crystal. The sewing thread is removed after the embroidery stitches are worked around the edge and up the sides of the crystal.
A foundation of backstitch is worked around the outer edge of the crystal, using two strands of floss. This foundation is the attaching point for each crystal. If I turned my work over now and snipped away the backstitch, the crystal and it’s little casing of detached buttonhole stitch would fall right off.
Into the backstitch foundation, three rows of detached buttonhole stitch are worked, and the last row is whipped with a simple whip stitch that’s pulled tight to cinch the buttonhole nice and snuggly around the crystal.
Now, working that first row of detached buttonhole into the backstitch foundation is not a big deal, if you’re attaching an isolated crystal that has nothing embroidered around it. In fact, it’s pretty simple!
But remember when I showed you the embroidery on the elaborate leaf in the photo above? I mentioned that there would be a couple problem spots when the grapes came into play when adding the grapes.
And it’s true – there were. With the leaf finished, it was more-than-fiddly to get the grapes overlapping the leaf onto the fabric! I had to work around the fine stitching on the leaf, wiggling the needle in and out of the backstitch foundations without snagging the long and short stitch on the leaf, and around the beads, which made it really hard to get a good angle on the needle.

With the first five grapes that overlapped the leaf area, I did my best not to murmur curses and blasts under my breath the whole time!
My frustration lessened considerably when I squelched my eagerness just to get the grapes on, and told myself to take my time and work through each one slowly and carefully.
And oh! It was worth it! Once the grapes were on, I was immensely satisfied with the brilliance of the sparkling crystals. No matter what light they were under – direct sunlight, the artificial light of my LED magnifier, or the daylight brightness of my stitching lamp – the crystals danced, gleamed, sparkled. I was mesmerized!
And so, thinking forward to future parts of the project, I did what any Reasonable Person Besotted with Sparkle would do. I decided to embroider all the grapes on the whole project.
My reasoning: it is Much Easier to embroider elements like this when there’s nothing else around them. Sure, when it comes to stitching the elements surrounding them (like the long & short stitch leaves that protrude here and there from the grape bunches), they might interfere slightly.
But it’s much easier to stitch long & short stitch and bead outlines around the grapes than it is to stitch the grapes around long & short stitch and bead outlines!
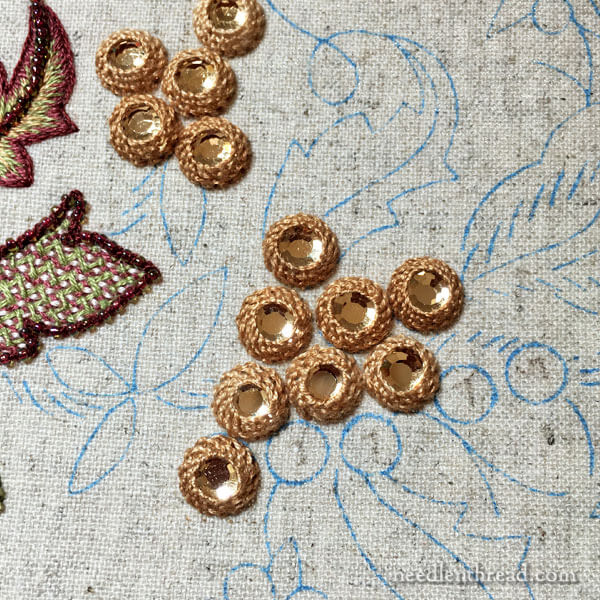
Lesson learned…and lots of luscious grapes are now firmly affixed.
When working the isolated grape bunches on the rest of the project – isolated, because I haven’t stitched any of the elements around them yet – I started in the center of the bunches and worked out from there. I found it was much easier to begin in the middle and work outwards (kind of like lighting candles on a birthday cake – you’re less likely to get burned if you start in the middle!).
Incidentally, on average, each grape took 16-17 minutes to work, and there are 38 grapes on the whole project. So that’s about 10.75 hours’ worth of grape-attaching.
Further Explorations
Fascinated with this method of attaching the crystals to the fabric, I decided to explore further.
I squizzed through some old goldwork and shisha embroidery books in my library to see if I could find similar methods of attaching objects to fabric. In a shisha book from the 60’s or 70’s, I found pretty much the same approach – it’s a kind of reversed shisha without the normal criss-cross foundation over the object – only the foundation around the disk is chain stitch instead of backstitch.
I’m going to try it and see how it works on other flat back objects – cabochons and the like. It’s a wonderful technique, and I’m betting that any detached needle lace filling could achieve similar results, while varying the decorative look of the embroidery. All kinds of ideas are churning in my head!
So that’s where I am with Late Harvest – and still totally in love with the grapes! I wish there were more to attach! I’d stitch them anywhere!
I hope you had a terrific weekend and were able to get in some quality time with your needle and thread!
I’ll be back on Wednesday, when I announce the winner of the Talliaferro crewel embroidery guide give-away (there’s still time to sign up!) and share some other updates with you.
Dear Mary
Well what a hard task you went through with the crystals, but they look beautiful and I can see that they gloriously shine, well done for sticking with the difficult grapes on the leaf. I like the buttonhole stitch it’s so versatile and always looks lovely on finished embroidery and your grapes look lovely next to the L&S lattice leaf. Your are certainly leaning a lot of techniques with the Late Harvest which always gets the grey cells working. I hope you show us your other ideas on bling embroidery. Thanks for sharing the Late harvest grapes with us and for your journey through this project.
Regards Anita Simmance
And this is why I subscribe.
I really enjoy having someone test stitch for me.;-)
I really do love your project progress posts, Mary!
I am dying to use this technique on an evening bag.
But, I have only two stitching projects at hand right now. We are still packing for our move (which is in ten days, eeps!), so this one will have to wait. Also, there’s that little annoyance of the several other projects that are boxed up and expecting to be worked upon once we do move, so…*sigh*…not yet…
It’s beautiful! I LOVE that topaz color and the gold touches on the leaf They go together so well. It’s just a stunning piece.
This is such a lovely piece and the grapes are gorgeous! Thank you for explaining how you attached them. Beautiful work.
This is a great technique for cabochons. I learned it from another student who was using it to make embroidered cuff bracelets.
I wish you’d do a video tutorial on this! It really helps to see it done.
Oh, I would love a video on how to do one grape also. I watched the detached buttonhole video but I’m not sure if I could do a grape as it’s round and I believe you said you have to decrease as you go to keep the crystal from slipping out. Maybe if you feel up to it. I know it would slow you down to videotape it but we’d really really appreciate it.
the embroidered crystals are so beautiful, i really like it¡
Oh Mary, I can completely understand why you’re obsessed with these grapes! The crystals are just sooo beautiful! 🙂 I sometimes also like to focus on just one stitch element in a design. It’s nice to keep going when you get into a rhythm, rather than breaking the flow by switching to another stitch type. I love how the light reflects off the gems … truly gorgeous! 🙂
So many questions I’ve been pondering usually end with, “I’ll wait and see what Mary does.” Thank you, thank you, thank you for giving us the benefit of seeing a project done and why the different order of working the elements is advised!
Love the grapes Mary! Chardonnay perhaps? While you are experimenting with other cabochon attachment methods, you might consider beaded bezels. This peyote technique works well for attaching both faceted & non-faceted flat-back “objets”. You can achieve some dreamy effects with size 15 seed beads!
Very interesting! I wonder, would there be any benefit in stitching the detached blanket stitch before the crystal is put in place? It seems to me like you are making a little “bag” for the crystal, and then you pull it closed with the whip stitch.
If you leave the “bags” empty until the end, the other stitching may be more convenient to do. I know you’re already done, but I do wonder how that would work.
Anyway, I’m interested to know your thoughts on it!
Hi, Monica – well, that’s a good idea in theory, but as you cover the side of the crystal, you’re actually tightening each row (and sometimes, you have to decrease the number of stitches), so that the whole thing fits snugly around the crystal. I think, otherwise, the stitching would not hug the crystal as well, for a nice neat finish.
Ah yes, thanks Mary! Maybe a “baggy” appearance is not entirely desirable! 😉
As Joan in VA says – this is (one reason) why I read your blog. I learn so much when you share your tips and processes. Late Harvest looks so tempting in Hazel Blomkamp’s book and looks gorgeous in your progress shots. I see some of her wonderful woven fillings peeking in at the side of two of the photos – you’ve made more progress than you’ve let on!
Mary I love your grappes ! Well done !
Absolutely brilliant!
I have pondered long and hard over how to attach cabochons and other such beasties to embroidery but never did I think of this. How utterly beautifully simple a method it is and how stunningly effective.
Thank you for bringing it to our attention because although I own 4 of Hazel’s books I did not remember this bit. What is it Americans say – my bad?
I am having a flirtation with dimensional bead embroidery ( instead of just stitching,) this year. I am finding your posts on Late Harvest interesting and useful. Thank you!
I am always awed at the work and the ability you have of finding such marvelous stitches. I know you are very busy right now, but sometime in the future could you show “attaching the crystals to the fabric” in a video? (unless you have already and I missed it) Thanks for all you share with us. 🙂 Jackie
Dazzling work! This is an awesome post about a type of embroidery I would like to try. I’ve been looking for a technique to use on successfully applying loose faceted genuine gemstones someday. Thank you for sharing your beautiful work Mary.
Been searching for this info for a project that is taking me way beyond my comfort zone. Told me all I wanted to know except – is it possible to use a dot of glue from a fabric glue pen to hold the crystal in place till you have done the “tacking”?
The pattern I am using is Norman the Tortoise from Hazel Blomkamp’s “Crewel Creatures”.
Hi, Jenny – I didn’t use a dot of glue, but I suppose you could. The only difficulty would be if it spreads, and causes the fabric to be stiff and uncomfortable to stitch through – or if any residue would show. You’d just have to be careful. Otherwise, I don’t see why you couldn’t!