It’s been a while since we’ve worked through a Stitch Fun! tutorial here on Needle ‘n Thread, but I’ve been experimenting and playing with embroidery stitches lately, so I thought I better start sharing some of those results with you!
For those who are relatively new to Needle ‘n Thread, Stitch Fun! is a series of embroidery stitch tutorials that explore unusual or just plain fun embroidery stitches and combinations of stitches. You can find a whole list of Stitch Fun! tutorials right here.
The point of the series is to have a little fun with your stitches. After all, it’s not unusual to get stuck in a rut with embroidery. Not a bad rut, mind you – but sometimes, we gravitate towards our favorite stitches, using them over and over again, and we tend to forget to let loose once in a while and try something different!
Those of you who are following along with a Year of Stitches – the year-long stitch exploration project I mentioned in this article – you’ll find lots of ideas for your embroidery in the Stitch Fun! series.
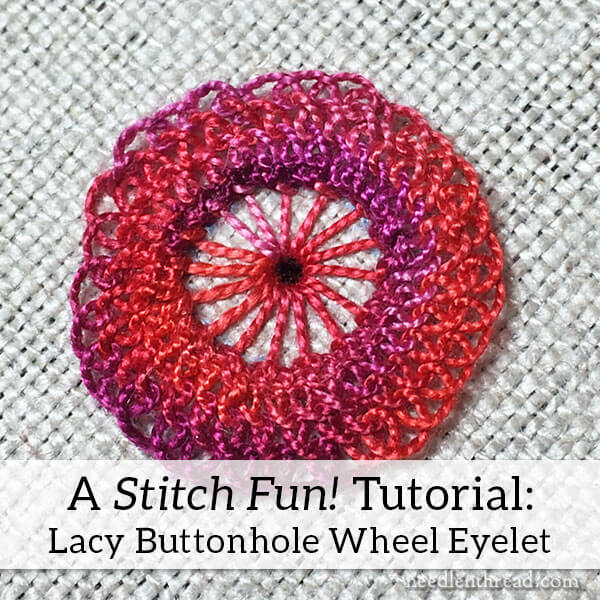
Today’s Stitch Fun! tutorial explores the buttonhole wheel eyelet, expanded a bit with some lacy surroundings.
This stitch combination can be worked in any kind of embroidery thread, and it can be sized up or down. It would make a terrific addition to encrusted, textured embroidery projects.
You might put it to good use in stumpwork or in Brazilian dimensional embroidery. It can be used for flower centers – or just as is, to add a spot of interest to your project!
In today’s tutorial, I’m using Strathaven linen in natural, an overdyed perle cotton #12 from Colour Complements, and a #7 crewel needle.
Let’s get started!
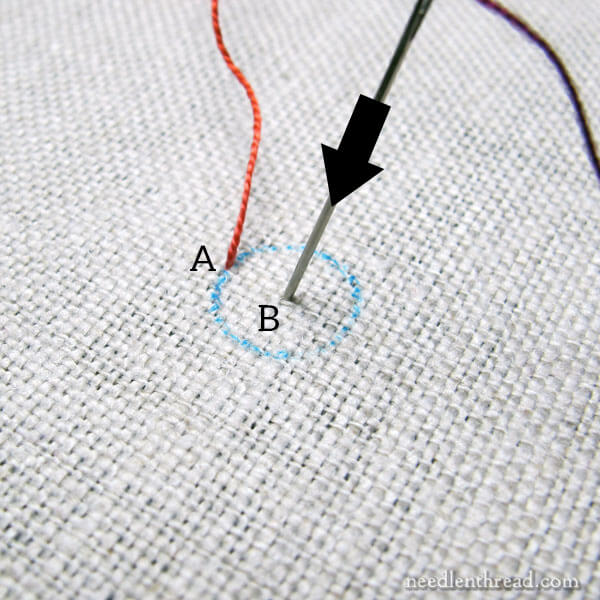
We’re going to start with a buttonhole wheel eyelet.
To work this stitch, you should be familiar with the buttonhole stitch and the buttonhole wheel. You can find a video for buttonhole stitch here and a video for the buttonhole wheel here.
I’ve marked a small circle on my fabric – it’s just smaller than 3/8″ of an inch in diameter. The finer the thread you use, the smaller you can make your circle. You’ll have to experiment with different threads to see what kind of proportions you like, between the size of the circle and the weight of your thread.
For the foundation wheel here, I’m using a piece of thread that’s about 18″ long.
Bring the needle and thread to the front on the design line, and take the needle down into the fabric in the center of the circle.
Because we’re working an eyelet, linen is a terrific fabric to use for this. If you enter the fabric at B in the “hole” in the weave (rather than splitting any of the linen threads), you’ll be able to form a small eyelet, or open hole, quite easily, by simply forcing the linen threads to part.
To make the hole, before you pull your needle through to the back, just twirl your needle around in the fabric a bit, forcing your fabric to open up in a larger hole.
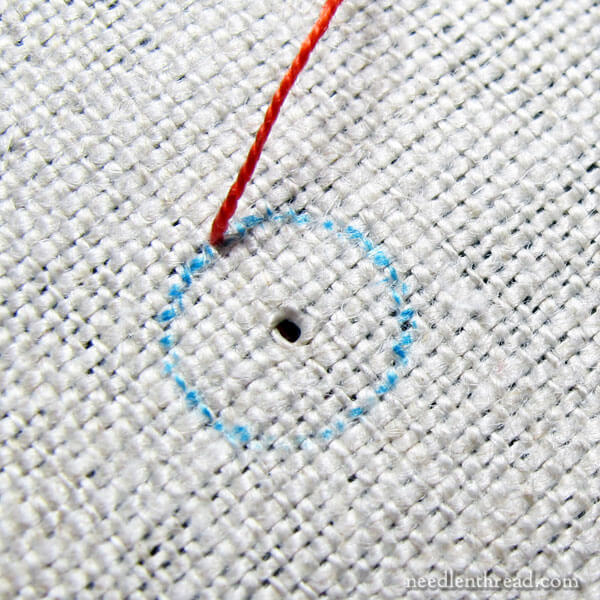
I just swirled my needle around in that space, until I had a nice sized hole.
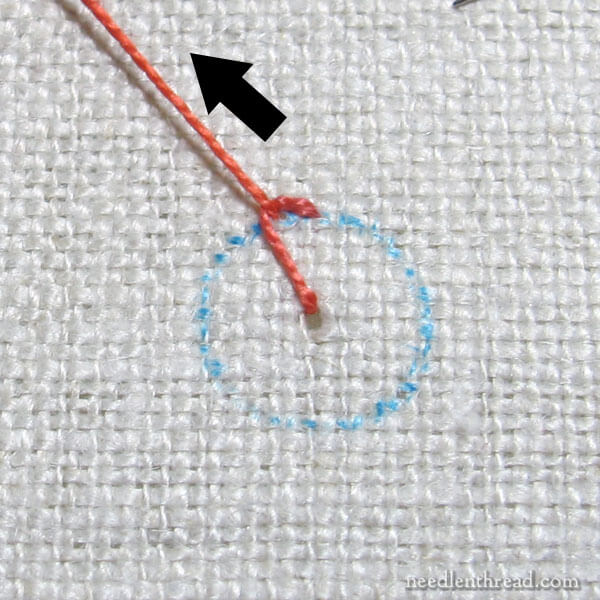
Now, I know a lot of stitchers have problems making buttonhole wheels and keeping the outline of the wheel from buckling in on itself.
When you make each buttonhole stitch around the wheel, it’s important to maintain tension on the working thread, pulling it in the direction that the little “elbow” in the buttonhole stitch points.
This tension on the working thread will also help open up your eyelet hole a little bit.
As long as you maintain tension on your working thread with each stitch, the edges of your buttonhole wheel shouldn’t buckle inwards.
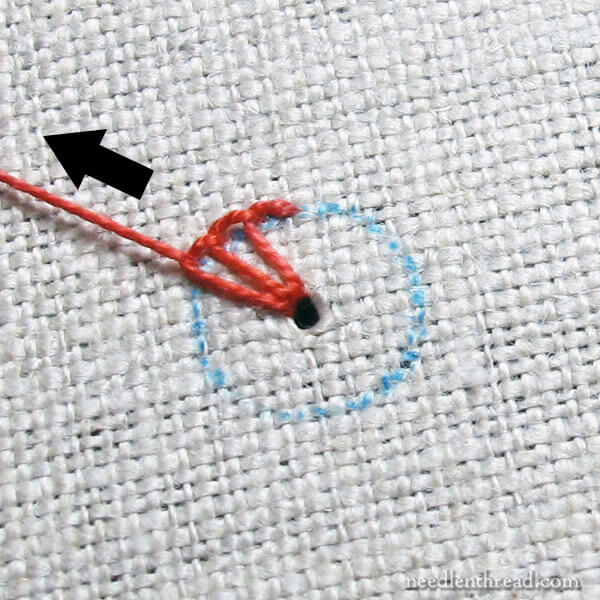
Continue around the wheel, maintaining good tension on that thread!
Now and then, you can swirl your needle in the center hole, too, to open it further as you go along.
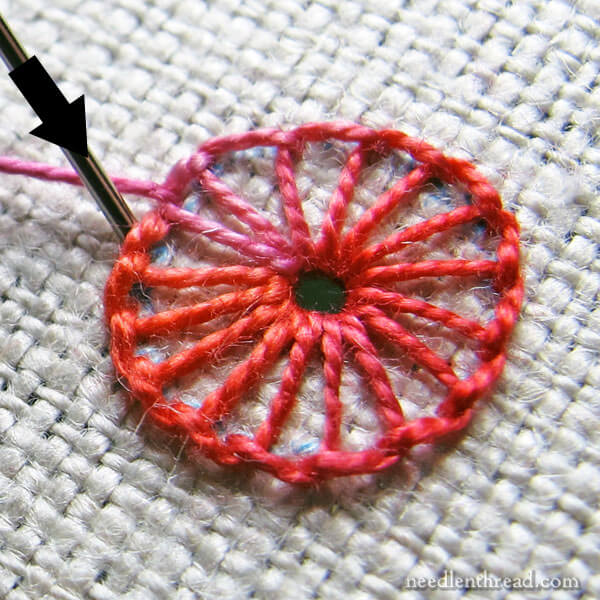
When you get all the way around your wheel, make sure to gauge the final stitches so that they are more or less evenly distributed. The “elbow” of your last stitch should line up right next to where you initially began stitching (point A).
To secure the wheel, take the needle and thread down into the fabric behind your very first buttonhole stitch.
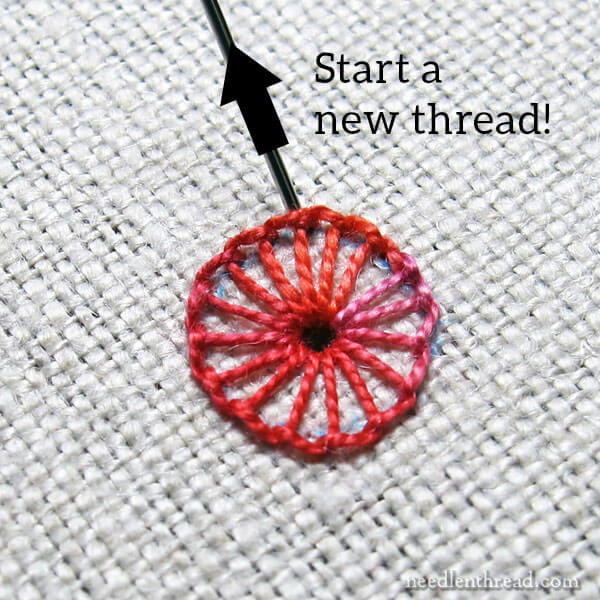
Once the wheel is complete, change threads!
This time, you’ll want a long thread. For the rest of this element, I’m using a 37″ long piece of thread!
It’s important at this point to take your time and go slowly. If you’re working with a long thread, chances are, it will twist up now and then, and if you’re working really fast, you’re bound to get slip knots. So take your time! Occasionally, you might hold your work up in the air and let your needle and thread drop towards the floor, to allow your thread to untwist if it’s getting cranky.
Bring the needle and new thread to the front of the fabric under the end of the buttonhole wheel, at the tip of any spoke.
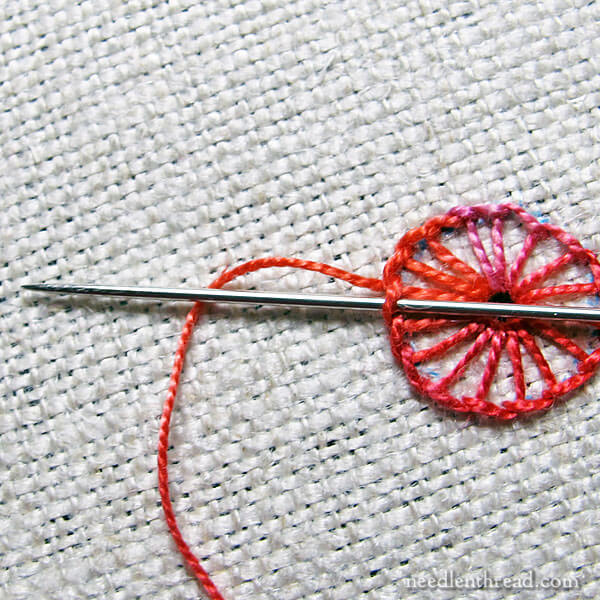
Now you’re going to work three buttonhole stitches over the edge of each buttonhole stitch on the wheel.
These three stitches should be worked rather tightly, so that they snug up around the previous buttonhole stitch edge. The three stitches may seem a bit tight in that small space – and that’s ok! They might even ruffle up a bit – and that’s ok, too!
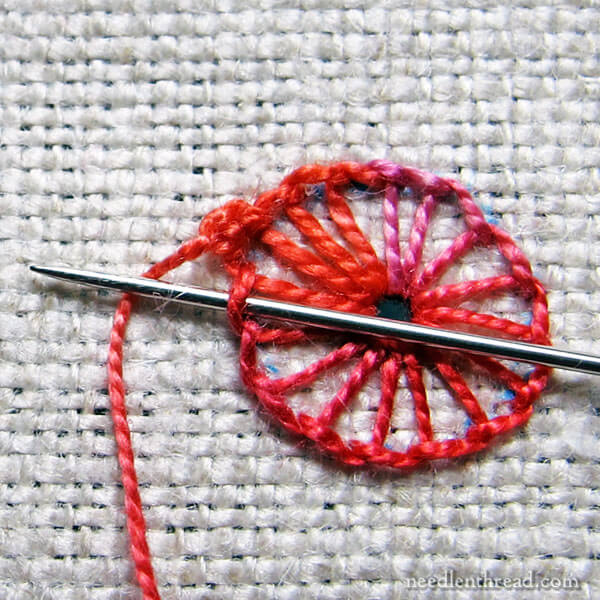
In the photo above, I’ve completed three buttonhole stitches over the edge of the first foundation buttonhole stitch, and I’m moving on to the second foundation stitch.
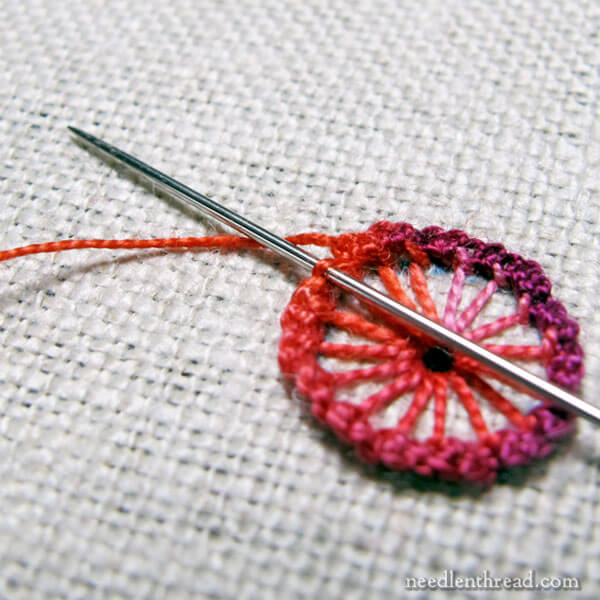
Notice how tight and close those three little buttonhole stitches are. That’s what you’re aiming for!
Work all the way around the buttonhole wheel, buttonholing the edge.
When you arrive back at your first set of loops, without going to the back of the fabric, you’re going to start another round of buttonhole stitches worked into the small, tight buttonholes on the edge of the wheel.
This second round of buttonhole stitches will be a bit different, though!
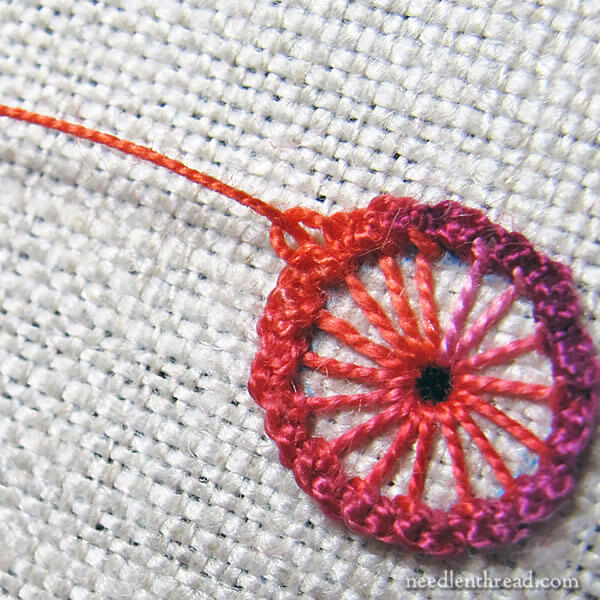
Working over the edge of each of the small, tight buttonhole stitches on the first round, you’ll work one buttonhole stitch. But instead of tightening the stitch up, leave the loop somewhat loose and open.
You can experiment and play around with just how loose you can leave these stitches. I’ve left them open enough that I can see the open loop clearly, but not so open that they are particularly floppy.
Work all the way around the wheel, making one loose buttonhole stitch in each of the tiny, tight buttonhole stitches you worked in the first round.
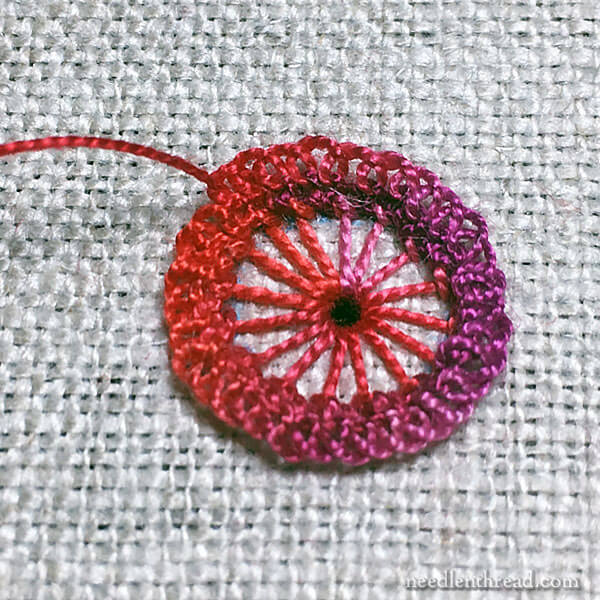
Eventually, you’ll be back at your first loose loop!
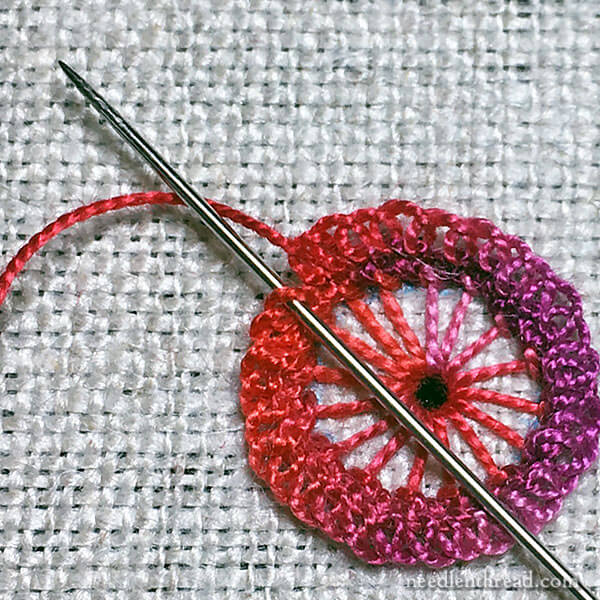
Without passing your needle and thread into the fabric, you’ll pass into the middle of that first loose loop, and work another loose buttonhole stitch.
And then, you’ll progress all the way around the circle again, working one more loose buttonhole stitch in each loose buttonhole stitch of the previous row.
Now you know why you want to work with a long thread! You’re continuously circling, without the opportunity to pass to the back of the fabric to end and change your thread again.
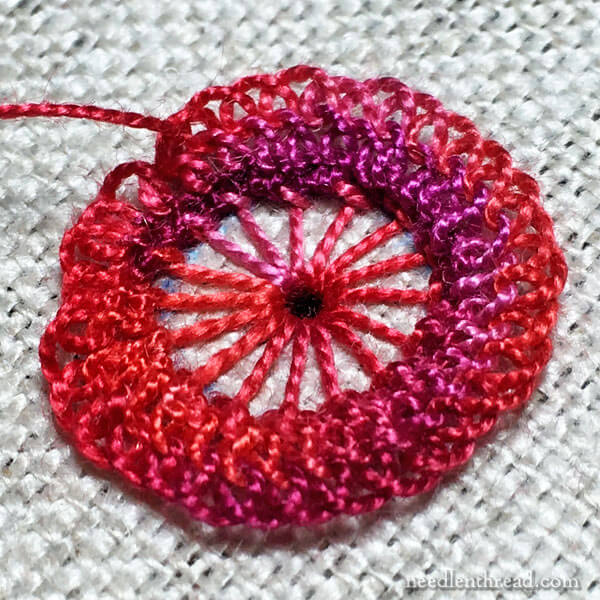
Eventually, you’ll end up back at the first loop of your second round of loose buttonhole stitches.
And you could keep going like this forever, I suppose! But this is where we’ll end it!
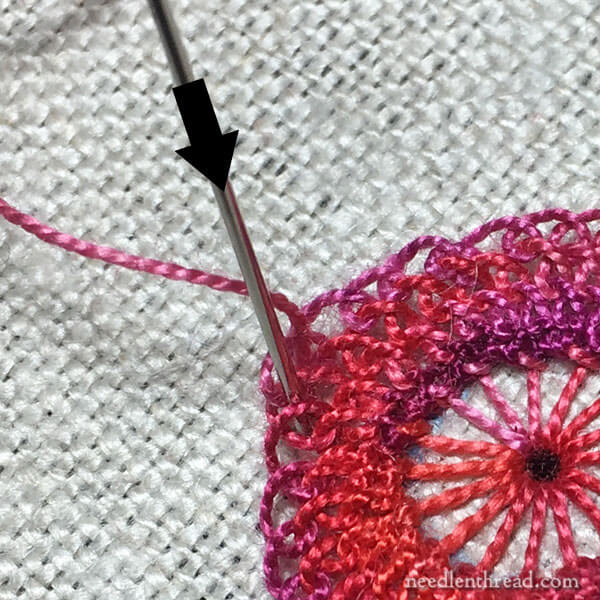
To end the thread and secure the stitches, you’ll just cross into the first loop of this second loose round, crossing over the intersection where you’ll see the last stitch and the first stitch of the round overlap.
Take the needle and thread to the back of the fabric and secure the thread by passing under the back of the stitches from the buttonhole wheel eyelet.
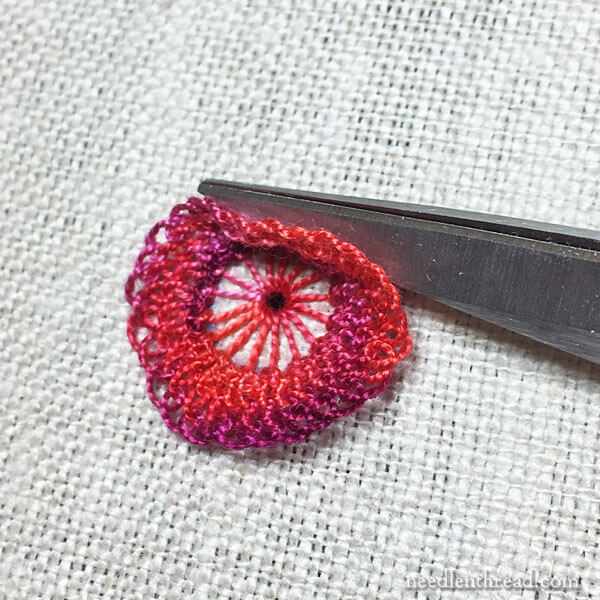
You’ve just created a detached, lacy circle that grows out of the buttonhole wheel eyelet!
You can see that most of the lacy circle is completely free of the fabric, except where the first round is worked in the buttonhole wheel eyelet and where you’ve anchored your last stitch.
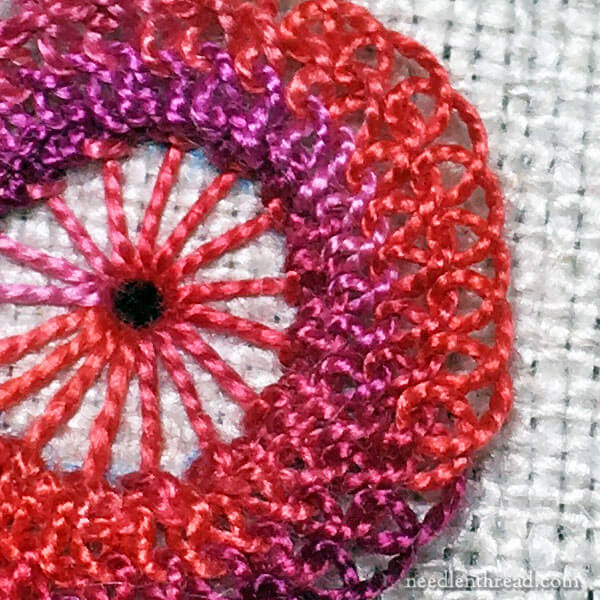
I’m still playing with this stitch. I’m trying to work a much smaller version of it into a sampler that involves some tiny flowers. As I play with it a little bit more, I’ll experiment with other ways to end the stitch, and with different ways to manipulate the finished lacy wheel.
I’ll show you my findings eventually, but in the meantime, feel free to experiment and explore with this one on your own! Who knows what fantastic configurations you might come up with!
Looking for More Stitches?
You can find a whole bunch of stitch tutorials here on Needle ‘n Thread. Over here in the how-to videos, you’ll find over 75 video tutorials that will help you learn and master a huge variety of embroidery stitches. And over here in the Stitch Fun! series, you’ll find plenty of step-by-step photo tutorials to help you add variety and interest to your stitching projects!


I really like using this stitch, Mary, and have fun adding multiple stitches in further rows to make the flower extra frilly. It’s fun adding a bead to each stitch in the last row, too, adding a bit of weight to the final stitches so they sometimes bunch up less. Definitely fun play!
I love your Sticht Fun Series, Mary!! Keep doing this so well girl!!!
Best regards,
Paula.
Dear Mary
I really like the fun stitch series and this is a really lovely fun stitch wheel and easily managed, I do like the buttonhole stitch, you could keep going and make it a really large wheel or flower which could enhance any project and the thread colour combinations are unlimited, this would look lovely added to any embroidery project. Thanks for sharing with us the lovely fun stitch lacy buttonhole eyelet tutorial, the photos are really helpful, so are the tips and techniques associated with this tutorial.
Regards Anita Simmance
I am not usually a fan of the button hole wheel…too rustic for my taste. This is super adorable and really interesting. Fantastic use of texture! Thanks so much for taking the time to create and teach this!!
How fun! Thanks Mary!
What a lovely idea Mary. You are so clever.
Great tutorial, Mary; thanks! You always provide something new and fun to try. I’m looking forward to trying this one on some flowers. Have a lovely day!
I know that this has nothing to do with the post today but I feel that you should know that there is a site that I came across today while searching for Carolyn Pearce workbox that had your exact words from a previous post on the book. Here it is : I hope this person had your permission or maybe it’s you ☺️. If not, shame on that person.
Hi, Soenie – thanks for your comment! I’ve been fighting with that website for a long time now. I deleted your link to it, to avoid giving it any traffic or referral. But yes, the whole site is a combination of my site – all the articles from my site seem to be reproduced there verbatim, all pictures, everything – plus a couple other sites. Ive contacted the owner, and now I’m having to take legal steps to get the thing removed. Unfortuntely, it takes a lot of time and no small expense. It’s very disheartening.
Please Mary do not let that awful website dishearten you. I have come across it, with its total lack of originality and awful plagiarism. The only reason I would look at it again is so that I could boycott any product ever advertised there. Good luck with the legal battle and with fighting the good fight. I’m sure it’s dreadfully draining, I’m glad u have your beautiful stitches to provide solace. Sending good thoughts.
Thanks, Megan!
Hi Mary,
Love your new stitch. I’m restarting my luncheon cloth, ( the first try was a wash out,)and your new stitch would be nice for the center of the flowers. It would add a touch of interest. I admire how talented you are. By the way, Your modern crewel turned out really nice, and your 56 count tree of life is going to be super. Gives me an incentive to keep embroidering.
Happy Stitching,
Louann P
How wonderfully timely! I have this mohair scarf that I wanted to add polka dots to.
For the last few days this has been pinned to my design board while I tried to figure it out. Knit circles, like bobbles? Crochet circles, like chain stitches? The scarf is really loosely woven, I had thought about embroidery, but kept coming back to well, won’t that look really ugly on the back side? (I’ve yet to master the double darn) Darn it!
But, I think tomorrow morning, I’m going to give this a try. I’ve just finished my first ever stump work, and ANYTHING has to be easier than that.
I’m think pearl cotton with a tapestry needle, because boy oh boy is that mohair fluffy. Thank you Mary!
I cant wait to add this to my #1yearofstitches … feeling rather nervous about working with such a long thread … will take it slow and easy as you suggest, and let you know the results. Loving the unscripted videos – Many thanks.
That looks very pretty in the varigated thread. Depending on the ground fabric, I bet bold solid colors could look really cool too. Very fun stitch combo!
I am not receiving your blog in my inbox.
How do I sign up
Hi, Deanna – on the right column on the website, you’ll find a subscription area. Just enter your email address, and you’ll receive a confirmation link in your inbox. Your address is secure & it’s not used for anything else!
The Lacy Buttonhole Stitch beckoning me. Thank you for one more inspirational post.
I love this stitch. I might have missed some of the first row tight stitches but it still came out looking really neat. Thanks.