


Happy Monday, from a windy, springish Kansas!
We’re going to hop back to gridded work today! After finishing Modern Crewel, I took a good chunk of time to set up a couple of my own projects last week and to make a wee bit of headway on them. (I love it when that happens!)
But when it comes to a quick-stitch-fix, a project that I can work on in 15 to 30 minute bursts when I have a little down time, it’s this 56-count silk gauze Tree of Life project that I turn to.
The last time we looked at the project, we chatted about the lower panel and thread re-organization. Today, I’ll show you a turn on the corner, we’ll talk about lining up the whole frame layout and my cheater method of double-checking my counting, and finally discuss working a project like this with the frame turned, to make the stitching area easier to see and reach.
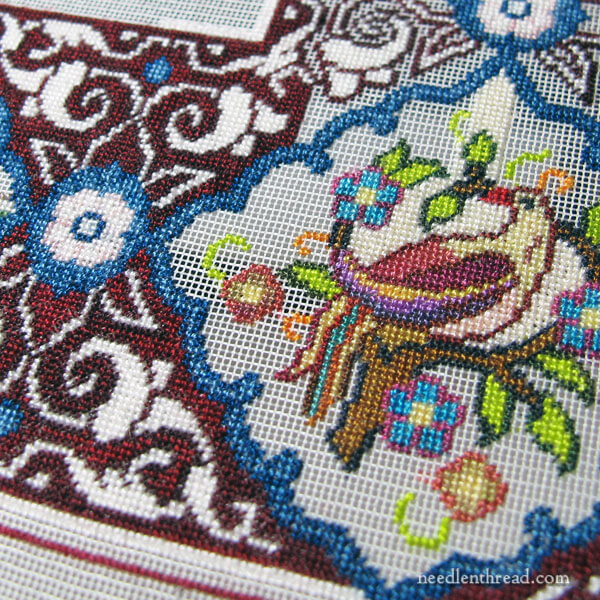
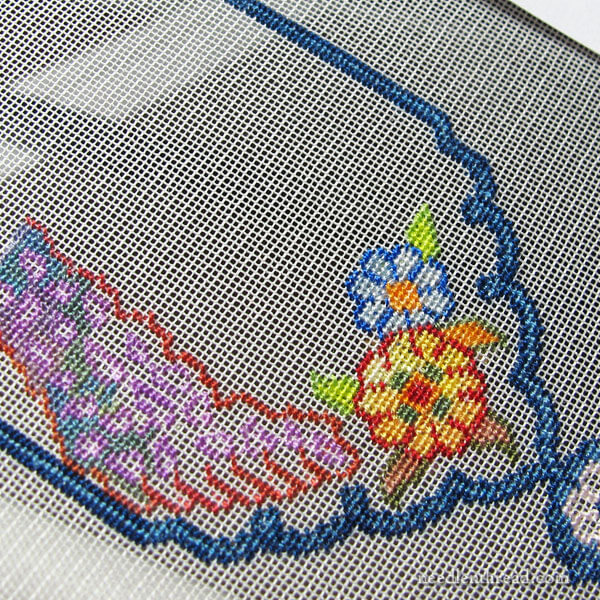
This is the lower right corner of the design – another colorful bird medallion tucked in the corner!
Why the Un-Stitched Backgrounds?
I should re-mention that none of the panels or medallions I’ve worked so far are actually finished completely. I’ve been leaving a lot of the background stitching undone on each area. I’ll go back and finish those when I want something easy and mindless to stitch on, that I don’t have to think about at all. The unstitched background areas don’t require any counting. It’s just a matter of filling.
Those areas are perfect for stitching while watching a movie, listening to an engrossing book, chatting on the phone, or Face Timing with my family far away. They’re also perfect for group stitching situations, when it’s more fun to chat than to concentrate!
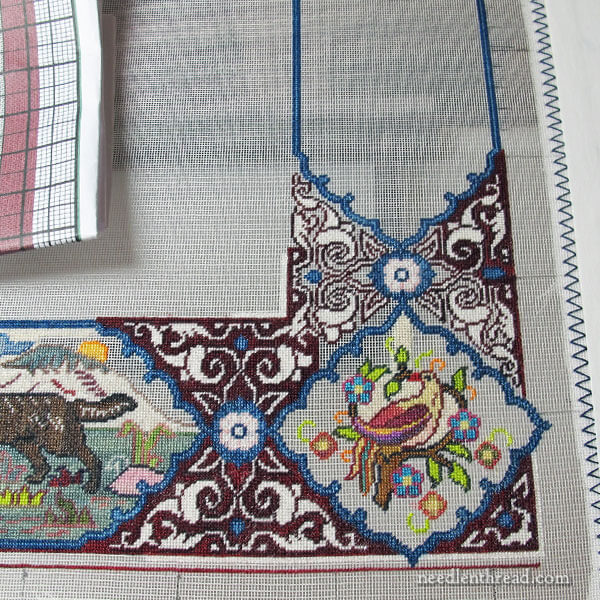
When last we met on this piece, I had planned to stitch in the blue frame all around the design as my next step.
I started to do that. But then I got hooked into the bird medallion. And then I got hooked into the background filigree design on the corner.
And you know, that’s my favorite part of Natalia Frank’s Tree of Life designs – those filigree backgrounds around the border! I love them. They’re fun to work. I do the white design element first, and then work around the white with the dark burgundy, and then it’s just a matter of filling with the brighter burgundy red. It’s very satisfying to get an area finished! The contrast in the design is quite striking!
After finishing the lower right bird medallion, I kept going with the blue frame. And, in fact, I finished it, although I never did get a good photo of it finished!
Using a Basting Thread to Keep Things in Line
I was a little nervous about the frame, as it’s symmetrical, and making a mistake on the count from one side to another would throw off the top, where the frame meets up.
So I worked the blue frame elements up the right side of the design first, and then I worked them up the left side of the design, with the intention of working the top part of the blue frame last, meeting in the middle.
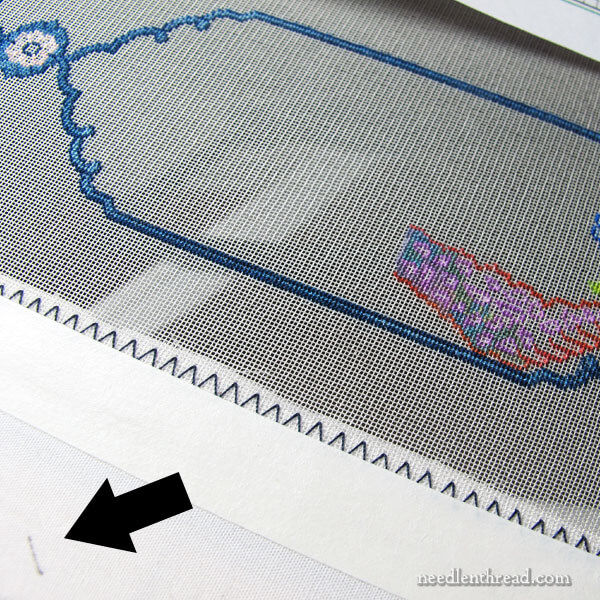
To make sure my left and right sides lined up correctly, I used a sewing thread and basted across the silk gauze from the finished left side of the frame over to where I was stitching up the right side.
The basted sewing threads helped me align the frame elements precisely. If I made a mistake in counting, it would be evident right away!
In this way, the frame worked out just right on the first go, without any unwanted counting mistakes.
At first, stitching the blue framed elements was slow going, because I was exceedingly worried about making a counting mistake. But once I was just working on the frame alone, things sped up. Each element is structured the same way, so once you become familiar with the structure, you don’t really even have to refer to the pattern frequently. It’s just a matter of repeating the same structure.
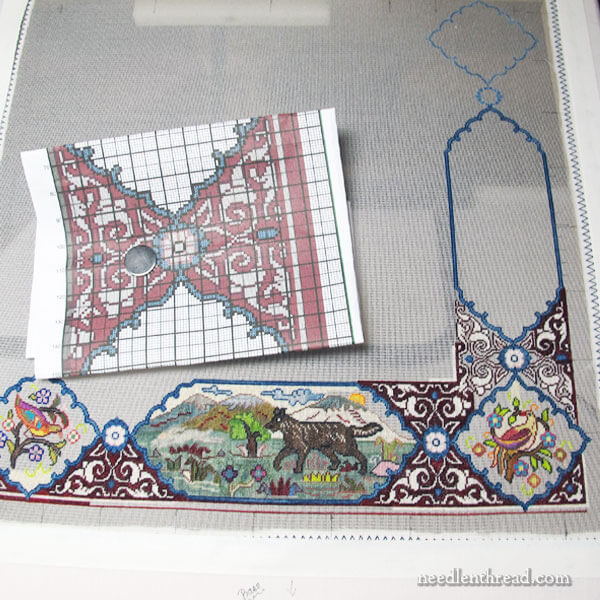
Once I finished the blue frame all around, it became vital to start the peacock panel, which runs up the left side of the design.
Why vital? Why, because it’s a peacock, of course!
Turning the Frame & Stitch Direction
To work on this panel, I turned the frame 90 degrees so that it was sideways in front of me. This way, I could see the gauze more easily (I stitch on it without my glasses on, so it has to be relatively close to me) and reach the stitching area very easily.
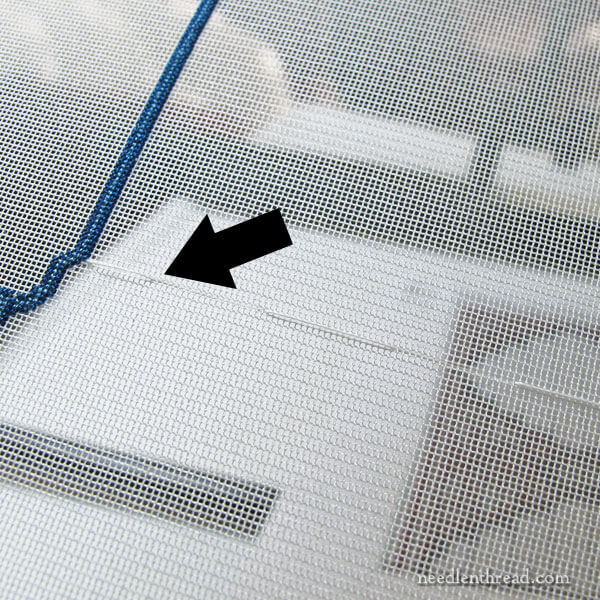
When you’re doing petit point like this (tent stitch), all your stitches should point in the same direction. In fact, it’s very obvious if your stitches don’t point in the same direction!
If you work with a turned frame, it’s easy to get confused on stitch direction.
To keep myself oriented, I mark a little slash on the fabric on the side of my frame. The slash indicates the stitch direction when working with that side of the frame directly in front of me. I turn the pattern on its side, too, and then I just work the whole thing like I would any counted piece.
The little slash is just an extra little guide that I can refer to, in situations of befuddlement. And, when you’re working on a piece like this, where you might move from one side of the frame to the other just for the heck of it, and where you turn your frame so that the side you’re working on is easier to see, it’s a good idea to take as many precautions against befuddlement as possible!
So now I’m attacking the peacock panel on the left side of the design.
You can see why this type of project – jam-packed with all its little separate elements – is perfect to work on in smaller bursts of time. Whenever I have a moment where I’m waiting (dinner’s in the oven, I’m expecting a visitor who’s late, I’m finished with something early and I have a few minutes before leaving for an appointment), I find myself saying, “Hey, I’ll stitch that tiny flower…” or “Hey, now’s a good time to stitch that rabbit…or outline that tail…”
Going about a project like this that way, before you know it, you can make some serious progress!
So, that’s the Tree of Life Update! Maybe I’ll be able to show you that peacock soon.
Here’s a list of the previous articles on this project, including the kit review and where to find it:
Miniature Tree of Life – kit review
Setting Up the Project – silk gauze on a frame
Stumbling Through some Strategies for Stitching
Coming Up on Needle ‘n Thread
A Stitch Fun! tutorial will be up later this week! It’s been a while, but I’m back to working up tutorials, so I hope you’ll keep an eye out for that!
Don’t forget that I’m giving away a gorgeous slate frame. If you haven’t joined in on that yet, here’s the article.
I’ve also got a great book on color with embroidery that I want to show you. I know a lot of stitchers (including myself!) struggle with color selection, so if you’re one of us, you’ll find this one quite helpful!
Hope your week’s off to a great start!
I do a lot of cross-stitch, and in which counting accurately is essential. I use Sulky Sliver thread to grid my fabric. It slips beautifully out of the fabric when you’re done, and there’s no chance of splitting the basting thread. (Yes, with a tapestry needle I have split a sewing thread!) I don’t know if the Sulky Sliver thread is too wide for 56 ct, though. But, gridding, for me, has been a God-sent for these poor eyes!
Hi, Phoebe – I actually didn’t grid this piece with basting threads at all. The only time I used a basting thread was to make sure the elements from the left and ride side of the frame lined up accurately. So I basically stitched a couple long lines in long basting stitches from the frame element on the right side to the same frame element on the left side, making sure the starting and stopping points were the same. Once I stitched in the frame element on the left side (the right one already being finished), I removed the basting thread.
I often do baste in a grid on particularly complicated counted patterns, so I’ll keep the Sulky thread in mind! Thanks for the tip!
Good morning, Mary! With so many small elements and changes of color, I am wondering how you are starting and ending your threads? It looks as if you have stitched some quite tiny areas but t here are no threads parked waiting to be ended and on this I think you need to avoid threads travelling across the back, espacially in areas that will be filled in with white.
Hi, Ann – I start the area with a waste knot and stitch towards it, covering the thread, and then clip the waste knot. And when I finish with a particular color, I end it by running it under the stitches on the back. The thing is worked in continental tent stitch, so the stitches on the back are large enough to slide the needle under. If it were worked in half cross stitch type tent stitch, it would be much more difficult to run the needle under.
I, too, worked a project that benefited from turning the frame. It was counted cross-stitch and I didn’t think about marking the fabric to indicate direction of the first part of the X. Instead, I put a straight pin through the fabric inside the hoop to show the direction of the first half. I’m glad I did that because I was surprised how many times over the summer that I checked to see that I was still working in the right direction.
πολυ ομορφο κεντημα. σας παρακαλω οι φωτογραφιες να ειναι απο πιο κοντα για να φαινεται καλυτερα το κεντημα. πως κεντα
τε πανω στο τουλι???
Hello, Katia – it is tent stitch, worked on silk gauze, which is not the same as tulle. The holes are square, like a needlepoint canvas, only very very tiny, and the fabric is somewhat stiff.
Mary, are you using the tent/continental stitch in some areas and then basketweave in others? What about half cross stitch? Maybe sometime you could do a stitch tutorial on the difference between half cross and continental. Those tend to confuse me and I wonder where to use one over the other.
Love your work and instruction.
Molly
Hi there, Molly – it’s just continental. No basketweave, no half cross, except where I can’t avoiding making a single half cross here and there, when switching direction and so forth. The continental creates a fuller stitch for better coverage, compared to half cross.
Mary I really love your stitch fun tutorials. However, I’ve learned not to read them while having my morning coffee. The pink banana slug made me snort my coffee.
I found a very cool thing to do with Palestrina Stitch. I made a monogram out of it that looks like a letter in barbed wire. Thank you for all of your wonderful work.
Your 56 count is leaping along, Peacocks! Can’t wait to see it done.
Good progress! And great encouragement. I always find myself “waiting for enough time” to DO something. I love this piece! It is fun to watch progress and listen (read) to your mental meanderings! Great fun!
This project is amazing. Using the basting to keep counts the same on both sides is a great idea. I will definitely remember that for future counted projects.
I’m loving it! I can’t wait until mine arrives. Your work is beautiful! I can’t believe how much you’ve gotten done in 15-30 minute increments, unless you’re scheduling them to get more time on this beauty! 😉
This is lovely. And brave: I’d never dare work such a fine fabric! 🙂
But I was so, so, so relieved to see you also remind yourself which stitch direction to use. It’s not just me!
Thank you for sharing your projects, how you plan them, how you adjust your plans and the results. *star-eyes*
Mary, thank you for the suggestions. I am finishing a needlepoint piece in which counting was crucial as there was NO way to hide a counting mistake. There were sprats head stitches in the border (Southwestern Sampler by Margaret Bendig.) Once the sprats heads were in, I was set. Yours was much more difficult.
Also, I bought the Dec/Jan issue of Stitch and found a nice piece by my favorite stitching guru. I always like ways to use up my stash!
Blessings, Charlotte
This is a really beautiful design and it must be so much fun seeing the different elements gradually appear. I enjoy counted work and have done quite a few large cross stitch pieces on fine linen. I find basting lines essential to keeping accurate stitch placement, so I can imagine how much it helps with such fine work as this. I know what you mean, it all feels a bit anxious until you get the initial framework in place, but once that is done it all becomes much more carefree! Enjoying watching your progress with this. 🙂
I would love to do something like that. I just don’t know if I’d be able to see such tiny stitches. I am so looking forward to another Stitch Fun tutorial. I love your Stitch Fun articles.
I crosstitch using a lighted magnifier, 32ct. is about all I can handle. What kind of magnification do you use for 56ct?
I actually don’t usually use magnification with this. If I’m stitching at my work table, then I can take glasses off and situate my work relatively close to my face, using a table stand. I can see really well under those circumstances, even on this, if I have my work light on and something dark on the table behind the embroidery frame. It’s not like trying to see 56 count fabric, because the holes are the larger part of gauze. So with something dark behind the gauze, the holes are very clear for me, when I’m working close to the fabric.