


I love meeting a deadline – even if it’s just a self-imposed one.
In fact, I’m not very good at meeting self-imposed deadlines, so it’s always really exciting when it happens. My goal was to finish Modern Crewel by the end of February, and at 9:36 last night, I put the last stitch in.
I loved working this project! I think it’s a gorgeous, fun, and instructive project, accessible to all levels of embroiderers from determined beginner onwards.
Below, I’ll show you the changes I made in the embroidery on the hillocks, list all the articles pertaining to this project, and announce the winner of the three A-Z embroidery books from last week’s give-away!
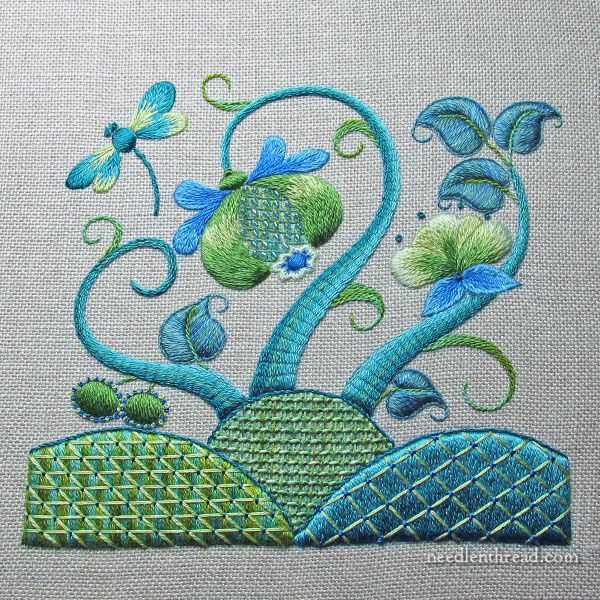
So, here’s my finish!
On the front two hillocks, I decided to take a different approach to the stitching.
In the original design, both hillocks are worked in detached needle lace stitches over felt. I wanted something a little less needle-lacy on mine, so I stuck with some typical approaches that still fit the nature of the design.
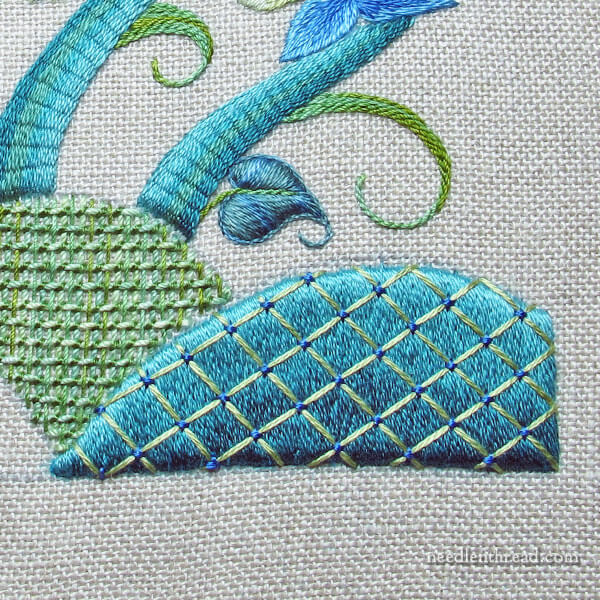
On the right hillock, using the blue felt that came in the kit as padding, I worked long and short stitch in three shades of blue-ish teal over the padding.
Then, I used two strands of the lightest green floss and worked a lattice pattern over the long and short stitch. I couched the intersections of the lattice with the darkest blue.
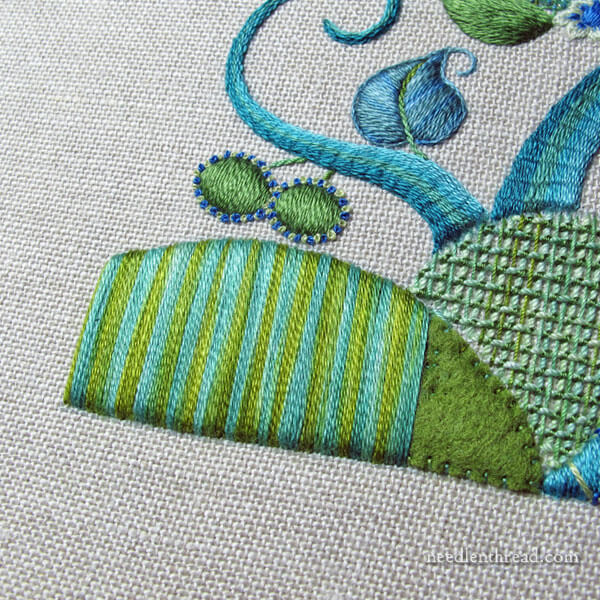
The left hillock was a little weirder!
I switched out the blue felt for green felt, and, using one of the overdyed cotton flosses in the kit – one I hadn’t used yet, so I had a good-sized skein of the stuff untouched! – I worked long straight surface satin stitches over the green felt.
The overdyed nature of the thread caused the covering to stripe up in fairly regular intervals.
At this point, I was thinking….what am I doing? This is so bizarre!
My plan was to stitch something over those satin stitches, since you could not leave satin stitches that are that long on the front of a project, un-fixed in some way, and expect them to withstand the test of time. Eventually, they’d droop and shift.

I tried a couple different approaches. One included feather stitching in random patterns all over the hillock! But it looked awful, and I forgot to take photos.
Eventually, I settled on yet another lattice design – this one worked in horizontal lines first, and then cut with narrow diagonal lines. I couched the intersections with the darkest teal.
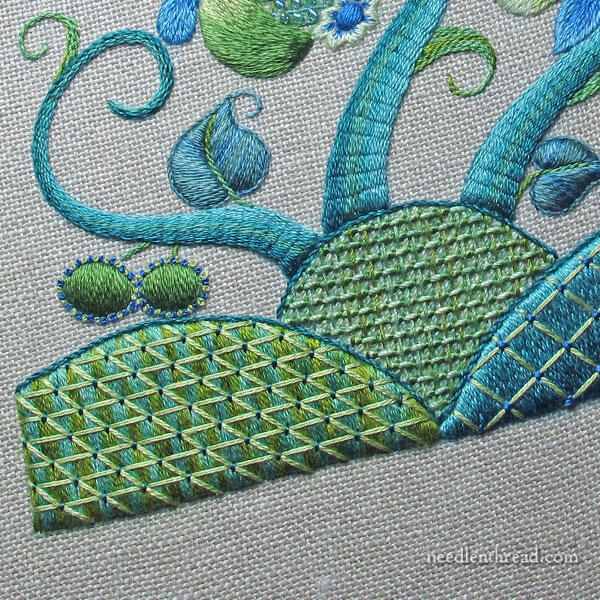
The overall effect of this particular lattice layout, from far away, is a diagonal zig-zag pattern, and I ended up liking it!
To finish the edges of the hillocks, I worked stem stitch with two strands of floss in the darkest teal.
I didn’t stitch around the sides or bases of the front hillocks, but just across the tops.
What will I do with this piece? I’ll most likely frame it and give it to someone as a gift. That’s generally what I do with these types of projects.
So, one off the list! I just loved working this project – thanks to Susan Porter for such a gorgeous design and to Inspirations Magazine for publishing it!
Modern Crewel Articles
Here’s a list of all the articles involved in this project, in case, you want to follow it through chronologically:
Modern Crewel kit review – where you can find the pattern, instructions, and materials list
Something Bright into the Mix – setting up the project
Raised Stem Stitch on a Trunk
Two Approaches to Padding Filled Areas of Embroidery
Pomegranate, Stems, and Leaves
Tips on Thread Twists and Needles
Close to Finished & Handling Shortages
Coming Up!
I’m still chugging along on the 56 count piece and on the crewel firescreen. I’ll be adding a little needle painting piece into my project rotation, along with a spring-inspired piece of two of my own designs. And I’ll touch on them all here and there as we go along, sharing tips and discoveries along the way!
Books Winner!
The winner of the three A-Z Books for last week’s give-away is Karen Reddick. Congratulations, Karen! I will drop you an email!
Wow!!! Your embroidered piece came out gorgeous! I think the combination of those colours make it really stand out….Wonderful!
Your stitching on this is really gorgeous, Mary. I don’t know if you think you are still improving, but you definitely are! And the new padded and couched hillocks are my favourite parts. 😀
That is absolutely gorgeous! Really a work of art.
Congratulations on meeting your deadline and on a beautiful finish. I went back to look at the picture of the original kitted piece, and was really struck with how different you were able to make yours from the same materials in the kit. Knowing that I normally follow directions to the T, I am inspired by your modifications. I really like the greens in the hillocks and the beautiful embroidery in the entire piece. Your work is amazing.
That is beautifully worked.
Well done Karen!
This is so beautiful! Lovely project and beautiful work.
This turned out insanely beautiful, Mary!
Very clever solution to those long satin stitches, although the striping is gorgeous on its own. But, yes, over time you’d have baggy, saggy satin stitches and that’s just…no. 😉
Beautiful and an inspiration.
Dear Mary
I’m so glad you finished the piece on time and it is beautiful, I love what you have done with the hillocks I think they are much prettier then the original design and the colours blend in beautifully with the rest of the embroidery piece, the whole piece is lovely and I love how the blues and greens blend in so well together and I also really like the lattice bits on the embroidery. Did you manage to find beads for the dragonfly I can’t tell on the picture above? Thanks for sharing with us your completed work on this kit and for all your tips and techniques along the way. I’m looking forward to your next project.
Regards Anita Simmance
Hi,Anita – I just used French knots for the dragonfly eyes, in the darkest teal.
Dear Mary
Thanks for your reply the dragonfly looks great as does the whole piece.
Regards Anita Simmance
Fabulous finish! Was hoping to see what you did with the dragonfly eyes but it doesn’t show up in the pictures! 🙂
Hi, Tina – I ended up just doing French knots. I dug about, but didn’t find any I liked with the piece. So I just went with French knots worked!
Beautiful, beautiful, beautiful!! Truly! Thanks for sharing, Mary! You are a walking, stitching wonder!!
Congratulations on a beautiful and well-timed finish. I love those front hillocks, particularly the zig-zag one on the left. Much more interesting and much more zing than the original design. The knots for the dragonfly eyes work very well, too. I don’t think beads could possibly have been prettier.
Hi, Elaine – I was happy with the way those weird zig-zags came out, too! I didn’t really expect them to zing the way they do, but when it was finished, I was pleased with them. I think I like them because they move diagonally, and I was afraid all the squared lattice type designs on the hillock would look weird together, but because of the diagonal movement on those, I think it works! Now, to get the thing framed….!!
I love what you did with the hillocks! And of course the finished piece is gorgeous. Loved following along on this project.
Mary, your needlework is absolutely stunning! I am so happy that we all get to see your beautiful work!
You inspire me to have patience and try my best!
Good Morning,
I just wanted to tell you how much I have enjoyed reading and seeing your article Modern Crewel. You explain things so very well and as I am new back to embroidery its a pleasure seeing this piece finished, your needlework and the colours, so very well stitched may I say. Beautiful. I just do ordinary embroidery, flowers and bits so to see your stitches and how to make up the hillocks was an eye opener and have never seen this type of stitching, building up and then criss-crossing. You have an amazing talent, glad you share it with the rest of us.
Thanks for sharing.
Di Mancino
Thanks, Di! Very kind of you! I’m glad you enjoyed this series of articles on this project!
It was a super fun project to work, but I’m glad it’s finished, because the stack of other super-fun-projects-to-work is growing, and it needs my attention! 🙂
Finished object. It’s gorgeous.
Firescreen, firescreen, sneak peak of firescreen Please.
Ahhhhh – the firescreen! I have to get back to it, Holly! Thanks for the nudge. You know what happened? Warm weather in Kansas struck early, and for some reason, I have a hard time working with crewel wool on Large Crewel Projects when it’s no longer frosty out. For some reason, they always seem like winter projects to me. But I will make an effort! 🙂
Congratulations on meeting your self-imposed deadline and for completing such a magnificent work of art! Your embroidery skills are just breathtaking! I love your blog.
Congratulation to Karen Reddick on winning the books!! I’m sure she will love them. And also Congratulations to you, Mary, on finishing Modern Crewel. As always, you did a fantastic job. I just love how you added your own style to the piece. Thanks so much for sharing your progress and the why’s and wherefor’s of your stitching. It is always a delight to read your posts and I always learn something! Thanks Mary.
Dara W in West Virginia
Mary…Congrats on a wonderful finish to the Modern Crewel! And, thanks for inspiring me…again! I have a tendency to follow directions to a “T” and I applaud you for “thinking outside of the box” and changing the stitches for the hillocks! I have been practicing the “pea stitch” on a scrap piece…that is what is listed for the pattern of hillocks #3. I am not doing very well on trying that stitch. Mine looks like a bunch of holes in a sock that has been worn forever! I was rather miserable that I could not get that stitch to look proper, when I read the changes that you made to the pattern directions! I know I can follow your suggestions and my hillocks it won’t look like socks full of holes! Thanks, again!
Oh my, your work is absolutely stunning. So beautiful!
Mary, that turned out beautiful! Thanks for all the detail in how you did the hillocks. I plan to give it a try. I love how yours turned out. Who ever receives that as a gift will be so fortunate!
What did you do for the dragonfly’s eyes?
Hi, Joyce – I ended up using French knots in the darkest teal. I just didn’t have beads that “sang” when I tried them there, so I went with the French knots, and they worked!
Stunning work Mary, and I love the colors you chose. The “hillocks” are especially interesting to me, and it’s so interesting to see how you achieved that look. Linda S.
Beautiful, Mary! I’m not gunna lie…as wasn’t easily convinced that those colors and “crewel” would do it for me, but now that it’s completed, it really is quite exquisite!
Thanks, Genevieve – Yep, the colors are a little out of my normal color comfort zone, too, but I actually loved working with them. They’re vivid and lively, but with just enough contrast, so the whole thing comes across as being quite sunny and bright.
Beautiful work.