


Ah, Embroidery Project Rotation! It can drive you nuts or keep you sane, depending on how you look at it!
These days, I have several embroidery projects going, and I work them in a kind of rotation schedule. I showed you earlier this year how I organize multiple embroidery projects at once. And as the year ticks along, things are working out ok with all of them, although, admittedly, some projects are getting more attention than others.
We’ll chat later on about the pros and cons of working many projects in rotation (and I’ll show you a couple more that I’ve added into the mix), but today, I want to update you on Modern Crewel, this project kit that I reviewed here, featured in Inspirations Magazine issue 90.
There are two tips I want to share that surfaced while I was stitching along the other day. I think they’re worth knowing, whether you’re working this kit or not!
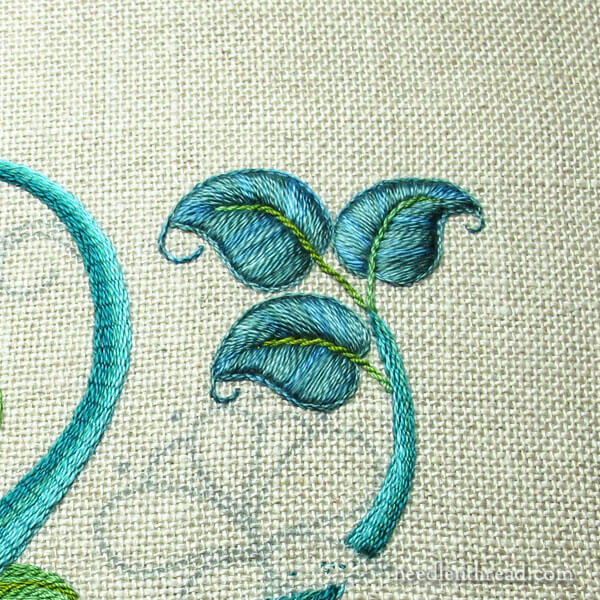
The last time we visited Modern Crewel, I had finished the central pomegranate, all the main trunks or stems, and had just started on the leaves, by padding them.
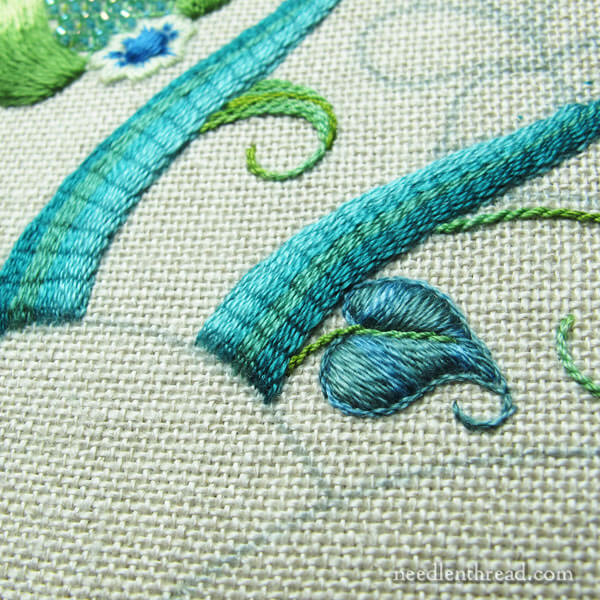
My next stitching session with this project focused on finishing the leaves and working all the little stems and tendrils.
The leaves are pretty straightforward padded satin stitch, outlined with stem stitch. They’re worked in an overdyed cotton so you get kind of a stripy effect with each of them.
I’ve never been too fond of satin stitch in overdyed threads, because I don’t really like that stripy effect. And with satin stitch, you can’t manipulate the color placement like you can with other stitches.
But on this piece, with all its vibrant color, its textures and movement, I find I really love the overdyed leaves! They add a certain what’s-it. A little pizzaz. Something different, and a little unexpected. Not the typical solid satin stitch or shaded long and short stitch.
Yep! It works!
Needle Check
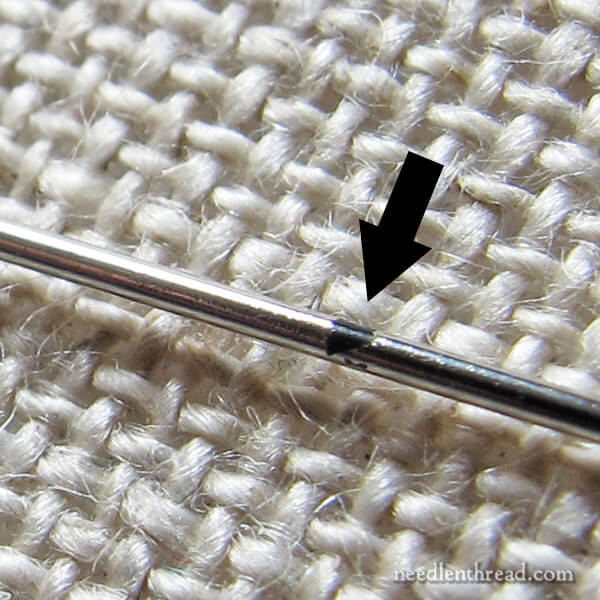
I ran into a little snag while working the satin stitch, and it took me a moment to figure out what was frustrating me and – worse yet – frustrating my threads!
Sigh.
I do hate to see flaws in a needle.
After very little stitching with this magnified beauty above, the finish began to wear off the needle. Usually, you don’t notice right away when this happens – often, it’s hard to see a spot where the finish has chipped or rubbed off.
But your thread notices. Subtle snags as the needle passes through stitches can become an increasing frustration if you don’t find the source of the problem.
Tip: If your needle is not passing smoothly through your stitches, if you’re noticing a little roughness in the passage, if you’re noticing a slight pulling or snagging as you pass through other stitches, or a slight hairiness left behind after your needle passes through… check your needle!
Also, if your thread is wearing faster than normal around the eye of the needle, check the eye carefully for burrs.
Substituting a new needle in good condition can definitely reduce thread wear and stitching frustration.
On Thread Twist
This topic is going to get a wee bit complicated. For those of you who have the kit and are stitching along, this is just a heads up. It’s a good tip for any stitching, actually!
I received an email from a reader who’s working this project, too. She ran into some problems with the stems and tendrils, and since I hadn’t gotten to them yet, I wasn’t sure what she was talking about and I couldn’t help much.
But, as soon as I got to the stems and tendrils myself, I knew exactly what my stitching companion was talking about, and this is specifically for her (sorry I couldn’t help you earlier, Rebecca!) and for anyone else getting to this point in the project.
The brighter green stems and tendrils on this piece are supposed to be worked in stem stitch, using a thread from Clarence River Rainbows. I’ve never used these threads before, and although I did a quick search for further information online, all I could find was a Facebook page. I couldn’t find a page with complete product descriptions.
I assumed that the thread (described as “P4 perlé 40”) was cotton. There are two perlé threads in the piece – a size 10 and a size 40. Everything else is cotton. So I figured they were cotton, too, and just numbered differently from the standard cotton perle number sizes.
But when I finally got around to taking out the thread to start the tendrils, my first thought upon feeling it was, “Oh, this is silk?” There’s no mention of silk threads in the materials list, so I was a little surprised.
It’s not shiny enough to be a synthetic, but it is shiny. It’s a bit bouncy (but then, it’s put up in a very tight twist on the thread card), and it has the feel of (and it’s about the weight of) a nice buttonhole silk.
Does it really matter if it’s cotton or silk? Well, sometimes it does.
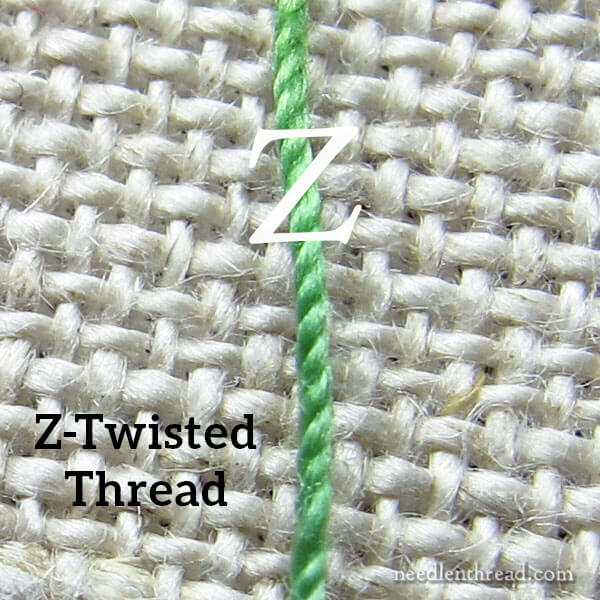
I’ve written pretty extensively about s-twisted vs z-twisted threads here on Needle ‘n Thread.
There are some instances in stitching when it’s important to know if a thread is Z- or S-twisted.
If you’re working only with cottons, it doesn’t usually matter, as most common cotton threads made for hand embroidery are s-twisted.
But with other threads, like buttonhole silks, synthetics, and the like, the threads are often Z-twisted. And the twist of the thread makes a huge difference in the outcome of some stitches.
If you’re not sure what the difference is between s-twisted and z-twisted threads, you can read more about them – and see the differences between the two – in the following articles:
S-Twisted vs Z-Twisted Embroidery Threads
S-Twisted vs Z-Twisted Embroidery Threads, Stitched
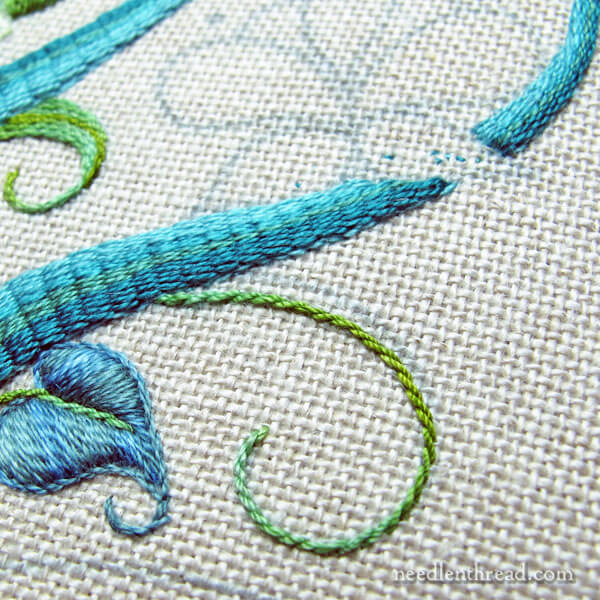
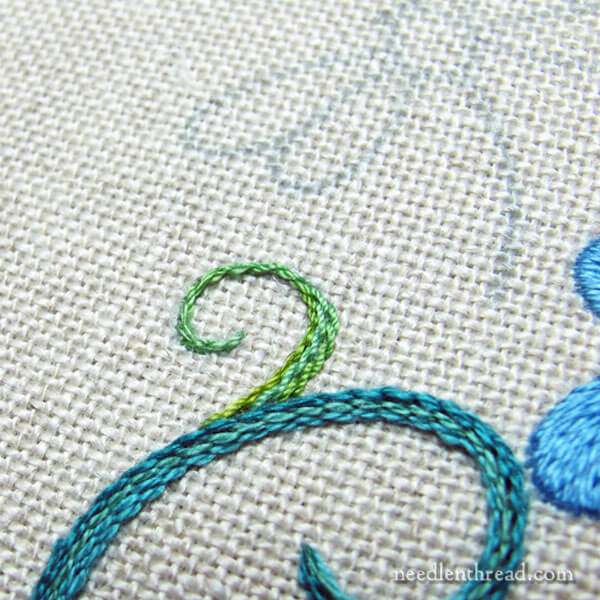
If you’re working with a z-twisted thread and you’re trying to achieve a ropey stem stitch – like the one seen on the tendril above – it isn’t going to happen if you follow the regular instructions for stem stitch that you’ll find just about anywhere today.
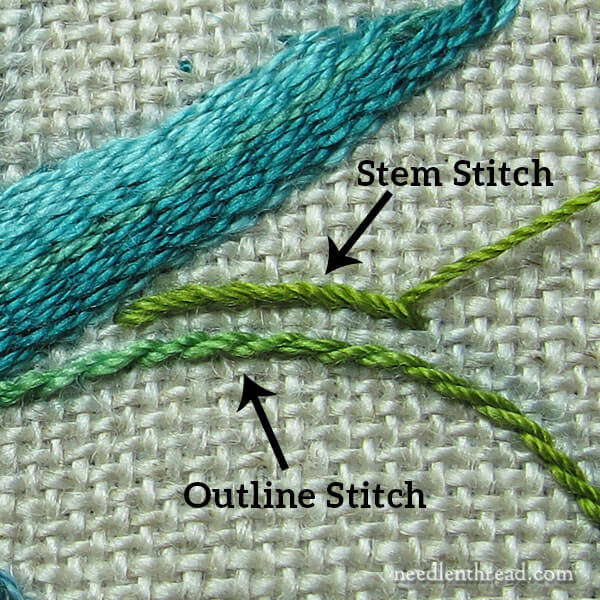
If you follow the standard stem stitch approach, where, when working from left to right, the needle comes up into the fabric above the working thread, your stem stitch with a z-twisted thread will look like the top line in the photo above. The thread will lose its twist and all the stitches will blend together.
If you want to achieve the ropey stem stitch look that we’re used to achieving with s-twisted cotton following the standard instructions for stem stitch, you actually have to work an outline stitch, where the needle comes up in the fabric with the working thread above it instead of below it (when working left to right).
These instructions vary depending on the direction of stitching and whether you’re stitching with your right hand or left. If you want a thorough understanding of what’s going on with the thread twists, you’ll find the information in the articles on s-twist and z-twist linked above, and in the articles on my stem stitch video page (and watch the video) and on my outline stitch video page.
In most books today, the instructions for stem stitch are the same as the instructions I use in my video and in the many articles on stem stitch here on Needle ‘n Thread. That being said, there are some books – especially older books – that don’t distinguish between stem and outline stitch, or that actually call them just the opposite (they call outline “stem,” and stem “outline.”) So that may be the point of confusion in the instructions.
In any case, there are no instructions for stem stitch in the article in Inspirations, as it’s such a basic stitch, so if you want the ropey look of stem stitch with the thread called for in this kit, you’ll need to work the outline stitch instead of the stem stitch.
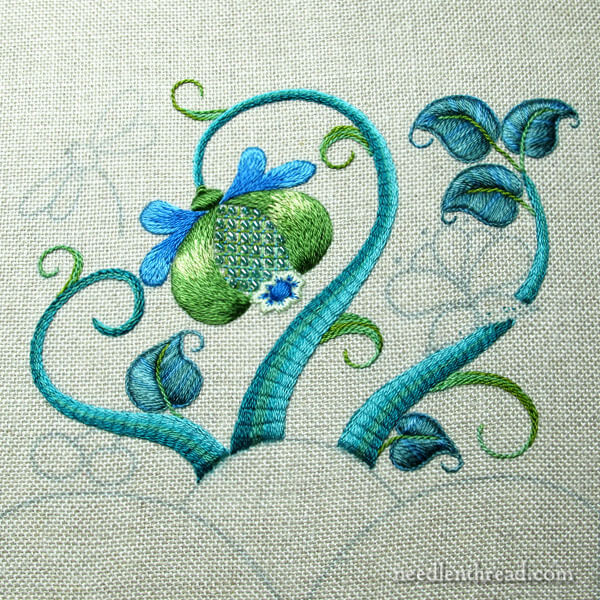
And that’s where I ended that stitching session – leaves, stems, and tendrils complete. Next time, I’ll tackle the flower, the dragonfly, and the two little berries. And then it’s just a matter of the hillocks!
It’s a fun project. Every time I take it out to work on it – especially on gray February days! – it’s like taking out a bit of sunshine!
Thank you for this post, and for reminding us that we really must pay attention to our threads and which twist is involved. I wonder how many beginners become frustrated because they don’t know anything about twist? Probably many of them. I would appreciate it if kit as well as thread manufacturers clearly marked the twist of the individual threads. At least that would alert people to investigate the twist, and hopefully they would also learn how to do their stitches differently before they even begin. The old phrase of “Knowledge is Power”, is still very true.
Hi, PJ – in most cases, I think twist doesn’t matter too much, if you’re not exploring different types of threads. I’d say the majority of beginning stitchers use cotton threads, in which case, they would never run into the problem. It’s only when you start to explore different threads (especially buttonhole silks or some synthetic threads) that the question becomes pertinent. I’d probably never “muddle” a beginner with the whole notion of thread twist, because it over complicates things. But once they start exploring other threads, it’s definitely a good thing to know. As far as stem stitch goes, the more pertinent problem for a beginner is whether the person is right handed or left handed! That’s where I see the most confusion with stem stitch for beginners.
I too ran into this contradictory stem/outline stitch issue. Working on a project, the pamphlet asked for stem in one place and outline in another but gave one description for both. I decided to look it up and in 4 different books got different answers as to whether the thread is above or below. I made me crazy until I just gave up and stitched until I was pleased with the way looked. So now I need to read about z/s twists and I’m going to write down my own description for future reference! Why I never remember is a whole other story…. Thanks Mary!
Liz
Mary, thank you for the tips re z/s threads. Looking at your photos, it’s amazing the difference in the stitches that they can cause.
Hi Mary. I work a lot of Hardanger with crochet thread, because it’s much cheaper (and easier to find) than perle in South Africa.
I think it’s causing a similar problem, so thank you for reminding me of the twist twist 🙂 It may also be causing the knitting challenge I’m facing (also using crochet cotton thread).
This’ll be a nice academic investigation for the weekend!
Thank you for your hard work on this site. It is so very valuable to the art.
Thank you! No I get why my stitches outline and stem don’t always look right. Use one stitch for z twist (I use silk buttonhole twist a lot in my crazy quilting) and one kind for z twist. I can’t tell you how I have struggled with this!
Make that a different stitch for S twist!
Mary…..Thanks for this insight! I am sewing along with this project…from the magazine/journal (what a fantastic publication that this “Inspirations” journal is all about!!!!). I am using my own threads…from my stash…since I don’t have the opportunity to acquire the actual thread for this project. But my threads are ok…really…close enough…and they will have to do…since I can’t just find the “real threads” and buy them! Ah…giggle giggle…do you know what I mean……….
Mary, thanks for sharing your “thoughts…ideas…patterns…ideas…updates…new threads” for the”spots” on this project! Wow…you have made me think about alternate ways of completing a project and I am swimming in ideas…round and round —- up and down and round and round —- stitch and stitch and stitch and…. Wow !!
Thank you so much, Mary. As a spinner, a knitter, and a weaver I really do know that the twist can matter. And yet, I never thought to apply that to embroidery. I need to remember not to pigeon-hole different fiber disciplines.
Being a left-handed stitcher, my stitching direction is reversed in execution. So it’s sometimes necessary to think in reverse which confuses me at times. Lol. I find that my stem stitch done in Perle cotton resembles the straight-line look versus the ropey look. The s-twist/z-twist info is invaluable; I just reverse think it. I faithfully look forward to each piece of info and creative inspiration seen on your blog. Thank you, Mary, for keeping us all in the know.
So helpful! You do such beautiful work, Mary. Thanks for sharing, and for letting us get a glimpse of the status of this project.
This is truly a beautiful piece, and i really appreciate the discussion on the stitch, and the twist. Am going to have to read those two posts on twist and study them.
thanks for all you do….
hope you are well.
kaethejean