


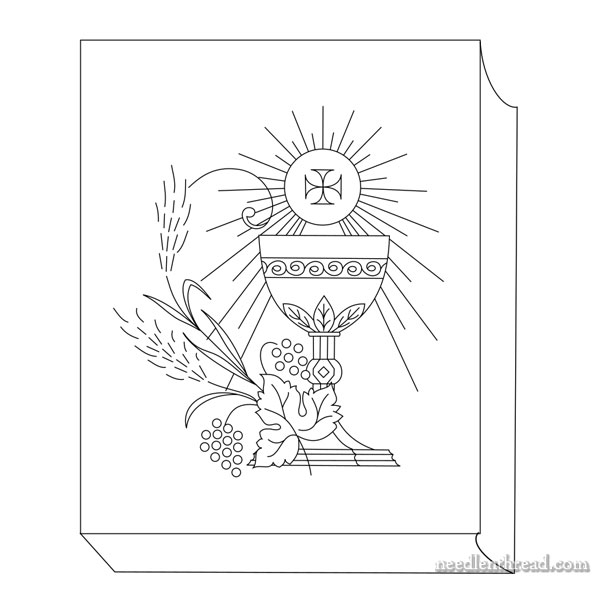
Last week, I shared this embroidery design with you, that I’m using to embellish a cover for a First Communion prayer book for my niece.
Her First Communion is on Sunday, as a matter of fact, so this is a bit of a rush job. I’m still not sure if I can have it finished on time. But I’m not ready to give up yet!
Today, I’ll show you the beginnings, talk a bit about choices for stitches and whatnot, discuss a few details you have to pay attention to on this type of project, and tell you about flipping.
Yes.
Flipping.
To set the project up, I ended up using a lightweight linen for the ground fabric.
I wanted the cover itself to be a lightweight linen, and the backing fabric behind the ground fabric to be lightweight, too, because it’s much easier to make up the actual book cover if there’s not a lot of bulk to the fabric.
Because the linen is lightweight and I don’t want the cover to be sheer at all, a backing fabric is essential.
My plan for the backing fabric was a lightweight cotton batiste. I knew I had a small piece of cotton batiste Somewhere, leftover from Something…but I couldn’t find it.
And being a little pressured for time, I figured I wouldn’t pull apart my workroom looking for it. Instead, I backed the linen ground fabric with another piece of linen.
To transfer the design, I ironed it on. If you want a decent iron on pen that makes a fine line, I strongly recommend Sublime Stitching’s fine-tipped iron-on transfer pen. I reviewed it here.
Why did I iron the design on? Ummm….time! Now the trick is to be able to cover all the transfer lines adequately!
Incidentally, the original design prints much larger than the size I’m using. I had to reduce the size significantly, to about 3″ wide by 3.3″ tall, to fit the size of the book.
I’m using one strand of DMC floss (from the six) for all the stitching. I plan on keeping things pretty basic, with simple, simple stitching!
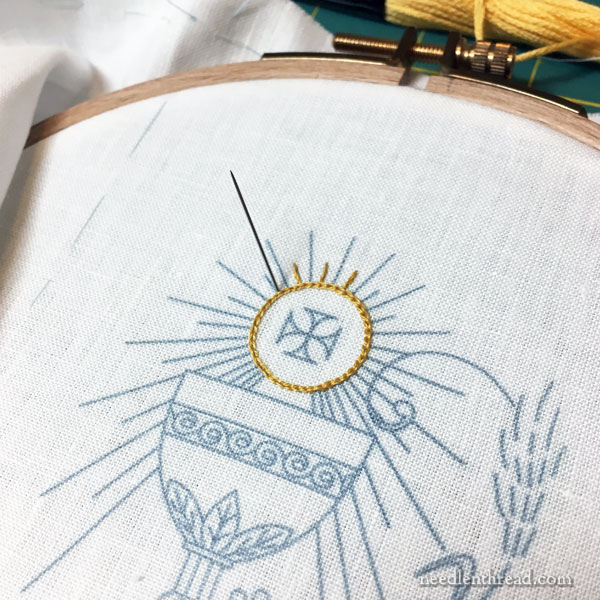
On the host and chalice, I’m using two shades of yellow-gold.
Using the slightly darker shade, in chain stitch, I outlined the host. I’ll do the same thing to the chalice.
I worked the cross in satin stitch outlined with stem stitch in the darker shade.
I’ll use the lighter shade (and stem stitch) to work all the details on the chalice.
The rays are embroidered in stem stitch, alternating the lighter and darker yellow-gold.
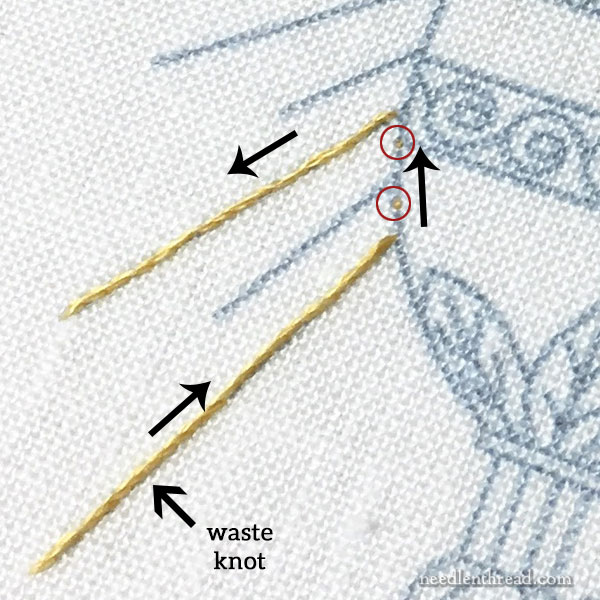
With this type of embroidery, where both fabric layers are lightweight and a little sheer, it’s super-duper important not to carry the embroidery threads across the back of the fabric in any empty design space. They would definitely be visible, even with the two layers of fabric.
So, to give you an example of the direction of stitching that saves the most time, you can follow my stitching path in the photo above.
I started with a waste knot where the arrow points in the photo above, leaving the knot on the top of the fabric, taking two tiny little backstitches, moving towards the beginning of the line in the lower left corner of the image.
From there, I started the stem stitch on the line, towards the chalice design, clipping the waste knot as I approached it, and covering up those two tiny tacking backstitches with stem stitch.
When I got to the line of the chalice, I took two tiny backstitches along that design line (they’re circled in red) and then started the next radiating line, moving out away from the chalice.
This way, I could easily stitch those two long lines without having to turn my work over and run the threads under the backs of stitches to get to a new line, or end the thread and start again.
The idea is to create paths for yourself that allow you to stitch as much as possible without having to end a thread, and without carrying your thread on the back across an empty design space on to get to a new part of the design.
After stitching that second radiating line, I still had plenty of thread, so instead of ending the thread, I turned my work over, whipped the thread around every other stitch on the back, and moved myself back to the chalice line, where I could make two tiny tacking stitches to move myself to the next radiating line in that color.
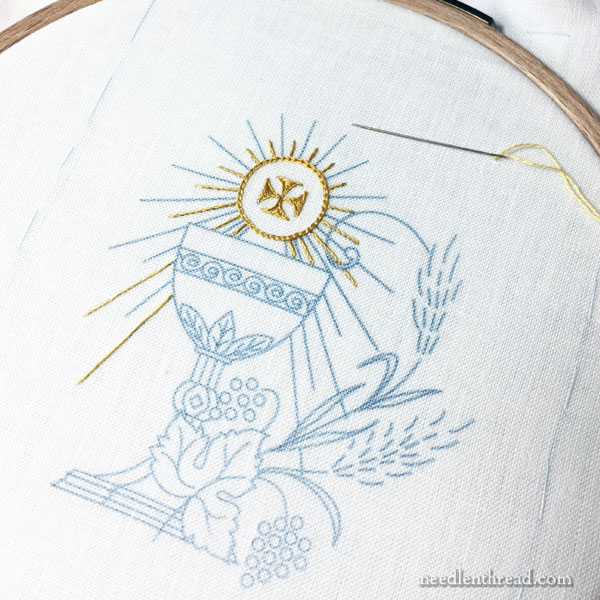
And here I’ve started on the chain stitch around the chalice, using the darker shade of yellow gold.
My chain stitch on this bit isn’t looking so hot. But hopefully, once there’s more around it, it’ll all just blend together and look fine!
And that’s as far as I’ve gotten on the stitching! Woohoo!
Guess what I’m doing today?
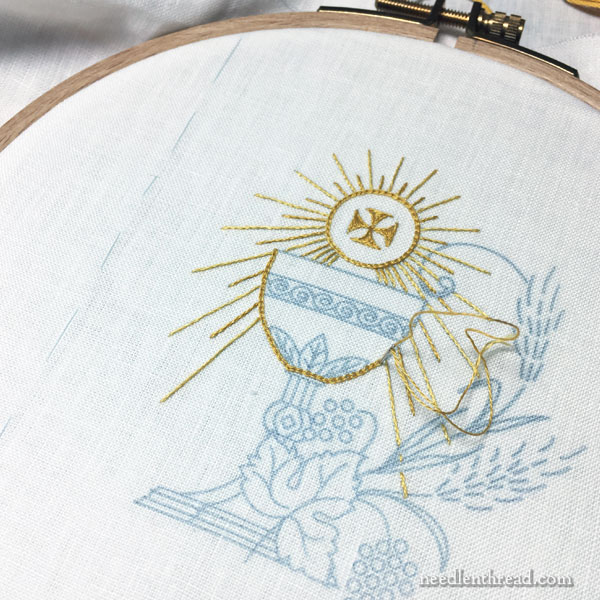
I flipped the design on purpose, by the way.
When I originally drew the design, I didn’t think of it actually on the book cover. Above, you get an idea of what the originally orientation of the design would look like on the book cover.
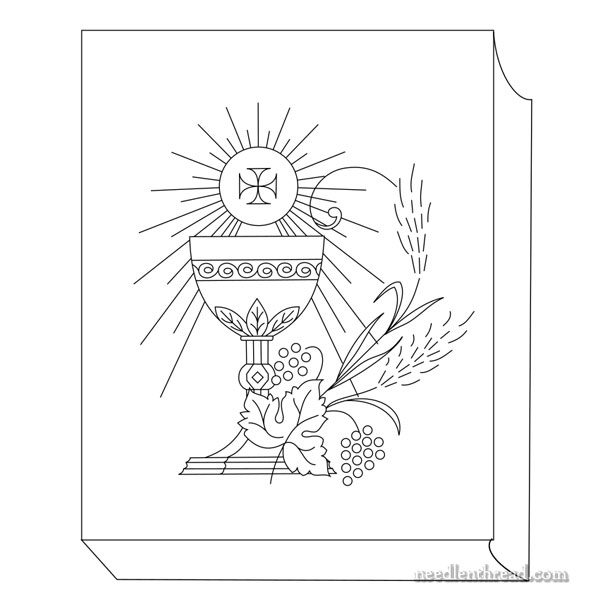
And here it is, flipped.
I like the heavier part of the design, with the up-swoosh of wheat, on the outer edge of the cover. In the overall scheme of All Things Book Cover-ish, I don’t know if it makes that much of a difference, but I just like it better. It “closes” the design, somehow.
So that’s where things stand today – hopefully, by the weekend, they’ll stand quite a bit further along!
Incidentally, while I stitched the small amount above the other day, I listened to Yvette Stanton on Fiber Talk – a positively charming, fun, thought-provoking episode of the podcast. Loved the reflections on materials and the development of art and craft in any particular region or era! If you haven’t heard it yet, have a listen!
Dear Mary
I like the the design you have chosen for the book cover it’s unusual and very decorative, I also like the gold thread you have chosen for the chalice it really stands out. The waste knot you have used is a good idea for a small project and lightweight linen. I do hope you finish it by the weekend I look forward to your progress and I hope your Niece will like it. Thanks for the tips on the waste knot and for sharing your progress with us on the Holy Communion book cover, lovely.
Regards Anita Simmance
Lovely work as always Mary. That stitching does not look like one thread from six – I don’t know how you do that. Looking forward to seeing the finished product.
Love this deep dive on your approach. I love the design. With a little modification it would be great for a Challah cover, too.
Lovely! I agree about the flipped design; it looks like it’s facing the right way.
Mary – please forgive me if I’m being rude here. Although I really like ecclesiastical and Christian embroideries, I come from a non-liturgist background, so a few of your terms are a bit of a mystery to me. Thank goodness for on-line dictionaries! I know what a chalice is, but I had to look up “host.” Host means the little bread wafer, and I am assuming that the circle with the cross in the center is the bread. (When I here “host,” I’m thinking “multitudes,” as in a “host of angels.”) I may be being picky here, but, sometimes, I need a bit more explanation on a few of these terms. I would assume some of your non-Christian followers are unfamiliar with some of these “churchy” terms too. BTW, I’m looking forward to seeing the your finished book cover — I already love the shade of golden yellows you selected!
My experience of the Sublime transfer pen is it spreads quite a bit during the transfer process. Not as wide and certainly not as dark as the Sulky pen, but I find the lines aren’t fully covered with 2 strands DMC floss. I have no idea how you managed to cover your lines with one! And although I ordered two black Sublime pens, one is a gray-blue when transfered, while the other is a very faint greenish color. Rather annoying, I don’t think it would work well enough even on bleached white. I need to get brave and start free-handing my own designs. I’m not much of an artist, but then the designs I like to stitch aren’t terribly artistic! 🙂
And, please, what specific linen did you use, and what various uses is it good for?
Holly
This looks so pretty! Just a thought-it might be helpful to add a picture/diagram of what you mean by whipping the thread around the stitches for those of us who are super duper beginners. That would help make this a little easier to visualize and make it a one stop post for doing a project. Although you’ve certainly done a lot of those for us already! (Thanks for your immeasurable awesomeness!)
Definitely a better composition on the book cover when flipped – the spray, sorry, the up-swoosh (what a fine description!) of wheat leads the eye towards the open edge, not back to the spine. I hope you complete your project on time – I am sure you will.
Good day Mary,
I just love this design, simple and yet looks full of details! It is juste perfect for my skill level. Will you eventually let us know the thread color numbers so if I am to do something similar for one of my nièce the piece would turn out gold instead of yellow! I will probably add a few beads for a bit of sparks hihi! Enjoy the rest of the week and I will keep my finger crossed for you to finish it on time, it is beautiful.
When I have something such as the rays you are doing, I do the same thing, but then will travel the thread back to the chalice line through the back of the stitching of the ray and then continue along the chalice line to the next and continue to do that. I would have ended up going back through the back of the stitches of the ray to end the thread anyway. I figure that if I can hide the thread this way it will hold better than if it was cut and restarted constantly for each ray or, in this case, each pair of rays. I probably would have done the rays after the chalice outline and worked the ray thread from ray to ray through the back of the threads of the chalice line, rather than taking tiny stitches along the chalice line. I am probably breaking all sorts of rules when I do this, but have found that it works for me.
That is a beautiful design Mary ! It is going to be a real little treasure .
Hi Mary,
Thank you for sharing the podcast. Very interesting to hear there is no “hardangar linen” used in Norway. (This was the two threads over two threads fabric that was put forward some time ago.) Yvette explains it very well.
Hi Mary:
I really like this design. Would it work for a confirmation bible cover?
Mary, I’m glad you enjoyed the conversation I had with Gary and Christine on the podcast. Like yours, it was a really fun time.
The embroidery is lovely. I’m glad you finished it in time for the event! 😉
Have you considered putting your designs on SpoonFlower so we could just select the design on the type of fabric we want…. and avoid the whole problem of transferring a design to fabric? That seems to be my hurdle when doing an embroidery project. Of course, I realize it would be tricky as some people would need more or less extra fabric around the design depending on what the embroidery project will be used for, like this book cover would depend on the size of the prayer book. My daughter will receive her First Holy Communion in about a year, so it’s about time for me to start a project like this for her!
Very grateful for your blog– it has been invaluable in my learning hand embroidery after over 30 years of machine sewing, I actually didn’t know it was POSSIBLE to hand embroider! I thought I had to spend several grand on an embroidery machine, but found and started reading your blog 😀
beautiful work. I can only hope that my stitches are as neat and delicate as yours!