


Have you ever completed an embroidery project and looked at it a year later – or maybe even just months or weeks later – and wondered, “What color number is that?” or “Gosh, how many strands of floss did I actually use?” or “Did I stitch that first or this first?”
This morning’s embroidery bit isn’t so much a how-to tip as far as stitching goes. Rather, it’s a kind of organizational tip.
If you’re a prolific embroiderer, especially if you plan to do something in the long run with your embroidery – maybe you want to be a designer, maybe you want to teach classes, maybe you want to start a blog to document your needlework journey, maybe you’ll want to reproduce the same project again down the road, or maybe you just want to be able to remember what you did when – this tip is for you!
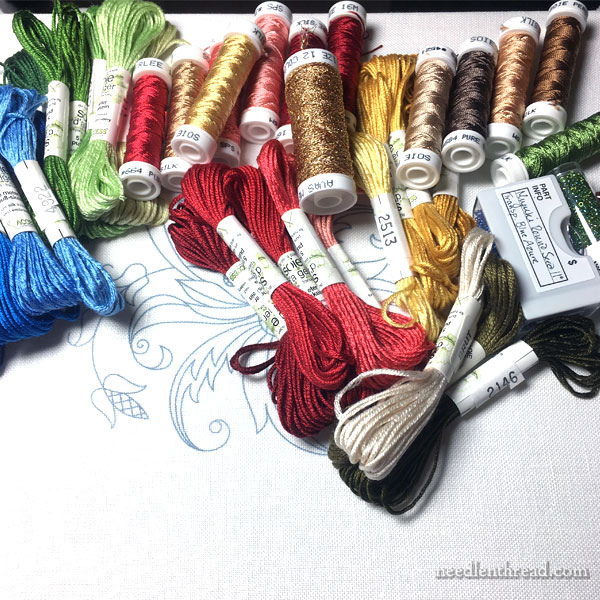
A couple weeks ago, I pulled a variety of silk threads for a new project. Since then, I’ve started stitching the design, using some – but not all – of the colors I pulled, and removing some of the original colors and replacing them with different colors of silk.
It often goes this way when I first start exploring a project. I have an idea for a color scheme, based on my original doodle when I started messing with the design, and I pull colors and shades that I think will work to bring the design to life in needle and thread.
But as I start to work through the project, I often change my mind. Maybe I mix in new colors, remove some of the originals, try different weights of thread, and experiment until I get the look I want. Maybe I use different stitches than originally planned on my doodle of the design. Whatever the case, it’s pretty certain that I’ll change my mind several times during the course of a developing project.
So, whenever I start a project like this, I begin with documentation.
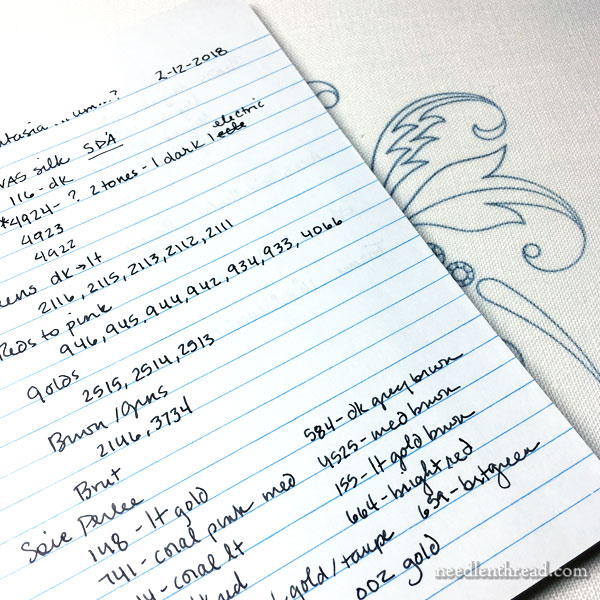
In a small notebook that I can easily tote around and tuck in with my project, I start a new page with the date and the name or description of the project. I fold up a copy of the pattern and tuck it into the pocket in the notebook.
Then I make a list of all the materials I originally pulled for the project, from the ground fabric I’m using to all the threads I might use.
As I change my mind – whether eliminating or adding new colors – I write it down. This is the only way I can keep track, with certainty, of the color numbers I actually end up using.
After all, when working with various shades or weights or types of threads, once stitched, different threads can look very similar!
I also note stitches or variations of stitches I use, because it’s easier to refer to the notebook than scrutinize the piece later, especially if I’m playing with a lot of stitch combinations.
The copy of the pattern I keep in the notebook is very handy for this. I draw lines to specific areas and jot the information down right on the pattern.
There are times, though, when I don’t jot down a color choice immediately. Maybe I’m stuck into the process of stitching and I don’t want to break my stride. Maybe my notebook is in the other room (and I’m too lazy to go fetch it!).
Still, I want to make sure I note the exact shades I used at any given point in the developing project. Otherwise, I might be in trouble when the project is finished.
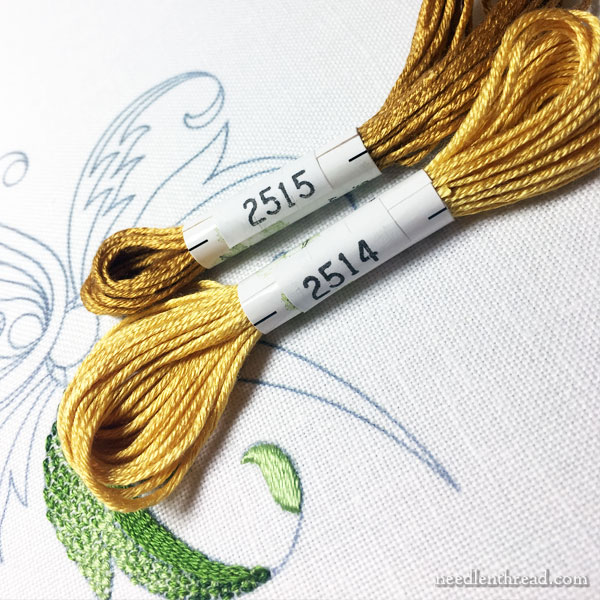
And that’s when the camera on my phone is super handy. I can snap photos of the threads I use, with the color numbers visible on the labels.
Then, when that stitching session is over, it’s just a matter of flipping through my photos and jotting down the required thread types and color numbers.
In a Nutshell
1. If you want to keep track of your thread and stitch choices on any embroidery project, keep a small notebook handy. Before you start stitching anything, jot down all the materials you’ve pulled for the project, from ground fabric to thread types and colors. As you stitch, make a note of colors, stitches and any changes you make.
While this may seem superfluous and tedious if you’re a hobby embroiderer, you’d be surprised how handy that notebook can be down the road. It’s a small investment in time that will pay off huge dividends later, if you want to remember with precision what materials, threads, colors, and stitches you used on any given project.
2. If your notebook isn’t handy or you don’t want to dig out paper and ink at the moment, and assuming you have a smart phone handy, at least snap a quick photo of the threads you decided to use during that stitching session, with a clear shot of the labels. Then you can add the information to your notebook at the end of the stitching session.
What About You?
I know there are stitchers out there who even keep swatches of threads and fabrics they use for each project – kind of like embroidery scrapbooking.
I tried that, once upon a time, but it took up more time than I was willing to commit to it, and it didn’t really add any extra benefit for my purposes. But if you like that kind of organization, it could be a fun exercise!
What about you? Do you keep any documentation of your project progress? Any questions, comments, or suggestions about documenting your projects? Feel free to chat it up below! I’d love to hear your input!
Facebook Group
If you’re on Facebook, why not join me and lots of other embroiderers over on my new Needle ‘n Thread Community Facebook page? It’s a great place for inspiration and information! Lots of good discussions already and a whole heap of lovely needlework!
Dear Mary,
Honestly, I am too lazy to keep count and write the thread colours down. All my projects are a once off. I only made one exception once, I embroidered a chickadee for a mutual friend of Roby and me. Roby liked it so much she asked me to do one for her twin sister and I said I might as well do for her too. Then I though actually I would like one myself. I lined up a production line embroidered one colour at a time on each three. It worked well, no keeping tabs on thread colours. On my snow leopard which is mostly black white and grey with some light brown and tan in between I could not believe when I started to put my threads away that I used over 60 colours. Love Elza Cape Town xxx
Though I cannot embroider anymore, I used to keep my notes and swatches of threads in a three ring binder. Each project had a page enclosed in a simple sheet protector. The last step was to color photocopy or scan the finished project and place that in the sheet protector page. One of my biggest projects, a map of NJ, required two pages since I had to xerox the top & bottom. I gave that one away but I can still see it anytime I like!
Hi Mary,
Love your article today regarding organizing the project. I was wondering on your project photo what stitch you used on the large green leaf under the gold skeins of floss that looks like snake skin? It would be perfect to use on a project I want to develop for a checkered lily flower, (Fritularia). Thanks for the great tip for organizing as I can use all the help I can get.
Mary Ann
That is actually a very good tip of the notebook. Maybe I should start one of those as well..
Usually I do document all the steps I take and materials I use etc., but I throw that out whenever the project is finished. It is sortof mentally finishing with a project and forcing myself to be creative again with my new project and not get stuck in a certain way of doing things. Mind, I only do this when I want the piece to be one in a kind (gifts orso).
Mary — this is excellent advice even for non-embroiderers. I am more of a quilter who adds ‘big-stitch’ and some more traditional embroidery as surface embellishment on my quilts. I started following your blog after a recommendation from Laura Wasilowski, the queen of quilt improv embroidery (and purveyor of delicious hand-dyed threads).
When constructing and quilting a quilt, keeping straight what you used is imperative. If you have several projects in process, you might have to breakdown the sewing machine set-up multiple times to switch between piecing and freemotion machine quilting. I use a notebook to document projects, sketch piecing and quilting designs, note needles, threads and colors used or to be used, including what I used in the bobbin. I also take lots of pictures of intermediate design decisions. Photos have saved me from sewing things together out of order many times, and they can help with design decisions. Thanks for all your interesting and informative posts. I’ve learned a lot.
It’s a great idea and I wish I was organized enough to keep it in one book. My thread list usually ends up on the tracing paper I use to transfer the design.
Mine does too, sometimes, but I end up transcribing it into my notebook, or stapling the pattern transfer into the notebook, so I know where to find it. Otherwise….!
Dear Mary
I don’t document my projects but I can see that Keeping a documentation of all the different threads/stitches you use in a given project is a good idea especially if you want to use the same colour/stitches again. But it makes sense to keep a document for further use if you are a teacher or embroidery is a business. In my present project I’m making a second quiet book for my Niece and I didn’t document the first quiet book and I wish I had as some of the pages are the same and I have forgotten the technique I used. Thanks for the tips on documenting projects and for sharing with us different ways of keeping a document.
Regards Anita Simmance
Good morning Mary
What a good article is this!
I do this, somewhat. I knit too and do more of this with knitting than embroidery.
To me the date started and finished is important and I like to add a paragraph on
details that were important 0r, what I would do differently the next time.
The photography is important too.
Good work, Mary
Shron
I use my iPhone to photograph my design, the skein numbers as well as the floss itself and then I go to notes and type whatever info about the project I can think of and add the picture(s) into notes. From there I send it to my email address and add it to a RW DVD for a permanent record of the project.
I’m the over-compensating stitcher who keeps notes and includes a photocopy of the piece in a notebook. (How many skeins of which colors, which fabric and needles, etc. I know, it’s a bit much.)
I scan and print the finished piece, then note the thread colors used, similar to the instructions you get with embroidery patterns.
I also have a section to note discontinued thread and fabric colors and their best-match equivalents.
Oh, and notes on which colors and threads didn’t work out so well.
I know, I know: I’m even rolling my eyes at myself, lol!
I document every project that I do. Many of the items I make are small felt ornaments, critters, and dolls for resale. I have created a form (in MS Excel) where I document the project, all the components (felt colors, thread colors, safety eyes, etc.). It really pays off when I have to create something again. I can still change colors or ideas, but I have something to start with, and I document the changes. The second page of my form also has process suggestions, e.g., the order to do things, tricks or challenges that I found. I recently received a new order for 40 holiday items that I had made in 2016. It’s for the sister of the original recipient. She wanted everything to look exactly the same. I was so glad I had my detailed documentation. It doesn’t take that much longer if you have an established process and form for the information.
Oh Mary, when I sew, I snap a photo of the dress, keep a snip of the fabric and note fitting changes…yes our bodies change. One day it came to me how important it was to note where I purchased my supplies and the cost.
I don’t know why I didn’t think of this when I started embroidering! I was putting together a quick learn to cross stitch kit. I ended up having to stitch it 3x. That was a lesson learned. And don’t forget to write down your costs, especially if you need to replicate the same project. I have been doing too much for my own enjoyment, and quickly forgot the lessons I learned from sewing. Great post.
YES, I do keep a note book of my designs and threads used for what element. I draw sketches of what I did for a flower or whatever it is, so months later when I am writing the instructions for my design I have my thread list and how I did the flower. In fact, that is what I am doing today; writing instructions, thankful for my notebook.
I hadn’t thought of the smart phone for pictures, that would be helpful for taking pics of stages of new flower I am creating. Now my phone will be close by along with my notebook.
If the item is a gift, I also make a note of who I am giving the gift.
Sharon ~ Modesto, CA
Well, I once made the same gift for the same person two years in a row! Since then I keep a notebook with a description of the finished project and, for whom it might be intended.
It also helps me realize what I’ve accomplished over the year. Other than a vague description of fabric, technique and size ,I’m never likely to do an exact duplicate so I don’t worry about the details. If it is something like a chair seat that might receive wear, I tuck in a few lengths of the threads used when I mount it.
I’d like to share something I read 25 years ago by Thomasina Beck: “how many embroiderers from the past are but shadowy figures….To add a date and your name is essential, but how much more interesting would it be to tell also how long the work took, and what inspired it!…Keep a written record of your embroidery.” So I began my needlework diary with a photograph and a few notes. Every few years I look through it and it brings back such neat memories!
Dear Mary, the last photo, above, w green leaf and gold floss…I do not recognize stitch used on leaf. Would u please take a minute to identify?
Thank you.
Hi, Pat – not quite ready to reveal anything on this piece yet. It’s a special project, and once I’m ready and it’s ready, I’ll write a little more about it!
I am conflicted about organizing–it doesn’t seem like fun when doing paperwork. However, I NOW see the benefits. Do you have UFOs? My mission this year is to complete things. If I borrowed thread from one project and didn’t return it to the correct project bag, I now have to be a detective and try to figure it out. For example, the time it would take me to document compared to the time it would take me to investigate is minimal. Even after investigation, fiber may be incorrect and thus result in ripping out. As of this date, I am on the side of documenting. It may not be fancy but the info will be available if needed.
I’ve always been hit or miss with keeping an embroidery journal. Best I managed last year was my start and end dates. Seldom even a photo. Even that though was improvement over the previous 30 years. Oddly I have always been very faithful on tracking full details on knitting, spinning and other passions. I decided this year was the year though. I find myself wanting to coordinate projects occasionally or see if I can improve on an idea. Then have no clue what colors I used or even brand of thread or fabric. Unlike years ago there are so many options available on the market, guessing can be difficult as time passes.
I’m simply using Word to keep track. One file per project. I’m already finding it useful in just a couple months. Nothing fancy, just all the common basics along with notes of changes and why. Such as this color stitched darker than expected, this new to me brand of fabric is too fuzzy or too thin etc.
I have a notebook of designs & threads I used for little designs. I usually transfer my designs by transfer pen drawn on paper. So I stick the used paper design in the book too. But this year I’ve gone further & started a blog to document my projects embroiderymuse.com. I’ve just finished a project, Yellow House Landscape and already I’m finding it interesting to go back to the beginning of it read my notes of how I did it and what worked and what got redone & why. I photographed it in stages so it works better for me than a written diary. Now I’ve started a design from your Church designs book and will do the same.
Hello Mary,
Well let me tell you that your notebook idea is great. I never keep track of anything.
And sometimes I wish that I could go back and be able to know what I used for a project.
So starting today, I have a little notebook right there in my sewing room . Just picking up dust, but not anymore. I will start using it tonight, because I am stitching Party in Provence, Tulip Festival and other projects. Thank you for such a great tip.
Have a nice evening.
Louise
I have to admit to not keeping any records. I normally only do a project once then give it to the person I designed it for. Until I finish the project I keep everything, all drawings, all threads and all my attempts of trying out a stitch in a separate small hoop. I recently made a lizard madly biking down a road and I made over 10 attempts to make his eye. I finally used a half dome of glass and used paint on the under side to get the colors just right. Then I used needle lace to attach it. (that was a few more samples to get the needle lace right). His eye bulged out nicely and looked just right. but I still have all those samples. (and I’m not sure why I keep them)
Mary, could you identify the stitch used in the green leaf in the picture shown directly above? Thank you.
Please disregard this second request. Did not see your rely about special project.
I keep a picture of the project I am working on and indicate on it the stitches and threads used to make the picture. More often than not I am working with wool and using an applique pattern that is not specifically for wool, so I get to pick and choose my thread colors and stitches. It is nice to have a little history, especially if someone asks me what a certain stitch is.
Dear Mary, thank you so much for your tips and tricks on how you keep your projects organized. I just finished a 23 month quilt project that included a lot of needle/thread paint embroidery. One row was made up of six wildflowers that grow in the Rocky Mountains. They took me six months and if didn’t keep good records I would have gone crazy. By the time I completed the project my notes looked like a good size novel. I really love the phone tip, I will remember that the next time my notebook is in another room!
Thank you for sharing your love of needlework, I love your newsletter.
Linda
I just started doing embroidery with the Party in Provence project so I haven’t set up a system for documenting it yet. But, I have long been a quilter and do keep a notebook with photos, fabric swatches, notes, etc. I glue a small swatch of every fabric I buy to a 3X5 card and write down it’s name, designer & maker, how much I bought, where and when I bought it, the price and note if it was purchased for a special project. Each card is numbered and that number is jotted down with a swatch in my notebook. If I want to know something about a fabric I used in a project, I have a path to the information. It seems like a lot of work but it only takes about 2 minutes to document new fabrics and I have had many times when it was very helpful. The cards are also helpful to take shopping to buy complimentary fabrics for a project. I know I will set up a system for documenting embroidery projects, too.
What a fabulous idea Mary! I never document as I’m usually too eager to get started but often when looking back I cannot remember which thread I used, especially if I like it and want to use it again! I will be using a notebook from now on so thank you for the idea.x
Hey Mary! A couple of years ago I participated in a challenge for our chapter of the EGA. It was so much fun deciding what to do and how to do it. When I was done, several people said that I should teach the project. Oh oh. I hadn’t written anything down. So I quick went back (before I forgot everything), and started step by step instructions and materials lists. I drew diagrams and made copies of the patterns that I had made. This actually helped me see where things needed to be tweaked or improved if I ever teach it. I have always made note of any changes that I make to a purchased pattern, but this was the first time I had documented one of my own designs. I recommend writing things down as you work, or very shortly after you finish, if for nothing else than re-reading in later years for your own enjoyment!
I’m keeping a journal right now for the 2020 challenge(crazy quilting) from Sharon Boggan. I’m doing 9″ blocks mounted on 14″ squares of muslin. This size allows me to use a 12″ hoop when needed. I’ve been keeping a running tab on the items used on the block by writing the info on the muslin margins with a ballpoint pen. Later, I transfer the info to my journal.
I use a 4×6 index card to keep track of all the material associated with a project (thread type, color, fabric & color, backing, padding, metal threads, etc), where they were purchased and cost, as well as stitches, inspiration, finishing materials etc. While the project is in progress, I keep the card in the bag or box that holds the supplies for that project so that it’s always at hand to make notes on. The index cards for completed projects go into a recipe box. I have a 3ring binder with sleeves to hold designs, and a larger folio to hold larger designs. All photos for a project (inspiration, in-progress and completion) go into that project’s folder on my computer. For me, this is the most efficient way to organize- I have the photos on my computer to quickly access, patterns are stored away safely, and the written details of each project are in an easily accessible and small recipe box.
Some great tips, Mary.
I have only really started designing my own pieces since starting the Certificate, as I would one day like to design for others. I keep a notepad with my original sketch handy, along with various copies coloured in different ways and with slight stitch variations. As I work I make note of the final decisions.
Having said that, I haven’t yet worked out a good way of documenting silk shading. I know the colours but not the exact placement!
Good morning Mary,
Quilting is my first love with embroidery a very close second. Some years ago I began a quilt for my parents’ 50th anniversary. I kept a notebook record of fabrics and laces as well as a record of my time, I also photographed each process. When it was completed I created a photo diary to give them along with the quilt. The valuation certificate was included at a later date. The quilt and album are now back in my possession and it’s a joy to look at them from time to time. I’ve done this since with a number of ‘special’ quilts and have found that it adds a special dimension for the recipient/s to be able to have a little insight into the creation of their quilt. Preparing the album does take some extra time but on each occasion it’s been worth it.
At our guild we have developed a journal for stitchers and quilters to document their growth. I wrote the stitchery part of the journal. In it I included charts of the different techniques, a guide on how to determine what level their work is at ie. beginner, intermediate, advanced and a page to record their project. On the project page, they are invited to make comments about their work and can ask a mentor to contribute comments as well. It is also suggested that they include a photo of their project. The journal is coil bound and in book format. We gave every member of our guild a journal on our Guild’s 40th anniversary.
Hello All,
I regularly document my projects with pictures. This is key with large projects. The photos serve two purposes. One it lets me view the evolution overtime and two it lets me see the entire project in context. When working on something that is more than 24 inches square, there is always something hiding on the rollers of my frame. If these will be framed, then this information goes in a pocket on the back. If not, then these just go into my project folder.
The little notebook is a great idea, but the take-a-quick-cell-phone-pic is even better! While I don’t design my own pieces, I do make changes to designs I’m stitching and my pattern and instruction sheets are often covered with marginalia. If I could get into the habit of using a notebook for all those notes and changes, it would save a lot of time later. Thanks for the great ideas!
Hi Mary,
No matter if is it knitting, quilting, or embroidery, I record the size of my needles, hooks, and all materials used. For knitting projects to determine gauge , I make swatches which I save. I photocopy or save labels from the yarn, fiber, fabric, or thread that I’m using. I also take notes on any deviation or corrections that I make to the pattern’s instructions.
Cheers,
Beth
Thank you! Thank you! I am really bad about documenting projects. I design them and have to go back and figure out later, how much time, what colors, how many strands. I know I should do better, but when I am in my creative moments, I am not thinking documentation. So I have to write it down, and find a scrap of paper handy, then finding the scrap later. You struck a chord with me!