


If you’ve ever browsed through a stitch dictionary, you’ve probably noticed that embroidery stitches are often arranged according to the job they do.
Line stitches, for example, are stitches that work up in lines – and this is where you’ll find stitches like backstitch, stem stitch, split stitch, and chain stitch.
Filling stitches fill up spaces. Here’s where you’ll find satin stitch and long & short stitch, lattice fillings and the like.
But there’s no hard and fast rule that says line stitches can’t be used as filling stitches – and sometimes, a line stitch is really the best option for filling up a design area.
Today, let’s look at a few examples of how line stitches can be used to fill spaces on an embroidery project.
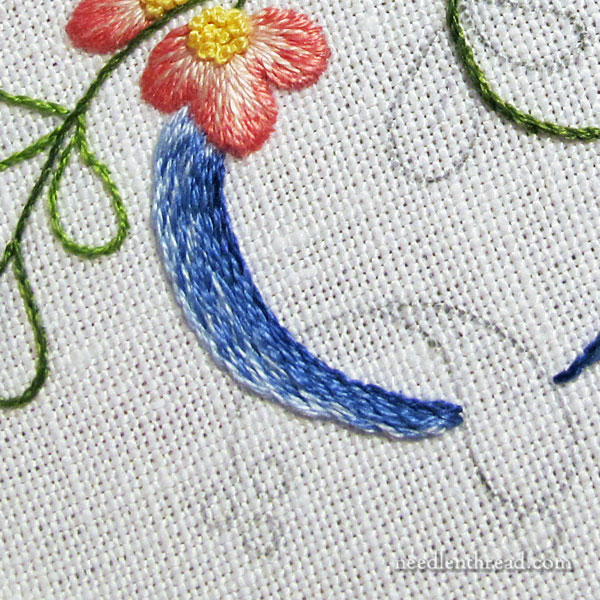
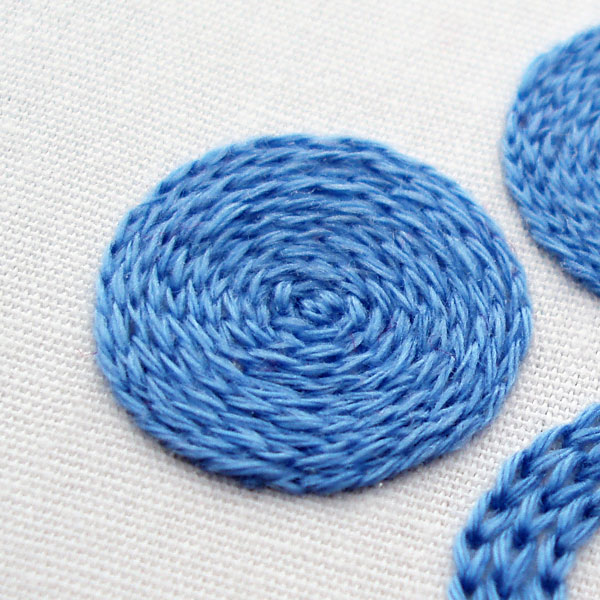
Stem stitch is normally used to create lines, delicate or bold, in embroidery. But it can also be effectively used to fill a space. Using stem stitch, you can easily fill a space with solid color, or you can easily shade with it, too.
Above, you can see an example of stem stitch used to fill part of a monogram. You can find the tutorial on how I stitched this monogram here.
To work a stem stitch filling, begin by stitching on your design line and then work subsequent lines of stem stitch to fill the space. Work the stem stitch lines close to each other, to cover the ground fabric.
If you stitch one line in one direction and the subsequent line in the opposite direction, you might have to change the way you work the stitch. You can learn about stitching direction and stem stitch in my video tutorial on stem stitch and in the article that accompanies it.
You can fill any type of space with stem stitch! On fuller shapes – larger leaves, petals, clothing on figures, and the like – it sometimes helps to work the entire outline of the design shape first, and then fill it in so that your design edges are crisp and true. You can manipulate the inside stitching to fill the spaces as you need to.
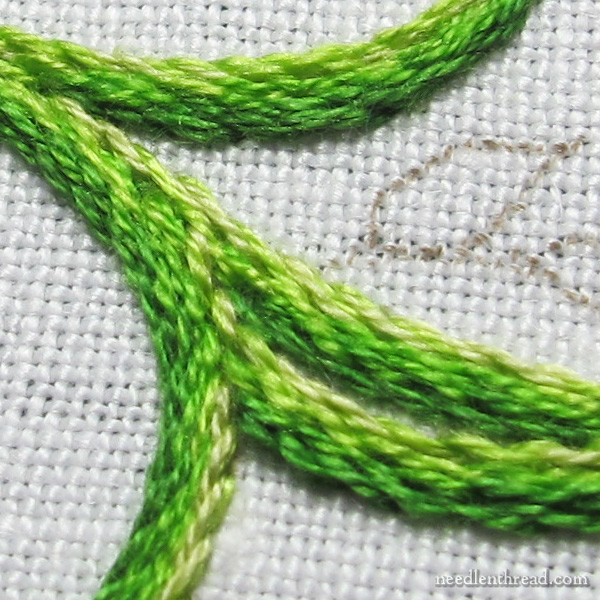
You can shade in a filled area with stem stitch. If your floss comes in a gradual range of shades, achieving a shaded filling is simple! Just switch to a different shade for subsequent lines of filling.
If you want a more gradually filled shape, especially if your floss does not come in gradually-shaded colors, you can still achieve this with the stem stitch and other line stitches by combining two different shades of thread in your needle at once.
You can read about this process of shading – used on both the monogram in the first picture and on the green vines directly above – in this article.
Chain Stitch as a Filling
Approach chain stitch the same way you would approach stem stitch: begin on the outside of the shape by working the chain stitch along the design line.
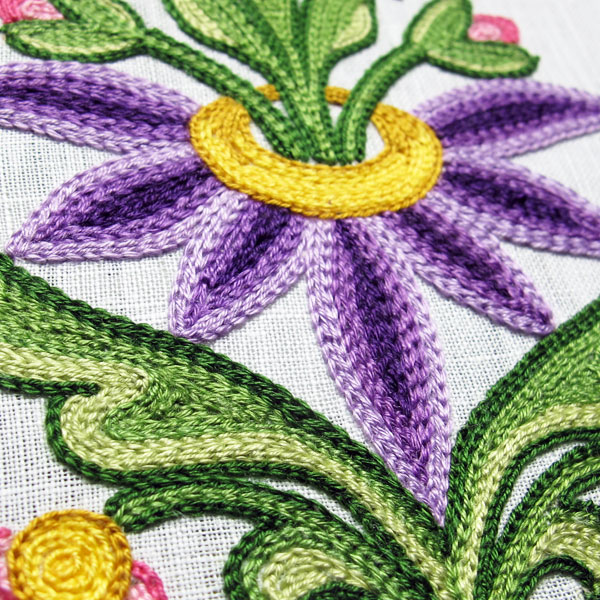
Beginning on the outside of the shape is important. Doing so will give you a sharp, neat outline and will set the shape.
Then, work subsequent lines of chain stitch, inside the shape, following the original outline.
As the shape fills and you reach the center, you may have to get creative in the way your lines fill the shape, but in the end, you’ll end up with a solid fill.
The flower above was filled with chain stitch, using a tambour hook. You can read about tambour embroidery here. It’s a relatively quick way to work chain stitch filling by hand.
While the elements on the flower are not gradually shaded, you can still see how a variation in shade intensity is possible by simply switching to another shade of the same color.
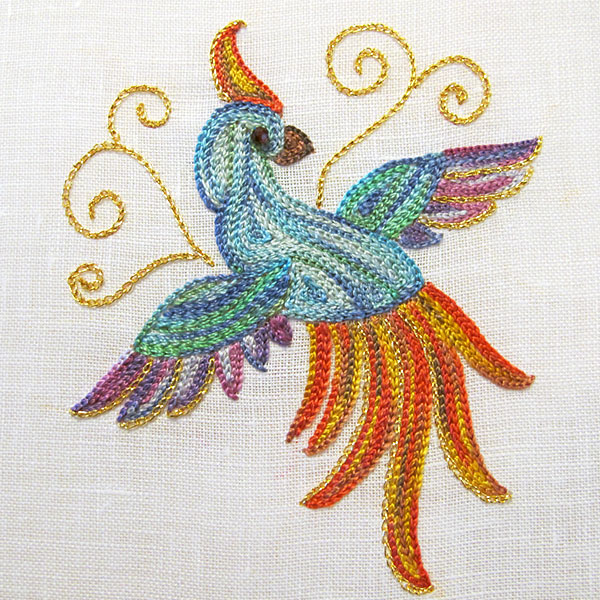
You can also achieve a sense of shading and color change by using variegated threads, like I did on the bird above – also worked with a tambour hook, but it could also be done with a regular needle in regular chain stitch.
Chain stitch doesn’t quite blend like stem stitch does, so it’s more difficult to achieve a nicely blended sense of shading, unless you have access to floss that has a color range with very gradual shade changes.
You can see this tambour bird in detail here.
You can find tips on working with chain stitch here and here.
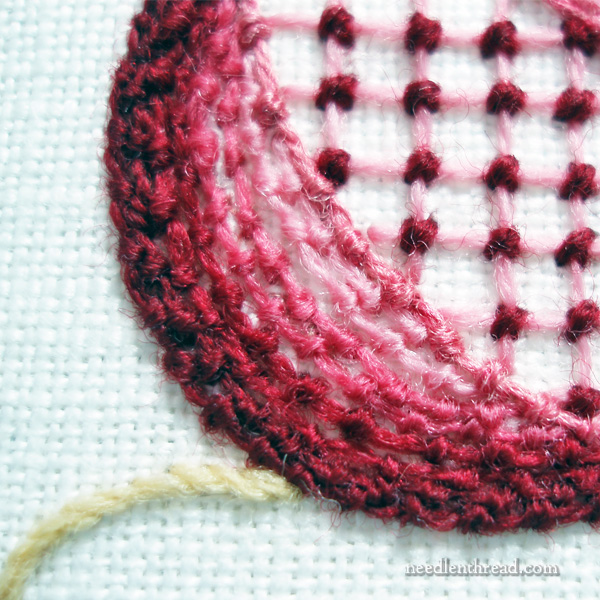
Split Stitch as a Filling
Split stitch is another line stitch that works very well for filling.
With split stitch, fill from the outside in, just as you would with stem stitch or chain stitch.
Be careful, though! Make sure you’re working the actual split stitch (coming up and splitting each stitch from below) rather than the split backstitch (which splits each stitch from the top).
Split stitch uses a relatively small amount of floss and the build up of stitches on the back is negligible. But split backstitch uses almost twice as much floss, and the stitches on the back of the work build up thick.
You can see the difference between split stitch and split backstitch in this article and in this article – and learn why which one you use actually does make a difference.
You can shade with split stitch as well, relying either on the shades of floss to provide the changes in shade, or by sharing shades in the needle to gradually change the shade (as accomplished with the stem stitch).
However, if you gradually shade with split stitch, you’ll achieve a better looking split stitch by working with odd-numbered strands of thread in the needle, rather than even. That is, use three strands instead of two. Why? Because when you use two strands of floss with split stitch, the needle is likely to split right between the two strands, separating them and creating a small gap in the stitch. If you use three strands, it’s easier to split the bunch without leaving a gap.
Knotted Line Stitches as Fillings
Depending on how much you like texture, you can even use textured line stitches as fillings.
For example, on the pomegranate design in the photo above, the red outer part of the stylized pomegranate is embroidered using coral stitch (a knotted line stitch) in crewel wool.
You can see more detail on this project here.
Working knotted line stitches like coral stitch add a certain level of interest, thanks to the texture they provide. But they also add an extra challenge to the stitching.
It is helpful, for example, to space the knots so that they are off-set in each subsequent line. This way, the new line of knots fits in between the previous embroidered line, and it helps fill the space better.
Additionally, it helps to think ahead before you start filling your space. You’ll want to stitch the knotted lines in such a way that the needle doesn’t interfere with previously stitched lines as you form whatever knot stitch you’re using.
Other Knotted Line Stitches
Besides coral stitch, Palestrina Stitch and Knotted Pearl Stitch (which is a reverse Palestrina stitch) are both knotted line stitches that can be worked as textured filling.
Along the same lines, Portuguese Knotted Stem Stitch could also create a highly textured filling made from a line stitch.
Give It a Try!
There you have a few line stitches that can be effectively used as filling stitches. Most of them are easy stitches to learn, they work up quickly, and they look great as fillings.
But don’t limit yourself to these! Think of your own favorite line stitches and see how you can apply the same concepts above to turn them into filling stitches, too. Backstitch, outline stitch, running stitch, various braid stitches – these are all worth playing with, to see what you can do to turn them into effective filling stitches.
I hope you give some of these suggestions a try – they’re fun and effective ways to fill space!
Have a jolly weekend! I’ll see you next early next week, when we finish Garden Swirl! Hurray!
Leave A Comment