


Last time we visited the Secret Garden embroidery project, we looked at the vines on the lower half of the hummingbird design, which were underway in shaded stem stitch filling.
I’ve finished embroidering the vines on the lower half of the project, including the center scrolls.
Today, let’s look at that part of the design. I’ll tell you how I stitched it (you might want to do it differently), and share some insights on some tricky spots.
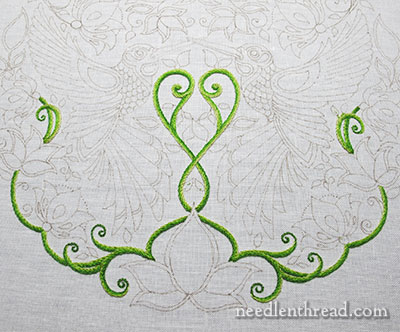
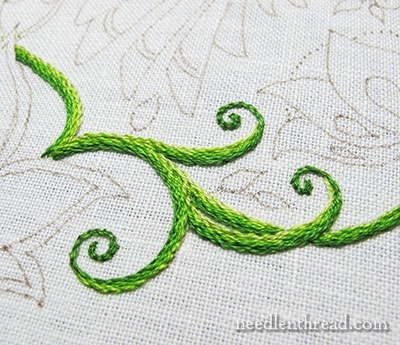
These are all the finished thicker vines on the lower half of the project. They’re all worked in stem stitch filling, shaded as explained in this article.
The only viney parts that aren’t stitched yet on the lower half are the smaller, curly stems that will be worked in single lines of stem stitch.
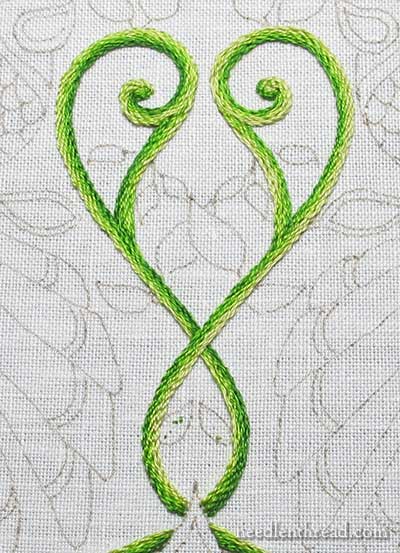
Here’s a closer shot of that center vine area between the two hummingbirds, where the one vine crosses over the other before they work their way up to a scrolly end at the top.
I embroidered the vine on the left (it starts on the lower right) first, and the shading on this vine is slightly darker than the vine on the right (which starts on the lower left).
So, on the left vine, the darker shading begins with the two darkest shades of green in the needle, and it ends on the other side of the design line with the two lightest shades of green in the needle.
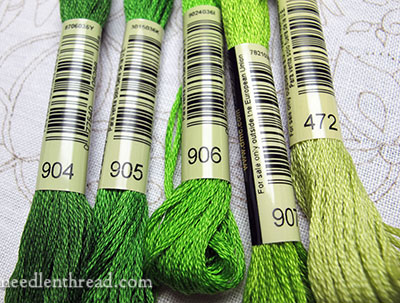
Here’s the line-up of the greens again. Let’s make the explanation of shading on the center vines a little clearer by listing them with letters:
A – 904 (darkest green)
B – 905
C – 906
D – 907
E – 472 (lightest green)
So, on the vine farthest back in the image (the left vine that starts on the lower right), I started on the inside line with the darkest greens (A & B) in the needle. Then, I worked B & C right next to that; then C & D; then finally D & E on the outer design line.
On the right vine (that starts on the lower left and crosses over the other vine), I began with two strands of E in the needle and worked the lighter outside edge first. Then, I combined D & E in the needle for the next darker shading, then C & D, and finally, B & C. I didn’t use A (the darkest green) on this vine at all.
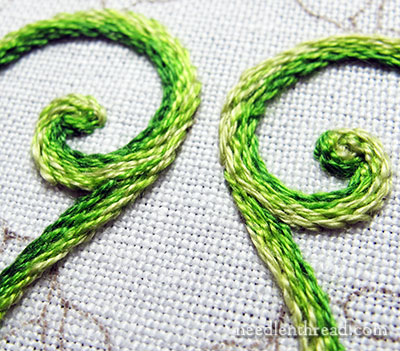
Not the best close-up in the world, but it gives you an idea of how you might make your colors and vine parts flow into each other. This is really the trickiest part of vines.
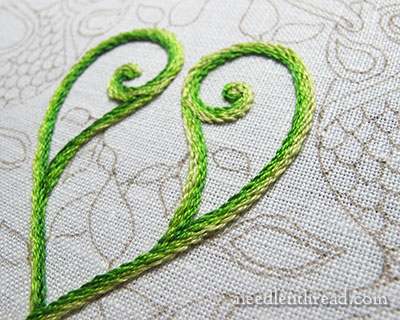
I embroidered around the curls first, but when I got to the off-shoot, I worked in some stitches on it before completing the curl, to try to create a more obvious flow into the off-shoot. It didn’t really work, because the darker threads I used created a line and a kind of shadow under the curl.
But I figured it worked out ok and looked ok. So I left it!
The easiest approach for this area would be to do the curly vine first, and then to stitch the short off-shoot that runs into the vine further below.
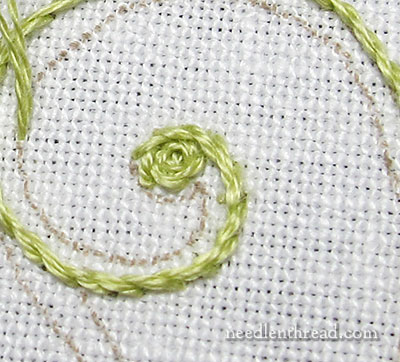
To fill the rounded tips of the curls on this area, I worked the lightest green in a spiral when I arrived at the tip of the curl, leaving some area around the base of the ball the ball, where I would eventually work a darker shade of green in stem stitch to fill the remaining area.
Stem stitch in this small of a space, worked into a spiral, is admittedly not the easiest thing in the world to do. But if you make your stem stitches progressively smaller as you enter into the sharper curves and finally into the spiral, it is manageable.
You might find an easier way to approach those ball tips at the ends of the spirals, and that’s fine! I did it this way because it seemed to make sense at the time. If I were re-doing them, I might try working the whole curl, terminating at the end of the ball, and then filling in the leftover little “scoop” at the base of the ball with a darker color.
It’s ok to try different approaches. In fact, you should! You might find an easier approach that you think is more appealing to the eye. Go for it!
Incidentally, you may have noticed on the rest of the vines that I didn’t end them in with a little round knob at the tips of the curls. Instead, I took the darkest green around into a small curly spiral. I thought the knobs looked too thick when embroidered, and I liked the lighter look of the spiral ends.
So there you have the vines finished on the lower half of the Secret Garden project. Next, the curling stems and some leaves!
In fact, lots of leaves.
Lots and lots of leaves.
Little leaves, medium leaves, big leaves.
To keep the leaves from becoming monotonous, I’m using a variety of stitches to embroider them.
More soon!
If you’d like to follow this project from start to finish, you’ll find all articles pertaining to it listed in chronological order on the Secret Garden Embroidery Project Index.
You’re shading technique is remarkable (as always). Thank you for the info. about starting at the curl-tremendously helpful.
Wendi
Very beautiful. Thank you for posting.
Mrs. Corbet,
Very interesting, thanks!
I was randomly thinking about the Mission Rose today. Have you gotten it framed yet?
Not yet, Sarah! Haven’t been to the city since finishing it. I hope to take it in sometime in the next week or so…
Sometimes when you only have a tiny bit done you can tell that it’s going in the right direction. This is one of those projects. This is going to be stunning!
I know that it is unlikely to happen but I wish that DMC (and every other floss company) would change the numbers so that every family had numbers in succession…. It would make it so much easier to deal with darker/lighter etc when choosing colors.
You do beautiful work, Mary.
Dear Mary
What lovely stitching and I love the contrast of the different shades of the green threads. Your right when you say you should try different approaches especially with the same family colours as in this case the green family he colours you have chosen match and intermingle with each other to make a lovely combination such lovely stitching as I know from experience stem stitch in small areas can be difficult but you make it look so easy. I’m busy practicising tambour stitching it’s not easy but it’s not difficult either it’s just getting used to the technique and keeping the turn in the same direction which when I loose concentration goes wrong, but practice is the key. Thanks for sharing your techniques on different shades and different techniques of the stem stitch.
Regards Anita Simmance
The vines are amazing. Such a beautiful use of color. I would have automatically mirrored both vines in the same shades. I love how it looks with slightly different shading. Thanks for showing us new ways to think about color.
How did you choose to shade the vines in the center lighter, and the ones at the bottom darker? Do we assume throughout the project that a light is shining in the center, and the edges are in shadow?
I ask because I’d like to do some preliminary work in color pencil before deciding on my colors. Thanks so much for your time and expertise. sandra
Actually, I wasn’t thinking in terms of light direction here, as much as what’s in front of what. I worked the one darker, because it is behind the other. -MC
Thank you for this beautiful demonstration in color, I do not realize the same project, but I also have large stems and I used the dark green is always in the same direction, the result is much less beautiful and less alive. When I look at you, I think .. but of course. What would I do without your advice? Thank you again to you and answer OMR I agree with it, it really is “pain in the neck” to run in families greens 300-3375 … should really I bought a swatch in France it is 26 euros is good and it is roughly 26 skeins and we never have enough colors …