


I mentioned last week that I like to rotate the types of embroidery projects I work on, to give myself a little variety, moving from more intense to less intense projects and visa-versa.
This is all part of my time-and-enthusiasm-levels Management Program, and it works!
Right now, I’m in a less-intense project phase. After finishing a very quick little weedy thing, I set up a new project that I’ve been eager to get going on for a while.
I think of it as a leafy sampler of sorts.
Right off the bat, I changed my mind on some key decisions that come along with any embroidery project, and although I made decent progress over the weekend, I’m going to stop where I am and start this project over. I’ll tell you why.
When I designed this project, my thought was that it would be irregular and a little random. I didn’t want a lot of structured regularity in the stitching.
But for me, that’s not how I roll! My “irregular” leaf above comes up looking…sure, irregular in spacing, but it’s a very regularized irregularity.
So that approach just isn’t going to work. Or at least, not the way I was approaching it. Maybe I was thinking about it too hard?
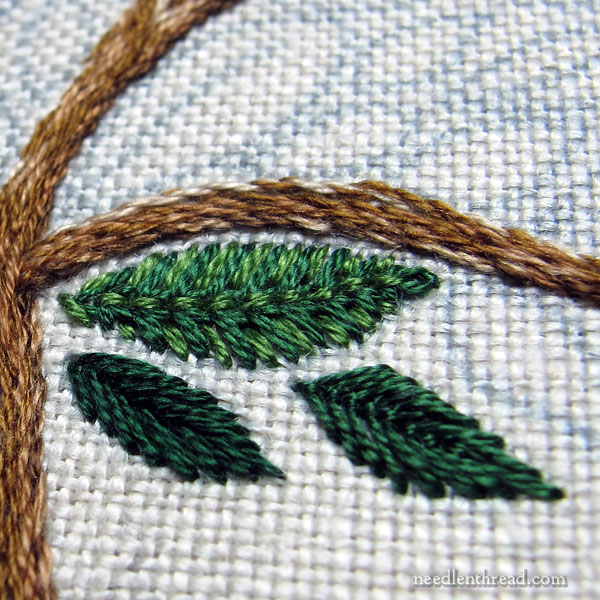
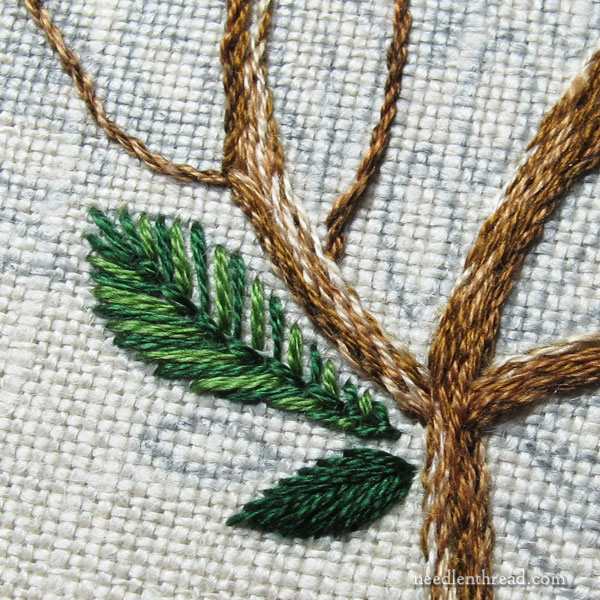
Trying to be random – and failing – I found myself coming back to the fishbone stitch repeatedly.
At this point, I think I had six leaves stitched in the same area of the tree. Three of them were in fishbone stitch.
This isn’t necessarily a bad thing. But the groupings were a bit off.
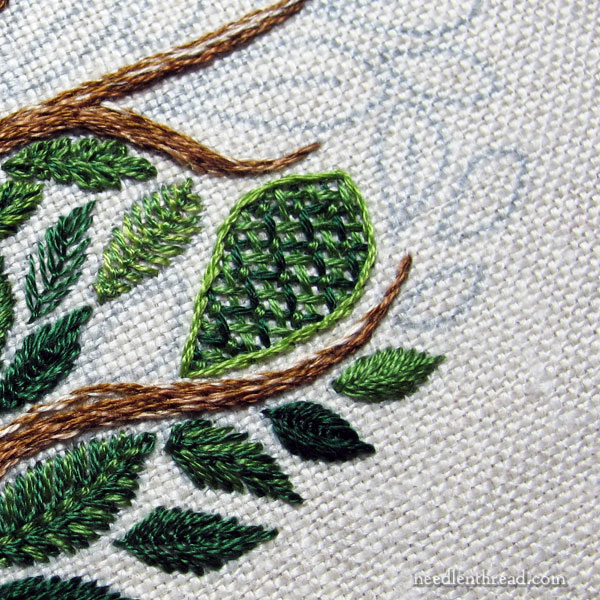
I started at the very base of this tree design I’m working on, with the intention of working all the leaves in that small section.
If you’re going for a seemingly random approach but you want a good balance on a project like this, this isn’t the way to do it.
The way to do it is to scatter your interpretations of all the elements across the piece and to work with the full piece in mind, rather than in small sectors.
I quickly discovered that the natural colored ground fabric has to go.
I love this linen – it’s Strathaven natural – but for photography purposes, I have a hard time with it.
When it comes to photographing something step-by-step, nothing beats a white ground fabric. You just get more clarity. It’s also easier to adjust camera settings quickly. And being able to adjust the camera quickly leads to more stitching time.
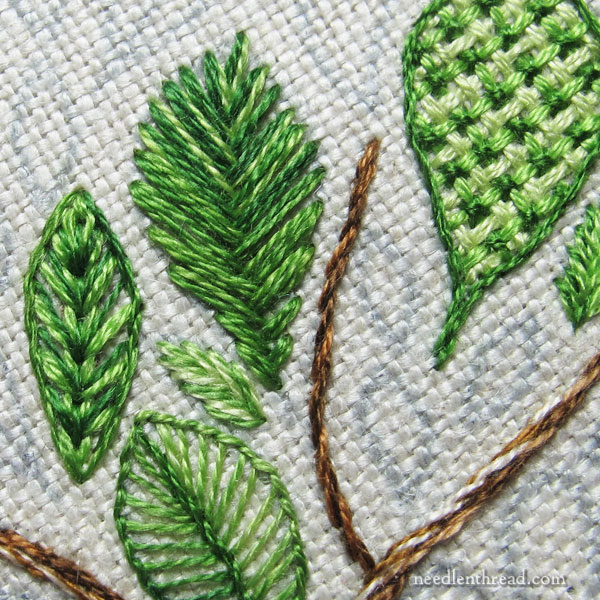
I tried to work within a set range of greens, from dark to bright, but it isn’t giving me as much variety as I would like. So I need to reconsider my color range.
I’ll most likely set up a new version of this project today, on a white ground fabric.
I’ll pull out both drawers of greens from my stranded cotton thread cabinet. And I’ll pull some over-dyed threads, too, from different thread sources to mix in.
I might even pull some other types of threads besides stranded cotton, and go for more texture. We shall see! This latter point can be problematic when planning a piece for others to stitch, because it’s more difficult to assemble the fibers if they’re coming from all over the place.
It was a good experiment while it lasted, and it carried me through the weekend with lots of fun little bits to pick up and work on when I had some quiet time.
I learned several things, I mulled over solutions, and I’m ready to start over.
Sometimes, that just the way it goes.
It’s never a bad thing to have to start over, if your reasons for doing so are sound.
Over to You!
Any questions, comments, suggestions? Feel free to have your say below!
Looking for Embroidery Projects for Spring Stitching?
If you’re hankering for some spring stitching projects, why not check out some of my e-books that feature colorful embroidery, perfect for spring?
They’re suitable for beginners and beyond, full of step-by-step photo instructions, and they make for fun little projects that work up quickly!
My three recommendations for Spring stitching: Stitch Sampler Alphabet; Lavender Honey & Other Little Things; and Will Ewe Bee Mine?
If you haven’t checked out any of my e-books available on Needle ‘n Thread, you’ll find them all listed here!
I am just wondering – what do your beautifully completed kaleidoscope designs interpret into after completion? That is always my query after completion of a project just because I like it or to learn a new stitch. Thank you, Mary! Blessings to you.
Hi, Jane! Do you mean how do I finish them? Well, they’d make great decorative pillows for a colorful room, but I generally frame my pieces and give them away. I’ve used parts of the kaleidoscope designs as embellishment for tote bags, though I haven’t finished the tote bag yet – but they work great in that application. One stitcher even worked one on the back of a denim jacket! And I’ve seen them finished into notebook covers. So there are lots of ways you can finish a design into something either decorative or useful or both!
OOOhh, Mary! A book cover in one of the kaleidoscope designs would be fabulous!
Would love to see this as an ebook/kit!!!!!!!!!!!
Mary, what do you do with projects that don’t work out. Do you keep them as examples of what not to do, or do you just make a note of what didn’t work throw them out, or what?
Hi, Linda – I might finish this one, because I do like the natural linen ground, but I normally just box them and use them for other instructional purposes and so forth. I don’t normally thrown them away because I can always use the fabric, if nothing else!
Dear Mary
You can learn a lot through experimenting with different stitches and threads especially when you start a new project. All those lovely leaves and the different green threads and stitches you could use sounds really interesting project on the sampler and will look lovely on white linen. Thanks for sharing your ideas with us and how not to be scared of staring again on a new project. Keep us informed of your progress on the project.
Regards Anita Simmance
Completely unrelated to your post really, but I felt I should tell you anyway. I’ve been following your blog for quite a while now, although I’ve only ever done cross stitch. I was fascinated by it and inspired, wanting to try and learn it myself sometime, but rather intimidated as well. Because I TOTALLY need more projects in my queue (said no stitcher ever). Recently I had some small cause for celebration and happened across a tiny kit with a hummingbird. Very simple, only stem stitch and satin stitch and the promise of instructions inside. Ha! “Instructions” turned out to be a fairly useless diagram of each stitch and some sort of cryptic ‘comic strip’ that I think is to do with framing the finished project in a display hoop. What to do, what to do? To make a long story short (or a short story long whichever you prefer), you have taught me both stitches, and I’m nearly finished with my humming bird. It’s probably sporting a fair number of rookie mistakes, and I haven’t managed to totally cover the line everywhere, but I’m mighty pleased with how it’s gone.
So glad to hear that you’re making it through the kit! 🙂
Where did you find such a perfect brown for the tree?
In my drawer of DMC stranded cotton titled “browns”! 🙂 It’s a combination of different DMC browns.
All. Your work looks great to me
🙂 Thanks, Ella!!
Hi Mary,
Since you brought up photography, do you have any other tips? I struggle taking photos of mine (especially in winter).
Thanks!
-C
Light! Light, light, light. And a decent camera – which doesn’t have to be a fancy-schmancy camera (there are some point and shoots that work great for easy, quick photography, especially when working step by step through a project). But the one thing to pay the most attention to is lighting. If you don’t have decent lighting, it’s hard – even in post production – to make a photo look good. If you don’t have a place to set up for photography, but you like to photograph your work as you go, then your best tool besides your camera is a good light that 1. is full-spectrum; 2. doesn’t pulsate; 3. has a large enough spread of light that it will work for larger projects as well, without putting half of them in shadow.
Thank you, Mary!
I am fortunate enough to have a decent camera, and post-production tools, but photography has never been my strong suit or passion. I will try to find better lighting – I am glad that is the most important trick because it is easier to correct than other things! 😀
-C
Hi Mary!
As always, I love reading all your posts and love the photographs even more.
I tell all my stitching friends that if MichaelAngelo Buonarotti was able to start over with the Sistine Chapel when he was not satisfied with how the first round of artistry/painting was going, then I think of him and I too can restart my project in order to get it perfect, the way I want it to be.
So, here’s my thought and inspiration to you as a Thankyou for everything you do that helps us follow your wonderful work!
Thank you, Mary.
Sincere regards,
Bárbara
🙂 Thanks, Barbara – and a very good point!
This project looks interesting! I hope it makes it way into your pattern shop!
Could you tell us what stitch was used for these leaves? Thanks, beautiful work so far.
Hi, Nadine – Thanks! I’m just working my way through it now. I’ll follow up with more once I’ve made solid decisions!
I very much enjoy your notes about your thought process when designing and stitching your projects! Your words today really spoke to me. I have picked out so many threads since yesterday, I could open a yarn shop! And, I, too, have the problem of achieving a more random look with my choice of stitches. There are times when randomness is called for. Thank you for all you do for the art of embroidery. Much appreciated.
This will be a fine sampler of leaf-filling and leaf-outlining stitches. Don’t choke on the fishbones, Mary: putting all the smallest leaves in the same colour and stitch might well be a good design point – giving some continuity while making the bigger leaves that are in different stitches stand out more.
It’s a shame that digital cameras aren’t too good at yellow shades as I love cream, naturals and soft buttery yellows. Have you tried putting a contrast colour to the fabric into the shot (which you can crop out afterwards)? Getting the camera to adjust for an area of deep blue or blue-violet, should help to save the fabric colour in the photo.
Very good point, Sue! I will try that! Thanks!
Hello Mary,
It’s not easy to envision a project and then trying to put it all together. But it’s all the fun and anticipation of needlework. I will unstitch if my project does not look right.
If I do not then I know that I will not finish it. And that is more frustrating than having to pull out stitches to make it look better.
Take care and have a good day.
Louise
I am enjoying your postings and wonder what do you do with all of these stitched pieces you create. How do you display them all? Could you write about that for us? It would be great to get some ideas on how to display our work tastefully in our homes.
Hi, Roma – I actually only have one tiny piece of my embroidery in my house, framed and displayed. The rest either end up as gifts – so I don’t have them anymore – or they end up in a folder or box to use as examples, teaching pieces, reference, and whatnot. Of course, Little Things, like the needlebooks in my ebook Lavender Honey & Other Little Things, end up getting used.
Good Morning, Mary. Would you take some time to talk about embroidering vines and branches please? I am now Quiltmaking and incorporate many embroidered bits on my blocks. I’ve blundered on with my small but decent number of embroidery stitches, but would love to do more. After all, I love have been embroidering all my life, long before Quiltmaking entered into it. I have to say, I am ever so grateful for your instruction and have followed you via your website for a long time now. Thanks so much for all you do.
Hi, Annette – As a matter of fact, I have some upcoming bits on that very subject. It’s in the works right now, so publishing a bit down the road, but it is a subject coming up on Needle ‘n Thread!
It’s a good time for me to experiment with the different stitches
Hi! I have been trying to stitch a tree and went searching for ideas on how to stitch the trunk and branches, and just found your pics. Im loving them! Just wanted to know if you have a how to when you decide colors or some advice you could please give me. Thank you!
There’s no specific “how to” on choosing colors – that’s something you do according to your own preferences.