


I promise this is the last installment on this year’s summer embroidery classes for kids!
I just wanted to share a few more photos, insights, and learning experiences from the recent round of kids’ classes, for those who have written in to ask questions and for those who want to teach children to embroider, too.
Here are a few progress photos and a few more finishes, then, with some commentary along the way. I hope you enjoy seeing what the kids have accomplished over their three week embroidery adventure!
Here’s a little progress on a flour sack towel, from one of the younger groups (11 and under). Check out those French knots! Yay!!
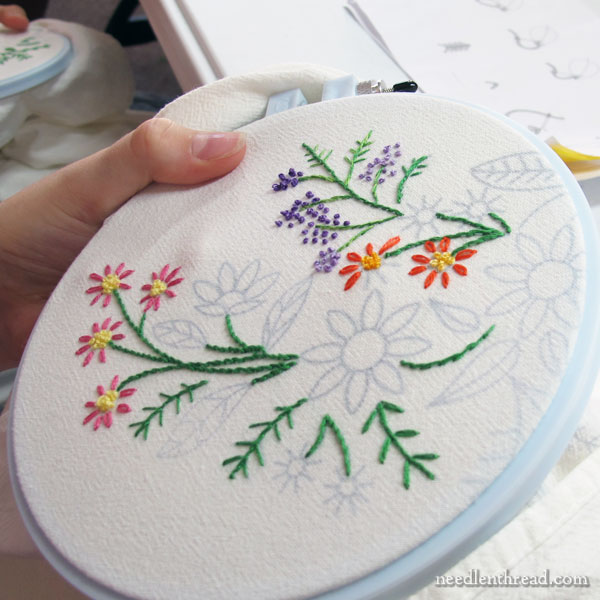
As mentioned earlier, I designed a floral composition for stitching on the corner of a flour sack towel as the second project for the classes.
The first design was a bit complex, so I lightened it up a bit and used the “lite” version for the younger classes, groups A, B, and C, which comprised 9-11 year olds.
On Embroidery Designs for Boys, Too
Now, many have asked about whether I had prepared designs for boys. In fact, no boys signed up, so I went with floral designs.
If you are teaching kids’ classes and you have boys who have signed up, there are lots of options for less “girly” floral designs – you could do animals, ocean life or scenes, trees and leaves, farm life (more appropriate, maybe, for Kansas audiences – if you’re in the city and farm life doesn’t resonate, perhaps it wouldn’t work as well). You could do geometric designs. You could try designs that are “zentangle” type drawings. You could have the kids draw something that interests them and embroider it.
There are many, many options for designs that would appeal to girls and boys. You could even check out the iron-on patterns, for example, that are available through places like Colonial Patterns online. They have the Aunt Martha range, but they also have the “stitcher’s revolution” range, that includes some fun designs. They’re inexpensive, and they’re a great way to have a stitch-ready design to use for teaching.

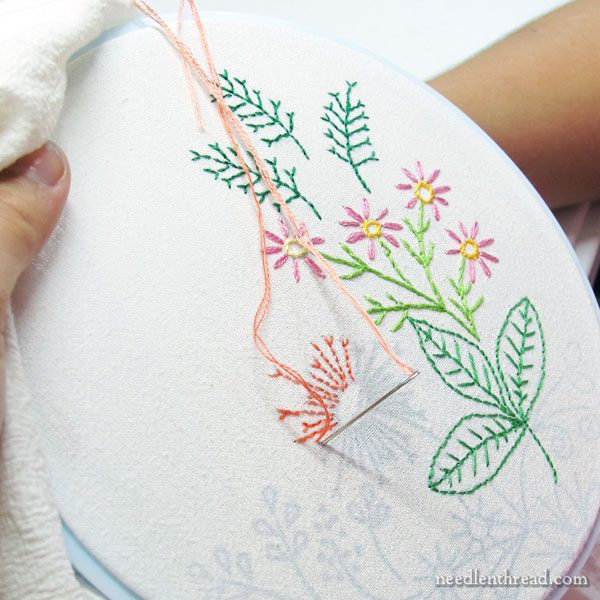
Here, we have some very nice, bright green stems underway!
This little stitcher was doing a fantastic job keeping her stems very neat. There was one little catch, but with this age, it’s not something I harp on: she’s actually doing more outline stitch than stem stitch, which was her intended stitch!
About Teaching Stem Stitch
This is one difficulty about teaching stem stitch to kids! With adults, even, the concept can be hard to master.
It’s the idea that stem stitch, when stitched left to right, always requires that the thread is below the design line or below the needle. But when stitched right to left, the thread has to be above the needle, to get the rope effect of the stem stitch line. Otherwise, you end up with outline stitch, which, due to the twist of the thread, ends up being a much smoother line, with more of a “wrapped” look to the stitches.
You can learn more about this concept in my stem stitch video and the article around it. You can also read about how s-twist and z-twist threads come into the question here, including how left-handed instructions come into the question, too.
It’s a complicated idea, so I don’t dwell on it too much when I teach little kids. I just remind them now and then to turn their hoops so that the line is left to right and to keep their thread below the needle in that situation.
If they don’t always stick with it – if they fall into outline stitch – that’s ok. If a child notices the difference and is really concerned about it, then I take time to explain it extra-specifically to that child. Usually, in such cases, the kid picks up on the difference and remembers it.
Lots of color going on here, and I love it!
Freedom with Color Choices & Class Preparation
On the floral corners, the kids picked their own colors as they went. They had the option of using the colors I used in the stitched samples if they wanted, or they could just pick the colors they like. Some stuck closer to the sample colors, mixing in their own favorites now and then, while others branched out even little farther and did entirely their own thing.
Kids love color, and they have very specific notions of what colors they like and what colors they don’t like. So it’s good to let them have a little color freedom while they’re learning to stitch.
That said, to prepare embroidery classes in a way that makes sense, I’ve found that it’s best to select a limited range of colors for each participant, rather than allow the kids to look over a whole line of threads to pick out their favorite colors (which would take far too long!).
In this case, the kids had about 15 skeins of thread in their kits that covered just about every color group. Originally, I had planned for 20, but I pared down the list to keep costs down by substituting some variegated flosses for two shades from the same color family.
Here’s one of the 12-year-olds, stitching along and making good, neat progress on her towel.
She’s got the French knots down. Each knot was perfect, beautiful, precise, and plump. Since I have a penchant for French knots myself, this made my little knotty heart sing!
Enthusiasm + Generosity = Success
One of my favorite overheard conversations during the course of the classes had to do with French knots.
The kids were slogging away on their doodle cloths, the class practically silent while concentration permeated the room. They were tackling the French knot for the first time – and suddenly, there was a breakthrough! One of the kids “got it”!
“Oh wow!” she cried, peering close at her fabric. “It looks like a perfect, teeny tiny rose!”
She got it – and after that, she was a French knot fiend!
But better yet, she was a magnificent support to her little neighbors, helping them get it, too.
Her enthusiasms for the French knot – with which the kids weren’t too besotted up to this point – spread rapidly. Before we knew it, the class was practically declaring their undying love of the French knot!
There’s nothing more infectious in a class of kids than enthusiasm and success, when generously directed outwards (rather than self-focused) through helping others experience the same delightful results.
That was a great moment for the kids and a great moment for their teacher, Anna. (I was sitting in the corner, stitching on something else that day!)
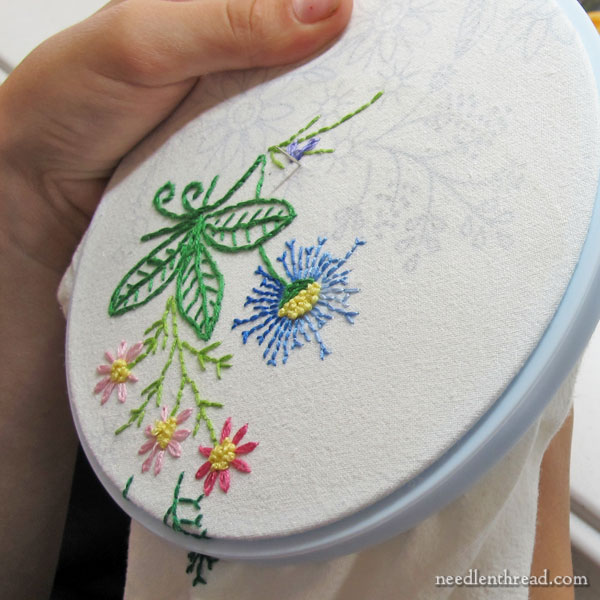
Here’s a very light and delicate approach from one of the older girls (12-15), who selected soft colors and worked with two strands on everything, keeping things really light. She opted for stem stitch circles inside the flower centers, rather than clusters of French knots.
I love the fact that she was thinking in terms of an impression she wanted to create (light and airy), and she achieved that impression by choosing colors and stitches that would convey it.
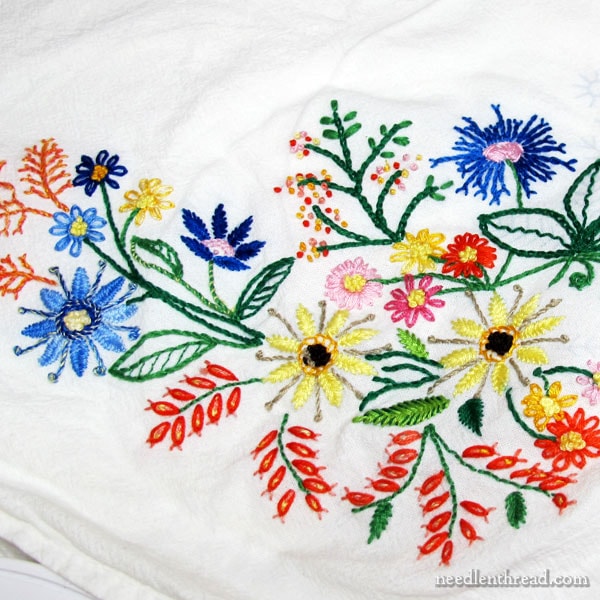
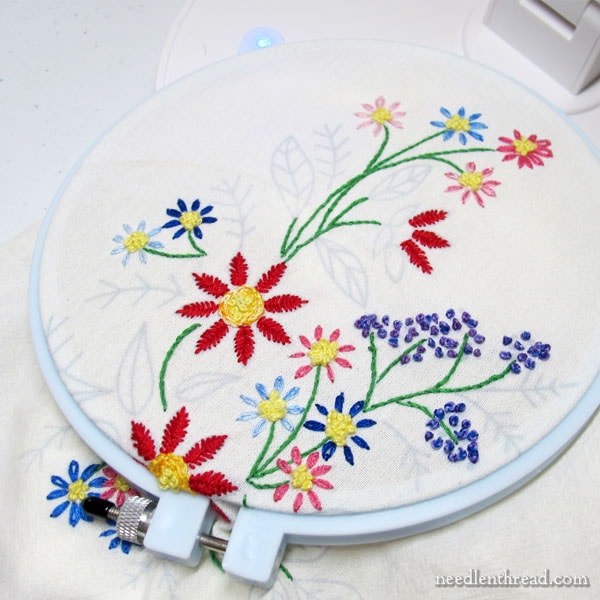
And here’s a bright and exuberant example from one of the older girls. I love the life in this! And I love the fact that she had no fear of trying different stitches, stitch combinations, and colors!
Her work indicates she was definitely enjoying the process – not just because it is lively and experimental, but because she progressed farther than any of the other participants. Her final project was just short of finished at the end of the last class.
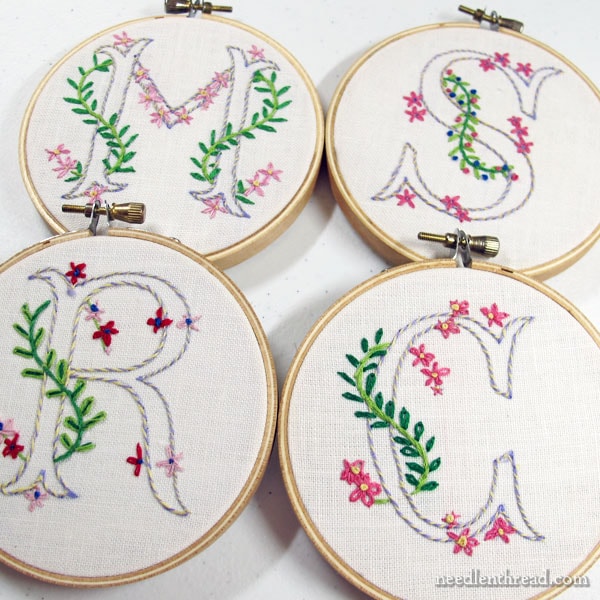
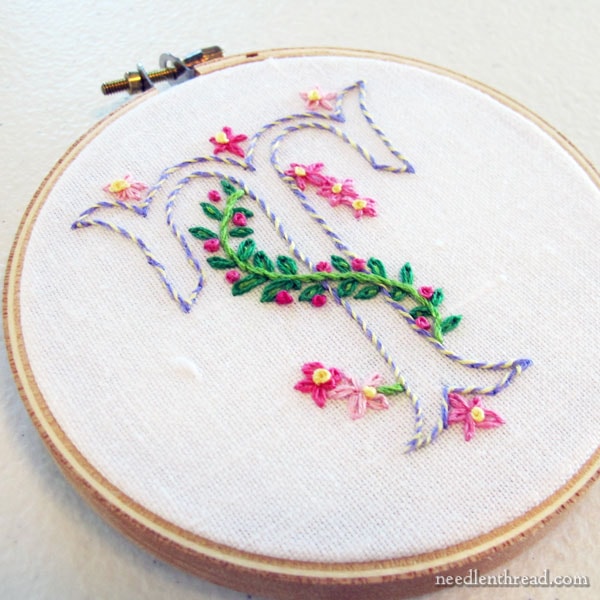
Of course, we had lots more finishes on the hooped monograms, too!
And that, my friends, is the end of our summer embroidery class adventures!
For those who have asked for the patterns for the floral corners, I’ll be making them available soon. I wanted to have them up on the site for you by the end of last week, but alas, as usual, I’m behind… I’ll be concentrating on that this week, and we’ll see how far I get!
I hope you enjoyed reading about the progress of the kids’ classes! And I hope it encourages you, if you have the opportunity, to share your stitching skills with little people in your lives – not just for the good of the art, but more importantly, for the good of the child!
Happy Monday!
Wonderful to read about this, and very informative to have your views and experiences in choosing designs and materials for the various age groups – thank you!
Wonderful article! Very entertaining and interesting! Though I’m not fond of your first sentence, which sounds apologetic, the entire article felt like I was right there in the classroom with you, and absorbing all the curious interest of the pupils! Thank you, Mary! I always enjoy reading your posts!
Lovely work! You and your students should be proud! Any tips for teaching kids how to thread a needle? When I taught my grandnieces, that was the hardest thing for their little fingers.
Practice! The fold and pinch method was pretty successful for us – once the kids got used to it!
I had to chuckle reading about the kids’ struggle to distinguish stem stitch from outline stitch. I am doing a project right now with a LOT of stem stitching. Before I started it, I needed a way to remind myself which is which so I could always start a line of stitching in the right direction based on wanting to stem stitch. So I reviewed your articles and videos on the topic and then suddenly it dawned on me! Stems grow UP through the ground so >stem< stitch = floss comes UP from below the design line. Outline stitch = floss is OUTside the line which I picture as "above". I no longer get confused!!
I have thoroughly enjoyed reading about these classes and dearly wish I could send my grandgirl! Thank you so much for sharing this with us.
Hi Mary, I really enjoyed reading all of the posts about the kids’ embroidery classes! And, loved seeing the photos of their work.
Thank you so much for sharing the results of your children’s embroidery classes. I was very impressed with what they accomplished.
I know it was a lot of work, but the results are stunning.
Great job!
Patti
Dear Mary
The children have achieved beautiful monograms and flour sack towels designs their stitching is lovely. I’m sure you are very pleased with the outcome of achievement by the children and enjoyed the experience and I’m sure they enjoyed themselves and learnt such a lot in 3 weeks. Thanks for sharing the children’s embroidery work with us and for the links on various tutorials. I hope you have a great week.
Regards Anita Simmance
It looks like the Corbet School of Embroidery Arts was a success. Of course it would be as they have Mary as their instructor. I am really impressed by the work the participants created and hope that needlework becomes a part of their lives.
Wendi
This was fun to read. And thank you for your reports and insights. I think you achieved a high degree of success!! When you first started talking about the class, I thought you were being “very optimistic” about what your young students could do. My mistake!! Your high expectations were met with enthusiasm and success!! Lesson learned!!
Hello there, I really enjoyed reading this article, all its parts. I pictured myself when I was 10, that’s when I learned embroidery thanks to an old teacher that used to work in the same school where my mom did. While she was teaching a class of 45 kids, I was in seating in the far end of the classroom with my needle and thread trying to follow her instructions to practice different stitches. Such good memories! From then on I have tried different styles and I have enjoyed embroidering pieces for the family. Thanks for sharing and for the insights about teaching kids, I hope to be able to do something like that someday .
Do you sell kits??????
Not at this time, Barbara, but I’m moving towards the possibility. I do sell a few ebooks in my shop, if you want to check those out. Thanks for asking!
This was wonderful, Mary. Thanks for sharing it!
And you’re right about sharing embroidery with younger folks. Just yesterday, my 19yo granddaughter started her first embroidery project. She had never shown any interest before, but she’s staying with us for a little while, and decided she wanted to explore this stuff I do all the time. Yeah, hurray!
I had her look at photos (thank you, Pinterest!) of things that she liked, that also looked fairly simple. She chose a border of various cactus in pots to put on one pillowcase, and a contrasting border of flowers in jars for the other pillowcase. I computerized the designs to the appropriate sizes. She transferred them using my light box and the Flair pens I started using at your recommendation. And she embroidered most of the day. She got excited when she realized she didn’t have to do it exactly the same as the designs, and had a lot of thoughts about which colors to use where. I think she’s on her way!
This really looks like the kids had a lot of fun. I recently found a little embroidery in my stash, done by a next door neighbor who was 5 at the time. It is so charming that I thought I might frame it.
The kids did such a great job. You’ve done a wonderful job on teaching them and they seemed to enjoy it with the great progress they made. Congratulations
Thank you for telling us about those classes. Your way of describing the “adventure” is just lovely.
Mary, How wonderful that you captured the attention of young folks away from their social media focus and into a traditional world of threads and stitches! Congratulations on a successful adventure with the next generation of embroiderers!
What a blessing these children were given in learning how to embroider. The results were fantastic! I realize I am behind in this area of study for my granddaughter. I taught her basic sewing, purchased her a machine that can easily take her through college. This summer we’ve added handstiched quilting to her repitore. She’s 14 so I ‘d better get with it with the embroidery lessons.
Gorgeous!
Have you ever read Embroidery Mary by Priscilla M. Warner? It’s an old book – it came out during WWII, I think – but it’s a lovely story about a girl taking up embroidery for the first time, taught by her aunt. Best of all, it includes lots of advice, illustrations and diagrams, so the reader can embroider along at home!
I haven’t, Deborah – but I’d love to find it! Looks like it’s not available online anywhere (used book sources, etc.)
I got behind in reading some of your posts on the children’s class but fun to read tonight. Brought me in mind of my first embroidery project. Two sets of His and Hers pillowcases, done in lavender and pink and green. Each set was different. I was somewhere around 11-14 years old when I was making these for my ‘hope chest’. I, unfortunately, made a very bad pick for a husband and he never noticed them at all. My husband now would have noticed them for sure.
I wasn’t the only one in the family that tried embroidery. My little brother did too. My mom has a cute photo of him standing up looking silly with his embroidery hoop and project sewn into his pants! I don’t think he continued on.
I wanted to make my first project because my sister had been making a set of pillowcases. I suspect that was her only project as well. I was the only one that stuck with any kind of needlearts and I wanted to do them all and be expert at them all besides. Never got that far and now my ability to do much of anything is limited.
Love your blog!
I have so enjoyed following the posts from your classes. The children have obviously enjoyed themselves and have learned and achieved so much!! I would love to have been one of the class. Well done to you all, you must all be very satisfied with the end results!!
Mary. I’ve really enjoyed your classroom! – and you have given me renewed enthusiasm to continue teaching my grand daughters! I look forward to seeing those patterns.
Loved the bit about the French knots 🙂
Judy
Qld Oz
I can hardly believe that these pieces were done by children. They look wonderful. No doubt that’s due to the great teaching they received! 🙂
A job well done Mary! Thank you for including us is your process.
L
This series for children is fantastic. It is obvious you put a lot of time and energy in the preparation for the class. Thank you for including pictures of the young embroiderers work. I’m slowly trying to introduce my 15 year old daughter to embroidery and she seems to enjoy it. A question I have is do you have a tutorial on your site to teach the proper way to separate the floss threads without a gnarled mess? I have an unconventional way of separating my threads that has worked for me but when trying to teach her I see the disapproval. I hold one end of the threads between my lips while my hands pull the strands apart and it works wonderfully.
Hi, Kelli – glad your daughter is enjoying it! Yes, I have a tutorial for stripping floss here: https://needlenthread.wpengine.com/2013/08/embroidery-tip-how-to-separate-floss.html
I’ve just spent the day teaching newly-arrived immigrant teenagers (many of them refugees with really sad stories to their lives) to knit for their first time ever! I love that light bulb moment when they get it and their persistence is wondeful. Such a lovely thing to be involved with
The children seem to have a done a great job- a credit to their teachers!
When, some decades ago, I taught myself the stem or outline stitch (depending on the project) the instructions with the various kits I had described the stitch the same way and did not specify if the next stitch should be over or under on a fairly consistent basis. As a result I varied in which of the stitches I was actually using as I would start a stitch over or under depending on the convenience of direction for either stitch when it was specified – sometimes switching direction around a turn to make the stitches fall nicely. I have since learned the difference and understand the difference in appearance between the two, but the poor instructions of the past may continue to exist in others who learned the stitches as I did.
My first project at just before age 5 had printed cross, lazy daisy and French Knots. The knots were impossible for me back then and my great aunt who was teaching me, ended up doing all of them for me. I am impressed that the children were able to do them.
Oh what an interesting resume of your class experiences Mary! I particularly enjoyed the story of the French Knots … what a delightful moment and one that you know will stay with every child in that room. I thoroughly enjoyed seeing all the different versions of the design from your students.
Mary,
I really enjoy reading your articles and I seem to learn or refresh my memory about something every time I do. Thats one of the exciting things for me about your articles is how much it stimulates my mind.
I started embroidering again about 8 months ago after a 25+ year hiatus. Boy, do I wish I had returned to embroidery before now but late is better than never. I find that it gives me a creative outlet for me to share things with my grandchildren, currently I am working on 3 jean jackets with designs to please 3 very different granddaughters tastes. (They each helped in the design process.) I am also working on a few side projects just cause my mind wanted me to. In a few of my granddaughters free time i am also teaching 2 of them how to embroider.
Teaching them has been a very enlightening and very enjoyable experiance. Originally my goal was to give each of them the knowledge of several of the basic stitches then just spend time with them while they did whatever projects they wished. Needles to say they have taken me far beyond what I had planned and we are diving into more advanced projects each session with varied interests.
That has led me to my minor problem. Each girls interests and goals are completly different. One has dived into more detailed and complicated stitches, she started adding beads to her stitches between our sessions on her own. Now she is challenging me to get into gold work. Her idea is I learn then teach her, lol. So am currently working on this as well. The other one is more focused on enc
Mary, cont.
Lol my dog jumped into my lap and sent my post before I intended. The joys of a busy house!
My other granddaughter is focused on encluding embroider into day to day items. Currently she wants to make a lap blanket for her mother. I had shown her a video I found that you use crayons or water color penc
Perhaps 3rd time is the charm? Not to mention shut the dog in a different room. Lol.
Water colored penciles set permently onto frabric then embroidering around them to highlight them. She has 5 brothers and sisters that she wants them to color a picture, set it, she will embroider highlights then quilt the pictures together to form a lap blanket for her mom.
As you can see from these disjointed emails, totally the dogs doing, the grandfaughters interest dont mess very well for group sessions of work. Hubby thinks I should just give up on that goal. I think even if they are so different we can all work together in the same space and i can just help out as needed. It would mean having a lot of different supplies out at once but I believe it could be done. Am I being to optimistic? Would love anyones opinion if they are willing to share.
Thanks,
Loretta
Hi, Loretta – I would imagine that you could all work in the same space, if you have plenty of room. Think of it more as a group crafting session than a “class.” If you have a space where you can leave things up, that would be easiest, but in fact, embroidery is pretty portable, so I would imagine you could each have your own box or something to keep your project stuff in, that comes out whenever you meet for a session. Even if you’re working on different things, you’ll all learn something together as you go.