


You can iron your embroidery.
I do it all the time!
But I hear from a lot of people who say, “I know I’m not supposed to iron my embroidery, but I have this tablecloth…” or “…I have this pillowcase…” or “I finished a flour sack towel and I want to give it as a gift…”
Everyday, usable embroidery is bound to need ironing, especially for a nice presentation. If it’s being displayed in your home or it’s being given as a gift, you want it to look crisp and nice and fresh and smooth and pretty!
I’m going to use one of these scroll towels that I finished last week as an example of how I iron everyday, usable, embroidered household linens.
And you’ll find information at the end of the article about the ready-to-stitch towel sets available for this design group.
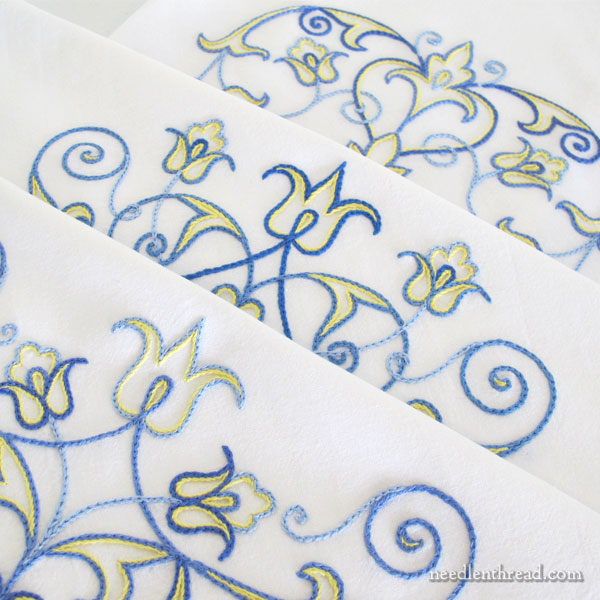
Here’s the finished set of scroll designs that I stitched last week on white cotton flour sack towels. They were fun to stitch, they worked up relatively quickly, and I am really pleased with the results. I’m including the set in a gift basket for a wedding shower.
The towels didn’t come off the hoop looking like this, though! Of course, they had hoop rings and they were a bit wrinkled from where I held them while I was stitching.
They weren’t dirty or anything, so I didn’t need to launder them.
Sometimes, we don’t want to launder something we’re giving as a gift – and that’s fine! Just take care when you’re stitching it to keep it really, really clean.
When you give it as a gift, include laundering instructions, if you haven’t already laundered them once.
Keep in mind, these types of goods are meant to be used, so they will need to be washed. They don’t have to be used for mopping up spills, of course! They can be used for decoration only, or just to dry hands, or as bread basket liners, tea cloths, or what-have-you. But no matter how they are used, they will eventually need to go in the wash.
In the case of flour sack towels, I generally launder them with whites or light colored items, on warm or cold, and tumble dry on low or hang to dry. Because they are household, everyday items, they should be able to go through the regular laundry.
Prepare the Ironing Board
The first thing I do when I need to iron an everyday household linen that has embroidery on it is to prepare the ironing board.
It’s very simple, really! I use two or three clean, plain flour sack towels smoothed out on the surface of my ironing board as a “pad” for any embroidery.
You can use any smooth, clean, relatively soft fabric surface, in layers, to provide padding for embroidery when you’re ironing. I don’t recommend terry cloth or any fabric that has texture. If you have a couple clean, plain pillowcases, they would work, too!
Since I have a surfeit of flour sack towels, though, I just use two or three, smoothed out on my ironing board, to pad the board for the embroidery.
If you don’t have any extra fabric or flour sack towels for this, and you’re ironing a flour sack towel, don’t worry! The towel itself can provide the padding!
Just fold the towel in such a way that the embroidery is face down on a couple layers of that very same folded towel. So, if the embroidery is in a corner, fold the towel in quarters, so the top of the embroidery is inside the folded corner, facing the rest of the folds of the towels.
To Mist or Not to Mist?
If your flour sack towel is not too wrinkled or marked from your hoop, you might not need to mist it with water.
However, I always think the ironed finish looks better when misted, so I usually mist the back of the embroidered area (and the whole towel, once I’m ironing the rest of the towel) with water.
I use the misting water bottle that I mentioned in this article to spray the back of the embroidery and the rest of the towel. It provides a beautiful, even, light mist of water.
Iron!
With the iron pre-heated to the cotton setting, I iron the back of the section of the towel where the embroidery is. The embroidery itself is face-down on the padded surface.
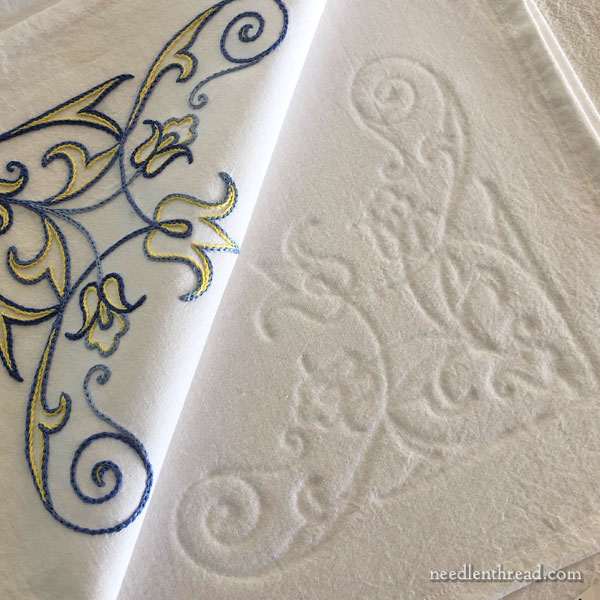
When you peel back the embroidered part of the towel from the padded surface, you’ll see the indentation of the embroidery in the padding.
This is my favorite part of ironing embroidery! I love seeing the design implanted in the fabric!
The whole point of upside-down ironing like this is to keep the stitches from being utterly flattened by the iron.
If you need to, you can now turn the piece over, and iron around the embroidery, but not over the embroidery. Iron the whole towel!
When you finish ironing, you should have a nice, smooth, beautiful finish on the fabric, and the stitches should still retain their plumpness. They won’t look like they’ve been flattened under a steamroller.
Simple, but effective!
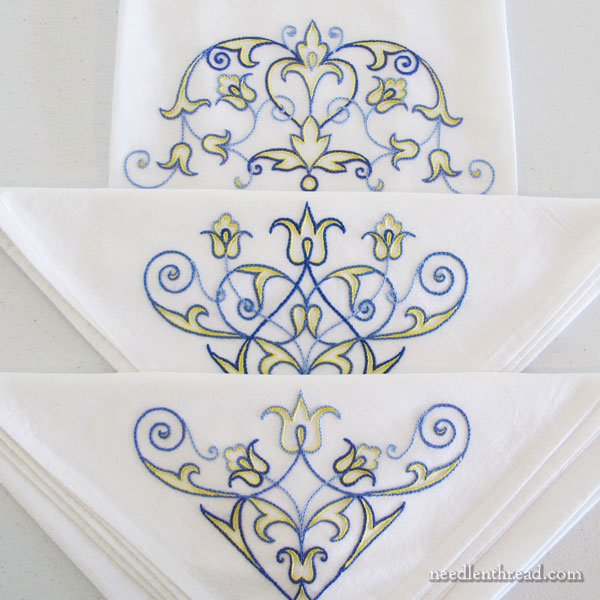
Scroll Design Towel Sets
I have a few scroll design ready-to-stitch towel sets available in the shop here on Needle ‘n Thread. If you want to pick up a set, now’s a good time to do it!
Please make sure to read the product description, so that you know what you are getting.
It is a 3-towel set, and each towel has a slightly different version of the design on it. One towel has a larger design centered at the lower edge, and the other two have designs in the corner, opposite the hanging loop.
The designs are pre-transferred for you, crisp and clear, and ready to stitch. It’s not a full kit – there are no threads and no instructions – but you can find stitching tips for this set of towels here.
Hello Mary! Thank you so much for all this information on how to care for embroidered goods. Do you have any suggestions for good ways to start and end threads in invisible ways for towels like these? (I am near-certain that you have indeed explained this already but I haven’t been able to find it!)
Hi, Mary Ann – If you have the Floral Corners e-book, you’ll find all kinds of tips for starting, ending, and traveling threads invisibly or with minimal visibility on these types of embroidery projects. If you don’t have it, check under “Tips & Techniques” in the main menu and look at the Beginners’ Tips section – you’ll find some info on starting and ending threads.
Mary, these came out beautifully. I hope they are going to come out as an ebook without the towels! I want to make linen bread basket cloths with this beautiful design.
How big is this design?
Can’t wait for all the towel designs to be in a big bundle.
Take care!
The three designs are different sizes. The larger center one is about 10″ long and 5″ high, I think. The corner designs are around 7″ in each direction, and a little smaller for the smaller one.
Morning Mary
Very informative post today and I guess necessary now that Home Ec is no longer part of the school’s curriculum. With the current availability of no-wrinkle fabrics, ironing has become a lost art.
I have a couple of very old with almost no pile on them terry cloth towels that do service in my sewing room. At almost 50 years old, they’re so thin they’re almost like your kitchen towels. There’s also a layer of Warm and Natural cotton batting under the muslin cover of my ironing board. I started using the towel over the ironing surface when I started using starch for applique, they’re so much easier to run through the washing machine than the whole ironing surface.
A little bit of domestic history here. Mum and Grandma’s (Grandma K was in service at 14 as a housemaid) all used the dining table to iron everything and padded the surface under the cotton sheet cover with an old felted wool blanket. Lovely crisp folds on bedding and table cloths, creases on shirt sleeve, pleats in skirts, and all hemmed edges after a long day at the table. (Grandma K learned to iron with flat irons heated on the Aga cooking range.)
Thank you for bringing back these childhood memories for me, happy stitching ~ Brenda
Mary, this is funny! People used to iron embroidered things all. the. time. My grandmother belonged to a bridge club – populated mostly by middle-aged to elderly ladies – and they served lunch or coffee-snacks, on embroidered tablecloths and napkins. My mom and aunt wore embroidered dresses (Sunday-best) when they were small – and you better believe those were washed and ironed!
I’m of the wash-and-wear generation, tho, so I eagerly read instructions for ironing things properly. I had this knife-pleated linen skirt, that I loved for comfort and style, that I never could iron properly; it never looked right after the first time I washed it (ecru- – yeah, it had to be washed occasionally). I finally got it dry-cleaned at the start of every summer, so I could at least start out with it right.
Yep! Ironing – I think it’s becoming one of those things of the past. I have a nephew getting married this summer, and his fiancé had an iron and ironing board on her registry list. People actually asked her why. LOL! I love ironing. I like the smell. I like the result. Granted, I probably wouldn’t want to stand and iron stuff all day long, but I love a good ironing session with household linens and things! (As for my clothes, I rely on the dryer or the hanger in the steamy shower for getting out the wrinkles. LOL!)
Mary, the impression of your lovely scroll design on the white padding shows it would work just as well as whitework! And, as ever, your timing is perfect. I’ve just finished the stitching on a tablecloth for someone else so am up to my least-favourite part, the washing and ironing. (It needs washing. Boy does it need washing. It’s a vintage cloth that had been started by the recipient’s grandmother and had been languishing for nigh on a century, with a century’s accumulated grime.)
G’day Mary,
Thanks for all the helpful tips for ironing. Love the indent print. Am getting together a collagraph today and putting aside heavy lace and whatever appeals that might work. Haven’t tried it on fabric which I’m doing this time. If ok I hope to do embroidery on the print, more expressional than traditional I think.
Cheers, Kath
Hi Mary,
I was wondering if you could please make these line designs available as a PDF for those of us on Europe who can’t buy the towel set?
Thanks, your blog is still the best
Laura xx
Hi, Laura – I’m working on something. When ready, I will definitely let people know!
I wash all of my embroidery or crochet gifts before giving them. Unless you can swear that you never sneezed or coughed or exhaled in the vicinity of the work, then it’s a soiled present you would be gifting.
Mary, I purchased these towel set and they are simply marvelous. Having said that, I am also hoping that these designs will be available as an ebook. Thank you so much for all that you share. Sincerely, Louisa
Hi, Louisa – There’s really not a lot of content to put into an e-book for these designs, aside from just the patterns. The line stitches are simple chain and stem. There’s not much to instruct on!
For the patterns, I am planning to make them available in a different format, but at this time, they aren’t ready. As soon as they are ready, I’ll definitely let folks know!
Thanks for asking!
Dear Mary
A great tip for ironing embroidered pieces and keeping them fresh especially tea towels and it’s really lovely that the embroidery does not get flattened and ruined. I really like the imprint of the pattern thats really interesting. I hope the person at the wedding shower liked the set of embroidered tea towels. Thanks for sharing with us the technique of how to iron embroidered fabrics this is very useful for future projects.
Regards Anita Simmance
Hi Mary! First off, these are such beautiful pieces! You always come up with such pretty color combinations! Thank you for posting this, it was really informative.
I was wondering if I could ask a quick question. Sometimes, when embroidering an enclosed section (like a circle using stem stitch or chain stitch), that area will become sunken or pinched when I remove the hoop. Ironing them sometimes fixes the problem, but there is still a noticeable wrinkle. Would this be an issue with the way the fabric is stretched on the hoop, or is there a specific way to iron to get the area a little smoother?
Take care! It’s such a pleasure to read these articles and see your beautiful work!
If your fabric is hooped up so that it is drum taut and not pulled out of whack, then the problem is most likely the tension on your stitching. When you stitch with fabric in a hoop, only pull the thread through enough that the stitch sits neatly on the fabric, close to the fabric, but doesn’t pull on one end of the stitch. If you’re pulling a hole open on one end of the stitch, then you’re probably pulling too tightly on your stitches.
I have been embrodering for many many years and when I have completed an item, I just fold it up and put it away. Now I have finished a project that I want to give to a friend and I am hesitant to launder it before stretching and framing. What is the best way to wash it?
Hi, Snell – It really depends on the type of materials you used. Whatever approach you take, don’t use anything warmer than lukewarm water. In fact, if you can manage cleaning it with cool water, that would probably be your best approach. Don’t use an iron on it while it is at all wet or even damp. Steam and heat are what generally will prompt thread colors to run, so you want to avoid that as much as possible. You might test a small discrete corner first, before you do anything to the whole piece.