


Well, howdy there!
I took a long weekend off from writing so that I could accomplish a few goals in the studio, have a little R & R break before the summer push, and get in some organizing on my publishing calendar. I needed to do some Thinking Work.
Did I accomplish everything I planned to accomplish? … uh. No. But I made some headway. I think the Rest & Relaxation got in the way. And that made it a great weekend!
I hope you had a great weekend, too!
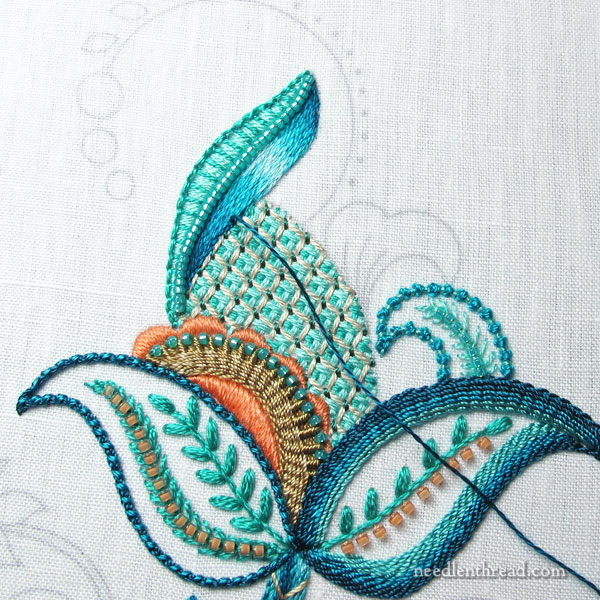
I managed a bit of progress on my Jacobean design. See:
As far as embroidery goes, I had a hopping weekend. As in, frog-hopping. Some call it frogging, this process of removing stitches, based (loosely) on the noise a frog makes (rippit, rippit).
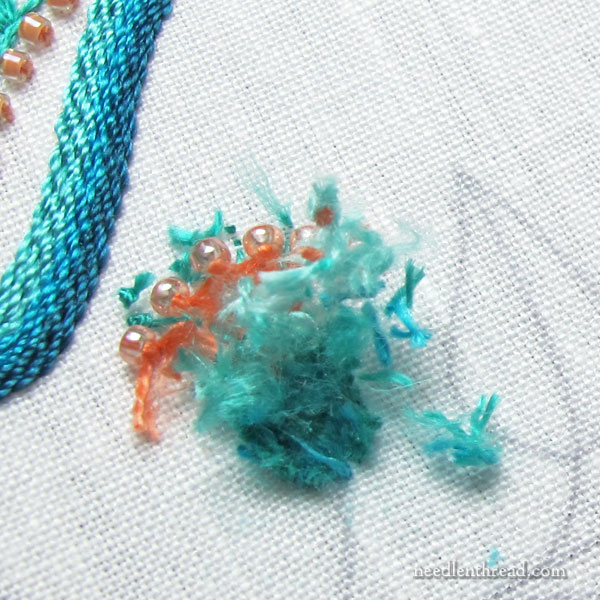
And I did a lot of it.
It’s probably a good thing I didn’t take pictures of every instance, or that’s what the next ten photos would be.
Tools for Frogging
I have three essential tools for frogging:
1. Tiny, sharp scissors
2. Tweezers
3. Tape
With those three items, you can remove embroidery stitches and bring your fabric back to decent condition before attempting the next round of trial and error.
I always cut my stitches on the back of the embroidery first, and then I use tweezers to pull out as many threads as I can. Then, I carefully cut through the front of any remaining stitches, and use the tweezers to remove the rest of the threads.
Finally, I take a little piece of tape (like Scotch tape), and roll it into a tube with the sticky on the outside, and I use my finger to roll this makeshift tiny lint roller all over the fabric, front and back, where the stitches were removed. This lifts off any extra fuzzies and bits of thread.
Mental Preparedness
I always go into a project like this one with a clear expectation that I’ll be doing a lot of frogging.
When I make my way for the first time through a design, I have ideas of what I want to do, but until those ideas are actually worked out in stitches on the fabric, I’m not 100% certain of them.
And sometimes, they’re a flop! And that’s ok! That’s part of the whole process for me.
So I prepare myself mentally for the exercise of picking out stitched areas, knowing in advance that it’s part of the process. Thinking this way helps keep me from being frustrated when something doesn’t work out and I have to pick out the embroidery.
It’s fun to put the embroidery back in and be able to say, “Ah yes, that works better.”
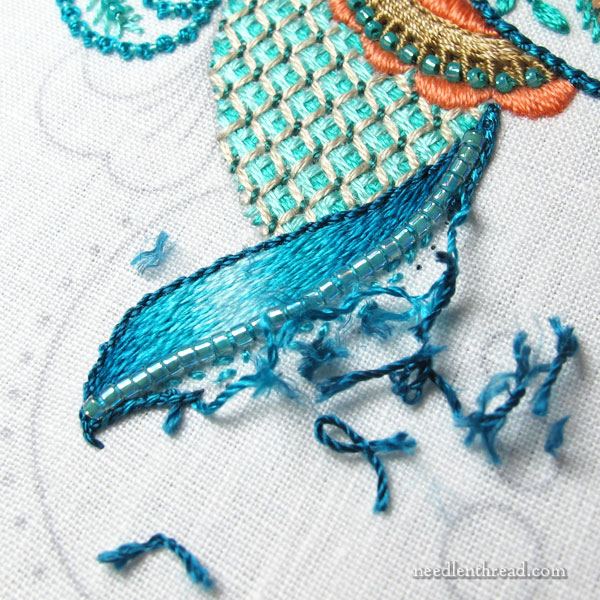
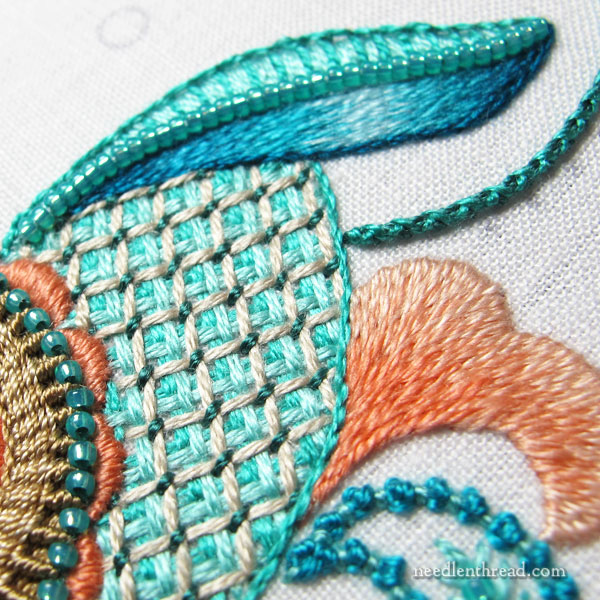
On the top of the swoosh in the image above, it was originally satin stitched in the darker blue found in the shading on the lower half of the swoosh. I forgot to take a picture.
I didn’t like it. It was far too heavy. It looked like Sam the Eagle’s brow. The whole thing was frowning!
I also didn’t like the beads I had chosen – they were too large.
So I cut all that out, leaving the shading on the lower part of the swoosh, and decided to lighten the top half up by bringing in the greener colors. Instead of satin stitch, I worked a spaced buttonhole stitch over padding, and then, between the spaced buttonhole stitches, I filled in with some straight stitches.
I switched the beads out to the smaller 15/0 round seed beads that are part of the brown sandy element below.
Originally, the outline below the shaded part of the swoosh was worked with a silk perlee, but I found this too heavy. So I switched to a single strand of Soie d’Alger, and I liked it better.
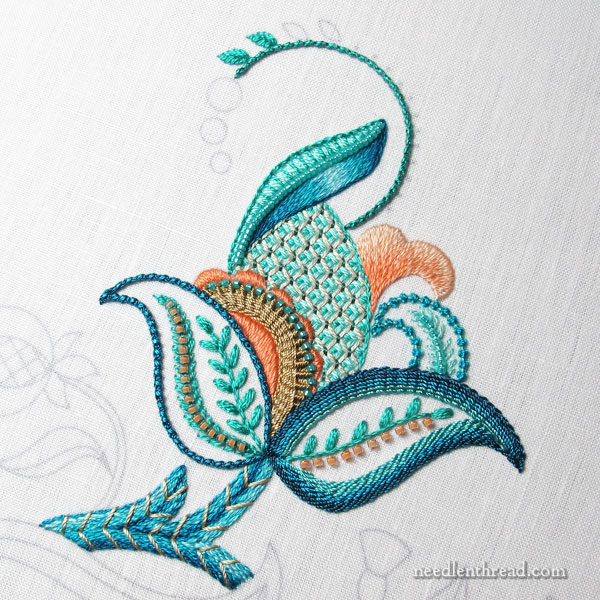
Once I was finished with the top swoosh, I worked the side elements, one outlined in Palestrina stitch and filled with a beaded fly stitch accent, and the other filled with long short stitch shading.
I also began working up the curled stem above the element, using chain stitch in Soie Perlee, whipped in both directions with one strand of Soie d’Alger, to bring in the brighter green that I wanted to use on the little leaves.
Then, I left that section for a while, so that I could think about the treatment of the circles at the end of the curled stem.
I contemplated adding an outline to “embolden” this long and short stitch element.
Lately, though, I’ve noticed so much outlining going on around long and short stitch in the embroidery world. It is starting to come across as very trendy, and it reminds me of coloring books.
I’ve developed a slight distaste for the look – so much so, that I almost didn’t outline under the swoosh in the darker blue. But then, there are times when outlining is necessary. It’s just not necessary all the time. So I decided to forego it around the long & short stitch element for now.
If, in the scheme of things, there needs to be a touch of something to enhance that element, I’ll think about that when I’ve conquered a bit more of the whole picture.

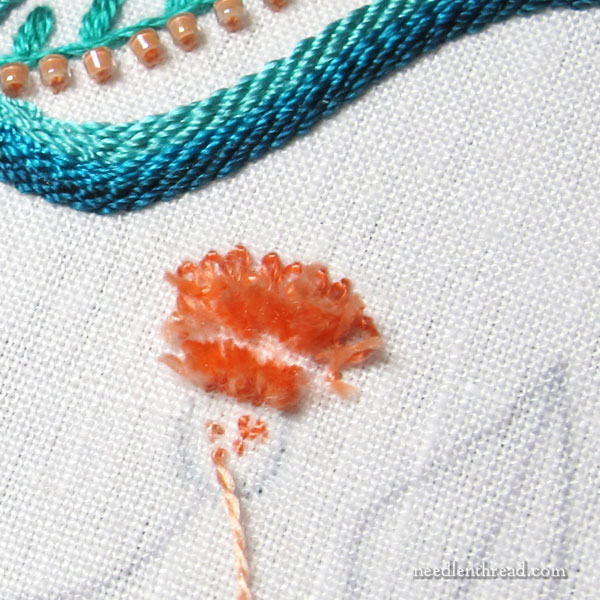
From there, I moved down to one of the little buds, and I stitched it like that (above) and I disliked it greatly!

I re-did it several times, and eventually ended up with this (above), which I liked much better.
While I was working on that, I was thinking about the circles at the end of the curled stem above the main element. Once I finished this little bud, the circles were clear in my head…
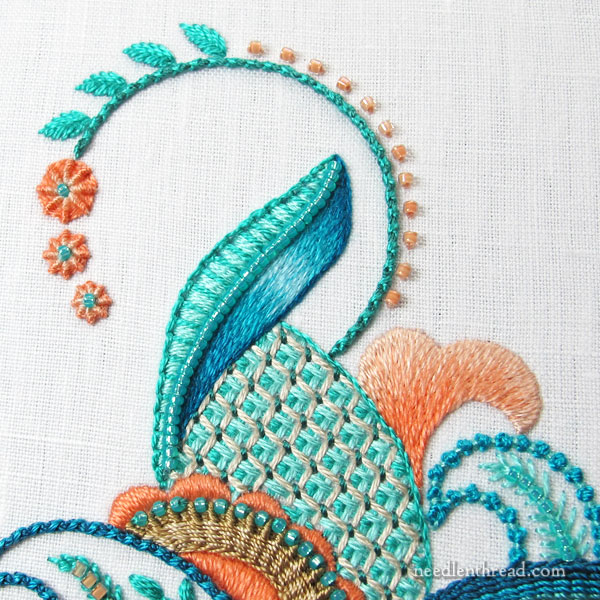
… so I went back up there, and worked them as ribbed wheels, shading them from light to dark and adding a small 15/0 seed bead in the middle.
I added some 11/0 beads (delicas) in the orangy-coral along the vine.
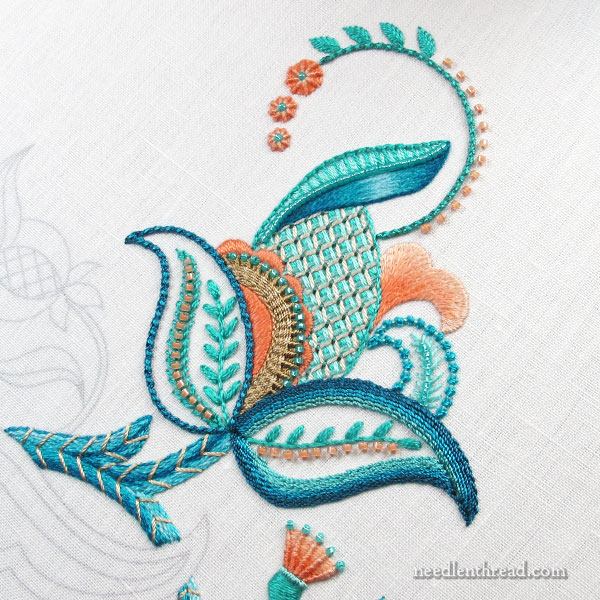
And there we are! I think it came together fairly well. I’m pleased with where it is so far, and I’m ready to move on to the next elements.
That’s where I am on this project. If you want to see the backstory, you’ll find the last update on the project here, with a full index of previous articles at the end of that page. I’ll be adding an index for this project under Tips & Techniques in the main menu on Needle ‘n Thread, where I have a list of hand embroidery projects & step-by-step lessons that you can follow along with.
If you have any questions, comments, suggestion, feel free to join in the conversation below!
Thanks for your tip on “frogging!” In my inexperience, I have to do a lot of that! Clipping from the back first sounds like a splendid idea!! And I liked the idea of using tape, too!
I’m really enjoying following along with this project!
Mary,
Thank you so much for your generosity of spirit in sharing your techniques and process. it is so helpful for a newbie to see that it really does take some creative experimentation to get it just so.
You do incredibly stunning work.
Stunning, as always!
I love the three circles as three flowers. They fit the design so beautifully.
I love this project! The colors are refreshing and your work is stunning. Thanks for sharing.
You are a Master! That is just so beautiful, you are a sculptor of embroidery!
Hi Mary,
I find it interesting in the difference between stitchers on what they find calming and enjoyable. I could never decide on what stitch/colour/design to use on a embroidery. You are truly amazing. My go to calming obsessions are cross-stitch and appliqué. Could spend my life just sitting and doing those.
I love your newsletter and work. Thank you for the inspiration you instill.
Sincerely,
Brenda Eckstein
Thank you for sharing this project. I’ve learned a lot. I frog from the back of my project, too. Instead of sharp scissors (I’m afraid I’m snip the fabric!), I use a small seam ripper.
You’re making jewels! So beautiful and fascinating to see the development. Do you have a system for choosing which elements to work on first? I’m imagining picking a large, central one.
So luscious I could die from lusc-t !!!!
Hi Mary,
It is really coming along, and it is STUNNING! Thank you for taking us along on your journey. BTW, in quilting, the process of frogging is called “unsewing.” Apparently, NO ONE wants to call it “ripping out!”
Happy memorial day from Canada. Enjoyed my first email from you.
The pictures of your Jacobean progress are fabulous. I am awed by your work. Taking my first baby steps in the world of embroidery, I am practicing the stitches from the tutorials on the How To web page. Thoroughly enjoying it. You give me inspiration to keep going. I know I won’t be doing advanced embroidery like you but am looking forward to doing a simple project after practicing the sample pieces. I don’t feel so bad about frogging. I even rippit with the samples.
This made me think that if you ever saw my embroidery projects you’d wonder if I even knew how to rip stitches out. But then I just stitch tea towels intended for actual kitchen duty and give them away as little gifts to my friends. I am always impressed with your work though. Absolutely gorgeous — and perfect!
Beautiful, thank you.
So utterly lavish! Even more stunningly beautiful than one’s imagination –
To be honest, all of what I see of your work is so lovely, I’m sometimes puzzled why you changed something. It all looks perfect.
My own stuff is a very far cry from anything like this – it will never be “art”. Sometimes, though, it really needs a redo. So, QUESTION: how do you not take out the parts that connect with your frogged area and so have a section “unravel”?? Do you always take out a whole section? I’m working on one of your wheat designs so the whole thing is in shades of the same color, no defined sections or no large ones. Plus, to save thread, time, and effort, I travel the threads along previously stitched elements.
Thank you to anyone who has hints for me!
laura
This is incredibly gorgeous. I literally oooohed and ahhhhhhhed out loud when I was looking at it. That curled stem with the ribbed wheels? I may have actually growled in…lust? Admiration? Adoration?
This may be the day I pull out my embroidery books, fabrics, and thread, and finally start a project! Thanks for the inspiration!
Thank you for the frogging reveal. It reminds me that it’s not always set in stone, stitches can be changed . . . they’re only stitches. I’ve so enjoyed watching your progress on this piece. Thanks.
Mary, thank-you for showing your progress on this project. Your stitching is divine–what a professional you are! And your creativity is beyond compare. What gifts you have. The embroidery world is so fortunate that you share your talents.
The photo is crystal clear and brilliant.
I’ve always enjoyed this particular
complimentary color scheme.
Wow! It’s coming together divinely!
I’m diligently working my way, bit by bit, through The Leafy Tree project–a design that I love, by the way! Yesterday I just couldn’t stand the way one of the leaves was looking, so with a big sigh, I carefully picked the whole thing out, thinking all the while that “I bet Mary doesn’t have to do this.” What a treat to read this morning’s post!! (Lol).
Your Jacobean project has been wonderful to follow through all the shifts and changes and, yes, the frogging, too. It’s a beautiful piece.
LOL! Oh, yes, I doooooo!
Thank you Mary for step by step instructions including the tips on “frogging” . I can not wait to see the finished project. Your work is amazing.
That little Jacobean piece just keeps getting lovelier and lovelier! Thanks for sharing your do-overs. It helps just knowing how much you rip and re-do stitches plus your very specific ripping technique suggestions are good to know as well.
Hi Mary, Absolutely stunning! You are making it more beautiful with each step. I appreciated your comment on the colouring book look which I have noticed a lot especially on etsy patterns and kits for easy quick embroidery or even vintage kits on ebay. Thank you
Oh, my goodness, this is gorgeous!! I totally agree with you about the long and short stitch shading thing. Too munch if it (says she who just finished a crewel project with a lot of soft shading!)
I’m looking forward seeing Both finished versions – and perhaps a kit???
Now I feel much better about all the ripping out I do!! I thought it was just my inexperience that meant I couldn’t tell how the stitch was going to look “in person.” Yes, makes sense to just factor that in at the outset–ripping will be done, and it’s just part of the process. Thank you!!
It’s looking great! I too spent yesterday evening frogging on my latest project, which is just a fun little experiment. I tried out a pale grey as background, and it turned out to be too dark; I think I’m going to have to go with something nearly white, which wasn’t my plan at all.
hola Mary
me encanto la seleccion de colores y puntadas
te comento e visto renacer con mucha fuerza el interés por el bordado a mano ,,La Pandemia ,cuarentena ,muchas mujeres jóvenes comenzaron a interesarse ,por esta tan maravillosa tecnica
un virtual abrazo y gracias,,,,
I just had to comment on this gorgeous Jacobean sampler. I have so little free time I haven’t had the time to really practice satin stitch or some of the other detailed stitching you do, but one day, I can only hope to be able to embroider as beautifully as you do.. I love your colors and how you used the beads to accent different areas. I can’t wait to see what comes next!
It’s rather comforting to know that even experts have to start over and tear things out. Thank you for sharing that part of the process.
I love to watch how the embroidery just blooms when you stitch it. It is amazing how everything flows even with the cutting out of stitching. Your choice of colors and stitches make it all come alive. You are magic!
Boy Mary, this piece is really quite stunning! You are a practiced and lovely stitcher, and I see the beauty in your even stitches. I really like the colors and embellishing you are adding, and I dare ask: will you offer this as a kit eventually? I know I could never complete it with the same beauty, but I’m game to try! 🙂
I increasingly think “The best pattern is no pattern”, when it comes to women’s clothes. I sort of think that about beads
when I look at crewel work. But perhaps I was born in in the wrong time period? Crewel is so beautiful that I have trouble with added “bling” or “glitz” or what ever you call it. Different strokes for different folks I think. Erasers, white-out, and delete are all signs of a thoughtful mind. I guess the ultimate thing to set your teeth on edge is having to backtrack on 18 #
needlepoint. Been there – done that. You learn to stop sooner rather than later when you start to wonder “IF?”
Just want to say how beautiful and perfect your work is! Thank you for sharing!
Mary, those ribbed wheels are fantastic as flowers! That whole tendrils element has come together deliciously. Bravo!
I’m in catch up mode with your posts Mary, and I’m really enjoying following your decision making process with this design. I particularly like how you have balanced that little bud with the coordinated ribbed wheels. Lovely! 🙂
OMG!!!! Ms. Corbet you are blessed. Your work is sooo beautiful. I can’t explain what it is that those extraordinary projects that you make, made me feel. It’s such a pleasure to look at them. Thank you very much for sharing them to us. Bless you child
att. Leticia Bermudez
Hello, Mary. I’m trying to understand how did you do the two colors palestrina Stitch on the left petal. Could you, please, give me some tip? Thank you. Have a great week!
Isis
The lower left petal (the large one)? It’s not two colors. It looks like a dark and a light because of the way the light plays on the silk thread. One of the many reasons I love silk thread!!!!!
I’d love to know what thread you’re using please! Gorgeous work!
Different types of silk thread, all from Au Ver a Soie. Hope that helps!