


Quite a while ago, we chatted about thread conditioners used in the needlework world, and I gave my two-cents’ worth of profound thought on the subject.
I’m not a fan of thread conditioners – you can read the article to see my reasoning – but I am an unabashed fan of beeswax.
But, before there’s any confusion, I’m not a fan of beeswax for conditioning or taming cranky needlework threads. Not at all! (I mention why in that article, too.)
But I do use beeswax for goldwork, to strengthen threads and protect them from abrasion from the metal threads. (And, yes, we talk about that in the previously mentioned article, too.)
It just so happens that I have a beehive in my backyard. And that beehive produces honey and beeswax. It’s my brother-in-law’s hive, and this past year, he harvested some nice wax. I got a little bit of it.
This weekend, I was beset with a headache that kept me from stitching and from computer work, so instead, I set about preparing little wax pats for goldwork kits.
I just love looking at, handling, molding, sniffing, melting, and, in general, playing with beeswax! So goldwork becomes a good excuse to indulge.
Besides, the smell of beeswax melting is always a wonderful antidote for all that ails me. It’s as good as a cup of tea.
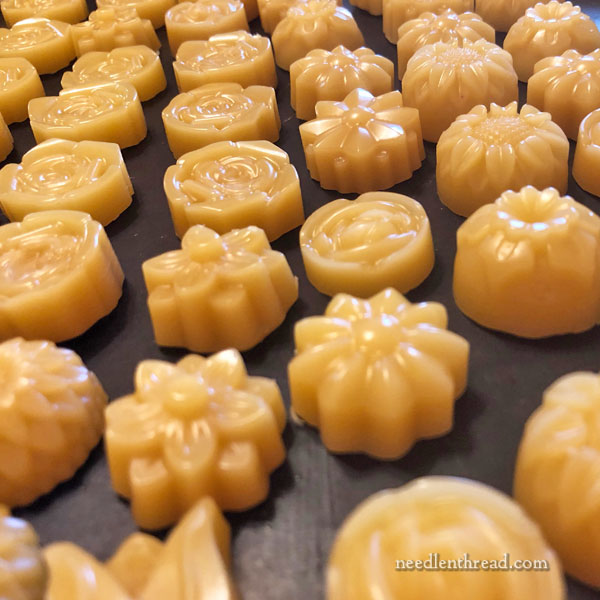
And I love the outcome. I love popping the little pats of beeswax out of their molds, to behold that smooth, creamy-golden wax in all its detailed glory.
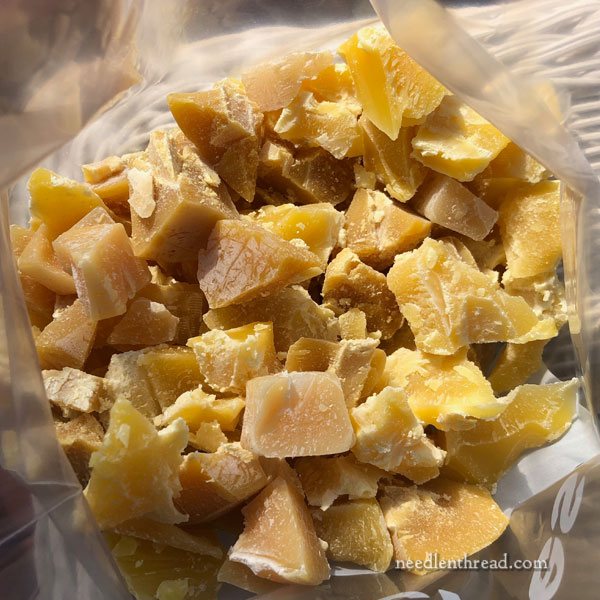
To prepare these little pats of beeswax to include with goldwork kits, I start with a collection of various degrees of filtered beeswax. A little bit is from the backyard hives. Some is supplemented from local beekeepers who sell beeswax, and some is recycled from candles and whatnot.
My least favorite beeswax to use is the stuff you can buy in super-duper-duper hard bricks from craft stores. It’s often so processed that it is hard and flaky. I like the stuff that’s a bit fresher, that still has a kind of elasticity to it. It softens nicely – not too mushy, but just a little, so that it it really coats the thread well when you use it.
I started this weekend’s waxy dabbling with about 1.5 pounds of gathered beeswax chunks and bits, all of which has been filtered to some degree, hardened, and then broken up into small pieces.
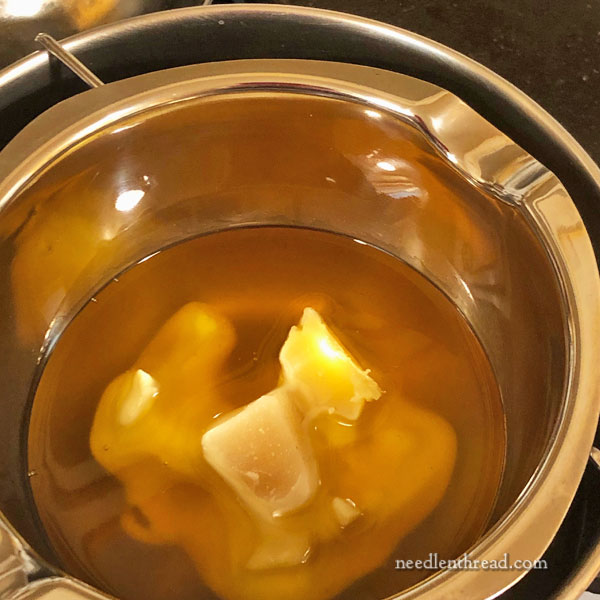
For melting, I use a little pouring pot over boiling water. It’s the easiest way to safely get a consistent, slow melt.
If it weren’t some 150 degrees-ish (beeswax melts at 147 degrees F), I could stick my face in there.
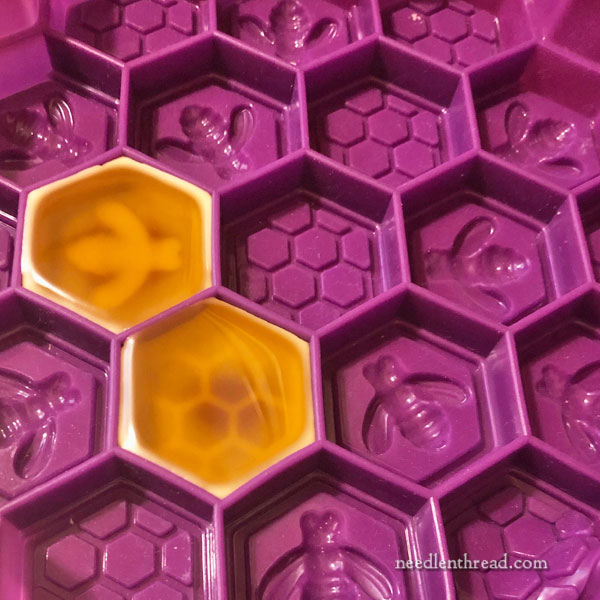
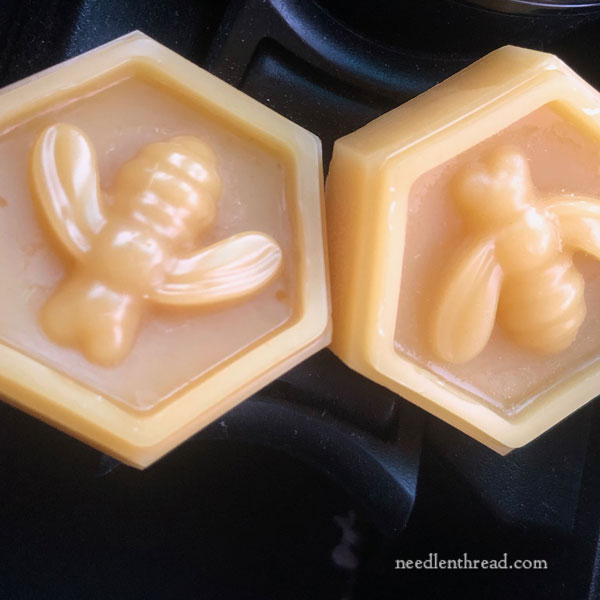
For the most part, I use chocolate molds for my little beeswax pats. I use other molds, too, depending on what I’m doing. I have this one mold, above, that was sold as a cake mold (it’s silicone). When I first came across it, cake never entered my mind!
The beeswax hexagons that it produces are lovely, but they’re really too big to include in most kits. I usually make a few for studio use and occasionally for gift giving. Aside from using for candles, beeswax makes nice household decorations – a few of these hexagons scattered among a candle arrangement on a rustic table looks lovely! It also works well in wax warmers that people buy for other smelly waxes. It gives off a soft, warm, comforting smell that can’t be beat.
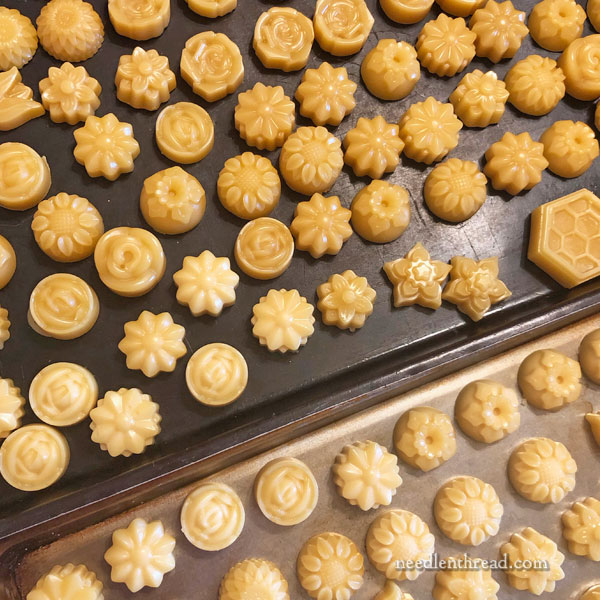
It doesn’t take too long to make a mess of little beeswax pats. It’s a low-stress, satisfying job.
The pieces in the lower part of the photo have not cooled completely – they’re a much creamier color. As the beeswax cools, it darkens, turns more translucent and golden, and it hardens significantly.
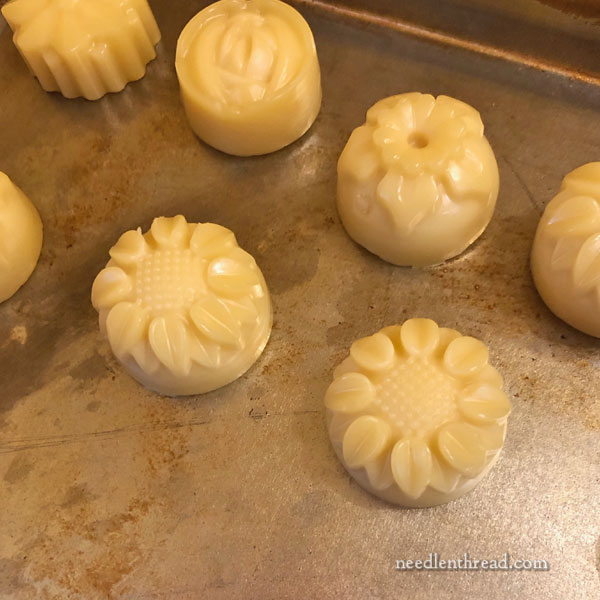
Creamy and smooth! Don’t you just want to eat it?
I took a couple of these over to my sister’s house and accidentally left them in the car. Oh happy accident! My car smelled glorious! I was just a little bit thankful, though, it didn’t melt and run. We’re having a warm spell in Kansas.
So that’s what I did this weekend on the studio front. I had great plans for a full weekend of computer work, photo editing, and stitching on my little Christmas projects (which I will show you later this week!), but alas, my head decided otherwise.
I was happy to get another step completed in kit preparation. It was a great way to spend time productively!
Enjoyed your article today. You love to experiment and then share results and we appreciate all your work. Keep up the good work and keep up sharing with your readers. You are a gift to the embroidery world.
Barbara
Dear Mary
Sorry to hear you were ill with a weekend of headaches how awful. The beeswax are beautiful and I love the beeswax moulds that you have used beautiful especially the bees. Wow so many moulds for your kits I wish I was a recipient of some of those lovely creamy little gems they are lovely, they look like tiny cakes good enough to eat . Thank you for sharing with us your lovely beeswax moulds and for the tips on how to make beeswax it’s so interesting. I hope you feel better soon.
Regards Anita Simmance
This was a fabulous post. Looks like so much fun. The only thing that might, just might, be better is if it were dark chocolate in those molds!
Hello! I would love to purchase some of your beeswax for gold embroidery. Where can I purchase it? Please advise.
I love beeswax too. Some I collect like the black raspberry, red strawberry (they hang from a silk ribbon!) and other cute motifs. I would definitely buy 2 each of the hexi’s-one to use and one to collect. I have a sewing box I keep my sewing related keepsakes in and the beeswax collectibles go in it. I have special buttons-my Aunt gave me some beautiful Chinese head porcelain buttons, very ornate and detailed. I have other buttons (I love Mother of Pearl items) and vintage items too.
Hi, Mary! I couldn’t agree more with your evaluation of beeswax, for scent and needlework. I do have one additional way I use beeswax in my needlework. For z-twist, art silks, and rayon that my late housemate referred to as “okra slime”, they start unraveling and/or slip out of my needle when dropped to spin straight. I wax about one inch of the needle end of my thread. It stiffens it enough to make threading easier, unraveling more difficult, and eye slippage less frequent. I NEVER actually stitch with this end! Once my needle is ready for sliding under, I cut off the waxed part of the tail thread (requires allowing more thread for tie downs, which stops me from stitching my thread to a nub!). I realize some wax residue will probably rub off on the holes in my fabric as I stitch, but judge the ease of stitching as more significant.
These are just the cutest things!
These are adorable!! What a great use of time with a wonderful sense of satisfaction. Thanks for sharing. Hope your headache is gone! Suzie in Idaho
Any chance you will be selling these on your site? They look lovely!
Hi — It’s funny that I read your article on thread conditioning and beeswax just as I was wondering if that’s what I needed. I’m using a DMC sparkly mouline which I love for that bit of dazzle it adds to an embroidered piece, but I also hate working with it. It’s hard to thread and it breaks easily. I can never decide if I should just one strand or two, but such a pain to thread. Sometimes after I’ve embroidered with it, I see areas where the thread is broken. Do you have recommendations for making working with this troublesome thread easier? Thank you!
Aren’t those darling? You might say they’re the … bee’s knees!
Please don’t ban me for bad puns. LOL!
Mary… these little wax bits are just adorable! Many years ago, I had a chance to “harvest” a bit of bees wax from a neighbor’s hive. I was able to melt and sieve it first…and then remelt it and pour into little chocolate molds. I gave a few little cute “dots” (as I called them) away as Christmas presents…and I found that some other friends were “hurt” because I did not give them a little wax “dot”! Incredible! Had to give more and more of my “dots” away which kept my friends happy! Your article remined me of the wonderful smell of the wax… not only as it was melted…but also as the “dots” sat in my quilt room before I gave the “dots” away. Yes, I kept a couple “dots” for myself…and, sadly, I have used them all up and they are now all gone. Thanks for this post that brought back a really terrific memory! Bonnie
I like to use beeswax on my thread for English paper piecing, and running each piece of thread over the wax became something of a nuisance. (I’m on about my 6th spool of thread and only about halfway through the current quilt.) But, I had a happy accident leaving my travel work box in the car a couple of summers ago.
Fortunately, my fabric patches were all in little plastic bags, so they weren’t affected, but my piece of beeswax melted all over my spool of thread, completely saturating it. Once I scraped off the blobs where the wax had cooled and set on the “down side” of the spool, I found it could still unwind and use the thread.
My couture sewing classes all recommend waxing thread for hand sewing, then ironing it to let the wax soak into the thread. But that always seemed too much work, especially with a “travel” project. Having the wax melt over the spool accomplished the same thing.
Now, instead of waxing each piece of thread as I pull it off the spool, I melt beeswax in a small pan and dip a whole spool (or 3) in the wax at a time. I put the spools on a skewer to drip and cool over the pan once they’re dipped. Then I scrape off any excess wax at the ends of the spool and the thread is ready to use. . Gives my nicely conditioned thread without fussing with each piece. The wax doesn’t penetrate all the way on 1000 yd. spools, but soaks in nicely on 100-200 yd spools
Hi Mary – you mention that the wax is filtered or partially filtered before you start the process. How do you do that? Would straining through muslin work or does it need a fine metal sieve?
As a fellow headache sufferer, I hope it’s long gone by now!
Hi Ruth – there are different ways to filter wax, but the easiest home process is probably boiling in water, cooling, and scraping… repeat, repeat, depending on how many times you filter it. You can probably look it up online – I bet there are videos. The headache is long gone. Thankfully, they’re pretty rare for me – I haven’t had a headache in ages. (Knock on wood!)
i just stumbled on your delightful blog and am enjoying learning about thread! i have only used 6 strand DMC for embroidery – but now, reading this and seeing your lovely was bits that are so beautifully made, i want to try goldwork – and to find a local source of beeswax! it’s good for conditioning sewing thread to not tangle so badly too; i used to use it every time i had to hand sew. thanks for your lovely blog – the pictures and descriptions are great.