


Towards the end of last week, I tucked into my Sea-to-Stitch Monogram M project, to try to finish up the background color on the M.
I didn’t get as far as I wanted to (isn’t that always the case), because I found myself pausing the play with around with colors.
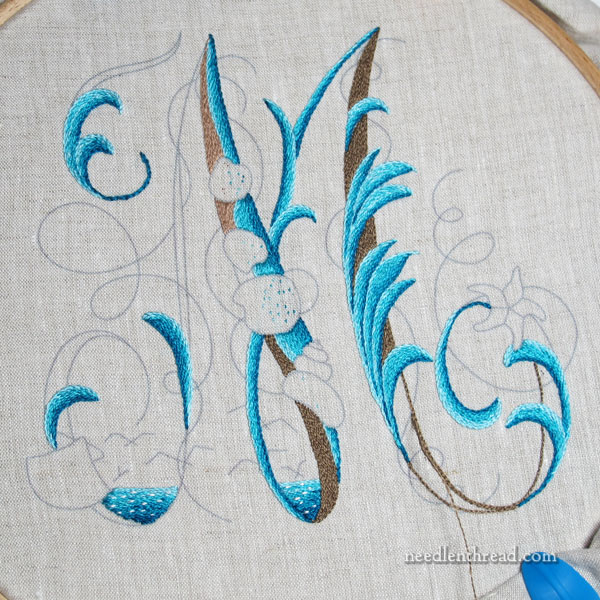
If you caught up with the project last week here, you’ll see that the water elements on the monogram were finished, and I was just starting to stitch in the background color. Today, we’ll talk about where things went from there, and why!
This is where I am now:
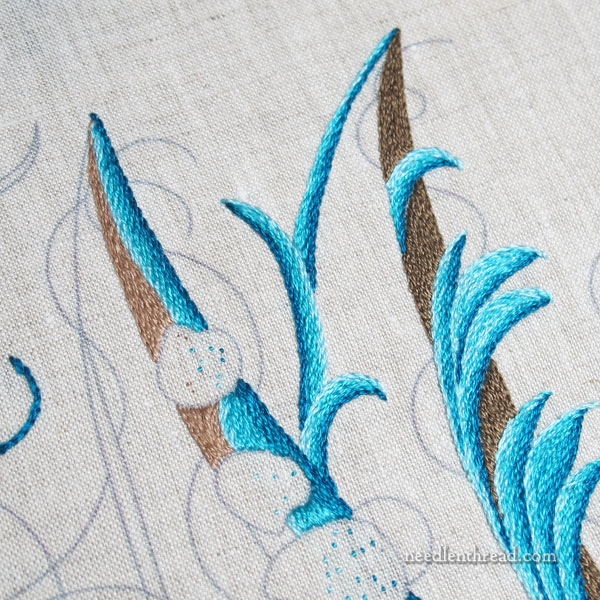
About my colors overall: I chose a completely different color set from those found in the book. Personally, I love every color option in the book – each one has its own perfect beauty. They work well together!
But I wanted to embroider mine with Au Ver a Soie silks in different weights, and play around a bit. I opted for a much brighter, turquoise-sea look, which corresponds with some of the shades I used in my Jacobean Sea project.
What led me in that particular direction? I wanted to go with corals and reddish-corals on the shells on the monogram, and I like the coral and turquoise combinations that I used in Jacobean Sea, so I turned back to some of those color selections.
I fell a little short on the “earthy” tones, though, for the background of the monogram. When you look at last week’s progress report on this particular monogram, you might notice that there’s a slight tinge of green in the darker background color that I was just beginning to stitch in.
Silk being the way it is, whether or not the greenish element was noticeable depended a lot on the lighting. But it caught the light enough to emit a swamp-green glow now and then, which really put me off! Plus, at the time, I thought the choice was a bit too dark.
So out it came.
Wouldn’t it figure? The areas that I chose to work with one strand of silk, in split stitch no less. Split stitch is such a bear to pick out!
I tried another color in its place and it didn’t work at all. So out it came, too.
Then, I settled on a color that I thought I would really like.
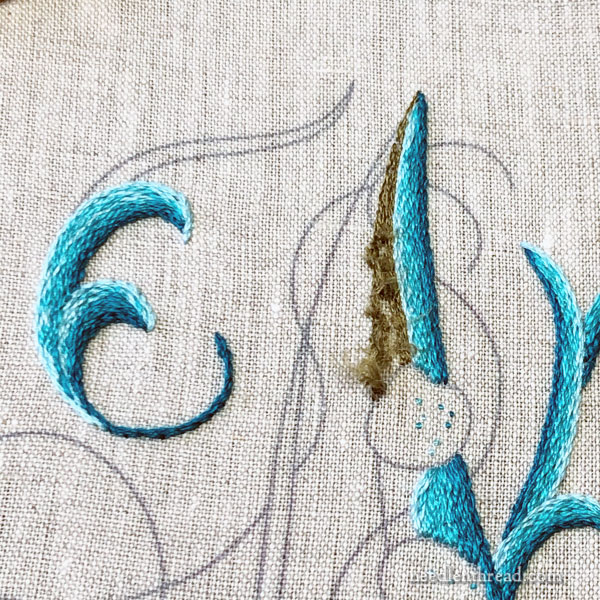
It’s this color. Well, not really. It’s sort of this color, sometimes.
That’s the thing about silk. Because of the way the light plays off the natural sheen of silk, depending on what angle you’re looking at something, the shade can look much deeper or much lighter.
In this case, in the photo above, this particular color looks like it has a decent contrast on the background fabric, and it also seems to afford a decent contrast with the blues.
There’s a pinky cast to it, though, that is somewhat insipid-fleshy and somewhat clayish. And from afar, the contrast with the background fabric and with the lighter edge of the blues is not as drastic as I’d like.
Plus, that pinkness doesn’t play out well with the other colors overall.
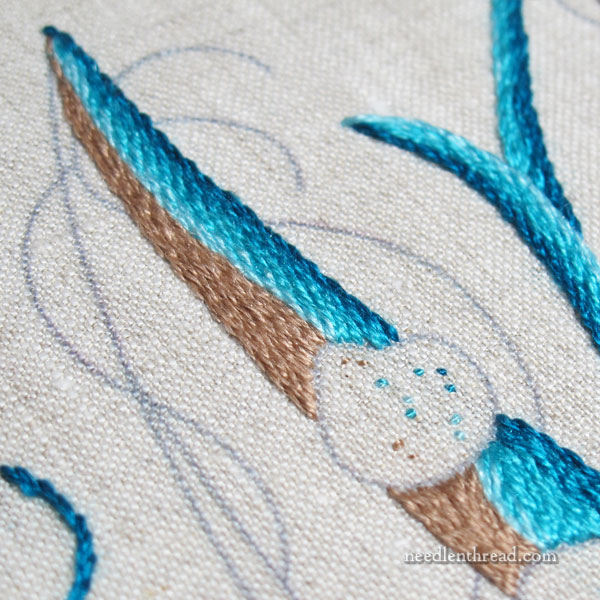
So I opted for a darker shade again, without a greenish tinge but still somewhat with a more grayish-clayish cast to it. This time, I stitched it elsewhere and left the questionable color in, so I could compare the two.
I like the darker background much, much better, especially with these blues. The blues seem to leap off the dark background (which is kind of what you want, with this design), and the contrast with the ground fabric brings the whole letter out.
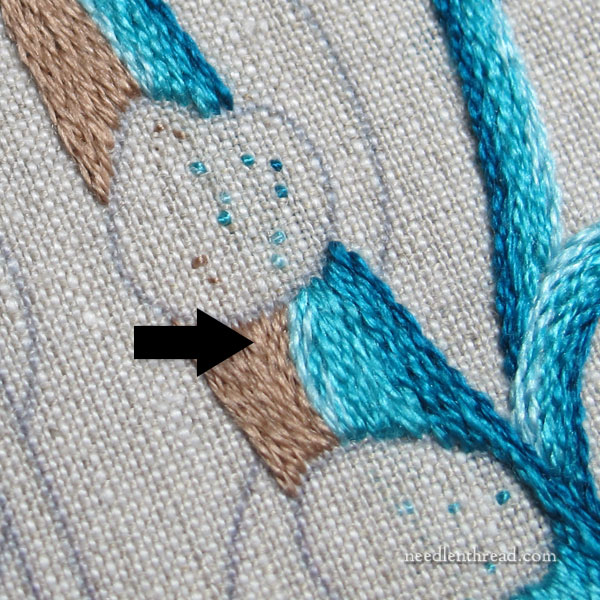
So, once again (third time’s a charm), I’ll re-do the lighter colored area. And it works out well, anyway, because see the arrow in the photo above? I don’t like that segment.
While the water should be following the curve, I think the background stitching should remain straight, not following the curve of the water, but the straight edge of the letter. I will be glad to get that re-stitched.
Linen
When I pick out this kind of stitching, I rejoice in the fact that I’m USING GOOD LINEN!!! (I never yell in all caps when I type, but good linen deserves a Huge shout-out!)
We will talk more about this linen a little bit later – be patient! – but for now, suffice it to say that linen is such a resilient fabric that it can handle stitching, unstitching, restitching, unstitching, restitching, unstitching and restitching again, like no other fabric can. The better quality linen, the better it stands up to the ordeal!
I will have more linen information for you shortly! If you wrote in about stitching cuts last time I mentioned it, I appreciate it! I’m working on a solution for you.
Picking Out
When I pick out something like split stitch, I start on the front of the work with a fine pair of scissors, very carefully slicing through the stitches perpendicular to their direction (and, if possible, away from any other stitched areas). Then, I turn the work over and do the same on the back.
Then, I use my favorite handy-dandy tweezers and pluck the threads out carefully. This can be tricky when you’re up against another line of stitching that you’re not removing. Always make your “slices” of the stitches away from other stitched areas! Take your time. Don’t over tug. Work the bits out piece by piece.
Finally, because most threads will leave fuzzies, I roll a piece of regular Scotch tape around my finger (that’s cellophane tape, the kind you have lying about for wrapping presents and such), and I dab all over the fabric area, sometimes rolling the tape gently back and forth. I avoid getting the tape on remaining stitched areas as much as possible.
This cleans up the fabric well, so that I can start with a like-new surface. No fuzzies.
Supplies
As soon as I work my way through the letter, I’ll add a list of the colors I’m using to these updates on this project. Because my colors will probably change frequently as I try out combinations, I don’t want to give a list at the start. If you decide to use the same colors, you’d be overspending on threads!
If you’re interested in working through your own Sea to Stitch monogram, you’ll need your own copy of the book. You can find it available here in my shop. I have a few in stock right now. Yay!
Hopefully, I’ll have time to finish up the background this week and start those seashells. I’m dying to get to the seashells!
Morning Mary – What can I say, absolutely delightful. So nice that you have a color theme going with other pieces too. It ties the home together. Looking forward to reading about what constitutes Good Linen also, if you’re going to dedicate that much time to a project it’s worthwhile to invest in top grade materials.
Thank you so much for sharing the why’s, how’s and wherefore’s of what you stitch, we all of us learn so much.
Brenda
Bonjour Mary,
J’aurais voulu savoir si vous mettrez en vente le modèle “Jacobean Sea” que j’adore.
Merci pour votre réponse.
J’ai acheté les monogrammes de la mer et il est sur ma liste de prochains projets. Il est si beau.
Bonne soirée.
Pascale
Thanks for showing us your process, often I learn more from what might be considered a “mistake” than from straight teaching. It is a comfort to know that it is not ALL smooth sailing on this sea.
Mary– Have you ever tried to use a 3M/Scotch Brite lint roller to clean up after a take-out? There always is a lot of wool debris after taking out crewel stitches, so I use it all the time. It is very gentle and easy. I roll it over any area that has pieces of hair left all over — both on the fabric and on the already worked stitches.
Hi, Taffy – I really don’t need anything that big – in fact, anything that large would be problematic, because I don’t want to roll over the adjoining stitching. The areas that I’m talking are about 1/2″ wide, tapering down to very narrow, and no more than 1/2″ – 1 1/2″ long. So they’re small bits and close to other stitching. A lint roller is great on a large piece of twill where you’re removing a lot of stitching, but on small spaces, they’re a bit cumbersome. That said, I use one on my winter coat all the time!
Mary,
I really like the darker green on your monogram. I’ve been trying to match greens all week looking for the right color of moss green to coordinate with some camo uniform fabrics. Not too brown, not too gold, not too grassy, yet needs to fit into the jungle garden. I feel your anxiety as I continue to work on my latest quilt. Thanks for sharing, somehow I don’t feel alone with the options when I know others have to try and retry to get it just right. In the end, I know those who receive our work appreciate our efforts.
I am not as fussy as you and most of the time like everything you do, but I am glad you ripped the background color. It was such a swampy green, I felt it distracted from the lovely blues! Your new color choice is a huge improvement!
Mary, are the little dots we can see where the shells are going to go where you started and stopped your threads? Would it be possible to see a pic of the back? Many thanks from a new learner of ways to start and stop!
That’s where I’m starting and ending my threads with little tacking stitches.
Dear Mary
The M of the Sea to Stitch project is coming along nicely and I like both the light and the dark brown, they both look good and I can’t wait for you to tell us the linen you are using it looks a study linen. The tip on unstitching is really useful and I will definitely use this way next time I unpick stitches, I remember you talking about scotch tape before and I always use this when I unpick stitches it really does a good clean on the fabric. Thank you for sharing with us the progress and the tips and techniques of unpicking stitches very useful. The photos are lovely thanks.
Regards Anita Simmance
Mary – will this project (sea shells) become available in it’s entirety at some point? (I’m a Patreon) No pressure! I’m just wondering if you’re going to offer a series of tutorials a la the wheat? Mostly, I’d love a KIT because sourcing all the silk and the beads and wire might be tricky. Thanks, Maggie
Hi, Margaret – This isn’t my design. It’s in Elisabetta Sforza’s book, A Sea to Stitch, which you can find here: https://shop.needlenthread.com/product/a-sea-to-stitch-by-elisabetta-sforza It’s one thing to show you my progress, to mention my own snags and how I overcome them, or to mention the threads and such that I’m using, but I could never publish it as a whole project, because it isn’t my project. I may do a materials pack if there is interest. I have several irons in the fire right now, though, so I’ve got to sort out the priority things first.