


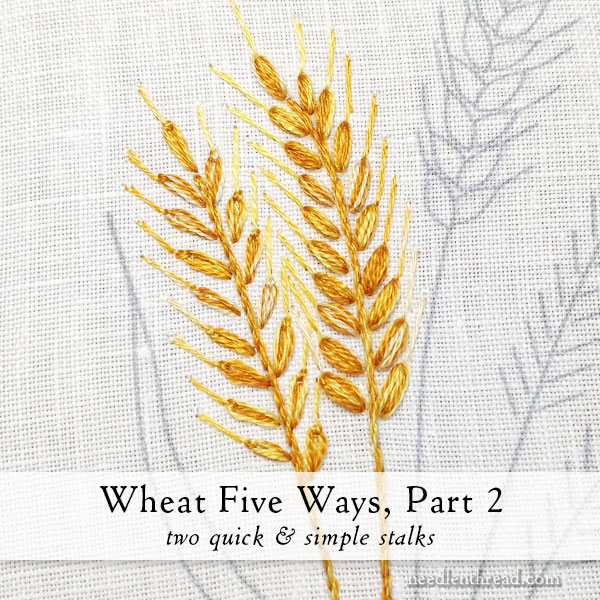
Good morning, and welcome to installment #2 on how to embroider wheat five ways!
Today’s tutorial will take a lot longer for me to edit the photos and write the article than it will for you to embroider the wheat. These are two very quick and easy ways to embroider wheat.
If you’ve been around Needle ‘n Thread for a while – or if you’ve embroidered my Festive Fall design – you will be familiar with the first method. It’s pretty much as basic as you can get.
The second method – also pretty basic – is probably my favorite way to embroider wheat. It always turns out looking really good, without a lot of effort!
Let’s get started…
In Part 1 of this series on how to embroider wheat five different ways, I gave you the design I’m using and we talked about materials.
It’s important to note that I’m using variegated thread (listed in Part 1). When it comes to this kind of grassy, sketchy, multi-shaded element in embroidery, I find that a subtly variegated thread like those produced by DMC (their Variations line) is an excellent choice for bringing life to the embroidery. If this embroidery were all done in solid thread colors, it would look less “painterly” and rather flat.
Either that, or I’d have to go to much greater efforts to get the variation in colors and shades that I like! So, yep – I’m all for using Variations on this kind of design!
Just a note about the thread choice: you can use overdyed threads from your favorite hand-dyeing source, but just remember that they may not launder well. If you are embroidering something you plan to launder or to soak in water, a hand-dyed thread is not always your best bet, because the dye is more likely to run.
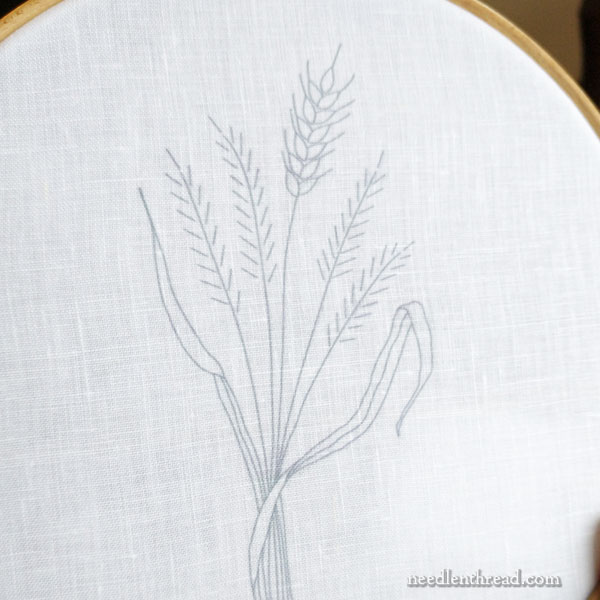
The first step – hoop or frame up your fabric with your design transfer on it.
It’s really important to use a hoop on this practice project, because some of the stitches we are going to use will perform better on taut fabric. Of course, if you’re used to stitching in hand, it’s up to you, but I find that I get the best results on the type of embroidery we’re going to be doing by embroidering with a hoop or frame.
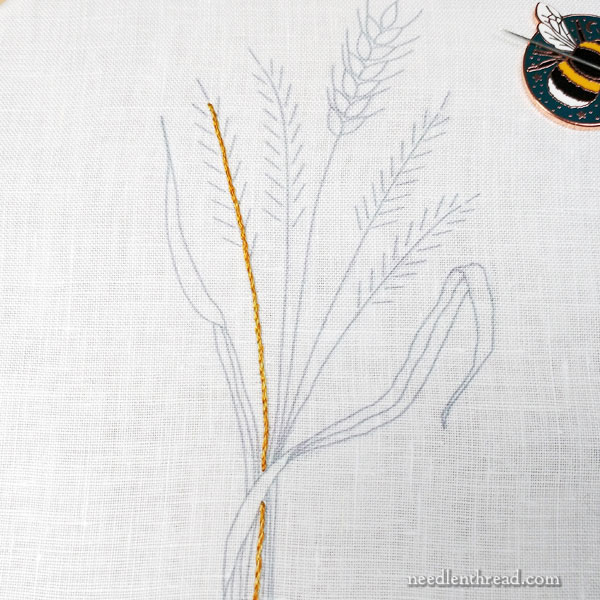
I used two strands of floss to stem stitch up the stem.
For pretty much this entire tutorial, when I’m using two strands, I’ll be mixing the colors in my needle – one strand from one color and one strand from another.
On the stem, I used one strand of 4129 (the darker Variations) and one strand of 781 (the lighter brown).
You can find a video tutorial for the stem stitch here, if you need help with it.
Next, I switched to two strands in the needle again – this time, one strand of 4129 (the darker Variations) and one strand of 4073 (the lighter Variations). If you don’t have variations and you’re using solids, use one strand of a light gold and one strand of a medium gold.
Begin at the top or the base of the wheat head, and work a daisy stitch over the straight line where each wheat berry goes, starting the stitch next to the stalk and ending it at the end of the straight line.
Anchor the daisy stitch as you normally would.
Then, bring your needle up inside the daisy stitch at the rounded tip of the petal (near the anchor stitch), and work a straight stitch inside the petal by going down into the fabric near the stalk, where the daisy stitch started (and inside the loop of the daisy stitch).
You’re just working a single straight stitch inside the daisy stitch.
This will bring you back to the stalk-end of the daisy stitch, and you can easily travel from there to your next wheat berry.
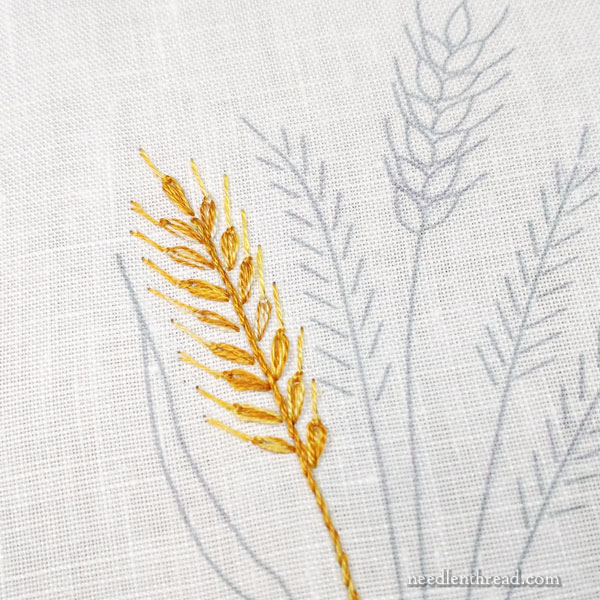
You can see that this makes a solid, filled daisy stitch. It’s quick and easy!
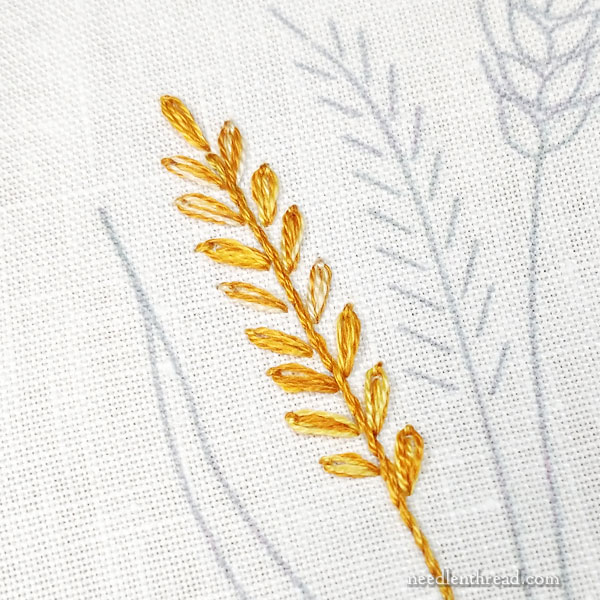
Work the filled daisy stitch all the way up (or down, depending on where you started) the wheat head, covering all the straight lines that indicate a wheat berry.
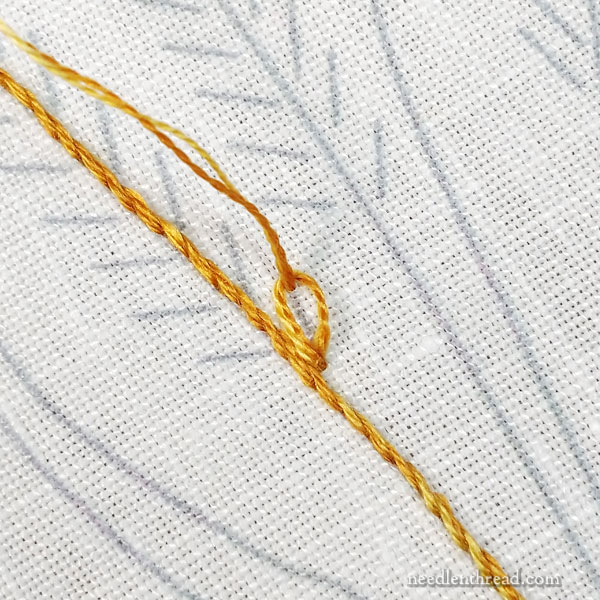
Now it’s time to add the beard – those long bristly fibers that will extend, in this case, from the tip of each wheat berry.
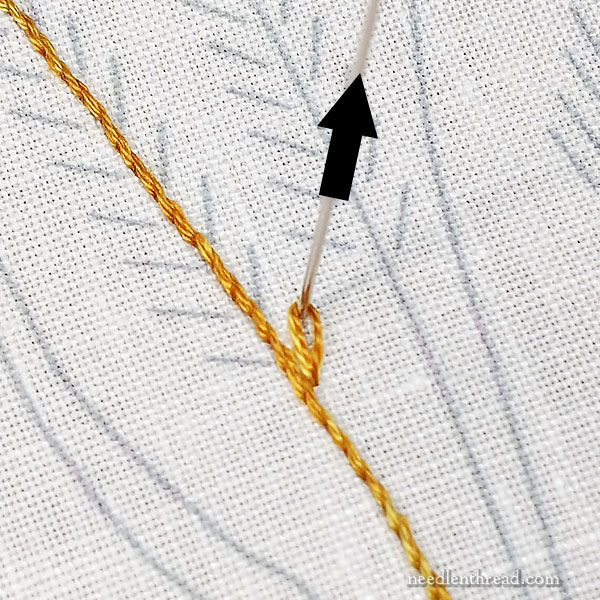
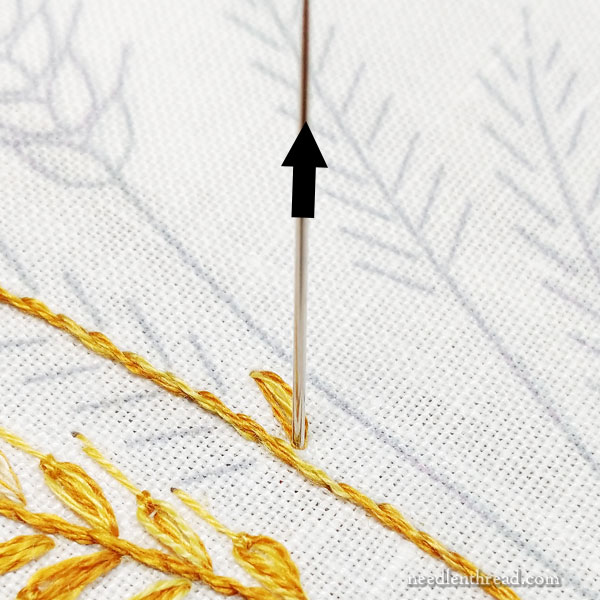
Use one strand of a lighter gold in the needle (I used Variations 4073). Starting on the outside of the daisy stitch, right where the anchor stitch ended, work a long straight stitch out from the daisy stitch. This stitch is about 1/2″ long – or the length of the original wheat berry, more or less. It can be longer; it can be shorter. If it’s shorter, it will look stubbly; if it is longer, it will look a little more airy.
Then, bring your needle and thread up just underneath the end of that stitch, on one side of it, and take your needle and thread over the stitch and down into the fabric, crossing over the long stitch and going down into the fabric behind it, so that you are locking that long stitch down with a slightly angled, long stitch.
The photo above demonstrates the stitch in progress.
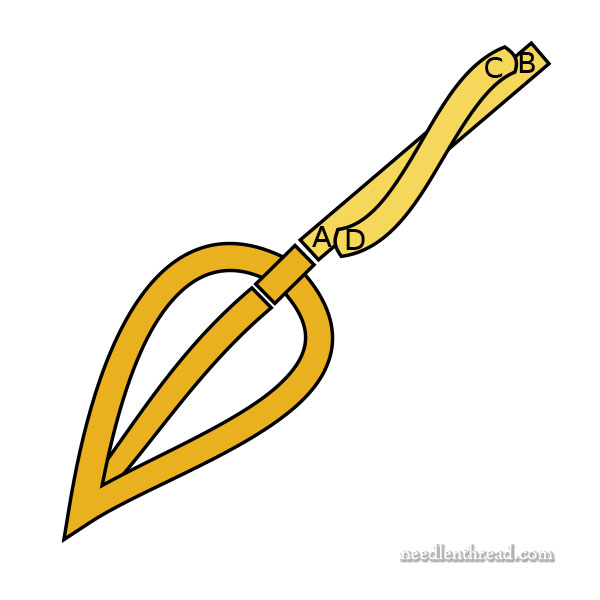
As a diagram, it would look something like the above. The filled daisy stitch is in dark gold. In the light gold, using one strand of floss, come up at A, go down at B, to make a long straight stitch.
Then, come up at C, from under the A-B stitch, near B, cross over the A-B stitch, and tuck the needle under the stitch, going down at D.
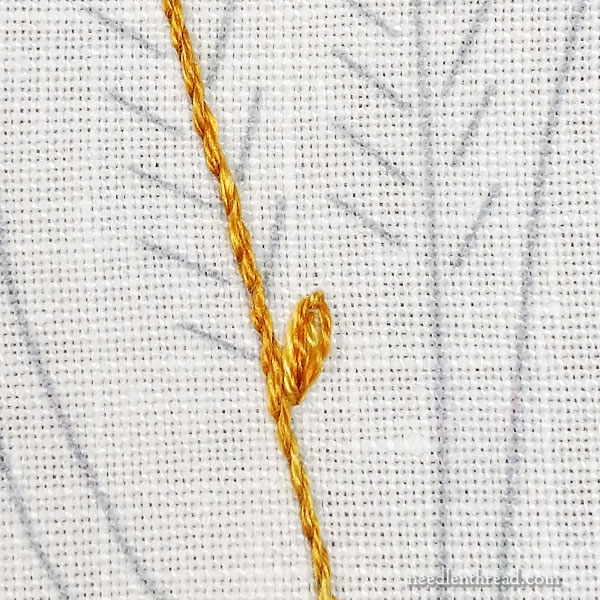
This makes a long couching stitch that is not really visible as a couching stitch. It’s a quick way to lock down that long straight stitch without “breaking” the look of the long stitch.
Work the beard all the way up the wheat head in this manner. On the back of the fabric, as you move from wheat berry to wheat berry, run your thread under previous stitches.
There’s the finished stalk with the beard.
The stem on the next stalk is the same as the stem on the first.
After stem stitching the stalk, switch to the lighter colors for the wheat berry, just as you did previously. You’ll have two threads in the needle.
These berries are granito stitches. You will find the tutorial for granitos here.
Oh, what a great little stitch! The stitch is aptly called “little grain” because that’s what this stitch produces.
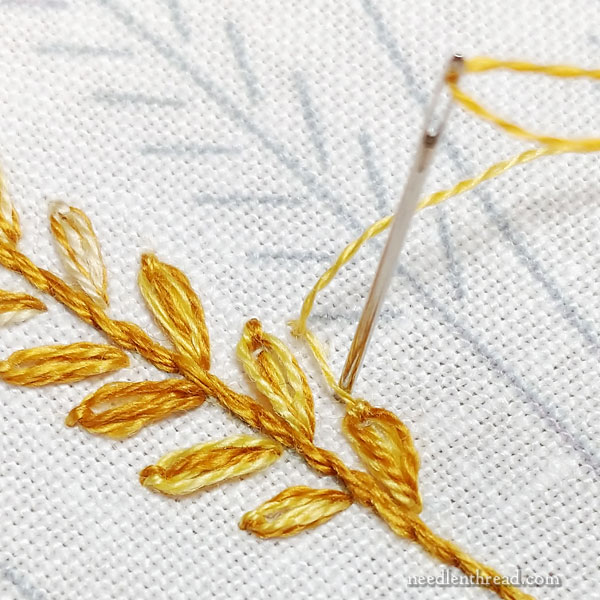
Granitos are simply a series of straight stitches worked in the same holes. Come up at A – one end of the straight line representing the wheat berry – and go down at B (the other end of the line), and do this over and over again, until the grain is as fat as you want it. Try to move each stitch to one side or the other as you build your little grain.
How many stitches you use to make your granitos is up to you. I would say use no less than three. I used four or five, to make the granitos nice and plump.
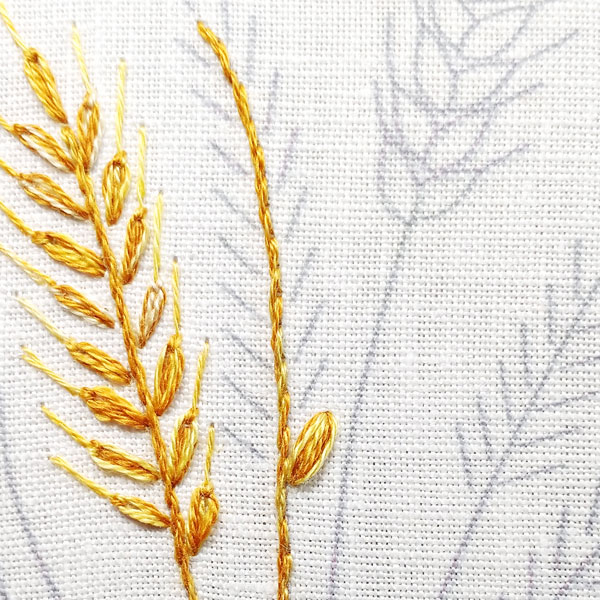
You can see the difference between the filled daisy stitch berries and the granito berries in the photo above. The granitos are definitely fuller and they round out on both ends.
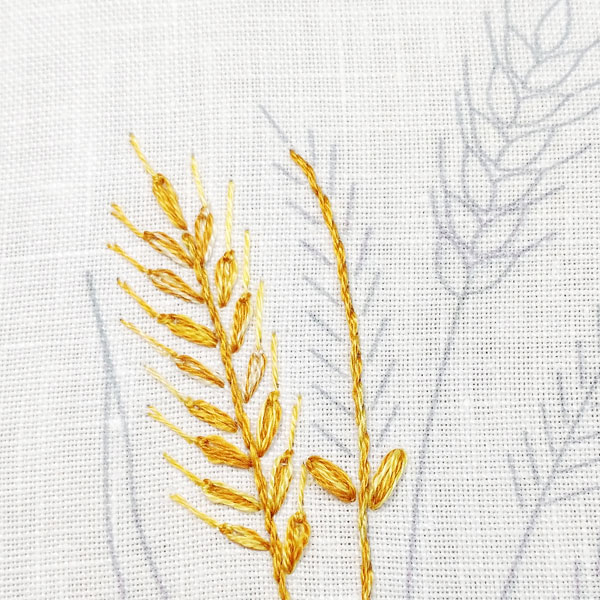
If you run into the beard on the adjacent stalk, don’t worry about it! You can stitch right over it.
See how the variegated thread gives the granitos some life and variety? And all that, without having to change out threads!
If you’re not using a variegated thread, I encourage you to use two strands of golden yellow in the needle, a medium and a lighter.
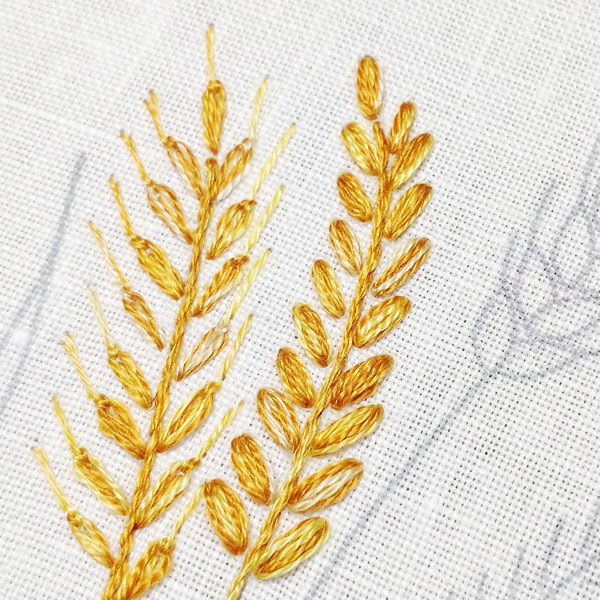
Work the granitos all the way up the wheat head. They’ll go fast, and they’ll be oh-so-satisfying!

Switch to one strand of lighter floss, and work the beard in the same way you did on the first stalk.
We’ll mix the beard up a little later, too, when we look at three more ways to embroider wheat.
Looking for More
You can find the first part of this series on five ways to embroider wheat here, where you’ll find the pattern and the materials listed.
You can find a more in-depth tutorial on how to embroider wheat with the first method above here.
This e-book – Festive Fall – employs a lot of wheat, so if you have that design or the ready-to-stitch towels, you can now consider other ways to work the wheat! (The ready-to-stitch towels are sold out, but you can always email me for advanced notice, for as soon as they are back in stock.)
We’ll move on to Part 3 of this tutorial – the two wheat ears on the right side of the design – next week.
Then we will look at the center wheat ear and how to embroider the leaves. Stay tuned!
For Patrons of Needle ‘n Thread over on my Patreon page, Part 2 will be available for you as a PDF download later today, so that you can print it easily, and keep it with Part 1. I’ll also sneak peak part of the finish for you!
Thanks Mary for this little study, I’m really surprised at how different each wheat berry is.
Happy stitching happening here – Brenda
So nice to see a stitching tutorial again, I really appreciate the clarity of your instructions and of your precise close-up photographs!
Very excited about this series! From the first post re fabric: “It’s a closely woven, almost even weave…” Please share where we can find this type of linen and how it would be described – by thread count? I am a beginner to surface embroidery as I do mostly cross stitch and need the knowledge to find this type of linen with confidence online. Thanks!
Hi, K – It’s a plain weave, so it’s probably not something you’d find sold by thread count. You might look for a handkerchief linen or something similar. Check with needle in a haystack online (www.needlestack.com) – they have excellent linen, and if you can talk to them on the phone, they’ll help you out!
I’ve been looking forward to this segment all week and I’ve just finished my first shaft of wheat – with stem, berries, and beard. I’m now anxious to get to the granito stitches as my filled daisy stitches look a bit weak. But hold it at arm’s length and it looks grand!! Thank you for doing this.
Dear Mary
A great tutorial I love how you mix the stitches from one wheat to the another. I really like the granitos stitch it is so satisfying and adding the beard stitch makes the whole design seem real, the colour thread are really lovely and look so bright and the variegated thread is such a good idea and makes the light and dark shades look so real. Thank you for sharing the wheat tutorial I’m really enjoying learning the different tips and techniques.
Regards Anita Simmance
I am having trouble finding the variegated DMC floss for the Wheat design. I have tried JoAnn’s at several sites in Lenexa and Overland Park, KS. Even tried Stitch On in Lawrence. Their numbers do not go up that high.
Suggestions?
Small local shops might not carry the full line of Variations, or, if places like JoAnn’s carry them, they’re probably in larger thread packs. You might have to look online, through Herrschners or DMC or 123Stitch or somewhere like that.
Thank you for what you are doing here, Mary.
As you have said, the stitches are simple ones that most of us have probably used in the past already. However, it is wonderful to see you take the time to demonstrate how you build up your embroidery, and what you are paying attention to as you go (colour, texture). It is this following of your thought process that helps people like me go from thinking about doing an embroidery to actually getting stuck in.
This is fun, and it feels like sitting down to stitch with a friend over a cup of tea!
I really enjoyed watching you work these two alternatives Mary, and I particularly like the plump effect of the granitos stitch representing the wheat grain. When I look at the two options together though, I like how they set each other off. They give a sense of dimension, with one stalk receding slightly behind the other. It’s very effective.