


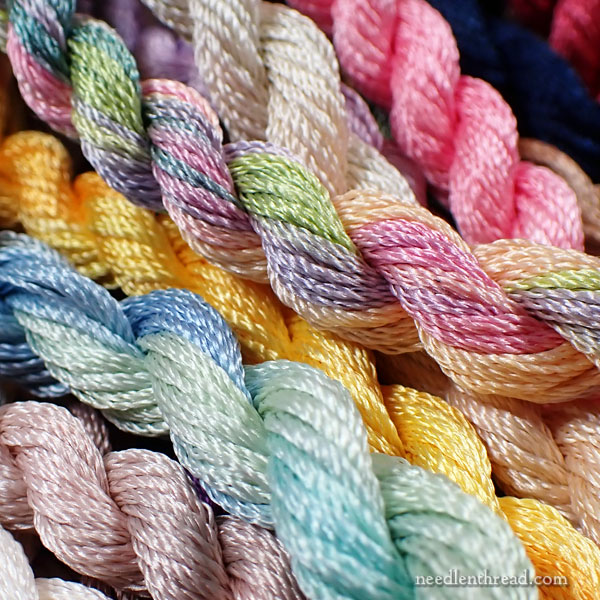
To my rather tunnel-visioned brain, there’s nothing quite as lovely as an abundant collection of glorious silk thread all gathered into one mass of twisty, colorful, smooth, shiny Possibilities.
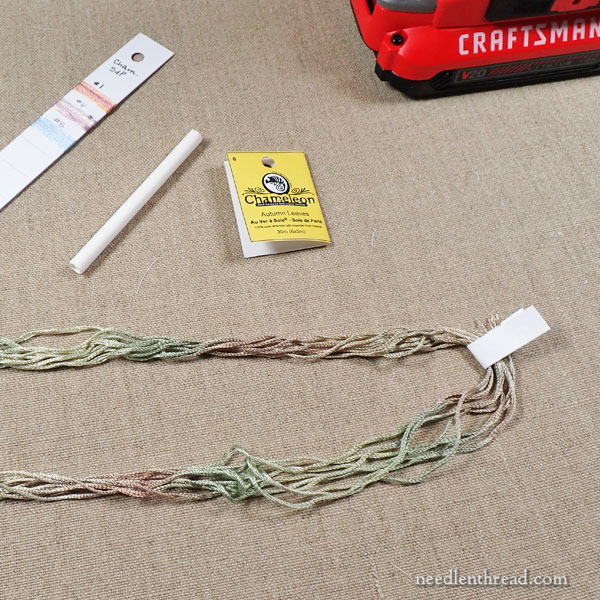
A few weeks ago, we chatted about this collection of overdyed Soie de Paris from Chameleon threads that are new to the studio, and since then, I’ve started some tentative planning with them.
I have Ideas, you see.
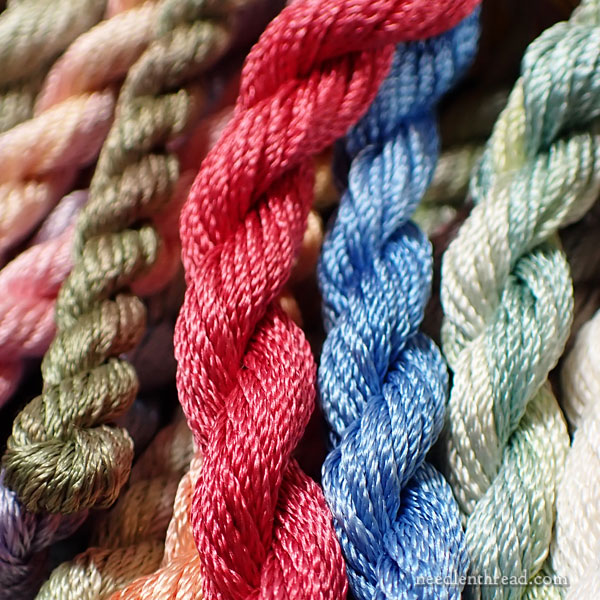
When you see something like this, does your heart rate speed up? Do you suddenly feel swoony? Does your mind start whirling with a gazillion plans and possibilities?
Uh huh. I can relate.
But.
(And there’s always a but!)
But… those beautiful twists – as beautiful as they are – also hint at future frustration.
The Problem
It’s not unusual to have problems with embroidery threads that are put up in twists. I understand why manufacturers use twists – they are much more affordable, and I’m grateful for that! But they do pose certain problems for the embroiderer if a little care ahead of time isn’t taken.
And the more slippy the thread, the more likely there will be problems once the twist is broken into.
Once you open a twist, if you don’t have something to do with the thread to keep it tame, organized, and labeled, you can end up with problems – like knots, messy bundles, wasted time, unlabeled and unidentifiable thread, and even wasted thread.
So before I start stitching with these threads, I know I need to do two things:
1. I need to make a thread card, so that I can reference colors easily as I work and document the threads I use; and
2. I need to solve the twist, so that I can be more efficient in my stitching process, so that I can keep the threads organized and clearly labeled, and so that I’m not wasteful.
The Solution
When the threads arrived, then, I pondered a bit. How can I solve the twist?
I eventually turned to the notion of spooling.
There’s a reason thread has been spooled for centuries, after all.
I already know that Soie de Paris on a spool is much, much easier to handle than Soie de Paris in a skein. In the US, Soie de Paris is distributed by Access Commodities on spools, thankfully. In other counties, it comes in skeins. It is so much easier to store, organize, and handle on a spool.
So, spooling it was!
But (there it is again)… how to do so in a moderately efficient way and an affordable way?
I explored buying spools in bulk and I came up empty: either the wrong sizes, or too expensive, or simply not practical in shape, type, methods to label, and so forth.
Then, I turned to the notion of the thread cop.
A thread cop is a cylindrical tube, somewhat like a spool but without a flange (or flat end) on either side. It’s just a cylindrical tube. Normally, they’re made of stiff board in a tube shape.
If you’re familiar with threads like Pipers silks, then you’re familiar with thread cops, because that’s what they come on – and so do several other brands.
Well, tubing is not inexpensive, either, especially if you’re looking for a particular size that’s pre-cut.
I went back to pondering.
Could I make my own cops out of paper? Yeeesssssss…. but that would involve a lot of time. No, there had to be another way. And there was!
Enter: The Drinking Straw.
And more specifically, the heavy duty paper drinking straw.
It can be cut to size. It can be written on. And I was pretty sure I could somehow rig my drill to make spooling onto the makeshift thread cop (straw) significantly faster.
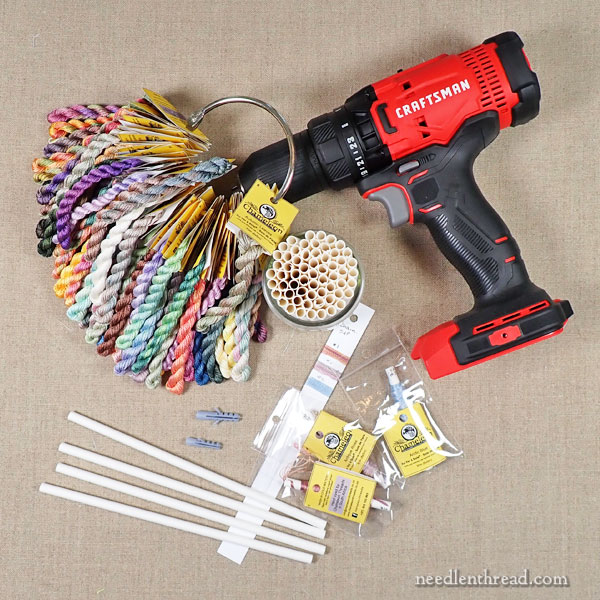
So, I invested a whopping $7 into a box of 250 paper drinking straws, which gave me 500 makeshift 3″ thread cops (plus 250 1.5″ leftovers), and I started testing to see if my theory would work.
And it does!
Tools & Materials
This is what I’m using:
- Heavy duty paper drinking straws, cut (with a guillotine cutter) to 3″ tubes
- A drill
- A molly that fits snuggly inside the straw and in the chuck on the drill
- A micron pen for marking the tubes with color numbers
- A single hole punch
- 3.5″ x 2″ zip bags
- Jump rings
- Strips of heavy card stock for making thread cards (in the same manner as these)
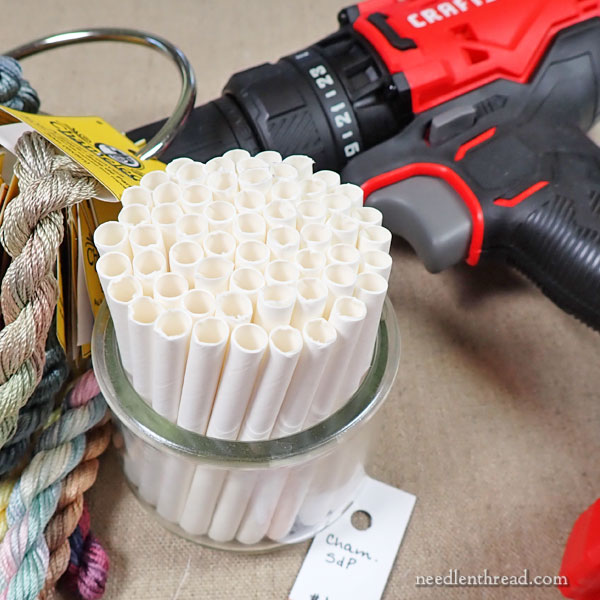
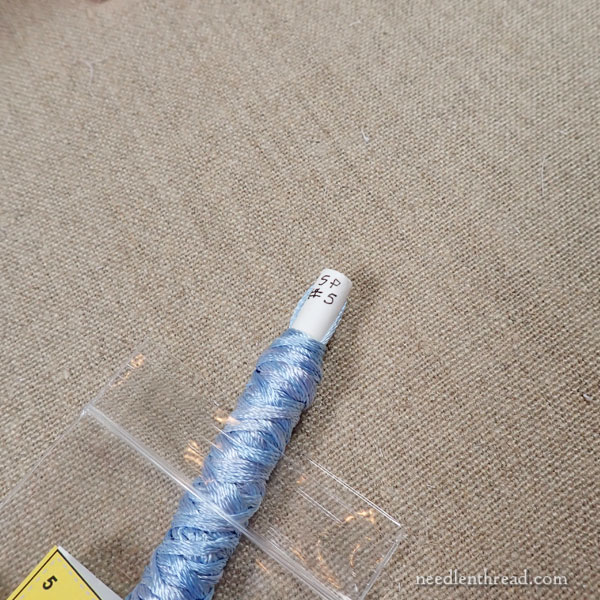
First, I cut a bunch of the straws down to 3″ long. This is very easy using a guillotine paper cutter.
As I work with each thread, I label the straw on both ends with the thread type (SP for “Soie de Paris” + the color number), and I clip two tiny slits in each end of the cut straw, to hold the thread ends.
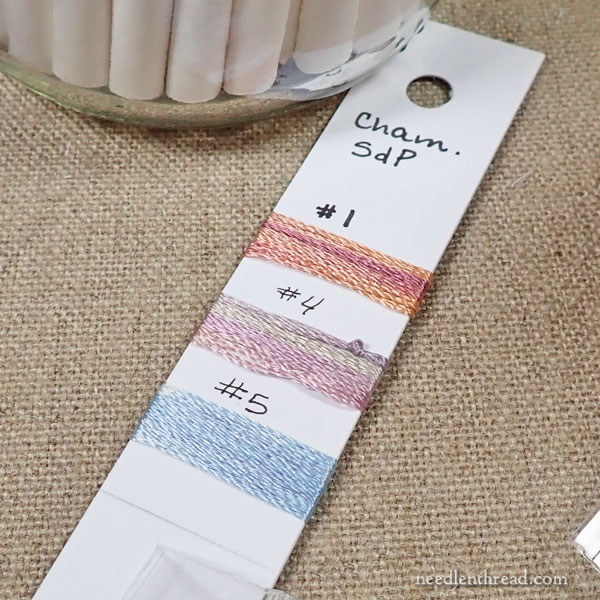
Before spooling up the thread, I cut about a 6″ length of each thread color, and wind it onto heavy card stock strips (using the method discussed in this article), to make up my own real thread color cards for the set.
Now, I realize that the colors are for hand over-dyed threads, and there will be slight variations between dye lots, but having the thread color card will help me with designing and with choosing colors, as I’ll be able to get fairly close to the colors I want, even if the dye lot changes somewhat.
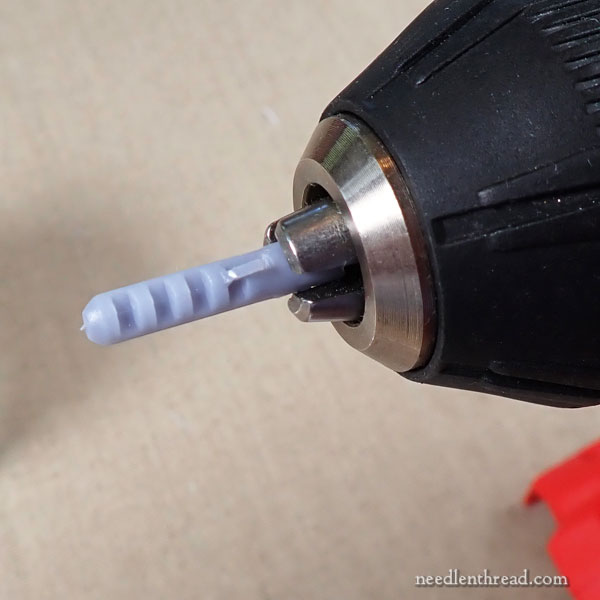
A molly is a small plastic thing that you stick in drywall to help hold a screw in place. I found that I could stick the end of the plastic molly into the chuck on the drill, and that the straw would slide onto it, and the plastic “arms” on the molly would help hold the straw onto the molly, so that the whole straw turns with the molly.
It works! You just have to find the right sized molly for your straw. It might take a little testing.
I remove remove the staple from the outer yellow product tag, and untwisted the skein of silk. I open the whole twist up and unwind it completely into one long piece, re-piling it on my work surface so that it will run straight onto the straw while the drill is on, without twisting or knotting.
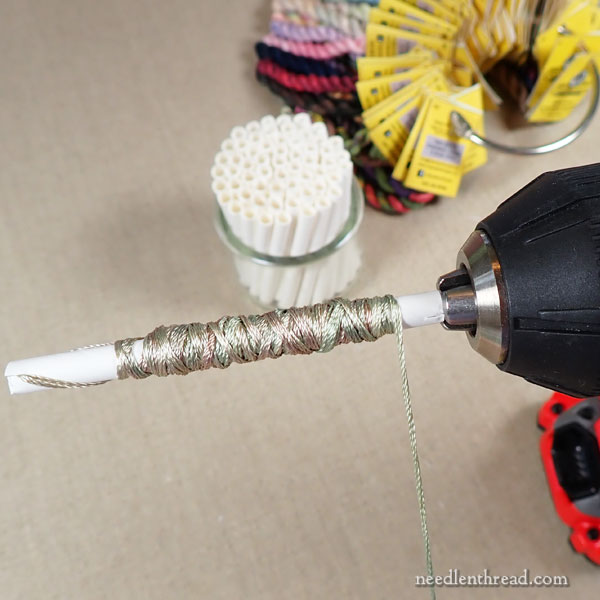
I label the straw piece with the thread type and color number (you can’t see it in the photo above – it’s on the other side of the straw) on both ends by the cut edge of the straw, slide the cut end of the thread into the slits at one end of the straw, mount the straw piece onto the molly that’s in the chuck on the drill, and, with the drill running, I feed the thread back and forth with one hand (running the drill with the other), so that winds onto the straw.
You have to keep the thread under a little tension. Occasionally, stop the drill and let go of the thread to smooth it a little and let it untwist. It wants to twist while the drill is on, but it looks better (you get a better sense of the color, too), and it goes on more smoothly if you let it untwist now and then.
The small bags already have a hanging hole above the zipper, but they don’t have a vent, and I don’t like to store fibers without access to air.
So, in the prepping stage, I hole-punched one side of the bags, up towards the zipper. It helps to hole punch a small scrap of paper with the plastic bag – you’ll get a much cleaner hole, and the whole piece of plastic will punch out. If you just punch the plastic, you’ll probably need to trim with scissors.
The punched hole in the bag provides a vent, and it also provides a feeding hole for the thread while you’re using it. You can feed the thread out of the hole, leaving it in the zip bag if you want.
Then, if you have thread leftover at the end of a stitching session, you can wind the leftovers back on the straw and tuck the straw back into the bag with the tail inside the bag to keep things neat.
I also keep the original product tag for each color inside the bag with the makeshift thread cop.
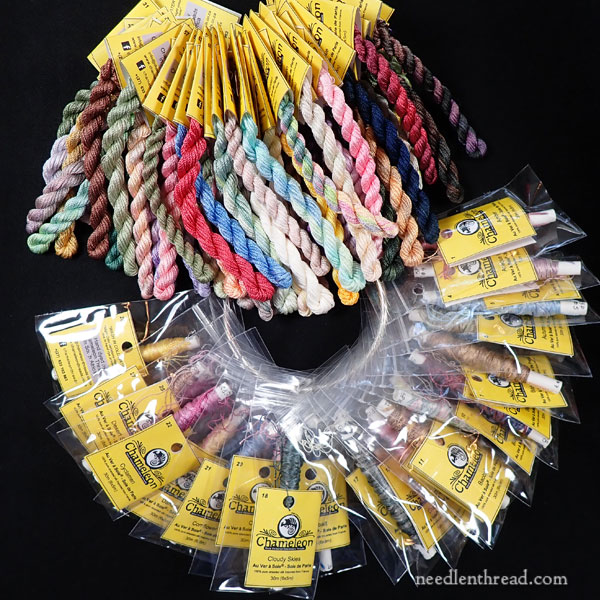
By the time I finish all of these, they’ll probably be stored on two separate jump rings. I’ll also store the thread card strips on a jump ring, in numerical order.
You’ll probably agree that the zip bags with the thread straws are not quite as attractive (not even close!) to those glorious twists.
The twists are beautiful!
BUT…
I think in the long run, I’m going to be very happy with the organization and efficiency of working with the threads off the straws rather than from the twists!
So that’s been my thread project lately. It’s actually Very Fun! I love doing it!
It’s a great way to familiarize myself with the colors, too. All the while, I have all kinds of ideas blooming in my head while those glorious silks run through my fingers onto their new little homes of straw.
It really is fun.
I might be nuts.
But it is fun!
Have a wonderful weekend!
This is such a great idea! I am going to try this!
I looooooove this post! It speaks to me so much I can’t even tell you.
I also love using my drill for things like winding weft onto a dowel for a weaving project (you can simply put the end of the dowel in the drill), I’ve even used a drill to twist together many lengths of carpet warp to make thicker weft (this was before I had a spinning wheel). It’s brilliant to use a plastic anchor as the pin to put the straw piece on! I’m definitely bookmarking this one.
Hi Mary! Why don’t you like to store fibers in airtight containers?
Depends on the fibers, but most natural fibers benefit from air that can circulate a little, to prevent any moisture condensation.
Ah, yes, floss in bags–easy to see the colors and the floss stays clean and un-fuzzed. That’s how I keep my floss, except my bags have two holes and I put them on two rings, so it’s like a floss rolodex. And yes, using a piece of junkmail to help you punch the holes makes all the difference.
Viva la baggie!
Brilliant! Absolutely brilliant!
That said, oh-oh, a new rabbit hole of toying around with threads, all kinds of threads! Whole new way to play! Straws on the shopping list!
Linda
Mary:
I love your idea!!!!
Are you too much!!! Thank you for making your experiences sensational!!!
Thank you
Mary, what a wonderful idea. At the moment I have all my embroidery threads in self seal polythene bags, but they are all as they came, some on spools, some on card, some in twists etc., along with file index cards to keep the bag’s upright, and stored in two large fairly shallow plastic lidded crates/storage boxes in colour order. When I need any for a project, I just fish them out and keep them all together in another bag with the felt “painting” that I’m adding detail to with stitches. Much as I’d love to do things the way you have here, it would probably take me a couple of years to do it, and I’d rather be stitching!
Oh, by the way, having seen from your picture what a Molly is, I thought I’d mention that in the UK they are called rawl plugs, for future enlightenment of your UK readers.
Best Wishes
Ann
Indeed. I once had to buy some in the US but had no idea what they were called and the guys in the hardware store had no idea what I meant. I probably took 20 minutes to sell me about 20 cents worth of rawl plugs. Presumably they didn’t rely on clueless exchange students for their livelihoods!
Where I’m from (Texas, US) these plastic inserts are known as “anchors” (or more specifically “drywall anchors”). I know in the UK they are sometimes referred to as a “wall plug” or “rawlplug”, but I’ve only ever heard the term “molly” (as well as “toggle bolt”) referenced when it is a specific type of fastener, usually made of metal, that bends to expand, or opens and closes, when used. Just throwing this out there because I literally had absolutely no idea what was being talked about until I looked everything up! =)
Sweet! What a great idea!! I have avoided buying twists for a long time because of this very problem. I still have, in the bottom of a drawer, a rat’s nest of lovely blue thread from a disastrous first encounter with a twist. I might have to buy some straws and dig out the rodent retreat.
What a great solution! I love how you solved this problem with straws. Wonderful!
That is just genius Mary!
Thanks, Bobbi! Any excuse to have another project, you know. LOL!
I have to ask: Do you need to worry about the straws not being acid-free/archival-safe for long term storage? Especially given that the threads are overdyed? Thanks for all your inspiration and sharing your expertise!!
Hi, Susan – I had thought about that. I know these are BPA free – I don’t know how that plays out on the pH neutral stage, though. But I considered the fact that I probably won’t have them “long term” enough for damage. I use my threads… in fact, faster than I like. So I’m not too worried about that. You could always use acid free tissue and wrap the straws – I think that would be less expensive than acid-free tubes.
You are so much fun, Mary! I love that you share your enthusiasms with us. Your delight is so pleasing when you uncover a new, tidy, and economical way to do do something. It’s just another reason to follow your posts. Have a happy stitching weekend!
Thanks, Katherine! 🙂
This is so clever I almost wish I had some twists to use the idea on, but I can’t say I’ve ever had any thread packaged this way. (It is all skeins – knotted or pull, spools, balls or spira. I’ve seen some Madeira thread sold this way, but it was much more expensive than the same thread in a spira pack.)
This is genius! What a fantastic idea. I think it sounds like fun too! o:)
Oh, it is! I finished this set of threads today. A great feeling of satisfaction, and I can’t wait to start the next collection!
What a good idea. I think I’ll raid the hardware stash for a few of those anchors and squirrel them away. Then I’ll either wonder where I put them, or find them and wonder why they are in the needlework stash 🙂 About releasing the twist occasionally – a yarn swift would allow the threads to roll smoothly onto the cores. Or use a lamp with a cone shape shade, and loosen the shade so it spins smoothly.
I know some don’t like bobbins because they kink the threads. Is there an issue with threads turning in to curly springy tangles with this method? A run through a damp cloth would solve that though, I suppose.
I’ve never had a problem with threads being a curly spring, coming off a spool. I have had that problem when they come out of a twist – which is why I’m putting them on spools. 🙂
That’s genius Mary! I love it … the paper straws … the drill … labels … everything! Plus I felt super intimidated by thread twists when I started gathering the supplies for the Home Sweet Home project (I’d only experienced pull skeins before this) and your previous articles on taming the twists took all the struggle out of stitching with them. But … although my threads are user friendly they are not storage friendly. I can see how this would take better care of my untwisted twists … thank you!
https://www.craftparts.com/product-category/beads-spools-wood/wooden-spools/
A good source for wooden parts in bulk, inexpensive.
Thanks, Holly! They would take up a LOT more room, though. I don’t have room for that many spools (I would need 500+).
Another problem with craft spools: they aren’t necessarily finished smoothly. I’d hesitate to wind silk on them. :-/ But … if I’m looking for spools (and I can think of a gazillion ways to use a spool here and there), that’s a great resource! Thanks!
those of you worried about paper-acid destroying threads, never under-estimate the power of aluminum foil to provide a convenient “block” between non-acid-free paper, cardboard, and wood.
You are nuts! But in a good way!
Dear Mary
I love this and it looks like fun, Such a great idea for storing threads and looks like no mess with unused thread at the end of stitching. You are so creative and looks so professional and such a simple concept. This is a great way of storing and organising lots of threads and knowing the name, colour, number of the thread and setting up a real colour chart is also very useful and a great idea. You are a very talented lady. Thank you for sharing the tutorial on how to set up thread storage and how to organise them, a great concept.
Regards Anita Simmance
🙂 Thanks, Anita!
It’s really very easy to recreate the twist. That’s what I always do, then slip the label back on. 🙂
Wow! You have so much more patience than I do! If I had to recreate the twist every time I cut from it, that would just frustrate me.
I was so excited to read your tips on organizing the silk twists threads with the drill,straws and mollys. It’s clear and concise. Thank you for all your helpful tips. I was plagued just seperating a 12 strand into 6. When I thoroughly got in a bind I went googling and found your guidance and tips. I am so grateful for you and your help !
When you are making the straws into thread holders, do you leave the Molly inside the straw to make it rigid? Your ideas are wonderful and cause me to spend $$$$.
Thanks,
Linda
The Molly is just there to hold the straw on the drill, so the thread can wind on it. Once the straw is wound with thread, pull it off the Molly, leaving the Molly in the bit holder on the drill.
LOL, taking a brake from winding my Soie d’alger onto cops.
And don’t know if they sell AA batteries in the US in the same kind of plastic box as here in Sweden. Room for 24 cops, 5 cm (app 2 inch) tall. Very space efficent!