


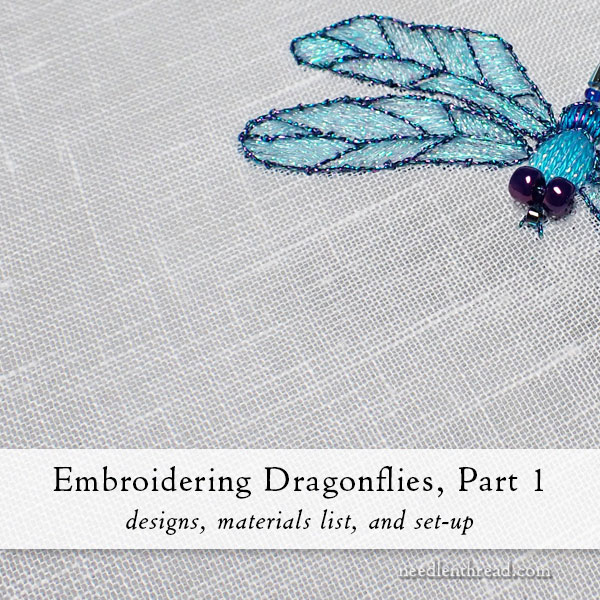
Good morning and welcome to the first official installment of How to Embroider a Dragonfly, wherein we will talk about the design, materials I used on the sample, possible substitutions, and setting up the design for embroidering.
This project belongs to the How to Embroider (Blank) tutorial series, which you will find here.
Before we launch into the dragonflies, a little announcement: The Mini Sampler Stockings ornament kits are at long last ready to ship! The supply lines being rather slow these days, it is not likely I will be able to restock these before Christmas. If you want one, please get them while you can!
Now, let’s talk about dragonflies!!
On Wednesday when I introduced the project, in my ramblings I asked what you thought about making supply kits available for these types of tutorials, and many of you chimed in enthusiastically, wanting a supply kit for this tutorial.
While I would love to have supply kits for this tutorial ready to ship to you, the truth is, kitting a project takes a good 4-6 month turn-around, and sometimes longer, depending on the resources, so there won’t be kits for this project (at least, not any time soon). I was asking more about projects going forward into next year. You’ve given me some good ideas and response – thank you!
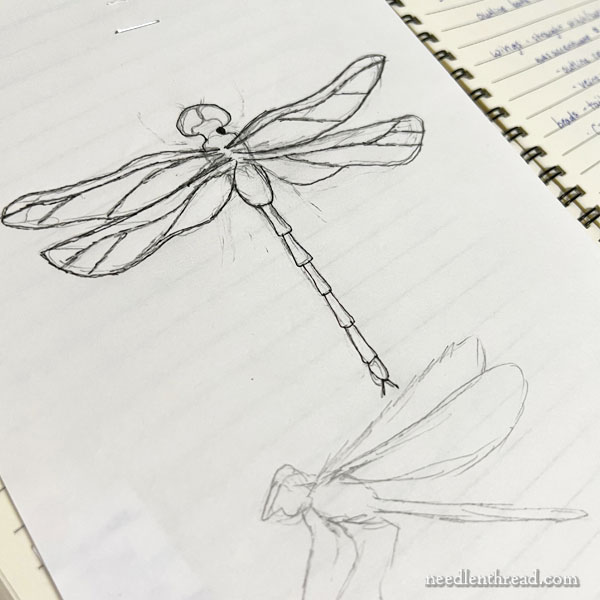
At the beginning of a project like this, it usually starts with an idea and some doodles or sketches, which are rather random in nature. These eventually get stapled into the project notebook so I can see the progression of thoughts or ideas when I go back to the notes.
The sketches aren’t necessarily perfectly accurate, and they aren’t necessarily the exact size or the exact proportions that will eventually materialize as the project.
Once the sketchy idea is in place, it has to be manipulated and honed down to work for embroidery.

This often leads to a more simplified sketch. But even at this point, it’s not necessarily “perfected” for an embroidery transfer.
At this point, you might hear some murmuring, like, Yessssss, that will do for now. Let’s try it and see what comes out on fabric.”
And then it might get stitched entirely or maybe only in part, without having an “official” design or traceable pattern for the project.
During the stitching process, modifications happen.
And eventually, I realize it’s time to drop the project on you, and to that end, I need a design that’s clear, that you can trace.
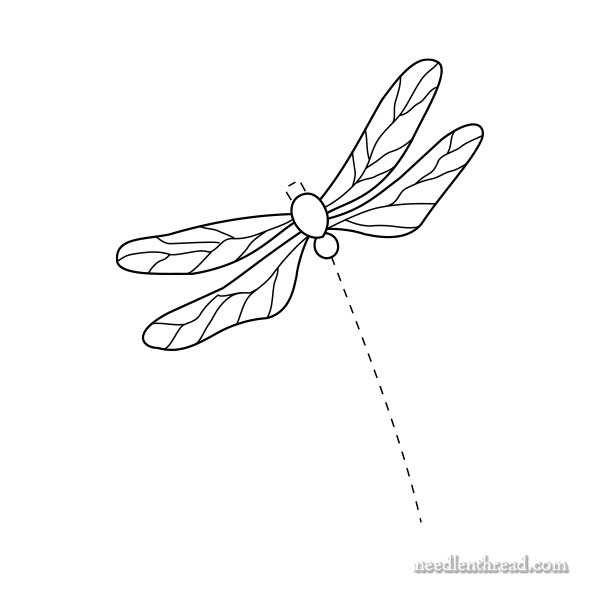
And that’s when something like the above image comes about…
Downloadable PDF for Dragonfly #1
…which is then made into a handy-dandy downloadable PDF:
The PDF above should be printed at “actual size” or “100%” – whatever option your printer dialogue box gives you, when printing something. The paper size is standard letter (US) 8.5 x 11″ and the resulting design should be about 3″ long.
Supplies & Substitutions
If you don’t have the supplies that I used, use whatever supplies you have on hand, that will give you a similar effect, or try to find interesting materials that will provide a similar effect.
For this project, the look of the dragonfly relies very much on metallic threads, especially a thread called Accentuate and metallic braid by Au Ver a Soie. These are not necessarily widely available. Needle in a Haystack online carries Accentuate. And you can find similar metallics available in needlework shops.
These are the supplies I used:
Fabric: I used Glass Linen, a very lightweight, semi-transparent linen with an open, ethereal weave. It’s featured in my white linen sampler pack along with three other types of fine white embroidery linen. If you don’t have this linen, that’s ok! You can work the dragonfly on any linen or other fabric. A tightly woven cotton might be somewhat more difficult with the metallics, but it can be done. Feel free to use what you have!
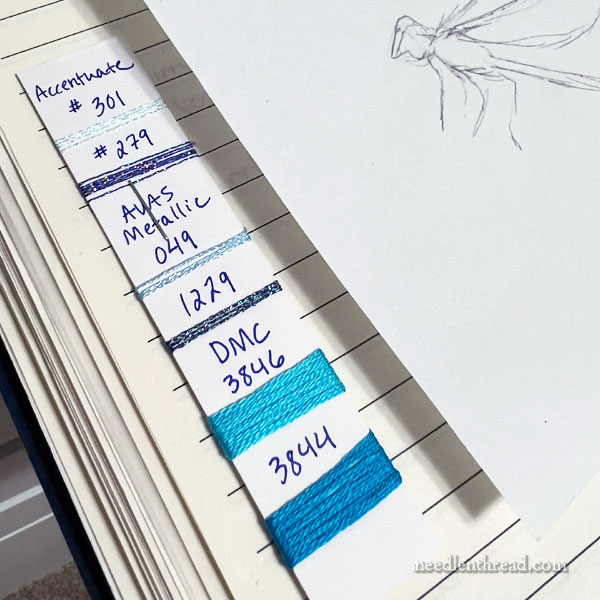
Threads – as you can see, there aren’t many!
Accentuate #301 and #279
AVAS Metallic Braid #049 & #1229 – these are #4 metallic braids (the finest size of the braids)
DMC stranded cotton #3846 & #3844
Look for similar metallic braids and blending filaments, if you can’t find these specific threads.
Beads:
I pulled from my stash beads that looked like they would work well. Unfortunately, bead manufacturers don’t necessarily label all their beads with color numbers and whatnot. I’ll describe them as best as I can. The idea would be to look for size and type, and then find colors that would work well for your dragonfly.
The tail is worked with Czech glass beads size 11/0 seed, in a color listed as Sapphire Iris, and silver lined light blue bugle beads (6 x 2mm) in color number 2147 (not sure what brand).
The eyes are a couple beads from Artbeads that were included in a design mix of 6/0 round seed beads. The design mix is made up of TOHO beads and the mix is called “purple passion.” Look for 6/0 round seed beads in a color that would work well for big ole dragonfly eyes. These were the closest I had on hand that seemed like they would work.
The mouth is a Mill Hill Magnifica bead in color 10014.
Other Tools
You’ll need a hoop or an embroidery frame. The project here (in the photo below) is set up on Evertite stretcher bars, because those are my favorite quick-project frames. You can read about Evertites here.

You don’t need stretcher bar frames, though. A hoop (5 or 6″) will work just fine!
I pretty much always use crewel needles – #7 and #10 work fine for this project.
A laying tool might come in handy, or anything that you can use as a laying tool. If you’re unsure of what a laying tool is, you can read about it and see it at work in this article. Laying tools often come in handy when working with metallics. If you don’t have a laying tool, a large tapestry needle can be used the same way.
You’ll need scissors. When cutting metallics, don’t use your best embroidery scissors. I always keep a few pairs of scissors to use only on metallics – and they’re usually not-very-expensive scissors. Metallics are hard on scissor blades.
Setting Up the Design
When you print the design, you’ll notice that it is whittled down to basic lines. That’s all you need to trace – and even then, you don’t need to trace them all. The little dashes where the eyes (beads) go, for example, don’t need to be traced. Even the tail doesn’t need to be traced. Pretty much, all you need to trace are the wings and the thorax. You might place a dot where you want the tail to end, to give you something to shoot for.
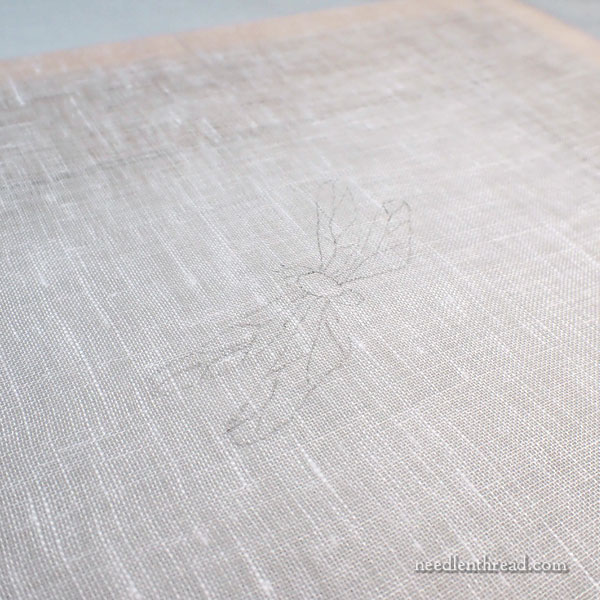
To transfer the design, trace it lightly with a mechanical pencil. If you’re using a heavier fabric, you might need a light box or sunny window.
If you’re using the glass linen, you won’t need a light box or sunny window – you can see right through it. The pencil may be difficult to see, though. If you can’t see it well enough, try a very fine tipped micron pen (005) to trace the wings and thorax. Try not to sketch as you trace – just trace the lines with one stroke that can be easily covered when stitching.
Next Up…
Next time we visit this project, we will stitch the thorax and wings. And then after that, we’ll add the tail and the head. So for this dragonfly, it’s only two more lessons.
Then, we’ll tackle another dragonfly project with some slight variations.
Fun stuff!
As usual, members on Patreon will find the downloadable PDF for each installment in this series posted a little later over on my Patreon page. Keep an eye out for it!
Question: What size stretcher bars are you using on this project? (I have none at this point :)) Thank you!
I think I used a 10″ x 11″ – 10″ and 11″ are my most frequently used sizes.
Thank you for sharing your process with us here–I never thought of keeping a project notebook with patterns and a thread card. I’ll start doing that now!
Dear Mary
I do like the How to Embroider Series it’s so interesting how you choose the different themes, threads and stitches that make up such an interesting project. As you know I love beads in embroidery they do give a lift to the project and make it more vibrant. I’m really looking forward to the progression of the dragon fly and can’t wait to see what styles of stitching you will add to make a lovely this a lovely embroidery. Thank you for sharing with us the How to Embroider a dragonfly and for the enclosed.
Regards Anita Simmance
Thank you so much for this Mary, it is simply lovely ~ I posted for you.
Best Wishes and love Louise
I hope you are all better now.