


Good morning, and welcome back! I hope you had a lovely weekend. We had a grand ole time out here in Kansas with the family. The weekend extended a little longer than originally planned, but all for a good cause! Nothing like a little family togetherness to highlight the summer!
But it’s good to get back into the swing of things here at the studio, where Anna and I are moving forward in small steps on the large goldwork project that we talked about a couple weeks ago.
As mentioned before, we’re making an altar cover, or vesperale, or vesperal cloth, which is a cloth used to keep the linens on a church altar clean and free of dust. Usually, the vesperale covers the top of the linens on the altar, and it has a fall (an edge that extends down the front and sides) that is decorated (or not) with lettering (and / or other art) in embroidery (or another medium). So many options!
This particular altar cover (for an altar that is approximately 11.5’ wide) has about a 10″ fall on the front and two sides. In the center front there will be an embroidered medallion and some text.
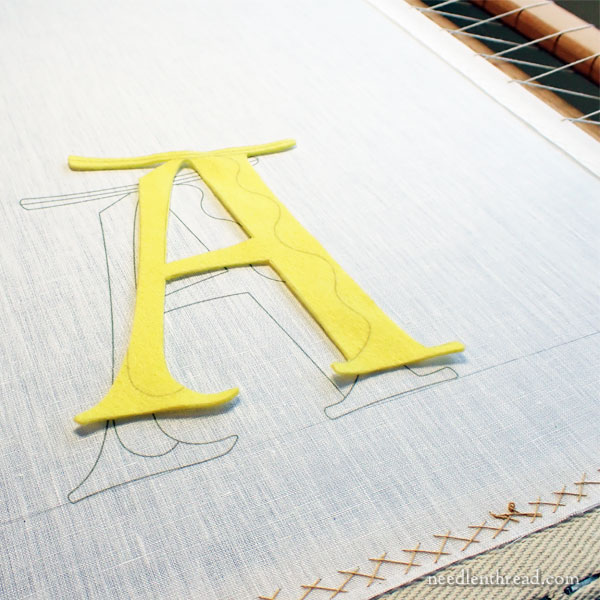
Right now, we’re working on the text. The letters will be in goldwork, and, once they’re finished, they’ll be cut from the linen that’s on the frame and they’ll be appliquéd to the altar cover.
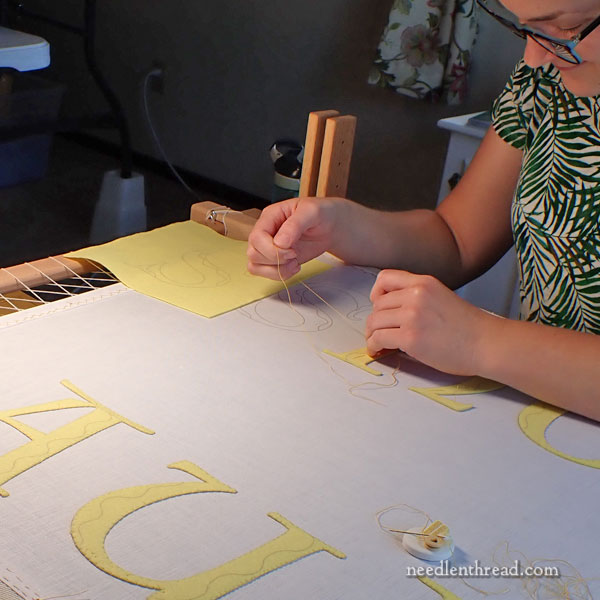
To work the letters, we could have set them up on individual small frames, one letter at a time, but it just made more sense to set up all the letters on one large frame, so that they can all be worked in a certain series of steps, next to each other.
This way, we can see the letters while we are working, and this will help us keep them consistent. I think it’s a good idea to work them fairly close to each other for precisely this reason.
As we work, to help protect the goldwork that’s already stitched, we’ll keep most of the frame covered, exposing only the areas we are stitching. But, when we want to or need to, we can step back and look at all the elements together as we progress through the project.
We’ve situated our work space by the large window in our main workroom in the studio. Predominantly, this is for the lighting. Even though we have a task light at each end of the frame, our best source of lighting is the sunlight outside that window. We don’t get direct sun on the frame, but it’s a good bright window – and the view of the neighbor’s extensive flower gardens and our bird feeders contribute to a perfect setting for the frame.
The Order of Work
To start, we set up and transferred the lettering to a large piece of linen that was mounted on the large slate frame in the photo above. We transferred the letters while the linen was under some tension, but not fully tensioned on the frame. We only fully tensioned the frame after the transfers were complete.
Then, we also transferred the individual letters to the yellow wool felt that provides padding for the goldwork.
The first step after setting up the frame and transferring the letter designs was to appliqué the yellow felt onto the linen ground fabric.
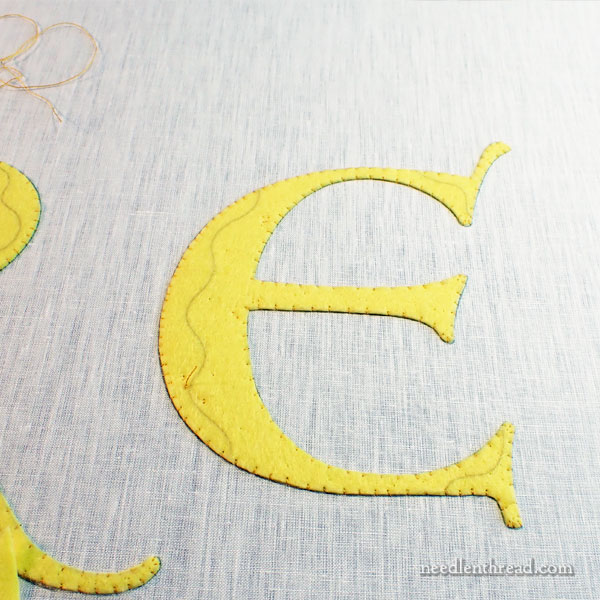
We cut out each individual letter carefully, and then tacked the letters in place with very large basting stitches down the middle of the letters (to keep them from shifting). We used tiny stitches on the sides of the letters (worked perpendicular to the sides, from the linen into the felt) to sew each felt letter securely in place.
Then we removed all the large basting stitches from the felt, leaving the yellow felt letters ready to receive the gold threads and wires.
These methods are not complicated at all. The preparation work goes pretty quickly. When it comes to the goldwork, although it seems like it is highfalutin, complicated stuff, it’s really not. Most of it is couching and the rest of it is the simple sewing-on of bead-like cuts of gold wire.
The most complicated factor of this type of goldwork, especially when two people are working it, is consistency – consistency in spacing, in stitch placement, in size of cut wires, and the like. Since we will be working on the same frame, within easy sight of each other’s work, and since we can switch back and forth from side to side, we will be ever mindful of keeping our outcomes as similar as possible.
The second most complicated factor (the second “hardest part”) of this type of job is overcoming monotony. It’s a lot of the same stitching over and over and over again, on a job that’s pretty big.
The letters are about 6″ high. There are ten altogether.
We’ll start by couching rows of gold passing thread on all the letters, to fill the majority of the lettering. Inside the sections marked out by the wavy lines on each letter, we will fill with chip work to add texture and a little variety to the letters. The sections will be divided with a line of pearl purl and silk and a line of gold twist, as shown in this article when we were testing some techniques.
We’re ready to get the goldwork underway, so the next time we update you on this project, we should have some of the actual goldwork to share with you.
Let the fun begin!
Tools & Materials
My large slate frame (42″ wide) is from Ecclesiastical Sewing. I like their slate frames!
We’re using a standard frame trestle (which was from a different company that is no longer making them).
The ground fabric that we are using is a medium-weight white linen from Ulster linen.
The wool felt is wool felt, and I can’t remember where I purchased it.
I’ll cover goldwork thread sources in future posts, when we start talking about the goldwork.
Looking for More?
You can find the previous articles on this project through the following links, which are arranged chronologically:
Testing some Texture in Goldwork
Goldwork Instruction
One of the best goldwork books available for extensive goldwork instruction is Alison Cole’s Goldwork Masterclass. I keep this book in stock in my shop, where you will find a curated collection of fine embroidery books from around the world. If the book is out of stock, drop me a line and I’ll send you an email as soon as they arrive again.
If you want to read more about the book, you can find my review here.
I always have to read your articles slowly and carefully, Mary.
But I chuckled this morning when I read your resources paragraph and fell upon the phrase “The wool felt is wool felt.”
I could almost hear you chuckling too when you typed it!
I’m pretty sure I said it to myself exactly how you imagined it! LOL!
Beautiful work. I’m learning a lot from your blog posts and appreciate how you explain the decision making process and the actual technique. Thank you for inspiring and educating! I’m new to linen appliqué and wonder how you will cut and seam the linen letters so the fabric edges doesn’t unravel. I’ve only done wool felt and cotton jersey appliqué and their edges don’t fray or unravel, so don’t need to be finished. Best wishes on your project!
Dear Mary
The project is really big and the lettering looks huge, I can see that a lot of goldwork is needed for this. I should imagine it will be very difficult for two people to stitch together on the same project, but at the same time you can encourage each other while stitching together. Given the size of the project I do hope you were able to obtain the amount of goldwork needed. I wish you luck with the stitching on this it looks lovely and I really looking forward to the progress on it. Thank you for sharing with us the latest on the vestment project. Oh who is that in the photo, just being nosy!
Regards Anita Simmance
I have learned so much from you over the years Mary. Reading about this project reminds me of one you had on your site, couching the gold work with red, and I loved it so much, I copied it! I was making a canopy for processions at my church, and I incorporated your alphabet, a pattern from one of your first books of the Agnus Dei with the wooly sheep, and it worked out wonderfully. Your videos are top notch, just like having you sitting right there. Thank you very much for all your hard work
Thanks so much, Tracy!