


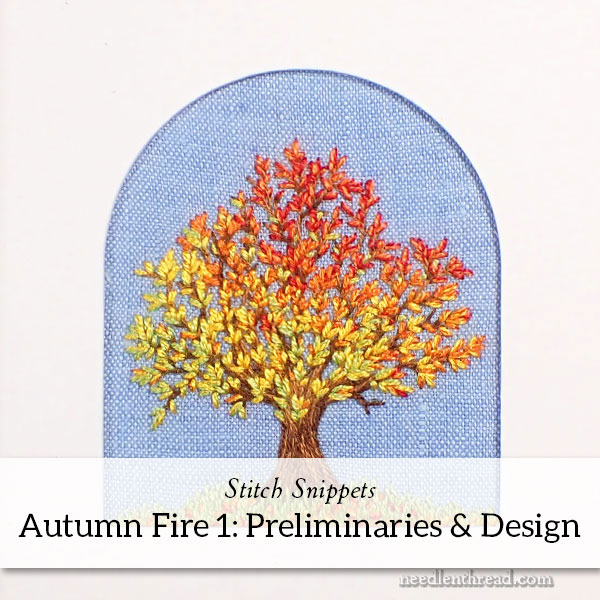
At long last! Today, we start Autumn Fire, the project I wanted to begin with you at the end of August, and here we are, approaching the end of September.
On the bright side, we’re just getting a taste of autumn here in Kansas. Perhaps my Autumn Mood (which is usually pretty chipper!) will kick in and the project will progress even better because of it. Two days ago, it was still 100 degrees here, after all. It’s hard to be cheerful about autumn when summer won’t release its hot little hands…
So, let’s talk about what to expect, cover some preliminaries, and then I’ll hand off the tree design to you. We’ll also chat a bit about the transfer of the design to your fabric.
The Order of Things – What to Expect
This is how the stitch-along will further unfold:
Part 1: Today, design & preliminaries.
Part 2: Details of design transfer, stitching the trunk, managing the two browns and their placement.
Part 3: The grass: managing silk (including cutting); sketchy long and short stitch
Part 4: The leaves: managing the silk (including cutting); combining colors; managing color placement and gradation. We’ll also talk about the back of the work, jumping around with the embroidery, and similar tips.
Part 5: Blocking & damp stretching; centering & pinning; trimming; lacing; framing.
So it’s a five part series, and we’ll cover at least one episode a week, but probably more. I hope to move through this pretty quickly, since we have another Stitch Snippet (with a slightly different approach) before Christmas.
Preliminaries: Fabric, Thread, Useful Tools
If you ordered the Autumn Fire materials kit, you’re set with almost everything you’ll need to work the project, including fabric, thread, pen for transfer, needles, mat board and arched mat, and lacing thread.
If you’re working from your own stash or you want to source your own supplies, that’s fine! You can make substitutions for any of the supplies I’m using. Even if the results aren’t the same, they’ll still be great, I’m sure! So don’t opt out if you want to stitch the tree, but don’t have the kit.
Concerning kits: I do plan to restock some kits. I’ll announce it when we have more in stock. It’ll hopefully be in the next few weeks. Keep in mind that the instructions will still be here on the blog, so you can work through the project at your own pace.
Fabric
For fabric, I’m using a blue linen chambray. It’s a fabric made for clothing, not for needlework. It was hard to find exactly the color of blue I wanted in a decent fabric. If you’re looking for fabric or if you have a stash of fabric, go for a blue that you equate with autumn skies. I always equate a fairly intense blue, but you want to be careful. Don’t go too dark on the blue, or too bright, or your tree won’t glow the same way.
The blue in my colored linen fabric pack works, if you have that linen fabric collection. It’s not quite as bright or deep a blue as the chambray, but it’ll work and the tree looks good on it.
I did dabble with a cornflower colored linen, but the results weren’t good – the tree somehow lost its vibrance altogether and just sort of slumped into the background. So color intensity of the fabric matters! You’d be better off going with a white or a paler blue than too bright or deep.
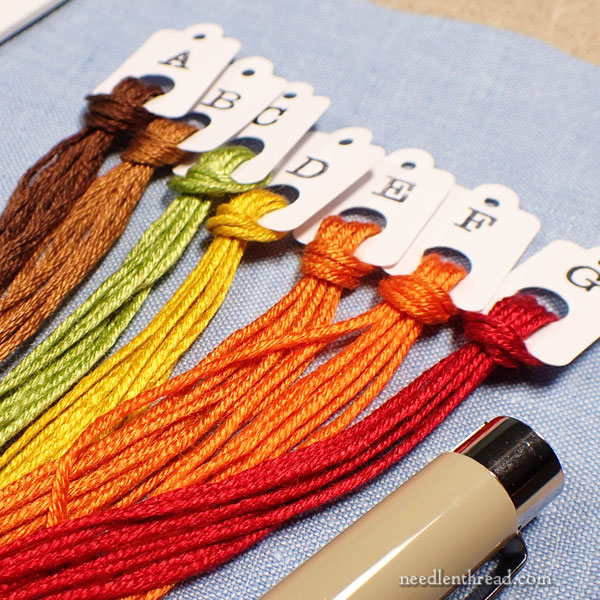
Thread
We’re using DMC cotton for the tree trunk, and everything else (grass, leaves) is worked in Soie d’Alger, a 7-stranded spun silk from Au Ver a Soie. This is a lovely silk to work with and it handles like stranded cotton, so most stitchers will be familiar with how to use it. It’s a little heavier in coverage than stranded cotton, because it has more “spread” to it – it’s slightly softer on the twist and in the fibers.
The biggest difference with silk is the natural sheen. With spun silk, there is a soft natural sheen that “outshines” the mercerized sheen of cotton, and it works really well for the leaves on this little tree.
If you don’t have Soie d’Alger on hand, use stranded cotton. Our color gradation in the silk goes from a pale grassy green, to a brilliant yellow, to a burnt orange, to a bright orange, to red. We’ll cover the color numbers when we get to the leaves, when we will also discuss why you don’t really have to have the exact same colors or the exact equivalent of them in your substitution.
If you are substituting threads and working from stash, you want a dark brown and a medium brown. And then you want to pull out the gradation of colors mentioned above. Select colors you think look like a good autumnal array. Make sure a couple of the colors are noticeably brilliant (like the yellow and one of the oranges). The rest can be muted or bright, depending on your liking.
Tools
This project will fit in a 3″ embroidery hoop, but it’s more comfortable to stitch it in a 4″ hoop. If you want to finish the project as “hoop art,” it will fit in a 3″ hoop.
You’ll need a pen or pencil to transfer your design. In the kit, I provide an 01 Sakura micron pen in gray because they are my preferred tracing pens. You’ll also need a light source behind your paper and fabric for tracing – preferably a light pad or light box, if you have one. You can also use a sunny window, or you can improvise by working on a glass-top coffee table or similar and putting a light underneath it. If you have a piece of plexiglass on hand, you can always clamp that to a table and shine a light up under it. Anything to give you some light underneath your surface where you’re going to trace the design.
If you don’t have that kind of configuration, or you find the tracing process too daunting, don’t worry – there are other ways to get the design on the fabric, and I’ll talk a bit about the tracing process and another method of transferring that will work. Because the tree is small, you’ll want a fine line for your transfer, so most iron-on transfer pens or water-soluble or air-soluble pens are not going to work great with this project.
For needles, look for embroidery or “crewel” needles (medium elongated eye, sharp tip) in size #7 or 8, and a #10 if you have one. You can get away with just the #7 or 8. You can also get away with a #9. It’s not really rocket science here – we don’t have to be too precise! You want a needle that will handle one strand of floss without letting go of it with every stitch because the eye is too big and that can split a single strand with split stitch easily, and a needle that can handle two strands of floss at a time, without the strands being too tight in the eye. You can manage all those requirements in a 7, 8, or 9. A 10 is a bit small for two strands.
You’ll need a pair of scissors. Sharp and small!
Good lighting is always a must, and, if your sight challenges you, magnification won’t hurt!
When it comes to finishing, you’ll need some sewing pins (round heads are easiest to manage), a place to block your work (I like a cork board), and a piece of mat board cut to 4″ square to mount it on. If you want an arched mat like the one in the kit, you’ll need an arched mat that fits around your finished tree.
The Design
Below, you’ll find a link for the tree design.
Now, this is a small project, but it isn’t “miniature” embroidery. The embroidery we’ll be doing is regular embroidery with regularly sized stitches, but the design is small. When you see the size of the tree, please don’t think there’s something wrong with your printer. If you print at the actual size (100%, or whatever option you get in your printer dialog box), the tree design (including the grassy knoll) should print at 2″ tall.
It’s a wee tree. But it’s a mighty tree!
Autumn Fire Tree Design (PDF)
The PDF features two trees, a “basic” on the left and a “fuller” tree on the right.
Your First Task
Besides gathering your supplies, your first task is this: color in the basic tree with a fine black, dark gray, dark blue, or any dark color micron (or very fine-tipped permanent) pen.
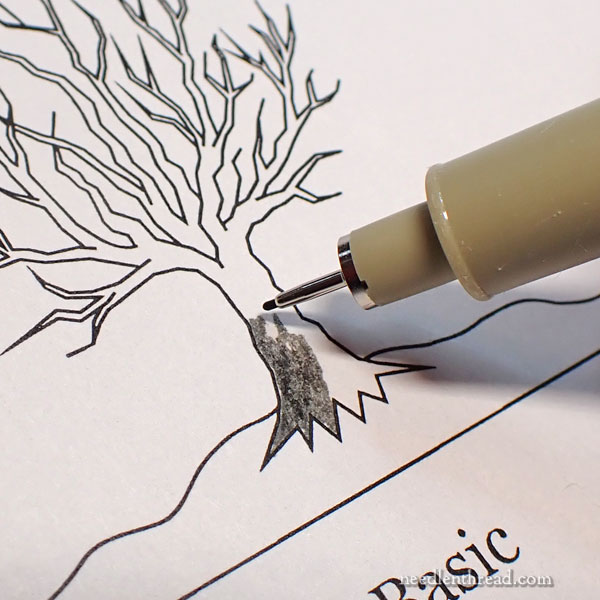
You don’t have to color inside all the really skinny branches if your pen tip isn’t quite fine enough or your coloring skills are a bit shaky, but if you can, do. Color it so it is dark and solid.
Two things will happen when you color that tree in:
1. You’ll be better able to see the tree perimeter when you trace it.
2. And perhaps more importantly, you’ll get a sense of the shape and flow of the tree and its branches, so that when it comes to tracing or transferring, it’s not going to be the first time you’ve encountered the tree’s shape and layout.
Coming Up
In Part 2 of Autumn Fire next Wednesday, we’ll dive into some transferring processes and look at two options (and discuss others), and then we’ll stitch the trunk and branches of the tree.
If you’re a member on Patreon, you’ll find the design PDF over there today, too. The first instructional PDF will come out next week on Patreon, when we actually begin the embroidery on the project. I’ll try to combine a few installments in the Patreon PDFs so you don’t have to wait as long between installments, because I can fit more in a PDF than I can in a blog post!
Have a wonderful weekend!
Thank you Mary. I received my kit & I look forward to following your detailed instructions to complete the project.
Thanks again,
Judy
My email address (which I have had for years) isnotbeingnaccepted by your site.
Hi, Giselle, I just manually entered it. You should receive a confirmation email with a link in it to opt in to the newsletter. Please make sure that the email addresses in the confirmation email are added to your contact list, so that they pass the spam barrier. Thanks a bunch!
Fabulous