


Time to launch into the official work on Autumn Fire!
Last week, we covered some preliminaries. Today, we are going to talk about design transfer and how to stitch the trunk and limbs of the tree.
As usual with stitch-alongs on Needle ‘n Thread, I’ll eventually have an index of these articles available so you can easily find them in one place here on the website, under Tips & Techniques in the main menu.
For members on Patreon, you’ll receive the instructions in PDF format, which makes it easier to save and print.
For those looking for the materials kit for Autumn Fire, we will have those in stock for you again. We’re just working on getting supplies in. Thanks for your patience!
Let the fun begin!
The first thing we’re going to talk about today is design transfer.
In this article, I’m going to draw from several of the samples that I stitched for this project. I think I have four or five little trees floating around the studio, and they’re all embroidered on different fabrics. So you’ll see some color differences and weave differences in the fabrics in the photos. You’ll also notice that the designs are all slightly different.
I’m going to talk about three possible ways of getting your design onto your fabric. First, let’s start with the most common approach to transferring a pattern like this: tracing.
Tracing the Design onto Fabric
Once you’ve printed the design (which you can find here if you are just joining in), you’ll want to color in the basic tree on the design page. I mentioned this in the previous article, and why.
With the design filled in, you’re ready to trace the design to your fabric.
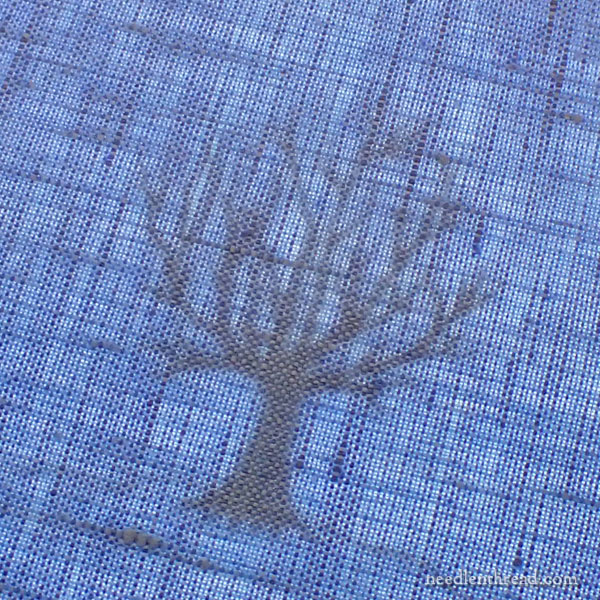
Tracing is the easiest and quickest way to transfer your design.
When I trace, I use a light box (or light pad) under my design. This is the easiest way to work with a light source when tracing, because you can sit at a table and do the job without having to rig anything.
If you don’t have a light pad or a light box, you can rig a tracing area a number of different ways: a glass top table with a light turned upwards underneath the glass; a plexiglass platform clamped to a table or propped between two table edges, with a light situated underneath it; or a sunny window.
The advantage with this project is that it is small, so the initial tracing goes pretty quickly!
Design Placement
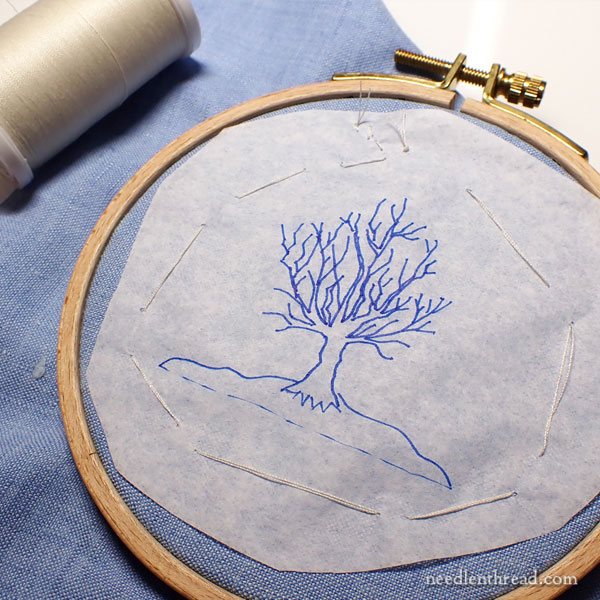
Tape the printed and colored-in design to your surface first. Then, tape your fabric over the design, centering the design in the center of the fabric.
Make sure that the design and fabric are situated so that the fabric is not on the bias in relation to the design. You want the upright tree following the vertical weave, and the base of the hillock following the horizontal weave.
You want the tree to be as much in the center of your fabric as possible. It does not have to be absolutely perfect, though, because you will center it again on the mounting board when it’s time to prepare the piece for framing.
Go Lightly
The pen that we are using (it came in the kit) to transfer the design is a Sakura Micron Pen, size 01, in Cool Grey. If you don’t have that pen, look for a very fine tipped permanent pigma art pen.
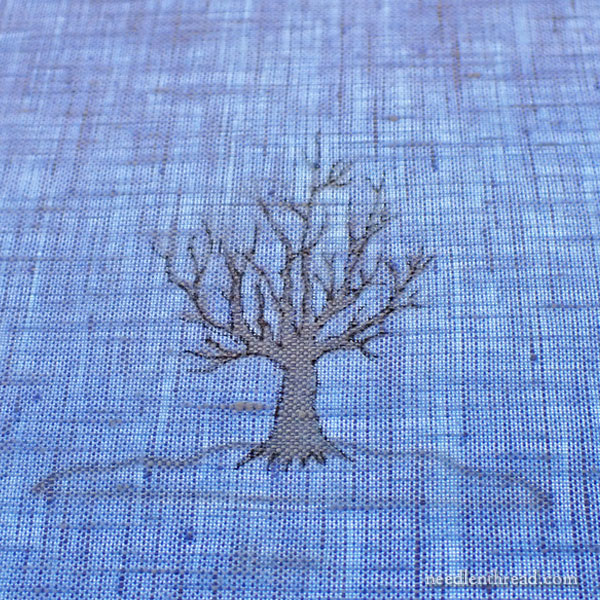
Even with a light source under your design, you may have trouble seeing the design clearly. Concentrate on getting the trunk and the hillock traced, and then work on the branches.
Don’t “sketch” heavily with the pen. Really, you just want to make the very lightest marking along the edges, barely touching the fabric.
When it gets to the branches, you don’t have to mark both sides of the thicker branches (although you can, if you can see them). Just sketch in the basic layout and flow of the branches down to the trunk. Be careful of making the lines too thick or too dark. Just gently touch along the path of the branches.
If you make a mistake, don’t worry too much – you can probably work any mistake into a branch or a twig!
Keep in mind, too, that much of this is going to be covered with fairly thick leafy foliage, so any mistakes can most likely be covered up pretty well.
Do not try to trace or draw in a lot of little twiggy bits on the branches. You can do that after you remove your fabric from the light source.
Once you remove the light source, you’ll see your outlines much better. If there’s anything you think needs to be adjusted or added to your tree, just mark it in very lightly. With the basic tree in, you can touch in little twigs on the ends of branches, etc.
You can also add twigs and even adjust your lines as you stitch.
Just remember that you want to keep everything more or less within the perimeter of the basic tree drawing, so that your tree fits inside your arch. The tree will fill out somewhat will foliage, but if you add to many longer branches and twigs beyond the perimeter of what is drawn for the basic tree, you risk your end tree being too large for your arch.
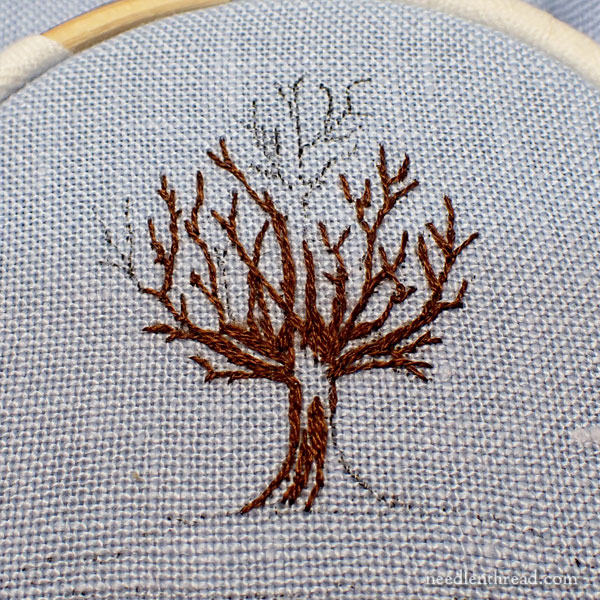
The Free-Hand Approach
If you’re good at sketching – and even if you’re only sort of adequate at it! – you can actually free hand the tree, or at least most of it.
You want to get the size correct, true, but the tree does not have to conform absolutely to the design I’ve provided.
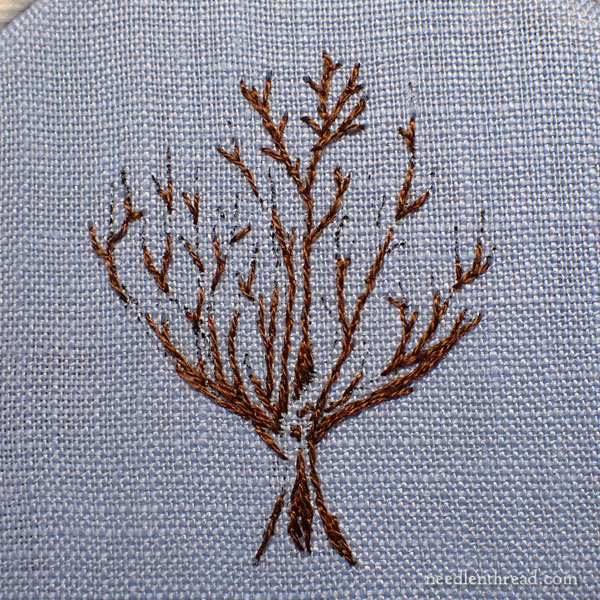
This is an example of a free-handed tree, in the process of being stitched:
We will come back to that tree a little bit later, just to show how the stitching progressed.
We’ll look at a third method of transfer – using tissue paper – at the end of the article. Right now, we’ll move onto hooping and stitching the design.
Hooping Your Fabric
With your tree traced to your satisfaction, mount your fabric in your 4″ hoop.
When you mount your fabric in the hoop, make sure the outer ring of the hoop is just big enough to push down snuggly over the fabric onto the inner ring. Don’t open the outer ring too far. Rely on the outer ring and the push onto the inner ring to provide the stretch to tension the fabric.
You don’t want to have to move around the ring too much, pulling individual areas of the fabric, because this fabric has some stretch in it and pulling too much in one area will warp fabric and the design. Be gentle, and try not to let your fabric get warped in the hoop. If it does, take the hoop off and start again, rather than continuing to pull and pull around the edges, trying to tighten up the fabric.
Stitching
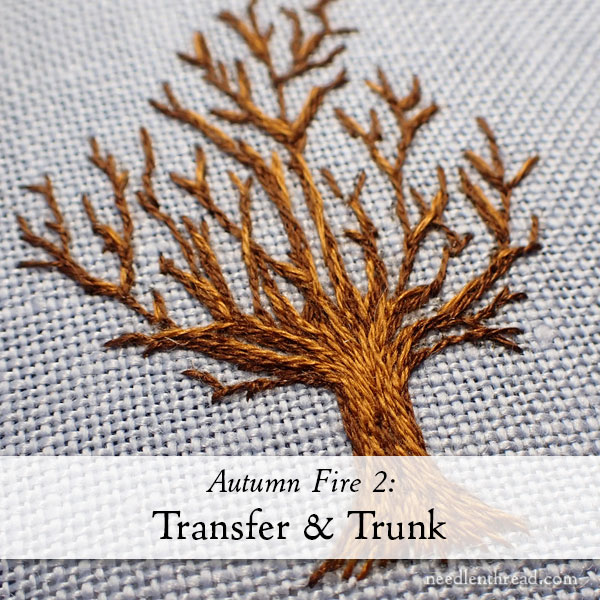
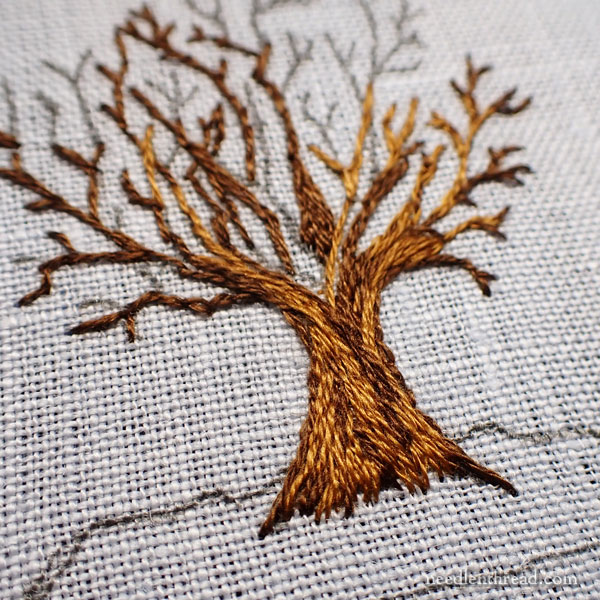
Start with the dark brown stranded cotton, which is DMC 898. You’ll also need the light brown (DMC 434) available as well.
The kit comes with a yard of this thread. Fold this thread in half and cut it, to give you a good working length. (We will talk about cutting the silk thread later – we’ll cut it a different length.)
Strip one strand from the six, and use one strand to stitch the trunk and branches. You can see how to strip, or separate, embroidery floss here.
I used the #10 crewel needle (the smallest in the kit) to stitch with one strand on the trunk and branches.
You can start and end your threads with tiny tacking stitches that can be covered, or, if it’s easier just to use a knot, use a knot.
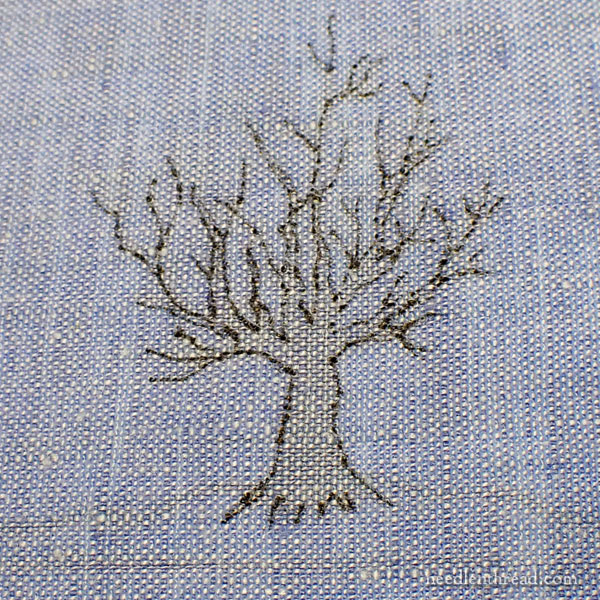
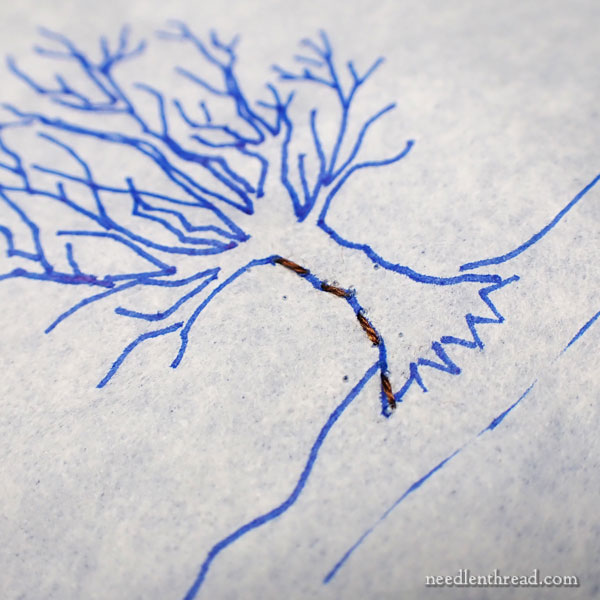
Using split stitch, follow the outline of the trunk up into the branches. On the trunk, fill in lines of split stitch with dark brown, but leave some open areas that you can fill with light brown.
As you get to the tips of branches, leave those unstitched. You can use the lighter brown (DMC 434) the higher you go on the tree.
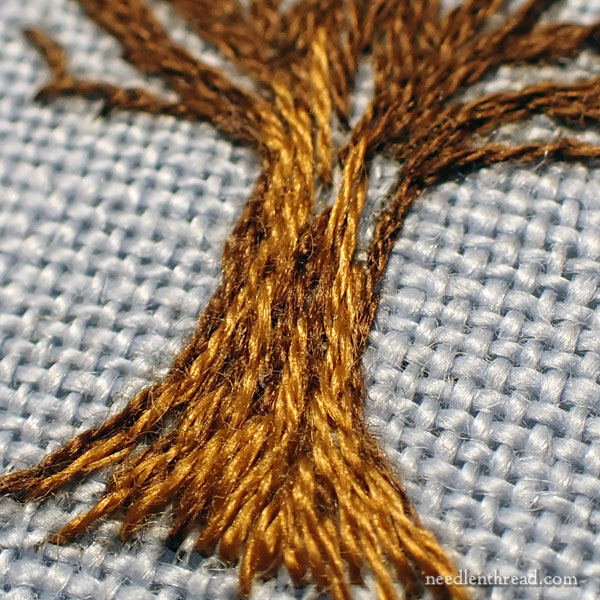
You can switch back and forth between the light and dark brown and fill in the base of the trunk with rows of split stitch, until the look of the trunk satisfies you.
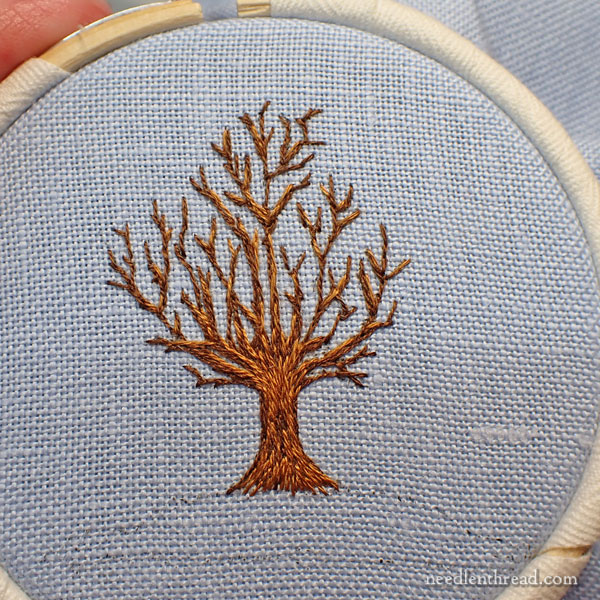
As you work the upper part of the tree, on branches that are thicker, work the lower sides of the branches down by the trunk with the dark brown. Work the upper edges of the branches with the lighter brown, and work more of the tips in light brown, too.
Anywhere you want a branch to cross in front of another branch, stitch the branch that is in the front in the light brown.
Stitching & Split Stitch
If you’re not familiar with the split stitch, you can find an instructional video for it here. I also wrote about split stitch in this article and this article (specifically on tree branches).
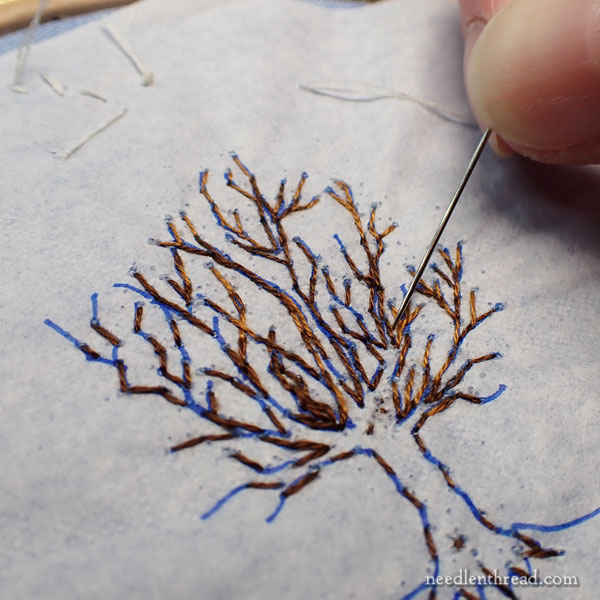
You don’t have to be super-precise with the split stitch. You can split up into the previous stitch (the traditional method of split stitch), but if you need to, you can mix things up and split down into the previous stitch (split backstitch), too. My branches are a variety of split stitch (splitting up into the previous stitch), split backstitch (splitting down into the previous stitch), and straight stitch (not split at all).
Your stitches should be anywhere form 1/8″ – 3/16″ long, with perhaps longer 1/4″ straight stitches on very thin twiggy, longer branches. You might have just a tiny straight stitch here and there, to make a twig off a larger branch.
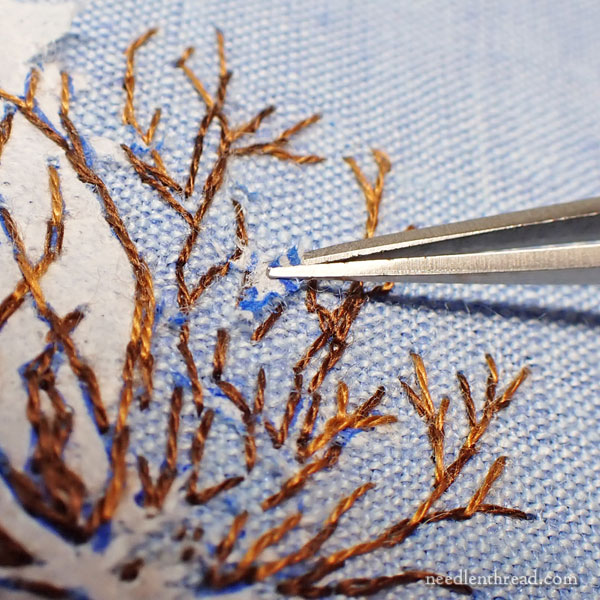
You can always add a twig here or there, where you feel a branch needs a little more to fill it out. We will be adding plenty of leaves, so many of the branches and twigs will be covered, but the twigs and branches give you a structure to build your leafy bits on.

All of this stitching is really very sketchy. Try to relax and not be too uptight about it. Just fill in here and there, as you go, making the tree look like a tree.
You can jump between branches with your thread in short spaces, traveling across the back of the work (you won’t see the thread, because you’ll have lots of leaves on the front), but as much as possible, try to stitch in an orderly flow as you fill the branches of the tree.
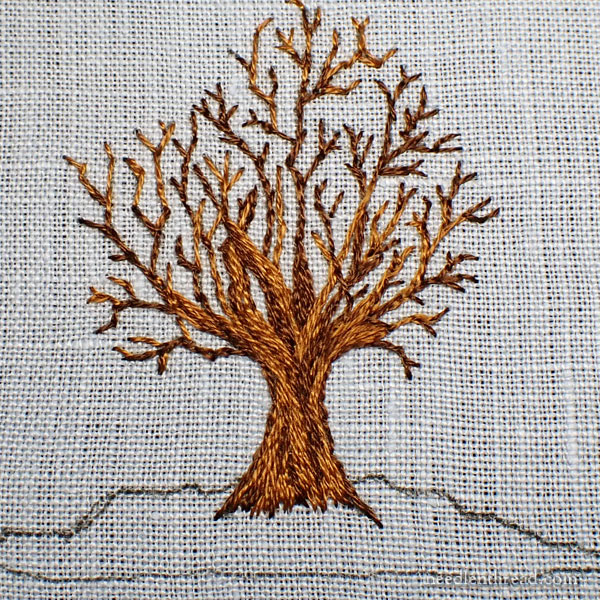
Fill in the trunk and branches all over, using the dark brown and the light brown as you wish, following the growth pattern of the tree (working vertically up the trunk and out along the branches) until you have a satisfactory (albeit naked) tree.
Tissue Paper Transfer
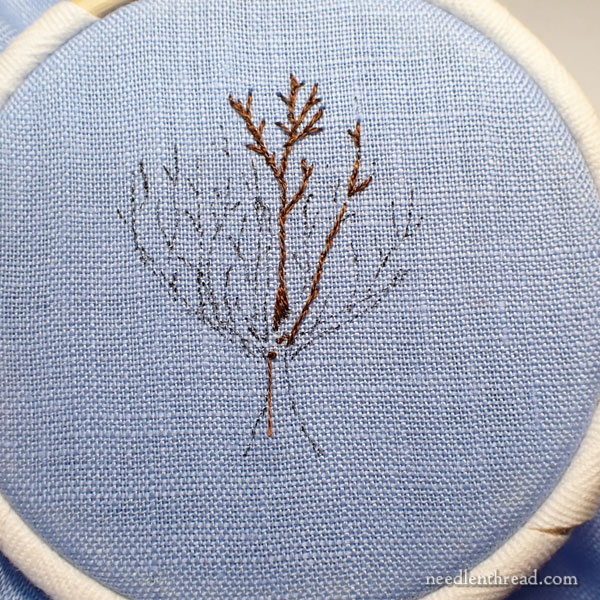
You can transfer your design to the fabric using the tissue paper and tacking stitches method, if you are unsure of tracing directly on the fabric.
Instead of tacking stitches that will be removed, though, you’ll make your transfer with the embroidery floss, so that the design transfer will be the first stitches on your tree.
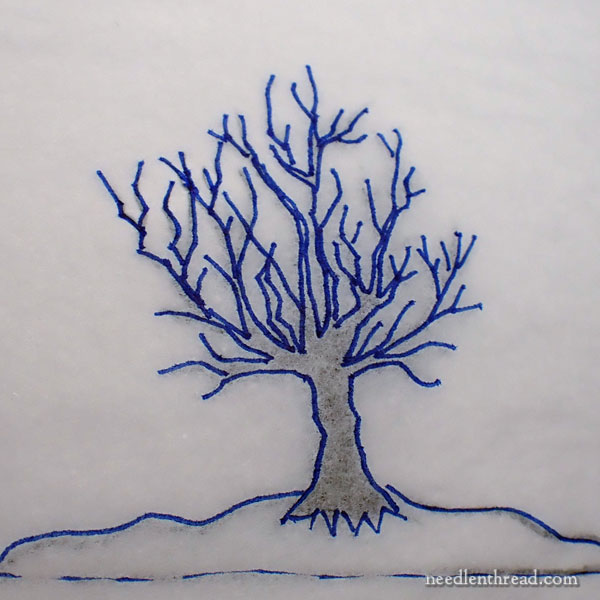
Trace the design onto regular tissue paper (like gift wrapping tissue paper). I used a permanent blue pigma pen to trace the design, but you can use any fine tipped permanent pen. Don’t use a ball point or a gel – the ink may not dry satisfactorily, and it could adhere to your thread.
Mount your fabric in your hoop (following the tips above). Cut out your tissue paper design so that it fits on top of the fabric in your hoop. If you’re using a 4″ hoop, cut out about a 4″ circle of tissue around the tree you traced.
Center the tissue paper tree on the fabric in your hoop and use sewing thread to tack the tissue onto the fabric, sewing around the outer perimeter of the tissue paper.
Then, using one strand of 898 in a #10 embroidery needle, work running stitches up the sides of the tree to mark the trunk, and along the branches.
In areas where you think the branches might get confusing, you can stitch the whole branch outline in with split stitch. Just don’t fill any areas, because that would make it difficult to remove the tissue paper.
Where you want the tips of the branches to be lighter, you can switch to one strand of DMC 434 (light brown) and stitch those branches.
Make your stitches are firmly tensioned (but be careful not to overdo the tension – you can’t see your fabric, so you can’t see how hard you’re pulling on it). Stitch most of the outline, so that you have a good idea of the whole shape of the tree.
You can also use the light bright for the hillock. Use a running stitch to work in the basic shape of the hillock.
Now, before filling in the tree, remove the tissue paper. Run the tip of your needle on the tissue paper next to everywhere you stitched. This will tear the tissue along your stitching path. Then gently remove the tissue paper by tearing it away. It helps to use tweezers to get all the little bits.
Try not to distort your stitches while removing the tissue paper.

Once all the tissue paper is removed, you can now go back with the 898 and 434, and, following the previous tips on stitching the tree, split stitch your tree until it is satisfactory.
Next Time…
We will leaf the tree in the next installment of Autumn Fire! Look for it next week!
Members on Patreon will find this installment available later today. Keep an eye out for the article with the download link!
This is so cute! For once, I an keeping up with the project and am ready for the next instructions. Love the guidance we get on Patreon, as it is very easy to print and follow in the PDF format. Everyone should join!
Hi Mary,
Thinking of using one of the natural linens in the linen fabric sample pack for the tree. Which one would you recommend as far as weight goes?
Manuscript Vellum.
What stitch will we be using for the leaves? Did I miss it or will that come next week?
It’s already been posted! It’s here: https://needlenthread.wpengine.com/2022/10/autumn-fire-3-leaves-color.html The stitch is a simple straight stitch. 🙂