


We have arrived at the final installment of the final Stitch Snippet for 2023!
Today, we’re going to go through the final finishing techniques on our little wreath ornament! We’ll add the cord and the felt backing and work the decorative edge.
For members on Patreon, I’ve already shared a PDF that covers all the finishing techniques, so you can retrieve that over there, for easy downloading and printing. I’ll also have a video out next week for the dedicated and avid stitcher levels that covers all the techniques we talk about today.
If you’re just joining in, you’ll find all the articles for this stitch-along project listed chronologically in the Christmas Wreath Ornament Project Index here.
Ok! Let’s get going!
In the last installment of this project, I listed the materials that you’ll need for the finishing.
You’ll be working with all six strands of DMC cotton floss for the decorative edge on the ornament, so choose a needle for that job accordingly. I find that a crewel needle in sizes 3 – 5 work fine. Something smaller than a 5 (6 or smaller) would probably be too difficult. And a #1 is like a railroad spike and just too big. I used a 3.
Damp Stretching Tip
Some folks have asked if they should damp stretch the ornament if the silk ribbon bow is already attached. Yes. There’s no reason not to. When you damp stretch, you aren’t soaking the fabric. You’re just spraying the lightest of mists over it. The bow won’t really be affected. I damp stretched with the bow attached.
Sewing the Cord in Place
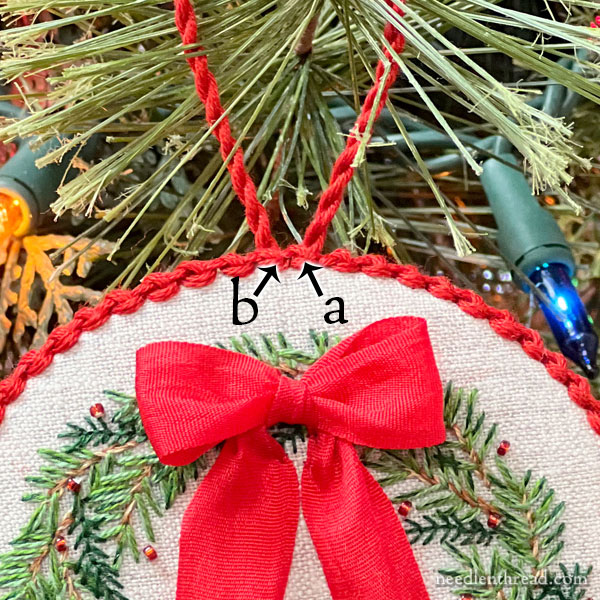
The first step today is sewing the hanging cord in place.
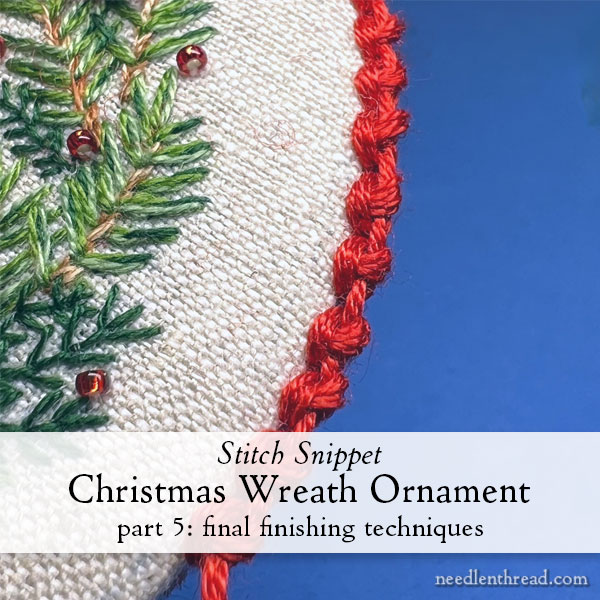
Mark the top center of your finished embroidered fabric round.
I marked the outside edge first, with the ornament face up on the table so that I could see the design clearly and judge the center point. Put a mark on the edge with a pen or pencil (it will be covered by the stitching), and then turn the ornament over and mark the back clearly, so you can see where to sew the hanging cord.
Fold the hanging cord in half. Lay the ends of the two halves on the back of the round, over the mark. One half of the cord will be on one side of the mark and the other half on the other side.
Make sure there’s enough of a loop extended above the ornament to make a usable hanging loop.
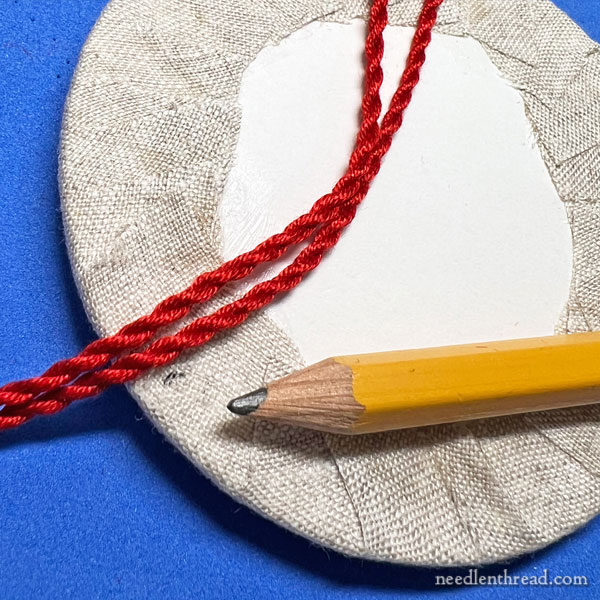
Use one strand of floss that coordinates with the felt backing to sew over the hanging cord. If your felt backing is green, use green floss, even if your cord is red. That way, you can use the same thread to sew on the felt.
Knot the end of the thread, slide your needle into the fabric on the back of the ornament. This may be somewhat difficult because of the glue. Do your best to wiggle it in, and use a thimble if necessary. Over sew the two ends of the cord tightly to the back of the piece. Occasionally, pass the needle and thread through the cords as well. Sew over the cords about six times, nice and tightly. (But don’t pull too tightly – you don’t want to break your thread!)
You don’t have to be super meticulous about this process. Just make sure the cord ends are sewn down tightly and securely. Knot the thread and cut it off.
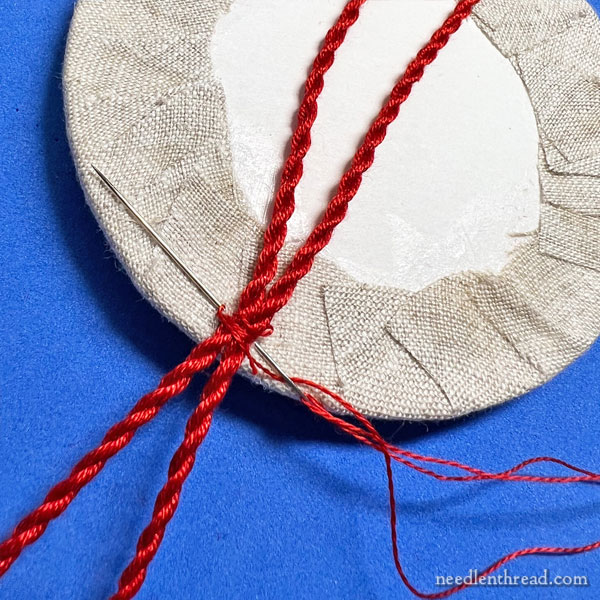
Trim the ends of the hanging loop, cutting especially the side that has the bulky knot on it. I cut both sides of the cord and fan out the threads.
You can see at this point why it is important to sew the cord on tightly and to occasionally pass through the cords, too. You won’t want to be able to pull up on the cord and have the whole thing slip out of the area where you’ve oversewn.
Sewing on the Felt
Now it’s time to sew on the felt backing.
I find it helpful to clip the backing on at least in two places. In one of those places, I clip the hanging cord out of my way, too.
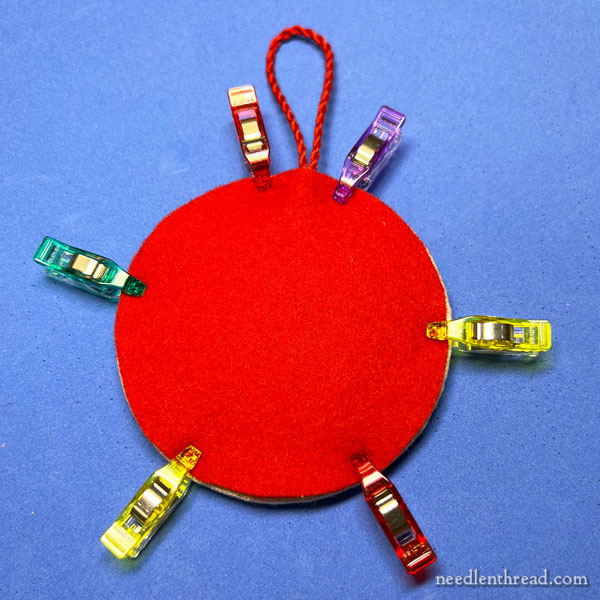
Here, I overdid the clipping a bit. You don’t need this many clips! But at least you can see here how the felt should cover up the whole back of the ornament.
The clips can get in the way and make the sewing a bit frustrating, if your thread is constantly catching on clips. Try working with just one or two clips that keep the felt in place and the hanging cord out of your way.
When you start and end your sewing thread, start with a knot and pass into the linen on the back of the ornament, somewhere where the knot can catch and will be hidden.
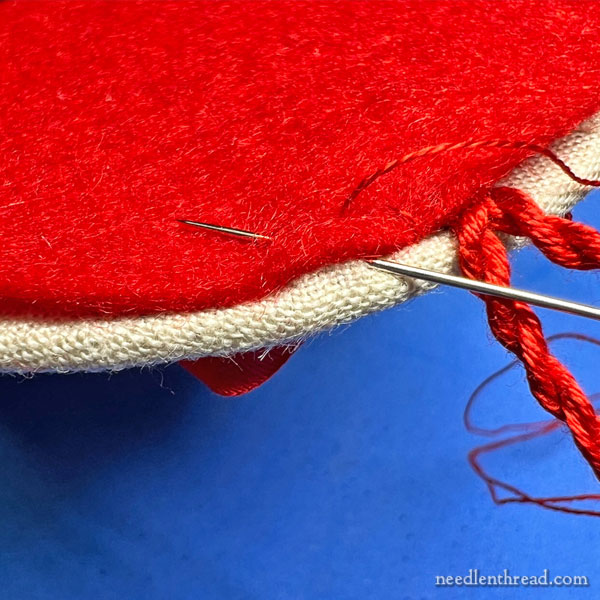
When I first started making these ornaments, I always sewed the felt on, stitching towards myself and holding the ornament up in my left hand while sewing with my right.
If you’re working with the ornament down on the table in front of you – hanging cord pointing towards you – and traveling around the ornament from right to left, it’s easier to pass UP into the felt from behind, then to pass down into the linen edge as shown, pointing the needle at an angle towards the next stitch that will come UP in the felt.
I’ve morphed into stitching the ornaments in either direction, whichever happens to be comfortable at the moment. The same thing will likely happen to you, if you work multiple ornaments.
So if I’m stitching away from myself, or left to right on the back of the ornament, I pass down into the felt and angle the needle out to the beginning of the next stitch in the linen, coming out on the edge of the ornament so that I can pass downwards back into the felt.
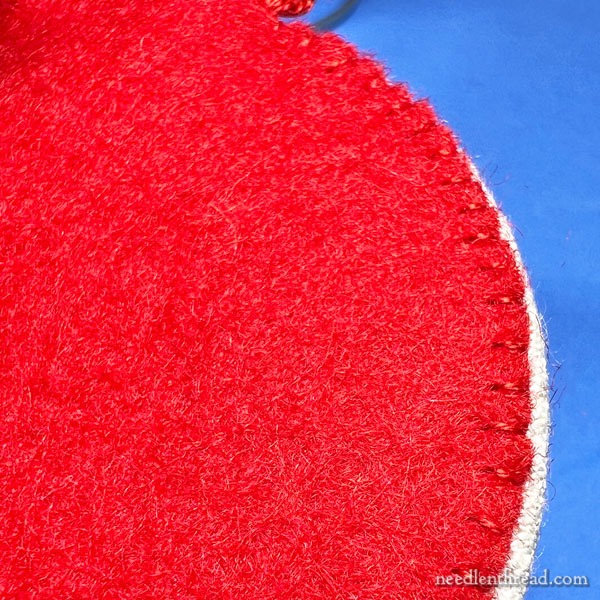
The idea is that you create stitches that work about 1/8″ deep into the felt, that are about 1/8″ – 3/16″ apart, and that are perpendicular to the edge. Whether you go up into the felt or down into the felt doesn’t matter, as long as you pick up a tiny bit of the linen at the edge and that your stitches are perpendicular to the edge.
Keeping the stitches a consistent length and a consistent distance apart is important when it comes to a neat back.
Embroidering the Decorative Edge
With the felt sewn in place, it is time to embroider the decorative edge – the last step in finishing the ornament.
Thread 30 – 36″ of floss in a larger crewel needle. Use all six strands of floss. Knot the end of the thread.
Pass the needle into the back of the ornament, between the felt and ornament back. Just find a place between two stitches that will allow you to pass your needle behind the felt backing and up and out up by the hanging cord. Wiggle the tip of your needle around to find some linen to pass into while it’s behind the felt, so that your knot will catch and hold inside the ornament.

Come out on the edge up by the hanging cord as shown above. You want to be on the outer edge of the edge, so if you have to take a tiny stitch on the inside of the edge so that you can emerge on the outside of the edge, that’s fine.
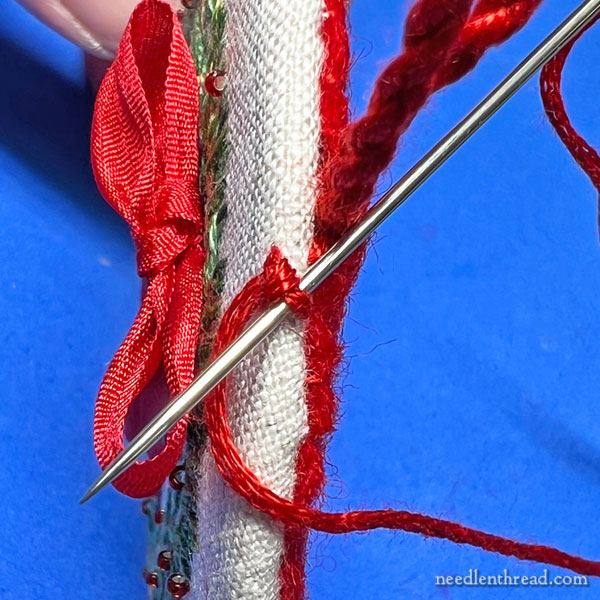
Now, we’re going to start the Palestrina stitch. If you’re not familiar with Palestrina stitch, you’ll find a video tutorial for it here.
Stitching towards you, pass the needle into linen on the backside of the edge and out again on the frontside of the edge, as shown above. Pick up a little bit of linen – about the width of the edge.
Pull through so that you have a stitch that slants from the front edge diagonally across the edge to the back edge.
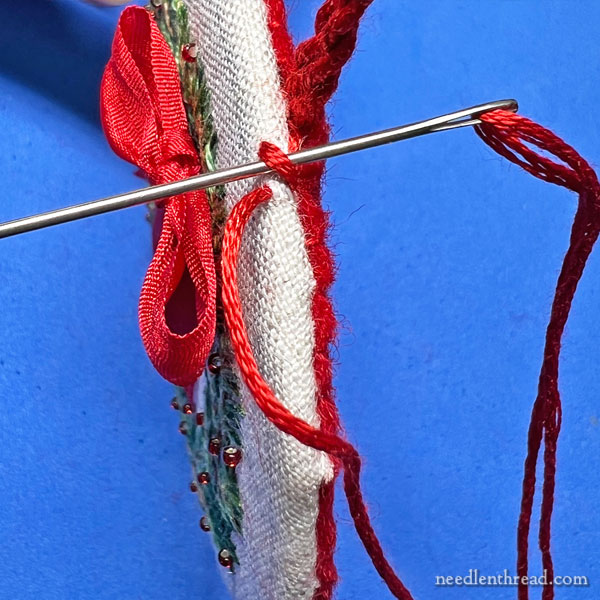
Now, pass the needle from right to left under that stitch, as shown above.
When you pull through, don’t pull too tightly. Just pull gently. You don’t want this first wrap stitch movement to be so tight that it pulls that diagonal stitch out of shape.
Now you’re going to pass from right to left under the diagonal stitch again, below where the wrap stitch wrapped the diagonally. You’ll be passing between the “legs” of an upside-down “Y” that’s formed by the diagonal stitch and the wrapped stitch.
As you pass under that diagonal stitch, come out over the working thread. This is how the round knot is formed.
When you pull this knot through, pull ever-so-gently. You don’t want the stitch to tighten around the working thread. You want it to see nice and plump and fat on the fabric, and this will only happen if you pull through slowly and gently, until the loop has closed around the stitch, but not so much that it’s tight.
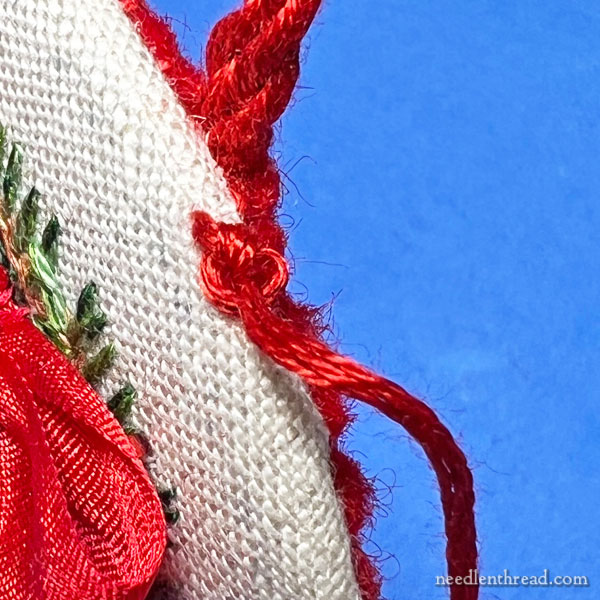
See how loose that looks?
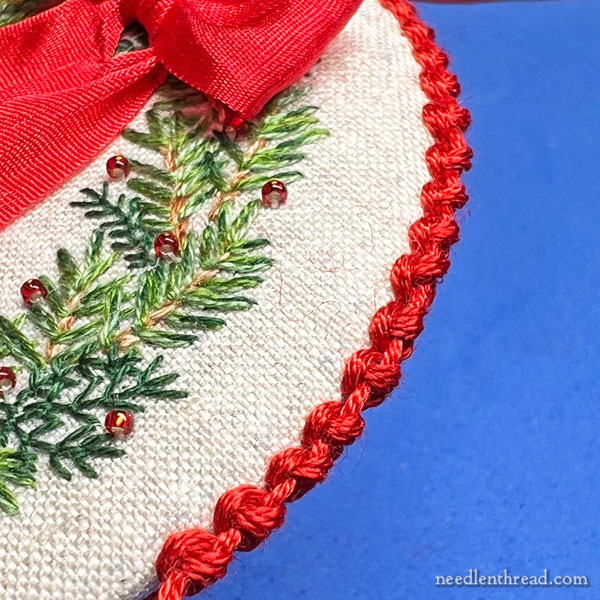
It’s the plumpness of this round loop that makes the decorative scalloped look to the Palestrina knot on the front edge of the ornament. It’s important not to pull too tightly!
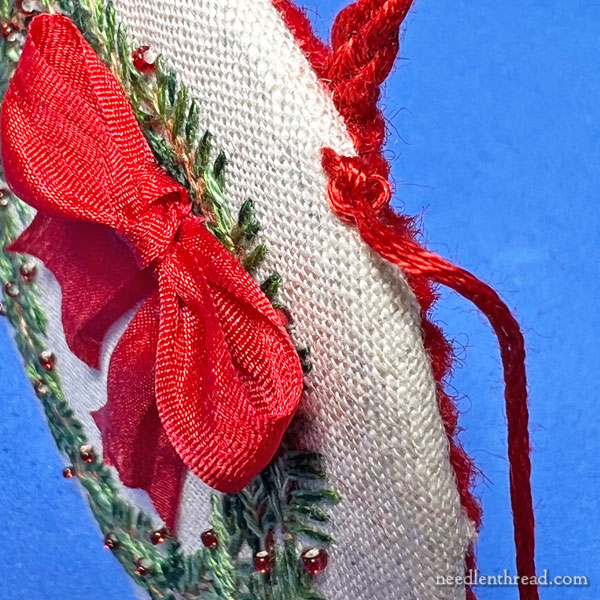
From here, you continue forward to the next stitch, creating the diagonal stitch by picking up the linen from the back edge to the front edge, about 3/16″ down from the first stitch.
Ending & Starting New Threads
If you can’t make it all the way around the ornament with the thread that you’re using, you’ll have to end it at the end of this diagonal stitch, by passing your needle into the fabric towards the back of the ornament. (Don’t come out again on the front edge.)
With the needle between the felt and the back of the ornament, find a place you can bring the tip of your needle out on the back edge of the linen, just around the felt line. Pull the needle and thread through, make a tiny backstitch, and go back into the “inside” of the back of the ornament (between the felt and the back).
Search for another place that you can bring your needle out, just on the edge of the felt, and make another tiny backstitch. After doing this two or three times, you can bring your needle out on the edge just near the edge of the felt and cut your thread.
Then start your new thread and bring the needle out on the front edge of the ornament across from where you ended the last diagonal stitch. Continue forward with the Palestrina stitch.
Work the Palestrina stitch all the way around the edge until you come close to your first stitch. Try to gauge the spacing so that your final stitches end up neither too crowded or too distant from each other.
End the last stitch with the diagonal stitch and work some discreet anchor stitches in the back edges of the linen just above or just under the felt edge, wherever you can reasonably work them. This part is a little fiddly. You want to make two or three tiny anchoring backstitches anywhere along the edge of the felt, where it’s discreet. Then take the needle inside the felt back and out again on an edge and cut your thread. The tiny backstitches will hold the stitching.
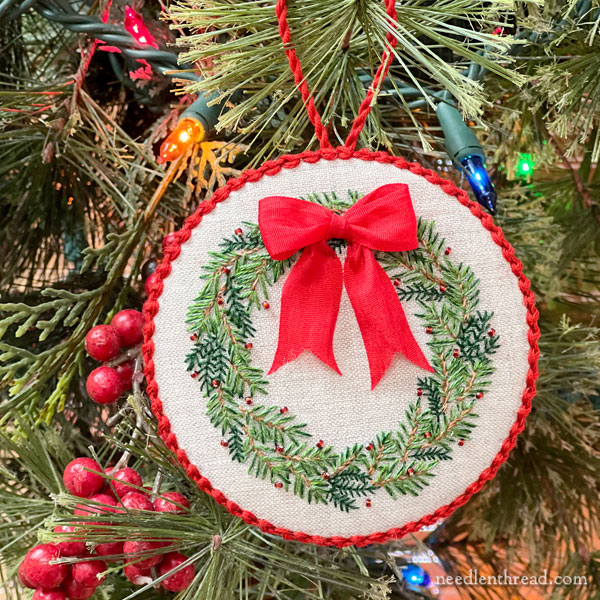
Voilá! You have finished the ornament! Congratulations!!
Just a word of encouragement: this part may sound fiddly and complicated, but read through the directions a couple times, visualizing what you’re going to do. Then, when you sit down to do the finish work, go slowly and follow the directions step by step. You’ll find that it’s not at all complicated and that it actually works up really quickly! Once you get the rhythm of the Palestrina stitch, it’s a piece of cake!
If you want to work up more beautiful embroidered wreath ornaments for this Christmas or next, you can find over a dozen Christmas wreath ornament designs with color and stitch guides and step-by-step instructions available in my downloadable PDF e-book Twelve Wreaths for Christmas, which you’ll find available here. They are a lot of fun to stitch and they work up quickly with a satisfying finish!
I hope you enjoyed this project. You will find the rest of the stitch-alongs here on Needle ‘n Thread listed here, under Tips and Techniques, if you’re looking for more!
Have a great weekend, and I’ll see you next week!
Leave A Comment