Today, we’re going to finish up the embroidery on the sample leaf for Harvest Hues.
If you’re just joining in, please check out the Harvest Hues Project Index for all previous installments in this stitch-along!
If you’re looking for a materials kit for this project (with all the materials to make at least three leaves), you’ll find them available here.
If you’re a member of the Needle ‘n Thread Community on Patreon, you have already received the printable, downloadable PDF for today’s installment.
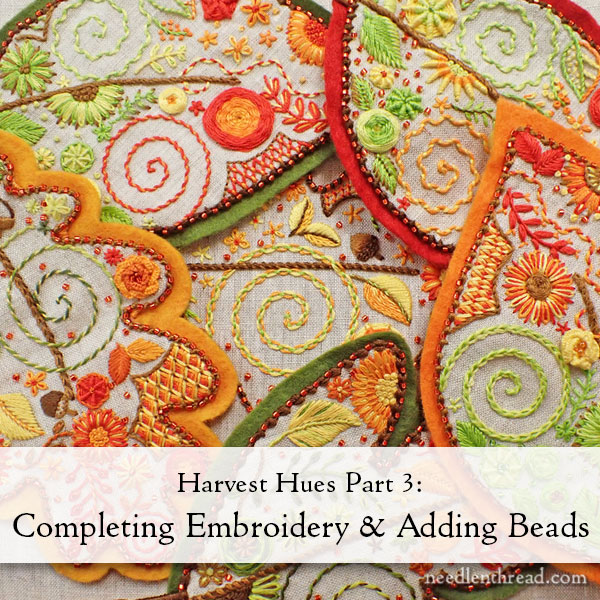
As you’re stitching your project, remember that you are not bound by my suggestions or examples of stitches or colors. You are free to approach your leaves in any way you want! What I’m giving you here is a guide with suggestions, but one of the main points of this project is to have a bit of fun experimenting, making color and stitch choices on your own.
Please note: I try to be pretty good about taking you step by step through a project. I know I’m not perfect, and I do make mistakes. But so far, this project has been straightforward and I’m pretty sure I haven’t missed anything in the process.
If I haven’t mentioned how to use a component of the kit yet, it’s because we haven’t gotten to that point in the project. Please trust the step-by-step process, and I promise we will get to all the components of the kit eventually. Thanks!
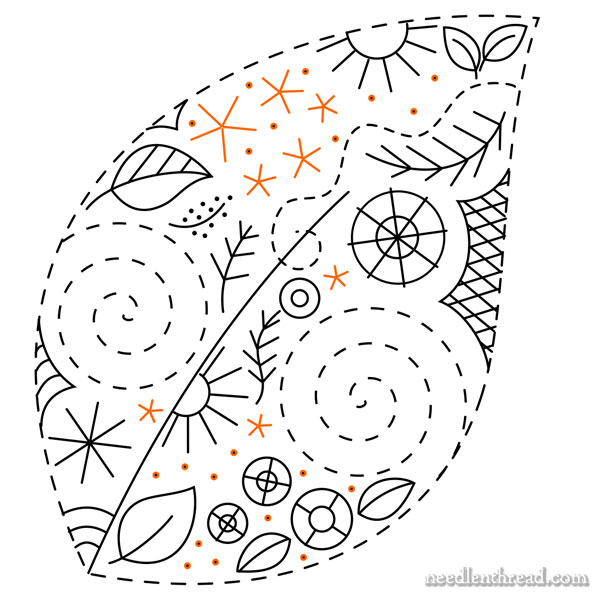
The diagram above shows you, in orange, the elements we’re addressing today. We’re embroidering all the small floral elements and we’re taking care of the dots scattered across the leaf.
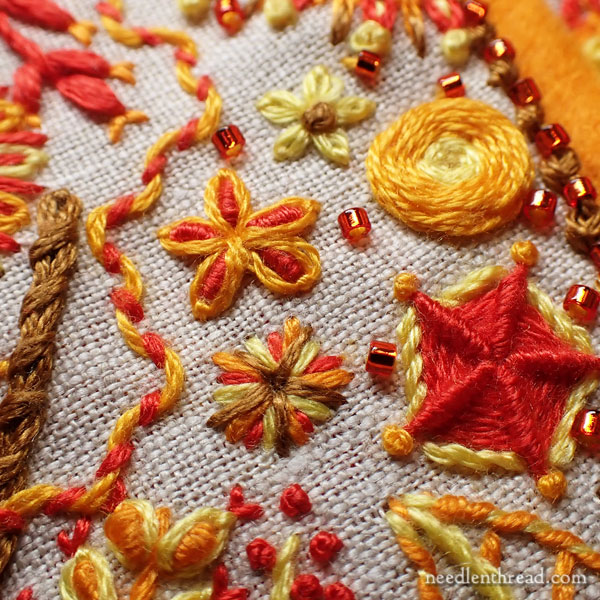
All the small elements on the design (they’re the elements with five “spokes” or petals) are worked mostly with either daisy stitch or straight stitch, or a combination of both. And often, they have either a French knot in the center or a bead, but sometimes, they don’t have anything in the center.
In the photo above, you can see some examples of stitching the smaller elements. The small light yellow flower with the brown center at the top is daisy stitch with a French knot center. Two strands of floss sufficed for this flower.
The second small flower down is stitched with bullion knots in red, with a daisy stitch worked around each bullion knot. Two strands of floss were used for all the stitches.
The third multi-colored small element is made up of straight stitches using one strand of floss, stitching the five petals in one color and then filling in around them with other colors.
Number of Strands
Most of the stitching is done with 2 or 3 strands of floss, depending on the weight and size of the flower. If you want a heavier flowers, use three strands. If you plan to pack more stitches in (using, for example, a combination of daisy stitch and straight stitch) use 3 strands for the main petals and 2 strands for the accenting straight stitches.
If the element is quite small, two strands will likely suffice in any stitch. And in some cases, one strand might work best. You’ll have a feel for the whole layout of your leaf and you’ll know if thing are looking too crowded or weighty – in which case, cut down on the number of strands.
Or, visa-versa – if an area seems sparse in comparison to surrounding areas and you want a bolder flower or group of flowers, add a strand. Ot two.
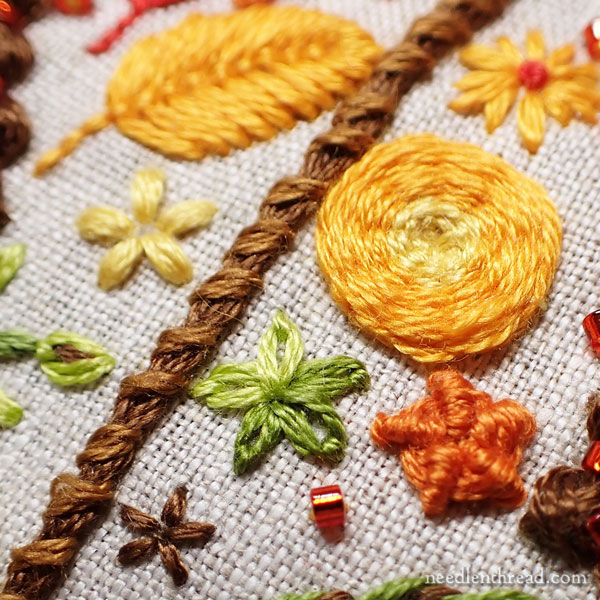
In the photo above, on the left side of the stem, the small flower is worked in light yellow granitos, using two strands.
The green flower just to the right of the stem is daisy stitch in three strands.
The orange next to that is a ribbed stitch flower, using two strands.
And the small brown flower towards the base of the photo is worked in straight stitch with one or two strands, depending on how heavy you want that tiny flower to be.
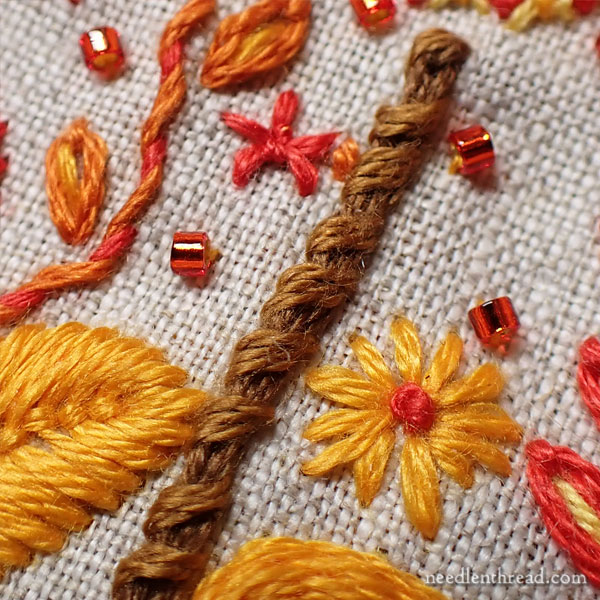
In the photo above, the small red flower at the top left of stem is worked in five straight stitches with two strands of floss.
The larger flowers a little lower to the right of the stem is darker yellow straight stitches. The five petals are worked first, and then the flower is filled in with more straight stitches. There is a red French knot in the center.
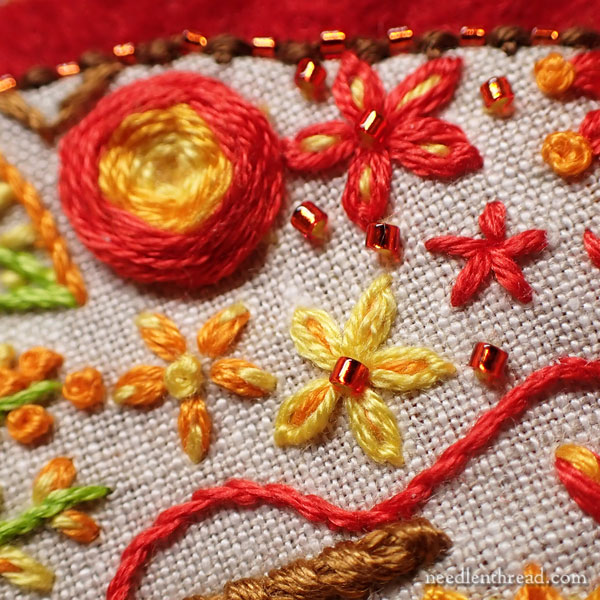
In the photo above, you can see small flowers worked in daisy stitch, with straight stitch centers in contrasting colors; granitos with small straight stitches splitting the ends of the petal; and simple straight stitch flowers.
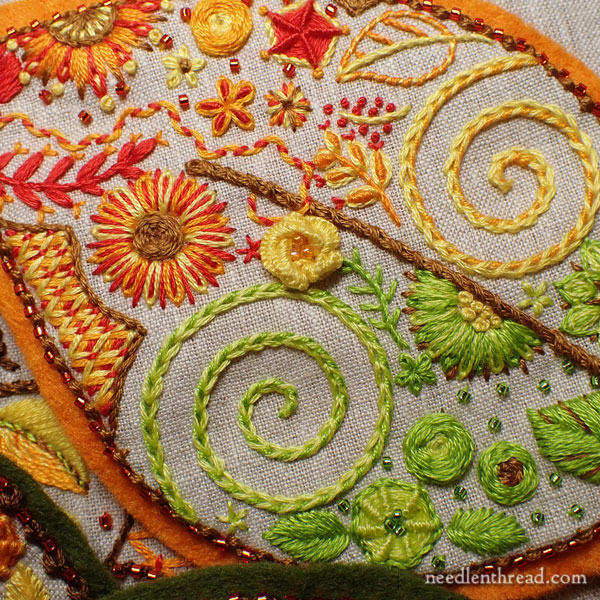
Here’s a broader view of a finished sample leaf, so you can see how the smaller elements scatter here and there on the leaf, according to the design.
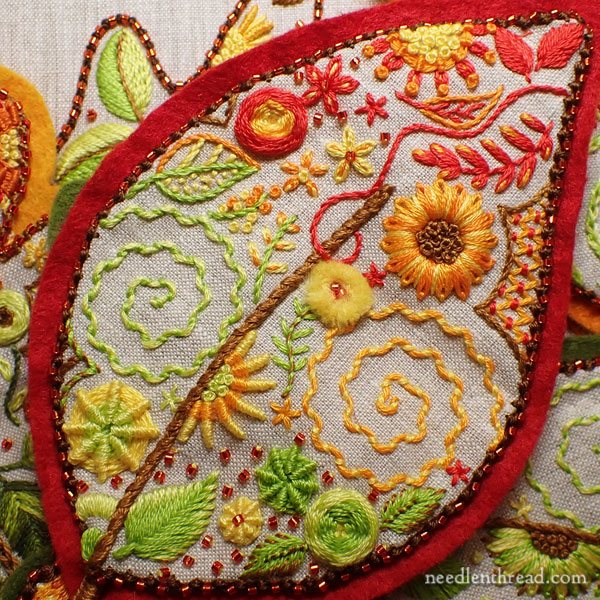
And here’s another view of a whole leaf embroidered with a variety of stitches.
Adding Beads
When you add beads, if you’re using a hoop (as opposed to frame) and moving the hoop around your embroidered area, you’ll want to add beads last, and when you move your hoop, you’ll want to situate it so that it is not covering any beaded areas.
If you can’t get your hoop in place without coming in contact with beads, it’s ok. Take your fabric out of your hoop, and sew your beads on without the fabric in the hoop. Be aware of your stitch tension – you don’t want to pull your thread too tightly between beads, because you don’t want to warp or pucker your fabric.
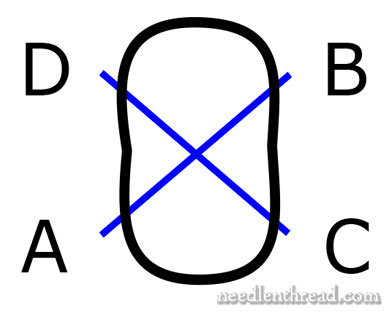
Use two strands of coordinating floss (red or orange) to sew on the beads.
The beads should sit up on the fabric in the same way that a tire sits on a road. You should not see the hole when you’re looking from top down at the embroidery.
Pass through each bead twice, in a cross stitch configuration as shown in the diagram above. This will secure the bead in an upright position and keep it from flopping sideways (for the most part – you might have to nudge them into place now and then) and it will attach them securely to the fabric.
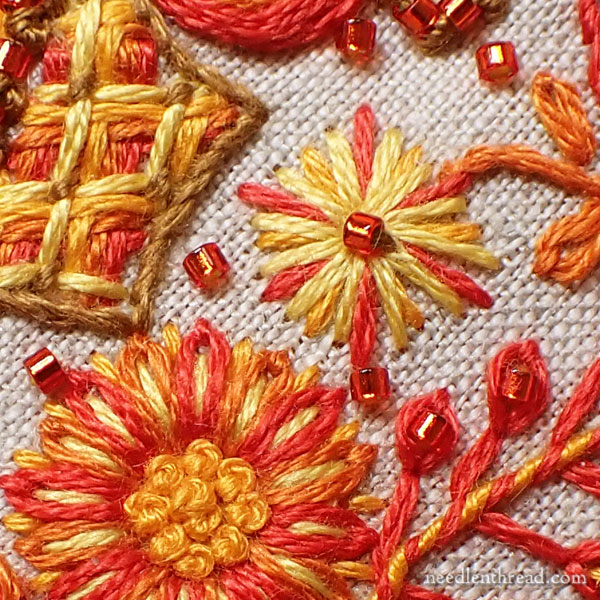
In the photo above, you can see a bead used as the center of a flower – you can do this with any of the floral elements – and you can see them scattered on the background.
You can also see, in the lower right corner, individual beads stitched in the center of daisy stitches on a branch element.
If you have the materials kit for Harvest Hues, you’ve got plenty of beads to play with in this way.
Just remember that the edges of the leaves are also beaded, so you don’t want to encrust the entire surface of all three of your leaves with beads (because you’ll need them for the edge), but feel free to be somewhat liberal if you want, adding them to flower centers, to branch elements, and so forth.
To get technical, in the kit, you have between 1,225 – 1,400 beads in the tube. That a minimum of 408 beads to play with per leaf – which would probably be bead overkill, if there is such a thing. But you get the point: feel free to play!
Little Acorn
For members on Patreon, you have extra design elements on the additional leaf designs, because some of the leaves are larger (like the oak leaf).
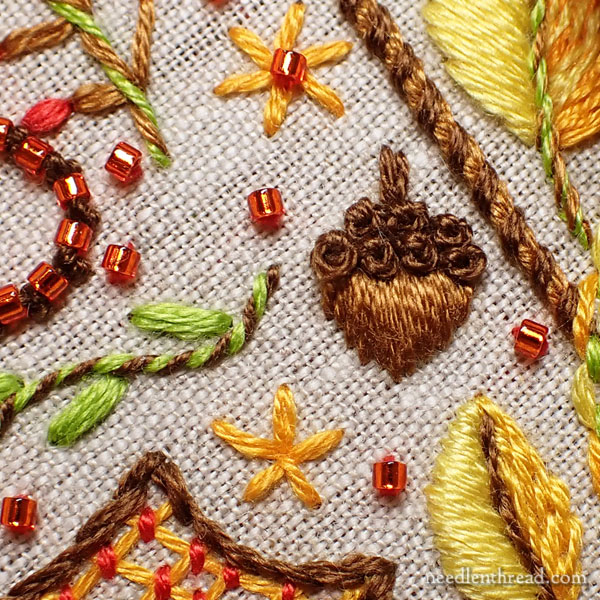
On the oak leaf, I incorporated some cute little acorns into the design. To stitch the acorn, I used satin stitch for the “nut” part in light brown, using two strands of floss, for quick coverage. The cap is a cluster of French knots in three strands in dark brown, and the stem is just two tiny straight stitches in one strand of dark brown. You could just stitch one straight stitch using the three strands from your French knot thread, too.
Embroidery Conclusion!
The brings us to the end of the embroidery on the leaves. What’s next? We’ll move into finishing!
Please Do Not cut out your leaves from the fabric until we move into the finishing steps together.
When your embroidery is finished, you’ll need to damp stretch / block your fabric. This is something we do on practically every project that we work together, so if you’ve done any of the previous Stitch Snippet stitch-alongs, you already know what I’m talking about.
Damp Stretch in Preparation
If you are not familiar with damp stretching, there are two tutorials here on Needle ‘n Thread that clarify the process. Please read them both!
Damp Stretching and Blocking Embroidery – this tutorial is from the earlier days of Needle ‘n Thread. Read this for the basic concept of damp stretching / blocking needlework. Since that tutorial was written, the supplies I use and my approach has evolved a little, but the basic concept is always the same.
Damp Stretching Tips – this article shows you how I pretty much always damp stretch and block now. I invested in some cork tiles that I use exclusively for this process, and I use decent, strong sewing pins to pin the fabric. It’s much easier than using push pins or similar.
You can use any surface that you can pin into, as a base for damp stretching. Some folks have firm, heavy-duty ironing board covers, and they use those as their damp stretching surface. Some folks save styrofoam packing inserts from shipped goods, and they pin their work on those. As long as whatever you use can withstand the pinning and the water mist, it’ll work.
Coming Up Next
In the first week of November, we’ll get into the finishing process for the leaves. And we will finish up Harvest Hues on schedule, despite the slight delay at the beginning of the project.
But I promise I’m not rushing you to finish! You can work at your own pace. You’ll find the lessons for the stitch-along here on the website when you need them.
But we do need to move it along, because during the second week of November, we’re going to start talking about (and launching) the Christmas ornament stitch-along for 2024, so that you have plenty of time to finish it before Christmas.
I can’t wait to show you this year’s ornament! Based on popular demand, I designed it so that it’s large enough to hold gift cards. It’s a pretty (and pretty cute!) ornament, somewhat themed to match a previous ornament that I’ve designed, and packed with all kinds of fun, but quick, stitching techniques.
I’ll show it to you soon!
Have a great weekend!


Thanks for all your hard working putting this all together. I am seriously a novice, but learning so much from you.
Merci
Les couleurs sont pleines de vie , dommage que les livraisons ne se fassent pas pour la France
Oh these look so lush! I hadn’t planned on working this stitch-along (new around here–though happily devouring the archive–and working through some other projects), but I’m tempted to try a couple.
If I were to work the leaf filling designs in wool instead of floss (and leave out the beads on the filling elements), would that work for this project, and is there anything I should keep in mind?
Yes, it would work great! Just use one strand of wool!