


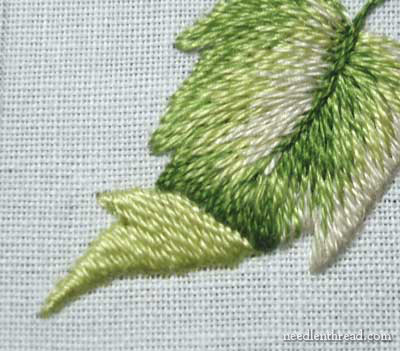
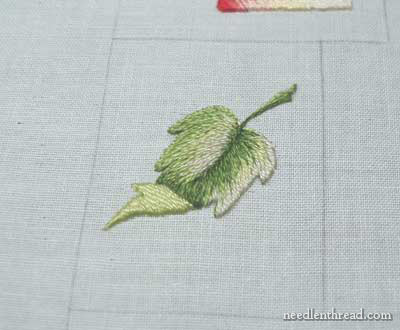
The Long and Short Stitch Shading Lessons here on Needle ‘n Thread are drawing to a close! Lesson 9 is the final lesson for the sampler, featuring a shaded leaf with a turned tip.
For those just joining in, you can find the rest of these lessons listed under Long and Short Stitch Lessons in the “Editor’s Floss” in the right hand column.
I’ve really enjoyed putting together this series, but I have to admit, this last lesson is not everything I wanted it to be. My stitching skills seem to be a bit “off” lately, and I feel as if I’m rushing everything I do. Long and short stitch is a technique that shouldn’t be rushed. This leaf demonstrates this point really well!
So I’d like to encourage you to play a bit with the shading. You don’t have to follow my instructions to the letter. If you’ve been following along here for the last eight lessons, then you are ready to play a bit with shading, to try to get the effect you want.
All that being said, let’s move on to the lesson!
Materials: You’ll need your sampler in a hoop or frame, focusing on the center section of the left side of the square, where you’ll find element #8, a leaf with a turned-up tip. Small, sharp scissors are a must in all hand embroidery, and you’ll probably want a pencil nearby, too, for drawing in your stitch direction lines. For needles, use #9 or #10 crewel, and finally, you will need the following colors of DMC stranded cotton: 469 (dk green); 471 (med. green); 472 (med-lt green); and 613 (pale green).
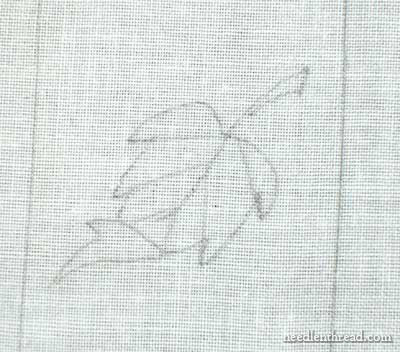
Begin by marking in your stitch direction lines. Just as we did with the other leaf lessons, your stitch direction points to the “growth point” on the leaf, towards the base of the leaf (which is at the top of the image) and the stem.

Split stitch only around the sides of the leaf using 613, leaving the turn-over part alone for now. Don’t outline any part of the turn-over at all at this point. Then work long and short stitch on the right side of the leaf, using 613. Notice that, at the base of the leaf, by the stem, a larger area is filled in with long and short stitch. I’ve actually worked two layers of L&S; stitches in that area, using 613.
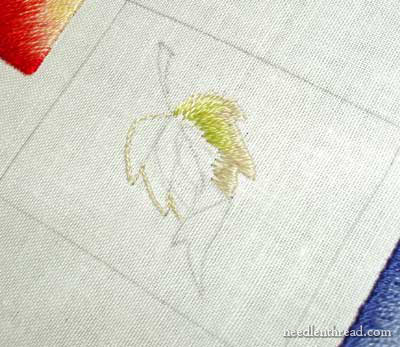
Using 472, fill in a small area of medium-light green at the base of the leaf, working into the layers of color already there. Notice that I haven’t taken the medium-light green all the way up the side of the leaf – it fills part of the base, and ends about half way up the side of the leaf.
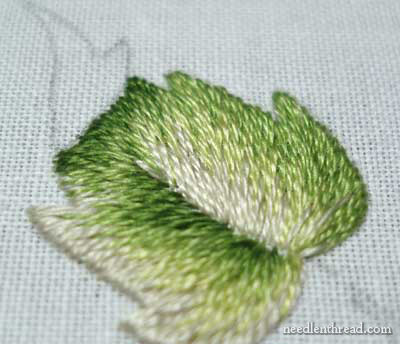
Switch to the medium green (471), and continue filling the leaf. Work the color into the 472 layer, and up to the center vein. Then moving up the side of the leaf, work a layer of the color into the palest green (613).
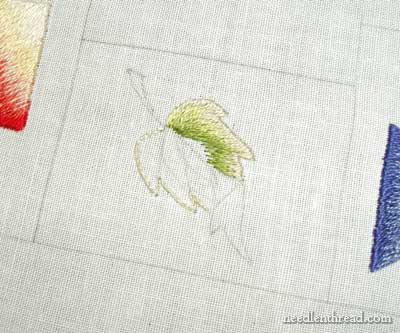
You can see here how the medium green (471) fills the remaining area at the base of the leaf, near the stem, up to the central vein, and then works into the pale green at the top of the leaf, leaving some space towards the center vein.
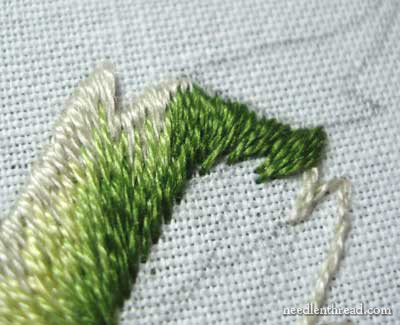
Now work the darkest green (469) into that empty space on the right side of the leaf, filling to the center vein of the leaf. Fanning the stitches around to keep your stitch direction consistent, continue filling with the dark green across the base line on the turn-over.
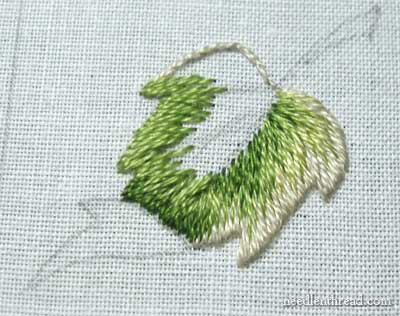
At this point, I switched back to the medium green (471), and began to fill the left side of the leaf.
Here’s where you can play a bit with your shading. If you want, you can mirror the other side of the leaf, keeping the layers of color the same on both sides of the leaf. You could also continue with the darkest green on the left side of the leaf, and then work a layer of medium, then light. Be adventurous!
After stitching that much of the medium green on the left side of the leaf, I began to notice that I did not much care for my color placement. However, the only way to overhaul the whole leaf would be to take much of what I had already done out. I decided not to do that.
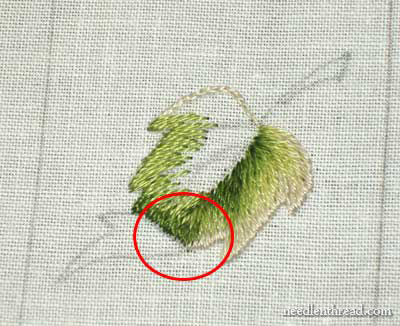
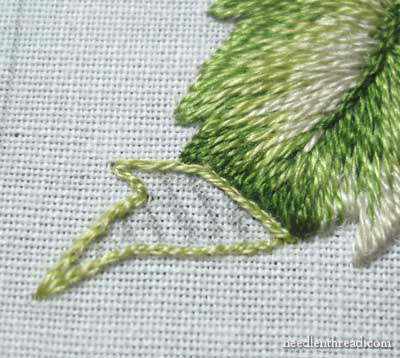
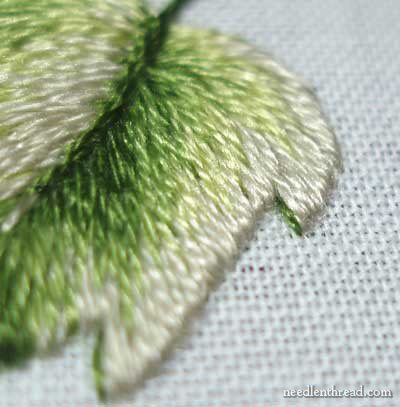
Still, in looking at the leaf at this point, I could see that there was one spot where I could make a minor adjustment without much effort – the corner area on the right side of the leaf, just under the turn-over. I did not like the drastic change from pale green to dark green, and I didn’t like the pale green covering that corner.
What to do?
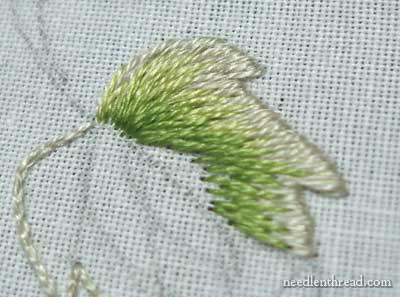
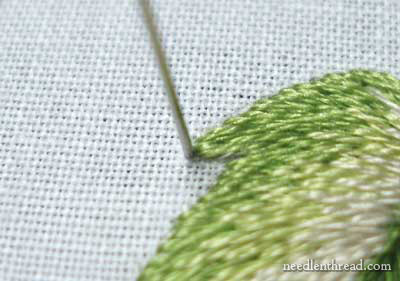
I brought the dark green up, just outside the corner of the turnover, and just beyond the end of the pale green stitching.
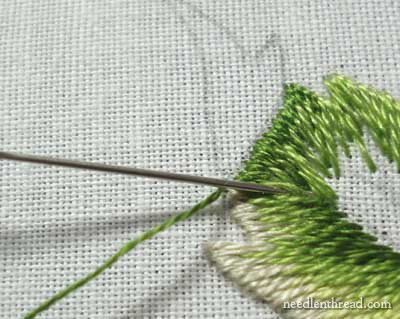
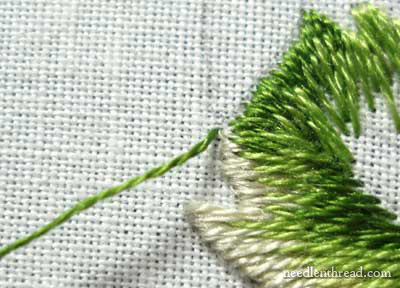
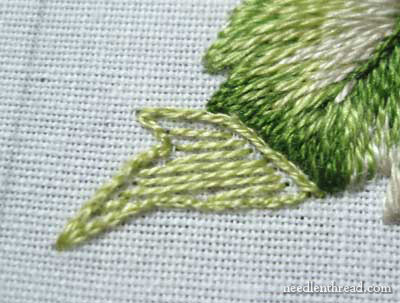
Angling my needle very low, so as to slide under the stitches already there, I put it between the stitches there, and drew it through. The needle was almost lying down directly on the fabric – just about horizontal to it – so that the thread would slide into the fabric at a long angle, rather than simply going straight down into the fabric and stitches already there, which would be very noticeable.
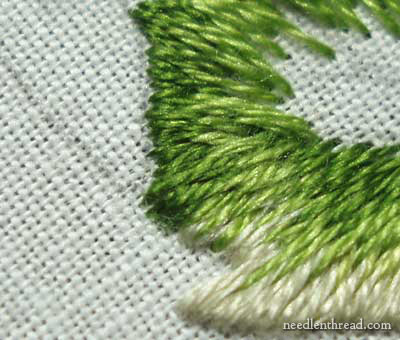
In this way, I took the dark green around the corner below the turnover, on the right side of the leaf. You can’t really tell which are the properly done long and short stitches here and which are the “tucked in” stitches in dark green, can you?
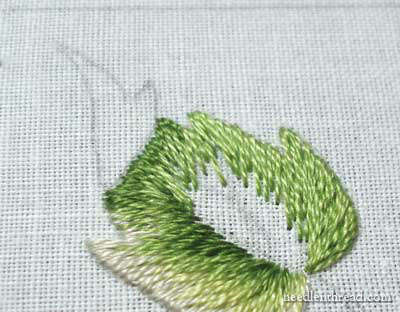
After that was corrected, I moved back over the left side of the leaf and finished the medium green. (In the photo above, I have the leaf turned, so it actually looks like the right side of the leaf….)
Next, I switched to 472, and layered in some medium-light green.
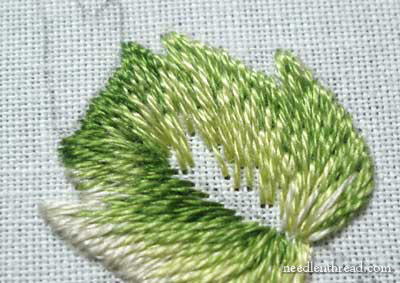
Finally, I filled the rest of this side of the leaf with 613, the pale green.
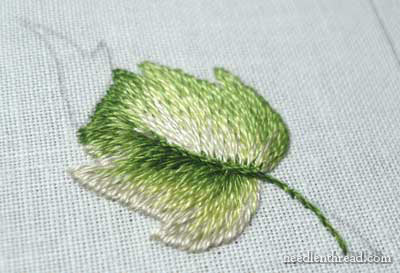
Taking the darkest green (469), I worked a stem stitch vein down the middle of the leaf, and along the right side of the stem. Again, above, my work was turned so that the right side of the leaf is actually in the lower part of the picture.
I left the stem at that point, to finish it up later. Now, let’s turn our attention to the turn-over.
The turn-over is going to be satin stitched, using the medium-light green (472). Begin by split-stitching all around the turn-over. You can also draw in your stitch direction lines if you wish. The stitches are going to span the width of the turn-over, just slightly pointing down towards the leaf, as you can see in the photo above.
After outlining the turn-over with split stitch, fill in the center with some long straight stitches, going perpendicular to your stitch direction lines. This will serve as a very light padding under the satin stitch, and will help to lift the turn-over up above the rest of the leaf.

Beginning in the center of the turn-over, satin stitch over the split stitch outline, from the center to the right side (towards the leaf).
Then move back to the center of the turn-over, and satin stitch up to the tip of the turn-over.
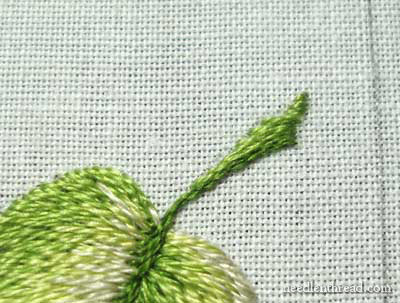
I finished the stem with medium green (471), filling in the remaining area of the stem with stem stitch.
Then, picking up the dark green (469) again, I worked a small straight stitch at theh tip of each of the little points on the sides of the leaf.

You can see the dark green straight stitch tucked under the points on the left side of the leaf…
… and also on the right side of the leaf.
Congratulations! You’ve finished the final element on the Long and Short Stitch sampler!
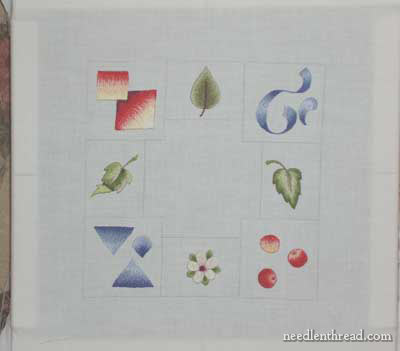
This is the finished sampler, as far as the long and short stitch elements are concerned.
If this is a sampler you want to keep, you could stitch around each box in your favorite line stitch, and then fill the center area with your own long and short stitch motif. How about a monogram? The first monogram alphabet on this page would look terrific in long and short stitch!
If you’re looking for the rest of the long and short stitch lessons, please check the index for them. They’re all listed there!
You can find the PDF for this particular lesson here:
Long and Short Stitch Shading, Lesson 9: Leaf with a Turned Tip
I hope you’ve enjoyed this series on long and short stitch shading! Now… any suggestions for a new series?!
Hello Mary,
This is just fascinating. I have enjoyed watching you throughout this series, and have learnt so much just by reading. You are such a giving embroiderer, thank you.
I am new to this site, and you may have done so before, but I would love to see a full blown rose embroidered [by you obviously…..LOL]. I have wanted to do a full blown satin stitched/needle painted rose forever, but just don't know where to start really. If this has been done already, I would love you to point out where I'm to find it. Thank you again for so much of your valuable time and knowledge.
Thank you so much, Mary, for such excellent instructions, including the pdfs!
Would you be willing to demonstrate a particular type of needlework, like goldwork, stumpwork, or Mountmellick? I would also be interested in seeing your progress on whatever project you're working on, with your commentary about what kind of design decisions you made along the way.
Mary me emociona poder admirar y aprender tan ,hermosa tecnica
gracias por darme esa oportunidad
un abraso
lidia
Hi Mary,
Thanks for the incredible stitch along.
I've been following this tutorial from day one. You've done a fantastic job of explaining this stitch (that's always been a mystery to me). I have all my supplies and want to do this project. All I have to find is the time. More importantly, the energy. Thank you so much for your terrific work.
irene
Thank you so much from near Paris
Thank you Mary! What a great series. I've printed out all the pdfs to keep forever.
I would like to see some step by step tutorials on using the long and short for birds and animals, like Tanja Berlin's kits. But, in more detail and perhaps with video? I get confused over the shading for the fur.
Also, I have a lot of trouble deciding on what colors to put together, especially when starting a piece with flowers and leaves. I know some people are naturally talented in color coordination, but I'm not! Any tips on how you choose your colors? Thanks again!
GRACIAS POR EL TODO TUTORIAL,VIDEOS ,ES USTED MUY TALENTOSA.Y PODRIA SUGERIR ,UN BORDADO.STUMPWORK
thanks You you Mary for these lessons.it's a great work our pdf's .
I started to stitch the square and the large box but my fabric was too fine ; I began again on a more thick fabric the result is better.
a question:if I stitch in a silk fabric may I use a fabric underneath?
Michèle
Hi, Michèle –
Yes, of course. It is good to line silk with another fabric, either linen or cotton.
Hope that helps!
MC
Many thanks Mary for your hard work on our behalf. I am very behind with the work on my sampler but have saved the lessons and am eager to get on with it. Perhaps I should get off the computer and go and stitch!
Hi Mary, Thanks again for creating this class…I have really enjoyed it & really appreciate all the work that went into it. Don't know what you teach but you must do a good job with it if these classes are any indication of your abilities! Have a question regarding the blocks around the sampler. If one of the blocks is somewhat distorted from pulling & trying to get a pucker out, will the stitching straighten it out? And, for future reference, if using 2 threads as in some of Trish Burr's patterns, do you try to lay the threads side by side? Thanks again, Sheila
Hi, Sheila –
Thanks for your note!
As for the puckers, I think it depends on how badly distored the piece is. You can steam iron it from the wrong side, on top of a towel or two, to try to work the wrinkles out.
Yes, with the threads, you'll want to "strip" the floss first (take each thread separately then put them back together) and then try to keep them parallel as you stitch with them. You'll get a cleaner edge that way.
Best of luck!
MC
Many thanks Mary for these very detailed lessons … It will help me in working in my broderies .
Claire from France
Thanks sooo much for your time in putting together lots of TLC in these lessons and for sharing them with us !!! I haven't finish with mine… but will be working on them gradually during this winter.
HI mary didi..
love ur blog. it is my firsttime reading ur blog. thank u so much 4 ur well explained tuturials. what do u do with tht cotton cloth for?is it for the table cloth or bedsheet?? can i stitch tht for bed sheet spread? waiting 4 ur reply.
lov IN CHRIST,..nim
Hi, Nisha –
You can use long and short stitch on pretty much any kind of cloth – it would work very well on a bed sheet.
I hope that helps!
Mary
ow about single bird feathers such as an individual bald eagle feather as well as overlapping feathers such as those in an Indian head dress or hanging from a dream catcher? Also, entire birds such as storks for baby nurseries and also flamingoes or storks with an Oriental flare/appearance? Could incorporate long and short stitch shading if intent is to continue along that line or introduce other technique(s) such as woven picot or various fishbone stitches.
I just wanted to say how much I appreciate your amazing website! I am taking up hand embroidery after a very long time away from it and your tutorials, examples, and information are truly special. Thank you for all of this incredibly helpful and beautiful instruction! Best wishes to you.
Thanks, Dianne! I’m glad you enjoy the information, and welcome back to the world of hand embroidery!-MC
hola mary mucho gusto en saludarte . me ha gustado mucho las lecciones .realmente maravillosas espero iniciar esta semana a prcaticar las puntadas muchas gracias y felicidades. saludos desde México
atte
azul
Hi Mary! First off, I loved this tutorial and I love your site immensely. I only searched out a embroidery site to learn a few stitches. I am a quilter and just got back into quilting again. Well, with every quilt, it needs a label. Sure, my sewing machine can make one, but it just doesn’t seem personal and kinda sneaky to use machine embroidery on something that is handmade. I am also, well, first and foremost, I am a crocheter I like working with my hands and making something with just a hook and some yearn, much like here where you use a needle and thread and make beautiful art.
Anyway, I do have a couple of questions for you before I get started on your sampler and doing the tutorials( I read every tutorial- I think I can do it!)
1) I need a sit on hoop. I am disabled and can’t site straight up for long periods of time, but I could use one of those sit on hoops. Overstock has one for $30-40 but I really don’t know what to look for. (OR look out for!!!)
2) I purchased “cheap” floss ( 100 skeins for $15) That was before I found your site and have since picked up some DMC floss. What a difference by just touching it! Is it wise or okay to use the cheap stuff just for practicing?
3) Binding hoop- I purchased a 6 AND a 7 inch hoops and would like to bind them. You talked about twill tape and I have no clue what type of material that is. I live in a rural area, in the mountains in the middle of a national forest, so getting down the hill is not something I do everyday. There are no needle or craft stores for 30 miles from here. I do have a a lot of quilters cotton and something called potting fabric. Could I just make a bias binding (2 inch folded to 1 inch) and then bind and sew?
4) Preparing fabric. You said to run an over lock stitch, is that an over cast stitch? I though over lock was for a serger? I normally stay stitch or doing an over cast stitch before pre-washing all my fabric as I had getting my washing machine full of unraveled cotton
5)I picked up some DMC perle cotton #5, both the kind that is twisted beautifully and some in those little balls. The ones in the little balss are for basting my quilts. I hand baste my quilts, no pins or spray for me! It’s the ones that are twisted. How do I store those? Once they are untwisted, can they be twisted back again? They’re just so beautiful I don’t want to touch them or ruin them! Much like my yarn for crochet, I love quality yarn/thread in my hands. Just something overcomes me and I feel the creative juices flowing!
I am glad I found you site, I have learned so much already. I purchased some needles (before finding you) that were in an assortment pack. Darners, embroidery, betweens and sharps. I know what betweens and sharps look like, but couldn’t figure out what the embroidery looked like and I’ll be darned (no pun intended) if I wasn’t using the darning needle to practice my embroidery stitches – with the largest needle in the bunch! I did pick up some DMC 1/5 and 3/9’s, now I am reading here that there are better needles? sigh, I am going backwards!
Thank you again for everything you do here. I saw the needle painting and I knew that’s what I wanted to do! Just this feeling that came inside me and I was so inspired. I haven’t felt that way for almost 40 years when I first learned how to crochet a foundation chain! (I love the embroidery chain stitch, looks like crochet!) It’s sort of like a calling and I am ready to pick it up and answer. Have a great day and sorry for my blabbering…;0-)
1. The sit on hoops at Overstock are cheap made-in-China knock-offs. The one I bought to test was rickety and I really don’t think it would hold up well to repeated use. Check Hedgehog Handworks online for good-quality made-in-Germany sit-on hoop stands.
2. Cheap floss will always offer a less than satisfactory experience and can lead to a lot of frustration. I wouldn’t even use it for practice. DMC is pretty inexpensive here in the States, and worth every cent of the price difference.
3. Yes, you can make your own bias and use that. It’s just to give the hoop something to grip and add more friction, in order to hold the fabric taut, and it helps to protect your ground fabric. Twill tape is just that – a tape (like a bias tape) made from twill. It is found in the same section as bias tape at any sewing store.
4. My sewing machine has an overlock foot, and that’s what I normally use. But it doesn’t matter – you can use a zig-zag stitch or whatever you’re most comfortable with. The point is to keep the edge of the fabric from fraying.
5. DMC pearl cotton #5 comes in twists. The smaller sizes come on balls. I store either in drawers or boxes. I’d go ahead and touch it and use it. Otherwise, what’s the point of having it? When I untwist the #5 and cut it, I just tie the excess in a loose knot, to keep it all together and then I put it in my pearl cotton drawer.
I hope that helps! Glad you enjoy Needle ‘n Thread!
Querida Mary !
Estou encantada com suas aulas de bordado! Eu apenas bordei na escola quando pequena, mas ultimamente tenho sentido muita vontade de aprender o seu jeito de bordar, isto é, perfeito!!
Estou muito feliz que você nos proporciona aulas pela internet pois de outra forma não poderia fazê-lo. Sou muito grata a você e lhe desejo muitas felicidades !!
Abraços
Vera Lucia Fioretto
Thanks, Vera! I’m glad you like them! 🙂
Mary,
Your site is super-fantastic! I loved this whole lesson and learn so much from you. Thank you! Thank you! Thank you!
Bonjour Marie,
merci beaucoup pour ces 9 leçons que j’ai eu plaisir à suivre et à réaliser. J’ai beaucoup appris ! Merci encore
Andrea