


Composite stitches are hand embroidery stitches made up of two or more stitches that work together to create another stitch. It seems sort of odd to call a composite stitch a “stitch,” in the singular sense, because you actually have to work at least two stitches (and in the case of today’s example, three stitches) in order for the whole new stitch to come off.
Composite stitches are heaps of fun to play with! They’re usually very intricate looking, without being difficult to do. Most elements of a composite stitch, taken alone, are simple, basic stitches. With today’s interlaced chain stitch, I’ll show you what I mean!
Lacing a stitch is not really a novel technique. Many hand embroidery stitches can be laced. Laced running stitch, laced backstitch, laced stem stitch, laced herringbone stitch, laced buttonhole stitch, laced chain stitch, Pekinese stitch is technically a laced stitch – I could go on, but I think you get my point!
Among lacing techniques, there are heaps of variations, too. So even though this composite stitch is called “interlaced chain stitch,” don’t think it’s the only interlaced or laced chain stitch out there. It’s just one variation.
What I like in particular about this variation – besides the fact that I think it’s very pretty – is that it’s fun and easy to work, but with a deceptively complex look to it. The composite is made up of three stitches: chain stitch, a laced loop similar to Pekinese stitch, and little couching stitches.
Start with a Chain Stitch Line
Start with a chain stitch line. It’s helpful to work the chain stitches so that they are somewhat large – the individual chains should be open. For the sample, I’m working with #5 perle cotton, on Montrose 1750 linen, with a #22 tapestry needle. Normally, you’d work a chain stitch with a regular embroidery needle (crewel or chenille needle, with a sharp point), but because of the lacing, it’s a good idea to have a tapestry needle handy for the next part of the stitch.
Lacing the Chain Stitch
After finishing the line of chain stitch, bring your needle up at the top of the line (wherever the chain stitch began), right in the same hole the chain stitch line originally began. When working demonstrations, I like to use a contrasting color of thread for lacing stitches, so that you can see the second thread easily. You can choose to use a color that contrasts with the chain stitch, a lighter shade of the same color as the chain stitch, or even the same color thread as the chain stitch.
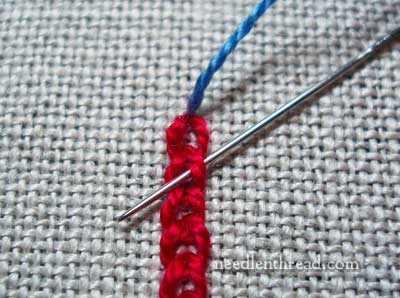
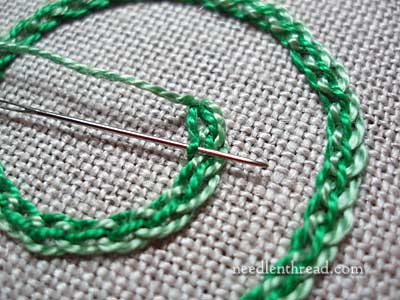
Now, slide the needle underneath the right side of the loop on the second chain stitch down the line, and out through the center of the chain stitch loop.
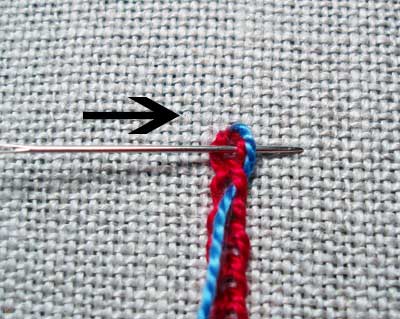
Pull the new thread through gently, so that it hugs the right side of the first chain stitch, and then pass the needle into the center hole of the first chain stitch and underneath the right side of the chain stitch and the working thread, as shown in the photo above.
That’s the lacing technique. Move down the line of chain stitch, skipping one stitch and going into the center of the chain stitch line from the right, then moving up one chain stitch to pass out of the line on the same side, going underneath the two threads.
You don’t want to pull the lacing stitches tight. Just let them lie right next to the chain stitch line.
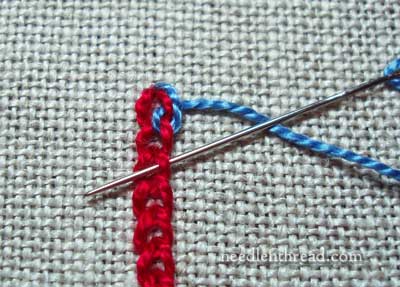
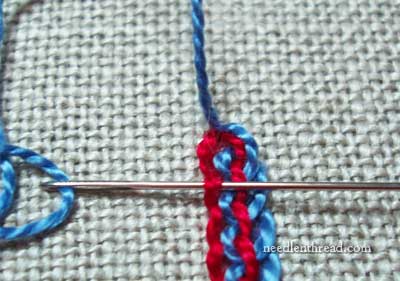
You can see in the photo above that I’ve brought the needle out under the right side of the first chain and the working thread, and now, to continue the lacing, I’m moving back into the center of the third chain down.
Then I’ll move up one chain and out again on the right, underneath both the side of the chain stitch and the lacing thread.
Continue all the way down the line of chain stitches with the lacing thread, making these somewhat loose loops, so that the lacing thread lies loosely next to the chain stitch line.
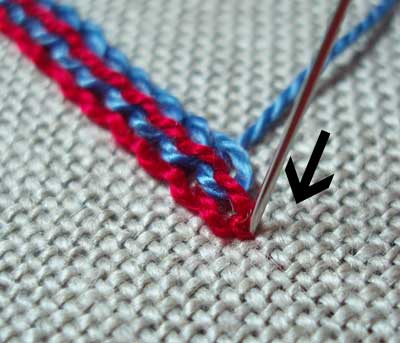
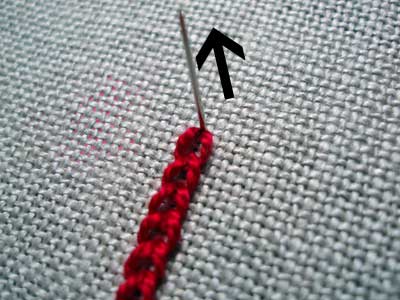
When you get to the end of your chain stitch line, you’ll take the needle to the back of the work by going down in the same hole where you ended the chain stitch line, as shown in the photo above.
End your lacing thread by weaving it through the back of the chain stitches on the back of the work.
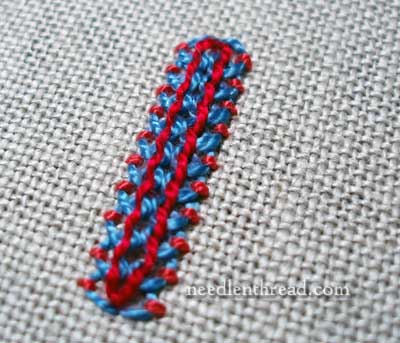
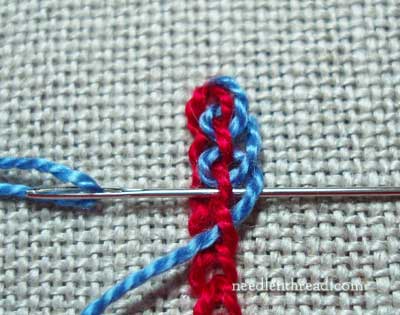
Start a new thread to lace the left side of the chain stitch. The technique for lacing the left side is exactly like the technique for lacing the right side. Starting at the top, go into the center of the second chain down, passing under the left side of the chain stitch, as shown above.
Then move up to the first chain stitch, and down into the center and out on the left, underneath the left side of the chain stitch and the working thread.
As you work each lacing loop on the left, make sure that, inside the chain stitches, the two loops (the one from lacing the right side and the one from lacing the left side) lie parallel next to each other inside the middle of the chain stitches.
Continue all the way down the left side and end in the same hole at the end of the chain stitch where you ended the lacing on the right side.

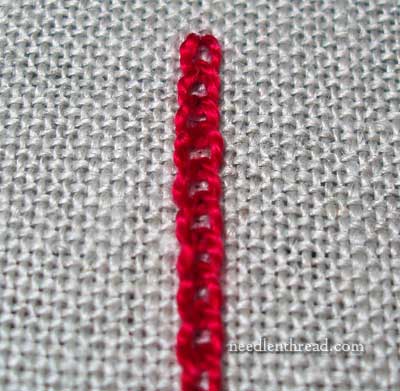
Couching the Lacing Threads
For the couching over the lacing threads, you can use the same color thread you used for the chain stitch, or the same color you used for the lacing stitch, or a whole new color altogether! Feel free to play around with color combinations – that’s half the fun of embroidery, after all!
Personally, I like using the same color as the chain stitch, especially if I’m working with two shades of one color (i.e. two shades of green), because it makes the stitch look like one braid stitch, rather than a composite of several different stitches. But it all depends on the look you’re after – experimenting with the stitch will help you decide what you like best.
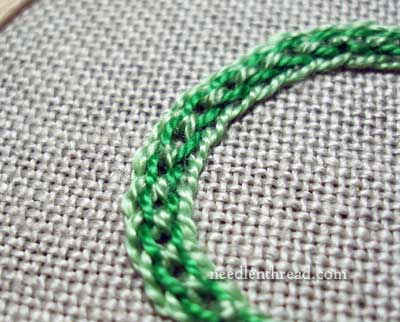
After lacing the chain stitches, then, the next step is couching the lacing stitches. This involves working a small couching stitch over the “zenith” of each loop on the lacing stitches. Try to keep the couching stitches evenly spaced and a consistent size.
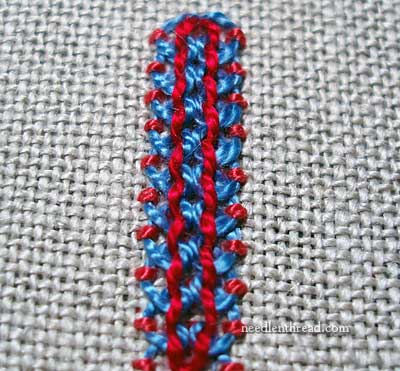
Work the couching stitches down one side of lacing, then down the other side, until each loop of the lacing thread is couched down.
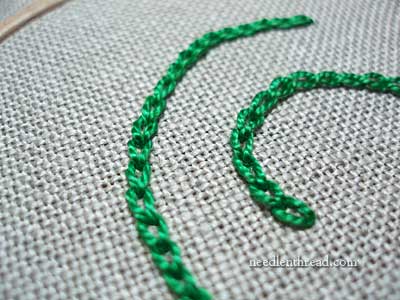
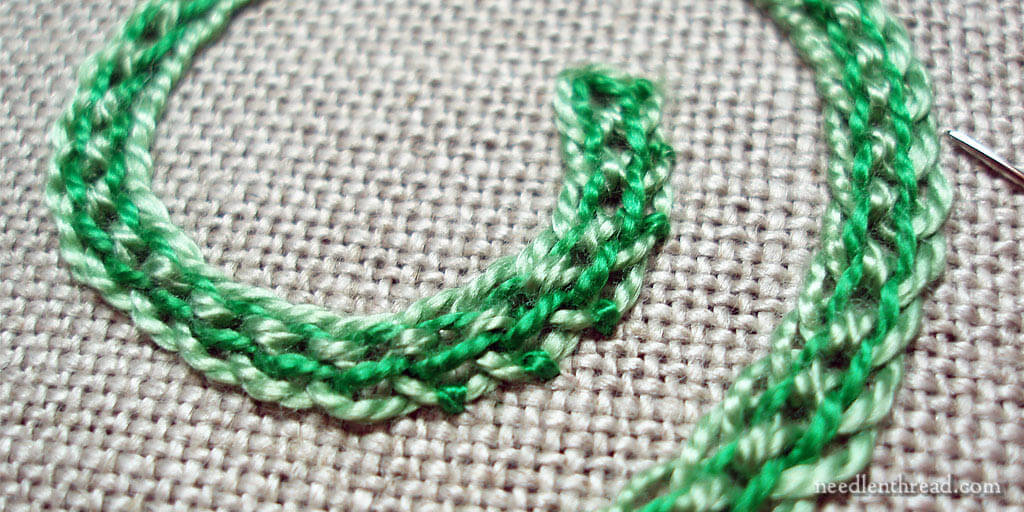
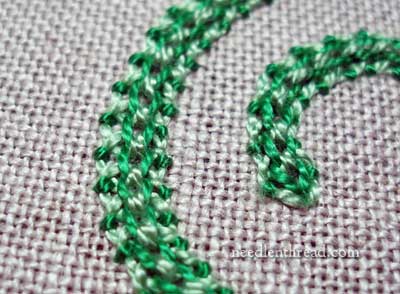
You can work this lacing variation on curves as well. Here, I’ve stitched a gently curving spiral in dark green…
… and then I laced it in a lighter green.
As you take the curves, the lacing loops end up a little closer together, but that’s ok!
I worked the couching stitches in the dark green again…
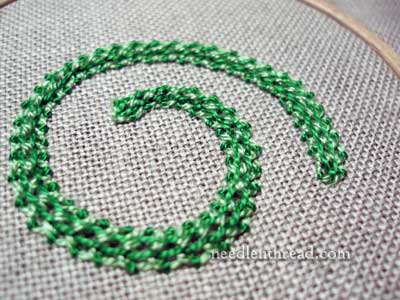
… and that’s the spiral!
You can add this interlaced chain stitch to embroidery projects as borders, vines, textured lines – anywhere you want a somewhat bolder line with a bit of texture to it. You can work the technique in a finer thread, too, like cotton floche, coton a broder, crewel wool, or buttonhole (perle) silks. You can even combine thread types – a silk chain stitch, wool lacing threads, and silk couching stitches, for example. Plenty of room for play here! I hope you have a chance to try some fun combinations!
For more Stitch Play articles and tutorials, you can check out the Stitch Play Index here on Needle ‘n Thread. You can also find some printable versions of more complex stitches in my Stitch Play Printables, available in my shop.
Mary, This is combination of simple stitches create a beautiful stitch. At first it looks like complicated braid, but it is not. Great thank you for sharing Stitch Play secrets.
I love the look of this stitch, can’t wait to try it. Thanks, Mary!
Thank you for sharing this stitch and all the others that you have demonstrated! You always get me thinking of how I can use them in my own work. Thanks for the inspiration.
Il really love this stitch combination ! Thanks a lot for this wonderful idea.
so beautiful creation,i will do.
Thank you for all of your helpful tutorials! I have several
Stitch books, but you have a way of showing us
not to be itimidated!! I will look to you for inspirations
with some new projects I am wanting to start!!
I have just started on the Home Sweet Home Workbox, and I MUST have the needlebook immediately, so that is what I am making first! This stitch is used on the peapod and the lacing is with a metallic thread. My chains are having a grand time flipping and flopping in every direction possible while I work the gold through the loops. Would it be “okay” to couch the chain stitch before lacing it (with a clear thread) and then couch it with the required color after the lacing is completed? I hope that I am asking in the correct spot on the site, and truly appreciate your advice. You and I stitch together all the time, you’re just not aware of how much time you spend here virtually. 😉
Also, is there a place that you know of that is a good reference/resource for tips from others who have tackled this mountain of a project?
Thank you again,
Sam
Hi, Sam – I’m thinking that, if your chain stitches are flopping about, you might be making them a bit too large? The problem with couching them down on the sides is that you’ll prohibit yourself from being about to lace them easily, I think. Could be wrong, depending on where you couch them…. Some folks were discussing the project on the ask & share here on NNT, but that section of the site is very quiet these days. It’s getting ready to be replaced, anyway, so starting up there again probably wouldn’t be the best idea. Once the new community section opens up, you could always start a group there, but I don’t have a fixed date on that yet.
Thank you for this tutorial! I added a few more layers of loops to make it wider for a cat’s tail.
The instructions are clear and love the stitches. Find gold embroidery difficult will try try again. Kenlynn