


My friends, my friends! Let’s talk about design transfer again today, shall we? It’s a wide-reaching subject in the world of embroidery, because eventually, we all have to do it if we ever want to embroider a design that isn’t in a pre-printed kit.
Today, I may shake you up a bit. I might even make some of you a little miffed. That’s not my intention! My intention is to caution you, to perhaps save you some heartaches, some time, some money. As my mom was wont to say, “I’m saying it because I love you” – preceding, of course, something I didn’t want to hear!
Transferring embroidery designs with pens made out of chemical inks that profess to disappear or reappear is generally a bad idea. Whether you are working on an embroidery project that costs you very little in the way of investment – say, a flour sack towel worked in cotton floss – or one that requires a considerable investment – something worked on a more expensive linen, using more expensive threads – there is nothing worse than doing all the work on the project, only to find that you made a bad choice in the method of design transfer.
That bad choice may not become immediately apparent, when using chemical inks that have disappearing and reappearing properties.
At first, these types of pens appear to work. They disappear.
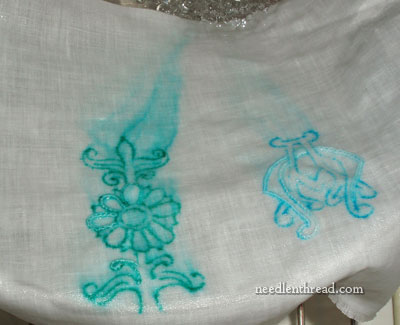
But what do they leave behind? They don’t just go away as if they were never there! They leave behind a residue, and that’s what you have to be worried about. These residues yellow with age, brown with age, or just reappear with age.
Additionally, you don’t necessarily know how chemical residues will affect, over time, the fabric and the threads that you use. Different types of chemicals can hasten decay. They can weaken fabric and threads.
Over time, stitchers have become more aware of the instability of the notorious water-soluble, air-soluble, and erasable blue transfer pens on the market. We’ve probably all heard horror stories about reappearing blue lines, if we haven’t experienced them ourselves. I’ve experienced them. I’ve seen blue lines re-appear after giving something as a gift! I’ve seen yellow-brown “shadows” appear over time. These incidents are not pleasant, after spending many hours of stitching a design.
If you are serious about your embroidery and have been stitching for a long time, I’m guessing you already know this and I’m not telling you anything new.
If you are a beginner, and you’re excited about the fun and funky and colorful embroidery peppering the internet and you want to try it, and you see that some stitchers out there use the blue pens – keep in mind that you’re seeing fresh photos after the finish. You aren’t seeing the effects of time on the fabric, threads, and markings.
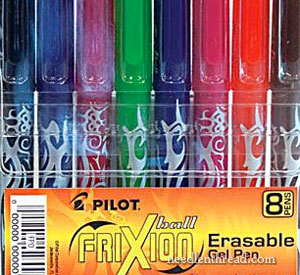
And that brings me to the subject of Frixion gel pens, which “erase” with heat. Over the past couple years, many people have recommended these pens for use on fabric.
You might wish to read this article on My Three Sons about Frixion pens. Angela played around with the pens, to see how they work on fabric, and she documented it very nicely.
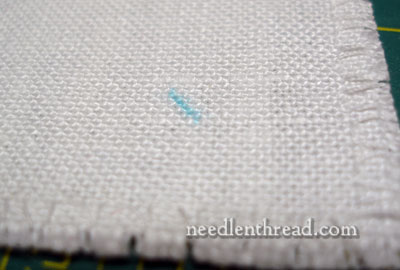
Remember that, although the marks from these pens disappear when you iron the fabric, this does not mean the actual chemical in the gel ink is gone. Under certain conditions, the marks return. It’s true that we don’t normally freeze our embroidery, but if the marks return under certain conditions, it means the chemical is still there, working on your fabric and threads. Even when the fabric is washed, “ghost” lines remain and the lines still reappear in the freezer, so we know that some residue remains even after washing. What will this residue do over time? How will the ink affect your fabric and threads? Will it show up again? Will it turn a yellow-brown over time?
Is it worth the risk of your embroidery to use these types of pens, when there are other tried and true methods of transfer that have withstood the test of time? I would say no.
I realize I can’t twist your arms on this – you might be a loyal fan of these types of pens. Perhaps they have worked well for you and you’ve had good experiences. That’s great!
But for those of you who haven’t made up your minds about transfer pens, I encourage you to proceed with caution! This is something I wish someone had told me, years ago.
So there it is, for what it’s worth…
What’s your take? Feel free to leave your comments below!
I read Angela’s post, then I began wondering… It seems most of the experiments I’ve seen are about temperature, and washing in cold water. Perhaps the pen’s solvents are alcohol based, or need another solvent like the sticker goo removers? Or what about hot wash? Detergents? I know some of these might wreak havoc with a finished project though.
Exactly! Would you really want to wash an embroidery project that you just spent hours and hours and hours on, with goo-gone or a harsh detergent? Probably not!
I’ve noticed that you always use a permanent ink pen, Sakura, or a Pigma pen (correct me if I’m wrong) but that has always scared me to death. I guess I just have to be really careful to cover those lines…? Is that the deal? The ink in these pens, they won’t do any harm to the fabric, in the long run?
I, too, have had the Blue Line Return. On a garment I made, and wore to church. I looked down and noticed it and was horrified. Made a beeline to the bathroom, where I hit it with water again, but then, what’s worse? Blue lines all over me, or looking like I’d just gone thru the car wash? sigh….
Hi, Karen –
That’s right, I do often use the Sakura micron pens, but only on pieces that I’m certain the lines will be completely covered, and on pieces that aren’t to be washed (goldwork and the like). You have to have a steady hand!
For whitework, a blue pencil with a very fine line is a good choice, because blue washes “into” white, and makes it appear brighter. I believe Yvette uses a hard lead regular pencil with a fine line. If the lead is not soft, the threads don’t usually pick up residue, and if they pick up a slight residue, even, it usually washes out.
MC
Thank you, Mary, for such an informative article. I’ve just recently bought a selection of transfer pens and pencils to experiment with. I’m trying to find something suitable for whitework (I really want to attempt some of Yvette Stanton’s Portuguese Whitework designs) but I think I might be giving the disappearing ink pen a miss after reading your post today. It is tricky finding a pencil that won’t transfer dust onto white threads, but I think that is probably easier to deal with than chemical marks that return to haunt you when you least expect it. Very grateful for the warning.
Have a nice day.
Kathryn
Hi, Kathryn – experimenting is always a good idea! I’ve wanted to write up experiments for every type of transfer out there, and maybe some day, I will. It just takes some doing, you know! And judging them over time is the key, I think. Good luck! MC
I myself used one of the blue disappearing ink pens to transfer a design onto batik. When I used water to make the ink disappear it mearly moved it elsewhere on the fabric. I kept wetting it to get rid of it but it would reappear elswhere as a line. I did not have time to start over and luckily the batik was blue so the line did not appear too out of place. I will rethink using it again.
I totally agree, Mary. I have seen the same sad results with quilting, so am pretty much sworn off these “magic” tools. I used to use them for fashion sewing, when they were the new hot thing, but the same disasters can happen there. Nothing like bright blue dots peeking out of the ends of your buttonholes.
Thank you so much for your warning. Altjough I am new to this world , it’s good to have your shared experience.
What would you recommend?
Grateful,
Marisa
Hi Mary, Great subject. It’s hard to know what to use for marking. I don’t use the blue pens. I’ve had lines come back later as you mentioned. I now use only the pigma pen and iron to set it before stitching. Do you know if these pens pose similar a problem later? What marking do you use?
I used one of the check writing pens that are suppose to stop check fraud on water soluable stabalizer to transfer a design. I embroidered my design then I rinsed off the stabalizer and the ink ran and turned my white floss a very light shade of gray it did not seem to change the other colors or the fabric. It did not ruin the project but not exactly the look I was going for.
Preach it sister! I used one of these pens once and it left a big blue blob on my embroidery. Fortunately it was just a napkin. After that I just used the blue pen to mark the fabric I was going to cut off when finishing pieces.
I find transferring designs into a project and setting up to be the most challenging part of embroidery. I use the prick and pounce method since I work with crewel embroidery. Wool and twill are very forgiving and you can wash them, but I don’t think prick and pounce would work for fine white linen and silk threads. I haven’t tried it yet. I am thinking of getting a light table and try that.
Well, I have to say that I completely disagree with this regarding wash-out markers made for fabric. I have been using them for years without ANY problem. They key is SOAP and water. The ink needs to be removed, not just wetted with water and the only way to do that is with a mild soap. I don’t expect coffee or tea to come out of my linens without soap either! Frankly, if these pens were damaging or as bad as you say, the manufacturers would have discontinued them long ago – or would have been slapped with legal action by now. They are available because they do work well for most embroidery projects. However, with ANY marking method, common sense should prevail, and fiber content needs to be a consideration. My 2 cents…
Do you have any ideas which fabrics should not be used with this type of transfer pen? I was wondering if fabric content would make a difference: say cotton vs. any synthetic blends.
I agree Carmencita. I often use a light box and those pens on quicker (as in less than a month) projects only, because I notice that the lines have a habit of disappearing before I am finished, let alone even get a chance to wash them. And, in my experience the lines do indeed disappear after washing. Yes, I do wash (as in washing machine) every project, and most of my projects are several months long I have one (a shawl) that I am just finishing that I started last year at this time that I will be washing later in the week, I also have a hand embroidered quilt that I have been working on for three years, that is not yet finished. This is the only time most of my projects get washed, I do not usually do clothes or anything. Maybe I am strange in the washing thing, but I usually roll it up and stuff it in a sock. Then I use a hair tie to fasten the sock (keep the project from escaping) and put it in a lingerie bag in the “delicates” cycle. Then I take it out and (while still damp) stretch and dry it. My budget only allows DMC or Anchor cotton, and I only put it on cotton or linen, that makes me believe (Irene :-)) that natural fibers respond better, but I usually put a 1 inch by 1 inch square of fabric, marked up, in the machine before I start to guarantee that it will sufficiently disappear from that fabric. A second reason I do not worry too much is because in most cases, the lines are mostly covered, so it is not all that annoying to me.
Hi Mary,
Thank you for addressing this subject. I am an embroiderer who loves to sew and stitch on little things, Christening Gowns and wee clothes. My love is Whitework. Over the years, after some horrifying results, I use only a #2 mechanical pencil(Bic is good). The trick to using a pencil is to spray starch and iron the fabric before using the #2 soft lead. Yes, it does disappear at times, but usually I am so far into the project that I don’t even have to redraw the lines. Using the starch method first, I have never had dark underlines in my whitework.
Thanks, Mary, for all your wonderful information. I look forward to every post.
Barbara
Thanks for the tip, Barbara!!
I am wanting to do something quite complex over a couched background and like your tissue paper suggestion on a previous page.
Bought 3 Frixion pens this week, and will throw them away–thanks for warning tip, MC! How about using Sakura archival pens–same (“chemical”) warning here? Tried using Haney prick-n-pounce kit–provides a light powder blue (barely visible) chalk, which I then “traced” around, using both water color .01 brush (could not get watercolor consistency smooth enough to paint a thin straight line) AND the archival pen (.05), which shows up great… Thanks, Mary!
I have had the blue, washout pens re-appear on a quilt.
I have two problems with permanent marking.
1. I am very new at this and often change my mind about which stitch I’m going to do or exactly what I want to do as I go along. Permanent marks can be a problem if, for example, I draw in guide lines for satin stitching or long and short stitch and then decide to use some kind of open filling stitch instead.
2. I’m not so good at covering the ink lines. I have a photo that I could show you if I knew how to get it in here. I used a variety of stitches on a floral design and the ink shows quite a bit. I’m sure that eventually I’ll get better at things like long and short stitch and satin stitch so that this won’t be a problem. But it is a problem now. And on one flower I used buttonhole stitch. Here the ink line shows through because the thread simply doesn’t cover it. Even a whipped stem stitch line shows some ink. I used a blue micron 05 (.45 mm line width) pen on Legacy’s 25 count Round Yard linen. Threads were DMC floche and Danish Flower thread.
On my hand quilting I mostly used pencil and after a few washings the marking faded away. But embroidery doesn’t get washed as often as a quilt that is used every day.
Hi, Ann – I don’t personally like the colored micron pens on fabric. The only ones I use are sepia and black. The key with the micron pens is to use the finest tipped ones available – they come in different sizes, and the heavier ones make a significantly heavier line. As with any pen, test first! By testing, I mean actually drawing the line on fabric and stitching over it, washing it if you plan to wash your project – do everything that you plan to do with your project with your test sample.
As for the blue micron pens, I had a student who used blue once, and it ran. So, test, test, test! Takes time, but it saves heartache and time in the long run!
MC
Good article to remind people that these marking tools are chemicals. I have always shied away from them and use a #5 mechanical pencil (not #2). One can erase the lines or use a mixture of alcohol and water with a toothbrush. The lines will be gone and not into the material or batting. Most of the times I embroider over the lines and they will not show unless the threads disintegrate. Chalk works well also and like the Roxanne chalk pencils. Linda in NM
A few weeks ago, you taught a method of transfer using a #5 art pencil. I tried it. It is such a great idea, that it is all I use. I love it, especially for things like the seasonal set of flour sack towels I am working on. I think it will be the best method for the tree pattern you sent a few days ago.
Sandy took out my power for three days, and I spent the time in our club house. I took my embroidery with me, and it was a real comfort to have something in my hands. I am a novice at it, and I am grateful for the things I have learned from you.
Thank you,
Marny
I’m going to toss them! I’m going through my drawers right now, as these blue disappearing ink pens are even recommended for use in transferring quilting designs to one’s completed quilt top!!!!
Give that a few moments to sink in….
Thanks, Mary!
I wouldn’t necessarily toss them, Lynn – they may come in handy for other things. Test them first, of course!
Soon I will start a large project. And I have been trying to decide how exactly should I transfer the pattern. Thank goodness you talked today about these pens, I could have made a grave mistake. Now will try to decide if I use a pencil or chalk. Testing is a must, and really happy that you have provided much needed information prior to me destroying an expensive piece of material.
Mary, from you, I would take any advice you give me. I have been using a mechanical pencil (Pentech) for tracing very small modern designs from Aneela Hoey’s book – “Little Stitches”. I have never used a pencil – and I have never asked about it – so now is the time. What about #2 lead – how does that work out – and is it okay to use the eraser on it? Maybe it sounds silly – but I usually use my quilting supplies – which does include (chemicals) – Thanks – Blessings to you!
Adding my two cents. I have a small light box (about $30.) I have used it lots in my illustrations, transferring the pattern (on paper) to watercolor paper. I have found that it works quite well on fabric. I just use a pencil to trace the lines in. Using a light stroke, just enough to show. Erasures can be made to some degree, but make sure your eraser is clean. The thread completely covers the mark on the fabric. I find it best to make the room dark so the line shows through the best. Oh, and you tape the pattern onto the back of the fabric so it doesn’t move.
And another thing. If you are going to manipulate the fabric a lot the pencil line may get too light. So you might use a micron pen to go over it or just go over the line again with pencil. Best to use a light pencil so it doesn’t rub. I have not had a problem with this.
Thanks, Brigid – that helps. I have some micron pens – never thought about them! I have different colors – I could use them according to my colors. Wow – you can’t imagine how helpful your comment is. Never thought to tape my pattern to my fabric either.
I guess I better start thinking more – or just wait for some wonderful comment.
Blessings to you – Brigid.
Hi Jane, good to hear from you, and blessings back! I am very happy that you benefited from these posts.
The pen I use is Staedtler, 01, “Drawing and Writing”. It is permanent (and btw doesn’t smear) but this size, 01 is so small, in most cases, it shouldn’t show. I sew mostly with DMC, 2 strands. I got it, and there are bigger sizes, at our local art supply.
hugs!
Dear Mary
Thanks so much for your indepth articles in the last couple of days. I just read Angela’s article and I probably won’t be using chemical ink pens. I use mainly Micron Pigma pens and have no problems with these, but I think I will give pencils a go when I start whitework. How is the mesh transfer going or have you decided against it, that;s a big project you are stitching can’t wait to see how you progress with it.
Regards Anita Simmance
Good morning, Mary. I sew couture and do hand embroidery. After many years of trying every new marking product that has been introduced, I only use these methods of marking and transfer: thread, fine pencil and Clover Chaco markers. Anything else WILL come back and bite you right in the backside!
Do NOT toss your marking pens and pencils. What works for one embroidrer may not work for another, but you won’t know until you TEST it. Test the marking method before you mark a project. This article is based on TESTING and OPINION. Yes, Mary is very leared and an excellent resource, as are many others, but it is not gospel, for goodness sake!
Ditto.
🙂
Another item, since our tap waters contain different things (even if they are not put there by the water company) the pens may respond differently to water in different areas differently. For example, the water here, contains flouride, maybe the pens “like” flouridated water better than other types. They could respond differently to hard water or anything else, so (like anything else) test the pens, and see how they work for you. That way you won’t be limiting your options for no reason.
So what transfer method do you use/recommend. I am new at transfering and I am getting ready to do my first redwork project, using coloring pages. Need expert advice…Thank you
For redwork, I’d just trace it with a pencil – an HB mechanical pencil works fine!
Thank you Mary. My blue and purple pens have just gone into the garbage.
I totally agree. As a professional embroidery artist, I never use these pens. I have in the past and they do reappear as you say. An HB technical pencil is my tool of choice for transferring on light colored fabrics. For dark fabrics, I use the old type of waxed carbon with a tracing of my design.
I am new to transferring designs but in the last while I have done a number of them and I don’t use pens. There is a product out there put out by Sulky – not sure you all know about it but the company does all kinds of sewing including machine embroidery and also has all kinds of stabilizers,etc. One product that is recommended by some hand embroiderers as well, is called Sticky Fabri-Solvy made by Sulky. Basically you photocopy or even take the paper design you have and print it onto a sheet of Sticky fabri-solvy, take off the backing and stick it onto your fabric (scary I know). You then embroider thru this product and after you’re all done you hand wash the fabric and bingo the product is gone and you’re left with a wonderful design with no mess of ink left behind. Check it out on the Sulky website or go to Bird Brain Designs who do a lot of hand embroidery and see their comments on it. They use it a lot. I love this product and have been successfully getting back into hand embroidery because of it.
THANK YOU! I hope this is read by many, many people. My friends and I have been quilting for 30+ years and we have NEVER resorted to anything other than a pencil or a pencil crayon (coloured pencils) to mark our quilting. Yes, the chemicals in the pens leave a residue and one never knows what they do to the fabric over time. I would hate to see someone’s heirloom appliqued quilt come apart where it was hand quilted because the maker used one of those pens.
I use either a regular #2 pencil, or colored pencils to transfer my design. They both wash out in the regular wash cycle. I have a light box that I use. So far, I haven’t had any boo boos, but time will tell.
Hi! I appreciate your advice… wish I had found this website before I started a big project! (and I am a newbie to this craft) I used a red iron on transfer pencil – and it (1) turned my white cloth pink – and after many washings the lettering is still there (bright pink and will shadow anything I put there) …
so I read here about the solvy – water soluble fabric stabilizer – got some – and draw my designs on that and pin it to the cloth. I am experimenting with lightly misting it – so far, it does wash out – and while it does stiffen the cloth – some of my flosses were like shredded by it.. so not misting it right now – also using your idea about quickly stitching the design on over the stabilizer using just a running stitch, because the stabilizer does obviously start falling apart the more needle pricks it has in it.
But anyway, my two cents is to draw on something that you can pull off or disolve – and not actually draw on the fabric – but I do sometimes use just plain colored pencils – lightly – which appears to come out – but I do try to use a color pencil close to the color of thread so that it isnt really visible if it doesnt completely wash out. l have a pink disappearing pen but on one test fabric it did not totally disappear so I did not use it.
sorry for rambling… hoping I may help some newby! I love this site and have been watching your video’s and learning alot of new stitching!
~ Gina
I total agree with you regarding both the blue pens and erasable pens….they are a hazard waiting to happen. I have always been told when working with any textile use natural products to transfer or mark…nothing with any chemical. I was told this by a textile conserveter with Henry Ford Museum. Also this was reitterated by textile conservetors with Winthur Museum and Colonial Williamsburg. In other words it is NOT worth the chance of damaging your work.
I appreciate everthing you are doing to educate and help people to enjoy the needle arts. Keep up the good work!
What do you recomment to use? This will be my first project.
Thank you,
Bernice
I tried the blue pen you show and was working on a white linen piece
For church. The test piece did fine. But when I ran low in the pen with the ink
The product turned yellow! No amount of washing will remove it from an Altar cloth I was working on. It will always show a faint stain..
I have used the Frixion pens and have not had any bad results with embroidery. However, when used on some solid fabrics to mark quilting lines and pressed gently afterward, I did notice a light line as if the pens’ ink lifted the color.
What do you recommend for transfering embroidery designs?
G’day Mary,
Many thanks for this very necessary caution and helpful replies.
Cheers, Kath
Mary, this is one case where I simply do not agree with you. I’ve been using the blue wash-out pens for nearly 30 years and have never ever had a problem with them. I do know other people who have, so I know it can happen. Several of my teachers from the Smocking Arts Guild also have been using them for decades, and have never had a problem with them; they use them a LOT, so you’d think they’d have had a problem if anyone would!
Always test the pen on the fabric you’ll be using before going ahead, especially if it’s a new pen (not a new brand, just a new pen. If the manufacturer has changed the formula since your last purchase, your results may change.) Sizings and finishes can “grab” the ink as well, especially on silk or silk blends.
The final trick is to make sure you rinse the finished item well. Soak it in PLAIN COLD WATER. no soap, no bleach, no nothin’. Just water. Swish it around a bit, then rinse again in new water. Launder as usual, preferably with a laundry soap that does NOT contain sodium carbonate, which is a dye fixer. Just spritzing will make the blue mark disappear for a bit so you can get an idea of what your design will look like, but it does not remove the ink, so it would be quite likely to reappear when dry.
I feel you are doing a disservice to readers by issuing a blanket statement to avoid these pens. As with any other tool, they must be used properly in order to work properly. (I feel like a heretic suggesting you might have done something incorrectly!) I would love to have a go at your bad sample up there to see if I could get those wash-away marks out for you, just for my own curiosity. I’ve not played with the teal frixxion pens, so have no experience with or opinion on them as yet.
Kathy, I agree. I do not even rinse it. I just stick it in the delicates cycle (already posted) and it has always come out just fine for me. I have never tried any of the frixxion pens, because the wash out ones have always worked for me.
Transferring a design has always been such a challenge for me. I have tried the new Frixion pens, and for now they are the way I will go. I hope that I won’t be disappointed some time. They are soon easy to use.
Thank you for this! I don’t generally use the pens because I find it hard to see the design, but I never actually thought about chemical residue. So you have taught me something new today 🙂
Thanks Mum
I have just started a correspondence course with the NSW Embroiderers Guild and for transferring the design for crewel work trace the design onto tissue paper and then tack through the design onto your fabric. Dampen the tissue and carefully tear away.These are the instructions from Effie Mitrofanis whose work is stunning.Thanks a million for all your considered research
…And don’t ever bring a blue pen tracing near heat. Not even sunlight. It turns brown and nothing will get rid of it.
Thank you Mary for raising this subject. Even if we think we “know it all” we do need reminding from time to time. In my experience and with advice from my conservator friends….
DESIGN TRANSFER – For the past 20+ years I have, for a “one off” design, I always used a pencil, just as professional embroiderers did in the past in the UK, circa 1700. They had noticed that some of the inks damaged the ground fabric. Use HB pencil kept very sharp, slant the pencil and use a light touch! The pencil will still be there in 300 years. (I use a light box).
With repeat designs for a workshop or kit, go to a professional specialist screen printer and ask them for a permanent print which will not damage the fabric.
COLOUR RUN DISASTER – For those of you who have a colour run disaster as pictured by Mary and mentioned below, then keep the fabric soaking wet and keep soaking and gently running the water through the sink until at least 10 minutes after the water is totally clear. Wet the WHOLE article or you will create a water line. Colour run is excess colour, so do this if you have washed any embroidery where the colour is running. I have removed black coffee with water only this way. Please advise anyone out there NEVER to wash old embroidery or anything with metal thread.
My 2 penny worth. I hope this helps someone!
Phillipa Turnbull, England
I totally agree with the contents of your article. Another way to transfer embroidery patterns is by using disposible fabric and stitching through it, it works well BUT BEWARE of the pens you use, if it is permanent ink it works well but if not when you soak your finished embroidery in cold water your ink will run in to your fabricI did this to my cost having spent hours and hours working a kingfisher the whole design now has a feint blue haze all around the edges of the stitching.
Whenever the topic of disappearing ink pens has come up in the quilting classes I’ve taken over the years someone has had a personal horror story, so I’ve always passed on using them.
The technology is constantly being tweaked, so the products are always new. Simply put, they haven’t passed the tests of time, and I don’t want my projects to be the “lab rats.”
PC
Hello Mary:
Thanx for this information, I am a beginner and appreciate all the help I can get and as you say this info saves me a lot of heart break.
Ann
I guess I think that everything has its place. I’ve used the blue disappearing pen and have had one or two small incidents where the ink didn’t quite rinse out — usually because I ironed on it, which is a no-no. I reserve it more for sewing projects than embroidery. (Frankly, it takes me so long to finish something that I find it kind of fades after a while and its not always as accurate as I’d like.) I generally embroider small projects on some sort of cotton and I find that a few layers of starch and then plain old pencil works just fine. Rarely fades or smears. And the starch keeps the pencil from adhering to the cotton. A gentle soak in cold water and poof, its gone, never to return.
I am reminded of the Navajo weavers of fine rugs and blankets. They always intentionally make a mistake in each of their creations. They believe it creates an opening for the Great Spirit to flow through…
I like this thought. I seem to make a mistake in everything I stitch but I tend to work around it as long as it won’t show. Now instead of thinking that I’m “lazy” I can recite this story. 🙂
Hi Mary,
Generally I love your columns but am a bit disappointed in this one. The trick to using marking pens is to use them correctly. And I stress the word correctly. This means washing them out after use. Not just wetting the fabric, but washing the fabric. I’ve used the blue washout pens for years, marking all over the garment in process and never, but never, have had a problem, because I’ve always washed the fabric thoroughly. If you can’t wash the completed embroidery, then you should use a different marking method. It’s that simple.
What bothers me the most is the subtle notion in both your post and so many of the comments that if we use a chemical, it must be bad. Remember, even water is a chemical, so is graphite (well, actually, an element). But the colored graphite is most definitely colored with chemicals, and it needs to be washed out thoroughly to complete remove all traces of the marks from the embroidery. You often use pens or water color paints with the prick and pounce method of transfer, but remember, these are also chemicals and we don’t know what the long term effects of these techniques are on fabric.
That being said, I do use the air erasable pens on occasion, when I need a temporary mark and I know it will be covered. I’ve never used the Frixion pens and have no desire or need for them.
The unknown in using any marking method that can’t be completely washed out is what will happen in the future. A good chemist or material scientist with a lab can simulate aging techniques (we do it all the time with paints, adhesives, etc), to try to approximate the long term effects of the various pens. But I doubt that anyone has the resources or the incentive to do so. Have the Pigma pens, water color paints and other acid free markers been tested for possible long term effects? I have no idea, and don’t know if they will have a detrimental effect on embroidery that is meant to be kept for a long time.
Mary, thank you for your quick response to my question. As a self taught embroiderer (is this a real word?!) I have enjoyed your site, you have broaden my horizon in needlework. It just tickles me to read responses from around the world! What a following you have! But appears that in your desire to “share” with us information you have gleened from personal experience, or from others who follow you, you have hit a nerve! Ladies, she is not telling us what to do, just passing on information and letting us make the final decision. Those ladies who added their experiences with other methods, I thank you also. We all need to keep in mind the TIME and energy Mary puts into this site FOR US. She could keep this all to herself! So from me (sitting in the middle of the USA) to all you HELLO beautiful women “across the pond” and “downunder” it was a pleasure to read what you all do. Wishing all of you a wonderful and beautiful Holiday Season.
If only I had known…. I have just completed a piece using the blue water-erasable pen, which seemed such a good idea at the time I tried it out first to make sure it would disappear, and it seemed to on that occasion, but maybe it works better when it has just been drawn than after some time. It spreads a little into the fibres of the fabric as the design is drawn, so a little had to be left showing. It keeps coming back. I seem to be washing it from the top fabric to the backing fabric, and back again, and it has spread, just like the photo above. It seems to have gone then comes back in a couple of days. I think I am going to take Cynthia and Philippa Turnbull’s advice, and wash the piece carefully, then put it back on the bar frames to dry, to keep the shape. The purple fade-out pen will follow the blue pen into the bin!
After reading, I wish there were other suggestions on how to transfer patterns for embroidery. I use a blue wash-out pen, and have lines re-appear. What else is there to use?
How do you “remove” your blue lines? Do you just spritz them with a little water from a spray bottle, or dab them with a wet cotton ball? If so, that’s why the line is coming back. The marks have to be well rinsed, even soaked, in clear water in order to completely remove the blue dye.
Mary has several great articles on other means of transferring designs. Check under “categories” in the right hand column.
Kathy, Yes, I agree, many people are unaware that if they are just spritzing or wiping it, they are just moving the ink around, and not removing it which is why the ink appears to be “returning”. It was never removed, so of course it will come back. Then, they may have ironed it after they assumed they removed it, so it possibly becomes permanent and they don’t realize it. I rarely iron projects, damp stretching them works better for me.
I say ditto to Therese from NE’s comments! What a privilege it is to sit out here 30 miles from the Mexican border and read the comments by very experienced embroiderers from all over the world as well as our own Mary!!!! I printed 11 pages already!
Hi Mary:
After reading todays message about transferring patterns I thought I would ask about the transfer pencils I have. They are old and I really don’t know where I got them but one is just named transfer pencil and the other is Eberhard Faber Potent Copying #746 and on the otherside it says “for Hectograph use”. I transfer the pattern to a piece of tissue paper from the original (it has to be a mirror image) and then it is ironed onto the fabric to be embroidered. Does anyone use this? and if so what do you think of this product? I’m am not sure now as to it’s permanence as I have not done enough projects to test it. This is the only process I knew of until reading Mary’s Tips & Tricks.
Thanx
Ann
Wish I had seen this before making a project for my daughter which was quite time-consuming. I thought I was being brilliant designing it on the computer and then printing it out on the fabric. Looked really great until I decided to wash it and the printer color started bleeding all over the place. I was horrified…so much work and time, now ruined. (P.S. gave it to her anyway, lol)
Thank you so much for this information! I’m a relative novice, and had no idea about problems with the blue pens. I won’t be using them in the future.
I’ve been reading all the comments. and would like to add s couple more comments to this thread.
I tried using an iron on transfer pencil – and it did NOT wash out of my cotton fabric, nor my silky blend fabric – however it did wash out of one cloth that was some cotton blend.
So I am guessing the same product acts differently on different fabrics. ALso, I bought one of those pink singer marking pens – and it is supposed to disappear after 48 hours – well, I marked the outer edges of my 2 fabrics to test it – and on one the pink did fade away – and on the other – it did not… it is still there actually.
I always wash my pieces when they are done – on gentle with cold water in the washing machine… never had a problem so far..
FOr transfering designs to my cloth – I tried tracing paper – but it ripped too easily and so did not work for me. I almost always had used tissue paper – but on this project the stitches were ripping and hiding the next place to put the needle – so I was looking for ways of doing it.
I read an article here about solvy.. fabric stabilizier. Well I hustled right over to amazon dot com and bought some generic water soluble fabric stabilizer.. I draw on that – never minding what pen I used.. and well – I did learn that some pens bled into my cloth… but after several washings did fade out.
However, now, I use the same stuff – but, when I am done stitching – I pull off the remaining stabilizer then wash it. And I was very pleased with the results.
I intend to try printing right onto the stabilizer… instead of freehand drawing on it. But, at this time, I am using ultra fine tip sharpies! and the new sharpie fine tip pens. .. because one thing I did find out is with some of the pens I used – they discolored the floss… oh and I am using 3 different kinds – regular cotton floss, single strand cotton floss and very thin and shiny polyester single strand thread – and I do only hand embroidery.
The only real problem I am having is (1) the stabilizer gets brittle after being pinned to my fabric for a few days, and tends to almost crack… and
(2) as I sew thru the stabilizer – it puts holes obviously – but – it does start to be that the stabilizier starts to come apart – and then I dont have a pattern to sew over anymore!! So I read Mary’s article and it talked about doing a quick running stitch over the lines in my design. That did save the day!
I used a red iron on transfer pencil – aunt marths’s… and I would say that is one never ever to use again, it turned my cloth pink and ruined the cloth and still now after many many washings still is there bold as ever.
And I also learned to be careful of pens on the stabilizier because some of them rub off on the floss… but I am having good luck with the sharpies on the stabilizer at this time…
This reminds me of a story my friend told me. She had been busy sewing at her kitchen table and had to step out for a while. Her husband was home when the doorbell rang. Girl Scout cookies were in. He picked up her disappearing ink pen to write out the check. Needless to say the Girl Scout came back after a day or two!
Thank you so much for this. I gave up using the transfer pens for a very practical reason of money. As an historian and archivist in training, I decided to use regular pencils. They have served me and my redwork well these last 10 years.
Thanks for brining up the topic of blue pens.
Personally I have never liked the blue pens. Not only because I don’t trust them but also because I don’t find they live fine and clean crisp enough lines. My favorites are the good old fine pencil and lately I have taken to using a super fine (0.01) acid free pigma pen for projects that will take a long time to stitch. I love it. The lines are really, really fine but what I like the most is that they don’t bleed or smudge. How the ink in these pens will react over time, who knows, but being on archival pen I can’t imagine it will do too much damage.
I will also use a variation of prick and pounce. The Danish version of this method uses a permanent ink instead of pounce so there is no painting afterwards and no pounce dust. Instead you end of with all lines marked a beautiful fine dotted lines.
Mary, although I gave up using the air- and water-soluble pens years ago, I agree with you and with Angela.
Personally I won’t use pens because nothing I embroider will ever be laundered. I make crazy quilting and 3-dimensional textile objects, none of which can be ‘washed, rubbed, soaped’ or otherwise laundered. So I most definitely do not want marks of any kind left behind on my work. Even my ceramic pencil is problematic if I don’t cover every single bit of it. For my purposes the best transfer method is to draw the design on paper, then stitch through that onto the fabric, then tear the paper away (carefully) and embroider. If any of the design thread is visible after it is relatively easy to snip away. I haven’t yet tried pouncing – it seems a lot of work for an itty-bitty design, but if I were ever to attempt a larger piece that would be one of the options.
Hi Mary, thanks for your insights, I do prefer tailor’s chalk, or pencil (!) but occasionally I do use the blue pen if its not going to show anywhere on the fabric. I have yet to find a supply to do the prick and pounce method.
Kind regards
Ingrid
Frixion pens have changed their marketing strategy now that the ink is reappearing: “send a secret message” so that you can write an invisible note to a grandchild and they can get the message over time or by freezing the quilt.
Remember if you are sending quilting or embroidery by airplane the luggage department is quite cold and can trigger the return of the frixion ink.
Just another thing to keep in mind.
I have used the micron permanent pens but usually use Roxanne’s quilters choice silver pencils. They are chalk pencils, water soluble and no chemicals. I have always had good luck with them though sometimes bits have to be remarked. Never had problems with them and they wash out easier than and regular pencil lead.
What kind of time frame have you seen for the “disappearing” ink to reappear? I’ve used blue Dritz Mark-B-Gone fine point pens for about 8 years & haven’t had a problem yet. I’ve washed projects in dish soap, but since I learned about Orvus (from you — thanks!)I use that.
I would like Sulky if they made finer lines; has anyone ever written the Sulky Mfr to request better quality. It would be worth $20/pen if they could produce a finer product. Also, what did they use pre-’50’s when they used to sell linens with the washable ink already on the fabric… If we could discover what was used back then, maybe we could market it… and become millionaires.
I have just unfortunately experienced the unthinkable. I have just quilted a double bed quilt using a V-Clear Erasable Pen and am now left with brown marks all over the quilt. In some areas the ink disappeared and in others I have a definite brown line. I will NEVER EVER use these pens again. If anyone has an idea as to how I can remove them please let me know.
I use the clover wash out pens to grid my cross stich, never had a problem with getting them out or seeing them reappear. one project I had drawn out all my grid lines only to find I had misscounted, so I washed it out and did it again. 3 years into stitching it and the origional lines show no sign of reappearing in blue, yellow or any other color. I dont just dampen it, or rince it, I wash it in mild laundry soap and cold water.
I am now quite frightened. I took a whitework class last weekend and the instructor had a Singer disappearing ink pen (purple or pink, not sure which I used). And she had us use it to draw a guide line that will not be covered by stitches. She uses this pen all the time and said she washes with mild soap and water. She was trained at RSN so credentials are credible. I’ve not finished the project yet, but I have a very dark pinkish line on my whitework. I hope I can remove it and it doesn’t ruin my project. Wish me luck, or send advice. Thanks.
Hello. I am having difficulty in transferring an embroidery pattern onto wedding satin. I have been asked to make a Rings Pillow for a wedding. I have tried the special red pencil for use on tracing paper and then tried to transfer the pattern by ironing the pattern which is on the tracing paper, onto the material but it doesn’t work.
Any ideas please.
Hi, Elizabeth – Prick and pounce, and then tracing the lines in with a chalk dressmakers pencil might work best, or, if you can see through the silk, tracing it directly with a dressmakers chalk pencil might work. I think it’s easier to transfer onto slippery fabrics like silk by first mounting the fabric on a frame (and, if you need to, the backing fabric – it’s often good to back lighter silks with a fine cotton or fine linen for extra stability), and using prick and pounce. You can find a tutorial for that method here: https://needlenthread.wpengine.com/2011/05/prick-pounce-embroidery-design-transfer.html When the fabric is already tight on the frame, it’s much easier to get a good transfer. But if you’re going to trace, look for the light gray dressmaker’s chalk pencils. They work pretty well on satin. And make sure you’re using the shiny side of the fabric. The dull side has looser threads, and your pencil or whatever you’re using can catch in those threads…..
I thought about trying out the disappearing ink pen for my cross stitching patterns, but now I think I’ll pass. But now I’ve something else to worry about. I never thought that chemicals could make my finished patterns decay over time. My preferred tool for transferring designs has always been a black pen and my pack of washable crayola markers. After reading this though, I’m worried that the markers I’ve been using for years may chemicals that cause my patterns to decay. Does anyone know for certain if crayola markers will do this to fabrics?
Ball point pens work ok. They are waterproof. Only drawback that I know of is that they are not terribly fine, but maybe you can find one that is. Before you use one, I would test it first for waterproof-ness.
I use those blue pens, but only the Clover one. I have had my lines show up once more if I just rinise out with water, but if I use Ivory soap they are gone for good. And by washing with soap, I mean wetting my fabric and rubbing that bar of soap on it, then I gently swish it in the water and let it sit for 15 min. and rinse. All the chemicals come out. When I iron it I dont get those yellow lines people talk about and over time there is no yellowing ether.
I am a cross stitcher who likes to grid my fabric before starting a project. On the recommendation of a friend, I purchased the V-Clear water erasable pen in blue to mark the grid. I used it on one project (a gift, I’m afraid)and it worked beautifully. The lines disappeared like magic when I washed the piece. I haven’t heard if the lines reappeared or not. So I used it on another project. Unfortunately, I left the fabric for quite a time before picking it up and finishing the project. The blue lines were yellow by then, but I didn’t worry given my earlier experience. When I went to wash the finished piece, I got a very rude shock. The yellow lines were still there. Washing in detergent as I usually do with a finished piece didn’t touch them. Given the piece is ruined by these lines, I plan on trying other treatment. Don’t know what it will do to my work, but I can’t use it as it is. Both pieces of fabric were Aida.
I am looking for iron on paper transfer
Help. I used Aunt Martha’s transfer pencils (red) to transfer quilt stitching lines on to a quilt that I was hand quilting and now I cannot get them to come out. I have NEVER had this problem before. I have used almost everything that I can think of to try to take them out. Can you give me any suggestions? This quilt is for a customer.
Hi Judy,
My heart goes out to you. I’ll offer to you a little of my experience since no one has as yet. I am not familiar with the specific pencils you mentioned. However, I have found that usually no one solution or method will work. The safest I have found is a product called Sodium Perborate. It removes old stains on lace and linens very well. Leaves them bright and not at all damaging. I buy it in bulk over the internet. I have used this on old Christening gowns It can be found in quilt stores under cute little names and the cost is extravagant when you are paying for the name and not the simple safe chemical. It is on the container as how to soak your item. Sometimes it takes three days of soaking and changing the water and adding more powder to get them out.
Also, I had an elderly lady tell me another method that has never failed. Lay the item out on a blanket or towel in the sun, leave overnight, allowing the dew to soak the item, leave the next day also. It really works
Hoping you have already found a method to remove the marks. If not, hoping this helps.
Barbara
So, what are we supposed to use instead? I was hoping your article would address this.
Hi, Mellan – There are lots of options for embroidery design transfer. I mostly use either tracing (using a light box and a mechanical pencil, or, sometimes, a micron pen – depending on what type of project it is). Lately, I’ve had really good success with Sublime Stitching’s fine-tipped iron-on transfer pen. It works really well!
Question topic: Pre printed embroidery kits
Recently, I purchased a pre printed embroidery pattern. When I ironed it on my cotton fabric something odd happened. It left a light impression on the fabric I ironed it to and a dark impression on the protective fabric behind that is protecting my ironing board. Is this normal? Any tips?
Usually, that’s because the light fabric that you’re using has a more open weave, so it’s passing through the weave of the fabric – leaving some on the fabric threads, but leaving a more intense impression on the fabric behind, which probably is a denser fabric. Your best bet, with a lighter fabric that’s got a more open weave is to extend the transfer time several seconds, so that you’ll get a slightly darker impression, but it will never be as dark as it would be on a denser fabric, because there are simply not as many threads in the fabric for the transfer to adhere to.
You didn’t say what the tried and true methods are……. only what you recommend to not do
what is the better way of transferring patterns…. light to dark and dark to light
Thank you
Hi, Nancy – if you look under Tips & Techniques in the menu: https://www.needlenthread.com/tips-techniques – you’ll find a whole section on transferring embroidery designs. Hope that helps!