


Stem Stitch is my favorite hand embroidery stitch, because it is so versatile and so attractive. The poor stem stitch doesn’t get the attention it is due, in my opinion – most folks tend to stitch lines today using backstitch, running stitch, and chain stitch, more than they do with stem stitch. But stem stitch makes a beautiful line stitch! Hopefully, the how-to video here will help you learn or perfect your stem stitch, and maybe you’ll end up loving it, too!
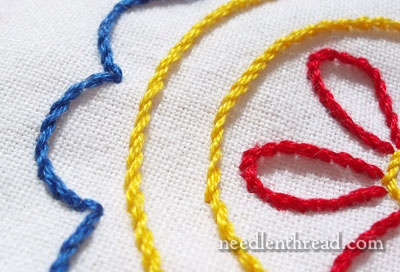
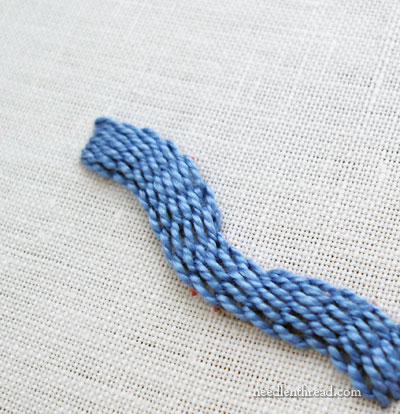
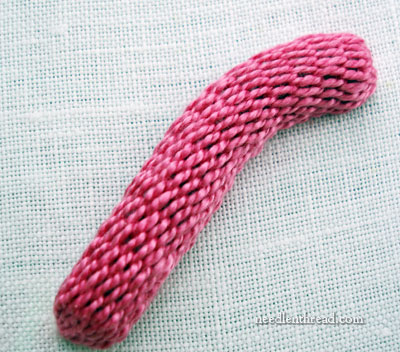
You can see that the stem stitch makes a rope-like line. How heavy the rope is depends upon the thread you use. Stem stitch can be very delicate, and can be used on the most delicate embroidery pieces. Or it can be bold!
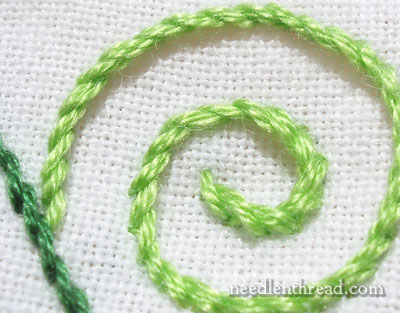
Stem stitch also takes curves really well – so vines, curly-q’s, little circles and so forth are a breeze with stem stitch.
You can also work stem stitch over stitched bars, to create a raised stem stitch band. You can see directions for raised stem stitch here.
Stem Stitch is also used in Casalguidi Embroidery, worked over thick string to create a highly textured, super-raised stem stitch rope. You can find instructions for this Casalguidi embroidery technique here.

And finally, stem stitch can be used to fill an area, by working rows of stem stitch close together. The shading on the leaf above is achieved by switching out different shades of green as the leaf was filled in.
If you want to read about the stem stitch in addition to watching the video tutorial, please check out the Basic Embroidery Stitch Index, where you will find stem stitch under the Line Stitches.
A Note Concerning Threads and Hands
Threads: For the stem stitch to produce the rope-like results in the photos above, if you’re following the method described in the video below (stitching left to right, and keeping the working thread below the needle), the thread you use should be an S-twisted thread. When threads are made, they are either S-twisted or Z-twisted. Cottons – such as DMC, Anchor, and other embroidery flosses, perle cottons, and so forth – are S-twisted threads. Most commonly used silks are S-twisted threads, but some are Z-twisted (for example, Trebizond, Soie de Paris, and The Silk Mill threads are all Z-twisted). Rayon flosses used in Brazilian Embroidery are Z-twisted. So what does this all mean for the stitch itself? It means that, to achieve the nice rope-like look of stem stitch, you would actually stitch with the thread above the needle, when traveling from left to right. But never fear! As complex as this sounds, most commonly used embroidery flosses are S-twisted, so in all likelihood, if you’re a beginner, you’re using an S-twisted thread, and the instructions in the video are exactly what you should follow.
Hands: If you are left-handed, go ahead and watch the video – you will see that if you use the stab method, you can stitch the stem stitch just like a right-handed person does, and if you want to use the sewing method, just follow the directions for stitching the top line on the rectangle in the video (from left to right, with the thread above the needle).
Here’s the video:
Some further tips on stem stitch can be found here:
Joining Stem Stitch in a Circle
Stem Stitch Corners
Raised Stem Stitch Band
Casalguidi Embroidery
Do you want more inspiration & information on hand embroidery?
There are all kinds of reasons to sign up for the Needle ‘n Thread daily newsletter! Check them out and sign up today!
For more video tutorials, please visit my whole collection of How-To Hand Embroider Videos here on Needle ‘n Thread!
If you like what you see on Needle ’n Thread, if you want to be a part of keeping the website thriving (and free of annoying network advertising), why not become a patron on Patreon? Check out my Patreon page here, where I’ll occasionally add special needlework bonuses for patrons.
If you shop on Amazon, you can support Needle ’n Thread without any extra expense to you by visiting my Amazon Recommendations page here, where you’ll find books and sundries for the needleworker available on Amazon.
Mary,
Is there any thing I need to do in order for the sound to work. When I click on video there is no sound.
Please let me know what I need to do so I can get sound.
Also I wanted you to know how wonderful this site is. I’m just learning how to embroider and this site makes it easy.
Thank You so much.
Here are some suggestions for sound:
As long as the volume’s turned up on your computer (check your speakers, check your audio settings), it should work. Try the little volume slider on the front of the video, too. There are a couple videos in the library that don’t have any audio to them, as they are self-explanatory without it. This particular one (stem stitch) does have audio, though – so it should work! Let me know!
MC
This tutorial is great – very clear to see and to understand. I do have one question about stem stitch, however, that I would like to see on video (or from a person sitting beside me): when using the stem stitch to outline, I am puzzled by going around curves. Must you always work in the same direction around, say, a set of leaves or stems? There seems to be a definite “slant” to the pattern and it is obvious if the “slants” of the stem stitch are going up one side and down the other.
Or is that the way it’s supposed to look?
Perhaps this comment needs to be on video!
Thank you very much for this website and for the very welcome Video Library of Stitches! Any explanation you can offer is most appreciated.
Well, maybe this will help: when you’re working from left to right with stem stitch, the working thread should be below the needle. When you’re working from right to left, the working thread should be above the needle.
If you go here
you’ll see the beginning of a sampler. The yellow or gold scrolly things on it are worked in stem stitch. The “slant” of the stitch merely follows the curves. I don’t change the position of the working thread in relation to the needle as I work around the curves.
Hope that’s helpful!
This is the BEST instructional website I have ever found. You are a PRO!
Thank you.
I coudnt see any videos,help me.
Hi,
The best way to work through a video-playing problem on your computer (at least with my videos) is to check the Google Video Help Center. For example, you have to have Flash installed on your computer.
Before going to any lengthy trouble, you might want to check it again – and hit play twice.
Hope that helps!
Love this site. As a beginner stitcher I’ve found the video tutorials so amazingly helpful. Thanks sooooo much!
Hi Mary,
I love how you do your stitches.
But how can I secure the stem stitch?
Will I put it in the back and do the whipped running stitch?
By the way,
I love your site!
Hi, Kristine –
Yep – just take your needle and thread to the back at the end of the line you’re stitching, and then run the thread through the stitches on the back to secure it!
Thanks for your comment!
Best,
MC
Hi,
Just wanted to say Thanks!! The video was a great help.
Lisa
Ps. Your site is Fabulous
Hi Mary,
Just a quick note to let you know how much your video series re: embroidery stitches is appreciated!
You work has inspired me to pick up needle and thread after 20 years away. I’m amazed at how much I’ve forgotten. Seeing your needle and thread in action makes the memories come back quickly. Much more so than in referring to a book.
Thanks
I was sewing some flower stems in backstitch last night but found myself liking the back of my work better than the front. Now I know how to stitch that way on the front! Thanks for helping out a very ignorant beginning embroiderer!
thank you !
Hi Mary can stem stitch be done by the stab method, as I am working on some very close weave at the moment that has not a lot of give in it.
Making it very hard to work in a frame with the normal was of stitching the stem stitch, any help would be great.
Regards Joyce
Hi, Joyce –
Yes, absolutely it can. I use the stab method pretty often, when working in a frame without much give in the fabric. Just leave a bit of a loop as you pull your thread through and use your non-stitching hand to hold the loop out of the way when you re-emerge behind it.
MC
Thank you! I'd been doing this all wrong and wondering why it looked so awful… I'm enjoying my work a lot more now! Your site is invaluable.
Thank you for this video! I looked at three descriptions before coming here and just couldn't figure it out. Excellent site!
dear Madom
Being a learner, this is the best site i'd ever come across.i can simply learn by sitting at home. you are really great.
thank u so much
devi
Dearest Mary
All of your help on the stem stitch is very much appreciated, but could you explain how to go around a corner, like an "L"?
Hi, wildviolet –
Thanks for your comment!
If you check out the series of tutorials on hand embroidered lettering that I'm running right now, you'll find all kinds of tips and tricks on using stem stitch for lettering, including corners, etc.
Here's the index for the lettering tutorials:
Hand Embroidered Lettering
Specifically, for stem stitch, you'll want to look at Lesson 4:
Lesson 4: Stem Stitch
If you're "writing" an L that's shaped like a printed L, the easiest way to do the sharp corner is to end one line and start the other, perpendicular to it, instead of trying to manipulate around the corner.
Hope that helps.
MC
Alright, well that's great, thanks for the help Mary ! 🙂
-Shuruthii
I was wanting to know how to do double stem stitch. I am doing a pillowcase and it calls for a double stem stitch.
jane
I am working on the same project. I contacted the manufacturer- Fairway Needle Crafts. A double stem stitch means make two rows of stem stitch side by side. They apologized for not being clear!
Thank you Carla and Mary! I too am working on the same pillow case with the ruffled dress and couldn’t find directions for a double stem stitch anywhere!
Hi, Jane –
I'm pretty sure that in instructions for pillow cases and surface embroidery projects, when it calls for double stem stitch, they're talking about a double row of stem stitch. I could be wrong, but I'm pretty sure it's the case – they mean two rows of stem stitch, worked right up next to each other.
As far as a stitch called double stem stitch – I've never come across it in any books or anything as an individual stitch, though I have come across double rows of stem stitch.
If they have a picture with your pillow case, check to see that the place where they're asking for that stitch on the picture is perhaps a slightly bolder line. That would answer the question – the bolder line is probably made from two rows of stem stitch.
Hope that helps!
MC
Thank you so much for getting back to me so quickly! I thought that might be the case, it is an outline of a Victorian dress. Again thank you.
jane
MC, I had never picked up a needle until after I retired in 2003. I took a quilting class at JoAnn Fabrics and I am soooo hooked on about every kind of needlework I see. I have been wishing for someone to move next door to me so I could watch how most things are done. I am terrible at understanding instructions. I have moved you next door to me. Yeahhhh! I love the Internet, it is like going to college for me. Something I could never afford before. Thanks for you generosity in sharing you time and expertise with so many people; I love love love you!!!
Thank you! I’ve always done very basic embroidery stitching and this explains things so well. Your site is wonderful.
DO you use yarn or just regular thread?
Mary, thank you so much for making all of these wonderful videos! I”m an intended fabric design major and I have been wanting to learn how to embroider for years. I can’t wait to get stared on my own creations!
Hi Mary,
Your videos are sooo helpful !!! Thanks for sharing them !!!
I’m trying to find on your website: how to start a new thread midway/halfway into a line of stem stitches?
I think I remember seeing this posted somewhere on your site but I’m not able to find it.
Thanks in advance !
Hi, Bambina! I don’t think I’ve actually done a post on starting in the middle of a line of stem stitch. I’ve done chain stitch in the middle of the line. I think I have some photos of stem stitch, so I’ll post that tip eventually. In the meantime, the best way I’ve found is to secure your thread as you normally would (either by making tiny anchoring stitches on the line in front of where you’re going to be stitching so that they are covered by the stem stitches, or by whipping the stitches on the back of the fabric), then you just bring your needle up where your next stitch should start, which would be centered with the last stitch you took, and to nudge the last stitch out of the way – so that it is below the needle – and then start the stem stitching again.
Hope that helps – I’ll try to put a photo tutorial together in the next few days or so.
~MC
Mary, Thank you so much for the explanation!
This has been such a help! ive been doing embroidery for my textile gcse and ive been so stuck on what stitches to do! this has helped so much, thank you! xxx
Hi – I’ve been doing redwork for… oh… lets see… two weeks? 😀
I really am a beginner. This is a great tutorial… I was wondering, is it okay to turn the material around? I find I get completely confused if I am going anyway but left to right!! :-O
G’day there Mary, I am thrilled with this video. Many thanks.
Another question. When stem stitch is used as a filling, is it usual to go in the one direction, ie always start from the same end for each row. Or is it done by going backwards and forwards.
I suppose it really depends on what look one is wanting. I forget which, but one of the ways looks a bit like chain stitch.
It would certainly be a bother to be starting from one end all the time unless 2 separate needles were used, which I’ve never thought of until just now while writting this!
Which of the ways did you do the leaves in the above photo? They’re really beautiful and the shading technique is a winner.
OH, I think it’s just come to me, one needs to keep the thread on the ‘right’ side of the needle, no matter which direction one is working in, (like yourthen the slant will always be the same. When I’m getting a chain stitch look it’s because, effectively, I’m doing say, stem st one way and outline st the other way. Am I right?
Thanks for your patience with all the questions and for creating the atmosphere that makes it easy for us to ask. By the way, what did you say your name is?!
Thanks and Cheers, Kath
Hi,Mary..your tutorials are amazing.I would like to know what is the type of cloth you used in this stem stitch tutorial. Thanks in advance.
Hi, Sampa – the fabric is a 38 count Italian linen, made by Sotema. ~MC
Hi Mary,
What is the red X for? What do I have to do to open the Video.
So glad you are doing this video as I love the stem stitch and have not
yet been pleased with the way I do it.
Love Marcia.
Recovering from SNOW in NYC.
Hi, Marcia – you may need to update the software on your computer, in order to view the video. You can find information on the software needed to view the video here: http://www.google.com/support/youtube/bin/topic.py?topic=17173
Hope that helps!
Hi Mary,
Thank you so much for this video. It is so wonderfully clear.
I have some Z twisted Silk Mill silk bought for me as a present back in June(!) that I haven’t got round to using yet. Am I right that to get the correct stem stitch effect you have to keep the thread above the needle rather than below it?
That if you try to do stem stitch with Z twisted silk as per your video, the effect you get is that the stitch looks like outline stitch rather than stem stitch?
I must agree with the previous person that your website is so very supportive of people wanting to learn more about embroidery. I send you a very sincere ‘Happy New Year’ and hope the year ahead is everything you hope it will be 🙂
Hi, Elaine – Yes, you’re right about the z-twisted. The thread goes in the opposite place in relation to the needle. Otherwise, you end up with outline stitch. I’ll have a little more up about this later this coming week, with some close-up photos and so forth to show the various differences. I’ll also have a revised outline stitch video available….
Thanks,
Mary
So glad to see an updated stem stitch video. I love it too and so many folks wonder what it is when they see it. just got my snail supplies in the mail and hope I can manage that.
Thank you! None of the books I have (and I have many!) has the directions on the corners. This would have saved me so much frustration over the years!
Dear Mary,
I’m practicing Stem Stitch on an old pattern. It has windows with different seasonal and holiday things in the different windows. There’s alot of intersecting of lines and things, i.e. trees, leaves and other things crossing the window frames and whatnot. How should I do these things? Do I do the tree itself, how do I approach all the intersecting lines, and for the tiny things like lines on leaves, tiny bee’s, etc..is stem stitch right for them? Thank you!
Hi, Christina – Well, on the more detailed (and smaller) elements, if you reduce the number of strands of floss, you’ll probably get better results. Remember on curves to shorten your stem stitch, to get neat curves where the stitches “hug” each other, rather than flatten out and look hairy or spiky. I’m picturing (correct me if I’m wrong) the window of a house, where you look through the window panes and see the thing behind it (tree, etc.) I would embroider the background (whatever you see through the window pane) first, and then embroider the window pain lines, embroidering right over the background elements, because that will put them in the background.
Hope that helps!
~MC
Mary,
Thank you for such a WONDERFUL video on how to do the stem stitch! I have been looking for a tutorial to refresh my memory–I haven’t done any embroidery for close to 15 years. By FAR–your clear and to the point video and explanation was superior to anything I’ve found on the web so far. Again–thank you for such a great resource to turn to. I have definitely bookmarked your site as one to return to often.
Thanks!
Shawntel
Dear Mary,
I am having such issues with the stem stitch. My threads always twist in up on themselves making my stitches hard to do because I’m constantly unraveling them. My thread keeps coming out of the needle too :/ I was reading one of the site for information on your informational sites thing. It was a five part booklet. Just curious is that for people who are trying to do all this professionally or is all that what you really do EVERY time you do a project. Is it true that you should have around 16 to 20 stitches per inch? Pull weft threads and all that? I want to make sure my projects come out as best they can, so I’m just curious as to how to go about all this. Thank You for you input!
Christina
Hi, Christina –
It depends on the thread you’re using and the type of stitch, when talking about the # of stitches per inch. 16 – 20 stem stitches with regular floss would be rather difficult, though with a very fine thread, I can see how you might get 16 per inch…. with a Very Fine Thread. What are you stitching with? It sounds as if you are stitching with something like buttonhole silk, considering the way it twists and that it comes out of the needle often.
Anyway, with stitch numbers per inch, embroidery stitches can’t always fall into that category. Hand sewing stitches – sure, but not embroidery stitches.
Let me know what thread you’re stitching with and whether you’re right or left handed, and maybe I can give you some pointers!
Best,
Mary
I’m working with DMC 25 thread..and using a size 8 embroidery needle. I’m right handed. I am noticing though that, for me, the sewing method is much easier with any stitch. I’ve tried the outline and stem, had the thread and needle issues, and back stitch…and with that it seems no matter how hard I try I can’t get an even stitch. I REALLY appreciate your help!
Thanks,
Christina
Hi, Christina – I think trying to squeeze 16 – 20 stitches into an inch with regular floss is probably part of the problem. Even stitching is mostly a matter of going slow and getting the hang of it, and then practicing. Are you trying to count threads in your fabric? (What type of fabric are you working on?) I find that “eyeballing” the stitch length is more effective. The sewing method is easier, unless your fabric is hooped up too tight or you’re working on a frame.
Try keeping your thread length relatively short (18″) and dropping your needle towards the floor every several stitches (still attached to the thread) and letting your thread untwist itself. You might also want to concentrate on what you’re doing with your fingers every time you grab the needle. Often we turn the needle without realizing it. Try keeping the eye pointing in the same direction as you stitch. You can also get used to rolling the needle between your thumb and finger in the opposite direction that the thread is twisting, every several stitches, to help keep it from twisting up.
I hope those tips help a little bit!
~MC
Thanks so much for these videos! Your instructions for chain stitch helped me finish a knitting project, and now this video is helping me with my first embroidery project!
Oh, I just realized something that I’ve never heard or read before while rewatching your stem stitch and outline videos over and over: When doing this stem stitch, you are pulling the needle through to the left, and with the stem stitch pulling to the right. No wonder these simple stitches can result in so puzzling results — speaking for amateurs like myself, of course! :^) It makes a difference in the rhythm of the work too.
Thanks for the generous tutorials :^)
Hi Mary!
I came over here again to see if you’ve answered to Kath (comment 34) about the direction of stem stitch (backwards and forwards)you did on the leaves. Can’t found the answer.
I’m doing a tree and trying stem shading with three shades of brown as you did in the leaves and I’m not happy with my first attempt. I’ll try again.
Happy Birthday and thanks for all your time with us 🙂
How do you hide the starting knot. I am doing tea towels and the back will show.
Thanks for your great site….
Hi, Vicki –
Thanks for your question! It’s always a good one! If you visit the Tips and Techniques page, you’ll find a heap of articles there to help you out. Probably, the section on starting and ending threads would be the most helpful. Here’s a direct link: https://needlenthread.wpengine.com/2008/09/beginning-and-ending-threads-photo.html
My favorite technique for starting any embroidery without leaving a knot in the work is to use anchor stitches, and working on a tea towel, if you’re outlining, this is still possible, by working anchoring stitches along the line you’re going to stitch. I have a photo tutorial for this here: https://needlenthread.wpengine.com/2008/09/starting-your-thread-anchor-stitches-on.html It’s a sure-fire way to secure your threads invisibly, and it is perfectly secure. I’ve never had any stitching come out or loosen up, even on items that are repeatedly sent through the wash. So that’s the way I’d do it, when working on tea towels.
Hope that helps!!
~MC
First off, thank you so much for posting this video library; I’ve found it to be immensely helpful in my fledgling attempts at embroidery!
I’m having a bit of an issue with the stem stitch. For the record, I’m a left-handed ‘stab’ stitcher using DMC six-strand embroidery thread. It seems that whenever I stitch from left-to-right, the stem stitch comes out twisted and wonky, sometimes resolving itself toward the end of my line. However, stitching from right-to-left looks great. I know the simple answer to this question is ‘just stitch from right to left from now on’, but I’m curious as to why I might be having this issue. Any ideas?
Thanks again for all the wonderful advice you offer through your website!
hi Mary,
You mentioned that you could use this stitch as a fill- how would you do that?
thanks,
alice
Hi, Alice – to fill with stem stitch, you work the stitch in rows close together. You can see an example of it here:
https://needlenthread.wpengine.com/2010/01/stem-stitch-filling-on-stem-stitched.html
And you can see how to control your colors (gradual shading) using stem stitch filling in this post:
https://needlenthread.wpengine.com/2010/12/needle-arts-class-color-control.html
Hope that helps!
MC
Mary –
This site is awesome! I’ve come across so many places that want you to pay for this stuff.
Whenever I sign my quilts I use the stem stitch. (It’s my favorite – much better than the straight ones.)
I was wondering, in your opinion, would this be a good stitch to use in a long trail and crossing over itself in places? For one of the main details on a quilt I’m making I was thinking about using the stem stitch instead of stitching on ribbon. I want the twisted look (which I won’t be able to get with ribbon), but it’s a large section and I would have to merge it with where I am using ribbon for the detail.
Thanks!
Amanda
P.S. This is going to be a gift; I’ve yet to make a single quilt for myself!
Hi, Amanda –
Yes, stem stitch is perfect for crossing trails. I use it for that all the time! When you come to the crossing of your lines, just continue over the previously stitched line – it’ll look great!
~MC
Hi Mary,
Thank you! This video just solved all my problems. 😉 I have been embroidering for years but have never been able to get the simple stem stitch to work. I love the look of it and always want to use it but it nevers works out for me.
Well now I know why. I am left handed and I am positive I have been working with the thread on the wrong side. This just never occurred to me before.
Thank you,
Heather
AH – that makes all the difference in the world, Heather! There aren’t that many stitches that make a huge difference (for example, chain stitch, backstitch, running stitching, herringbone stitch, etc., etc. – these will all come out right) but with stem stitch, for the lefty, you would stitch from right to left, with the thread above the needle, if you’re working with regular cotton floss or with spun silks. With filament silks or with rayon threads, you’d keep the thread below the needle, because the twist on the thread is different. I’m glad this has helped you!! ~MC
Hi Mary,
I haven’t tried this stitch yet, but I love the bold rope effect in the pictures. Can I achieve this using divisible cotton? I’ve got the 6-strand DMC stuff. Thanks for helping me make the best Xmas presents ever!
Hi, Ryan – yes, you can! Any floss or thread works with stem stitch, really! Enjoy it! ~MC
Thank you so much for this video… 🙂 It really helped me a lot in my homework.
I watched your previous video for stem stitch multiple times and my stitches never came out quite right. Then I watched this new one last night and I suddenly understood the stitch. And it came out looking great! I need to work on corners a little, but I’m on the right track. Thank you so much Mary!!!
Thank you! Your website is very helpful. I just started learning to embroider about a month ago and had bought a book that was of little help. For example, I tried to do a stem stitch with the book and found the results less than satisfactory, but easily mastered it after watching a video. The same with satin stitching.
People actually asked me if the satin stitched flowers I made were done by machine!
Thank you SO SO much for this video. I have a hard time learning with pictures – I need a video and this is perfect. I am NEW to stitching. Just getting started and this helped so much.!!!!
I could not get the viedo to com up. Enjoyed the text. judy
I can’t get the video to come up either. I can get other videos though. This one shows YouTube with an arrow and a line through it. I would really like to see the video.
Hi, Mindi –
If you have ad blocking software on your computer, it might be the reason. Otherwise, it should work. There are only a couple videos on Needle ‘n Thread with ads on them, but this does happen to be one of them.
Otherwise, if that isn’t it, you might visit YouTube’s help page. They may advise updating flash on your computer, or something to that effect.
The video is working fine from this end, and from my laptop, so I’m guessing it’s matter of updating flash or perhaps having an ad-blocking software on your computer.
~MC
Dear Mary,
Thank you for the help. I’ll have my husband try the things you suggested. It’s good to know that it is definitely working and also that there is an ad on it. I bet he will get it working for me. Love the pictures of your worked stem stitch and I’m thinking of using it on my next project and would like to see that I’m doing it right.
😀
Mindi
I see your tutorial on stam stitch it’s very good. I would like to know if I can make a link on my page facebook “Ricamare il disegno” and on the blog that I’m creating. Thanks in advance and sorry for the english. Monica Crescini
Hi, Monica – Thanks for your comment. Yes, you are welcome to link to the tutorial. Thanks for asking! ~MC
Mary
I just watched the video on using the stem stitch to make square corners (a box). Wouldn’t it be just as easy to turn the fabric, always keeping the working thread to the bottom?
Now I’m going to look for your video on using stem stitch for circles.
Thanks so much for this web site – it’s been invaluable to me since I started teaching myself embroidery.
Hi, Melissa – of course it would be, if you are working in a hoop. If you are working in a frame on a stand, them it wouldn’t be. But the point of the square is not so much to show you how to embroider a square without turning your hoop. What I’m trying to demonstrate is the orientation of the thread in relation to the needle, depending on the direction you’re stitching. With stem stitch, it is common to see people make the mistake of always keeping the thread below the needle or to the right of the needle, no matter what direction they’re stitching in, whether top to bottom or right to left. But if you are stitching down a line towards you (like on the left side of the square) or from right to left, then the thread orientation changes, or you end up with an outline stitch, which is less defined than the stem stitch. When stitching a circle, if you move counterclockwise around the circle, the thread is always to the outside of the circle, but if you are stitching clockwise, the thread is to the inside of the circle. If you’re working on a hoop, it’s easy enough to remember this, because you can turn the hoop so that you’re always working from left to right when going counterclockwise, but if you are working on a frame that you can’t turn, you have to keep the thread in the correct place even though you’re moving around the circle and by the time you get to the top, you’re moving right to left.
Hmmm…. I hope that makes sense!
MC
Hi Mary,
I know I had written to you twice about not being able to view your videos. It is a problem with my iPod and not on your end. I used our regular PC today and was able to access any of the videos I wanted…yay!!! Just wanted to drop a line ro let you know, and thank you for these wonderful videos. A lot of the time a book just doesn’t cut it for me!
Take care and many thanks!
Mindi Hammerstone
Hi Mary,
I am a 41-year-old mom who’s brand new to hand embroidery, having just received a book from my 93-year-old grandmother. I am anxious to learn and practice the stitches, so I was thrilled when I came across this site! I’ve already watched the stem stitch video, which was so clear and helpful. Thank you very much for taking the time to do this and share your expertise with others. It’s really very generous.
Thank you for this tutorial on stem stitching. It helped me to finish stuffed animal faces for my kids Christmas presents. It was just the look I wanted my patern suggest a chain suggest. I didn’t like the way that looked. I have never hand stitched anything before. Thank you for the great instruction!!!
Mary, I am a quilter but for a change I had a lady in to my quilting group to show us Redwork. The ladies seam to love it but I was only half seeing what was being done as I needed to know the group and the visitors were ok. When I got home I looked on the web to see of I could find out how to do stem stitch as this is what was being thought. Well when I came across you site I was over whelmed with all your clips. So impressed passed it on, we now have ladies as well as my self wanting to do Emnrodary
Thank you so much for the inspiration.
Mags
Orpington Quilters, chair. Kent UK
Gosh Mary you make stitches sound so simple you explain it so well .thank you
thank you for your EASY Peasy video….. I have not done any sewing in a number of years so I am refreshing my memory on the names of the stitches and how to do each one ! love your site 😀
Hello Mary mam,
These days i am learning embroidery and your wonderful videos are helping me do that in a successful manner this time, otherwise it seemed to be a difficult job in my previous attempts …..
i am doing it in a nice way by learning through your awesome tips and tutorial videos…….thank u..:)
with love ♥♥,
Priya..
Just found your amazing blog via Pinterest, so many stunning things to see, thanks for the tutorial, it was very helpful.
Hi,
Great video. I was wondering what kind of thread you are using in this video? I want to embroider a message on a quilt I’m making and the thickness of yours looks great.
Thanks
Hello –
I’ve been watching your stem stitch video (very new to all this here) and I like the end result better than other people’s videos. However I keep getting thrown by your words: “keep your working thread below your needle.” I don’t know why this confuses me so much (!) but I can’t seem to find a point in the video in which this becomes obvious. I guess I might need clarification about what ‘working thread’ means, though I thought I knew! And by below, do you mean that if going in a horizontal line, it would be below that line as opposed to above that line? Can you explain it in another way for my pea-sized brain?!! 😉
Thank you so much!
Theresse
The working thread is the thread that’s actually making the stitch. So that thread needs to be below the needle when you’re working from left to right. Notice that the location of working thread – or the thread actually making the stitch – doesn’t really change in relation to the needle. If you always imagine you’re working from left to right, even when turning a corner and changing direction, then your needle will always be in the right place in relation to the working thread.-MC
Thanks so much for this great site. This is the first tutorial I’ve watched, and it’s great. I’m a leftie, and I really appreciate you taking that into account as you teach.
I’ve pinned your site, and I’m sure I’ll be back because I’m just learning to embroider. It doesn’t seem so scary now.
Cheers,
Sarah
There is no video for the stem stich, just learning here, I think I understand the stich but would like to see the video.
Thank you
Marilyn
Not sure why it’s not coming up for you, Marilyn – it’s showing on this end. Do you have the latest version of flash installed on your computer? It also works on my tablet and iPhone…. You might check YouTube’s help center for playback issues on your computer. – MC
There is voice in your chain stich but no picture. Please advise. Thank you I am a beginner
I’ve been working on a project called “Cardinals in Dogwood” so there are alot of branches & leaves. The instructions tell me to use the satin stitch on the branches but I’m switching to the stem stitch. After seeing the video on the stem stitch it’s something I want to master (I’m a beginner!) & I think it will look better on my project than the satin stitch–which I’m not doing to my liking at all on those thin branches. Thank you for doing the video. It’s a perfect way for me to learn and fine-tune my stitching.
Hi Mary, I can’t thank you enough for sharing your skill so generously.i am in my late forties with grown up kids so when I came across your website and browsed through it,I was blown away! I just entered this interesting world of floss and needle a month back and many thanks to you ,am hooked line and sinker!my family enthusiastically sees my daily progress and praises my efforts whole heartedly . I wish you all the best in life,GOD BLESS! Warm regards manisha.
Mary, I cannot number the times I return to your side to watch these videos, either to learn something completely new or to refresh and “reset” my knowledge of familiar stitches. Thank you so very much for your tutorials.
Your “site.” The number of times I “return to your site.” Really need to try proofreading BEFORE posting.
Well, now I don’t see my original comment, only the edit–which will be confusing without the original! My apologies. All I really meant to say is that I have returned to your tutorials again and again through the years, and they always enrich, whether I’m learning a new stitch or brushing up on an old one. Thank you, Mary!
What a wonderful site. I have not embroidered (only hardanger) but came upon your site and now I have the bug. Finally,I have a true teacher. The pictures and videos are wonderful. Can’t hardly wait to get started. Thank you.
Ahhhhh!! Careful, Janet – you’ll get hooked! 🙂 So glad you enjoy Needle ‘n Thread!
I have tried 3 times to watch the video on the stem stitch. The audio comes thru, but no video. What am I doing wrong? Cinder
You might need to update your software (Flash?) or something. It’s working on this end, in Chrome and Safari and Firefox (I checked all three browsers), and it also is working on my iPad. So you might make sure your software is up to date, and then check YouTube’s help center. They have some troubleshooting guides there for viewing problems. You could also just try watching it though a different browser. Maybe your browser’s acting up…
Hey there, I have been doing a white work project and happened to see your thoughts on stem stitch – I’m sure I’m doing something wrong! To make a long story short, there is something embedded on your video and my computer’s security software is preventing me from watching it. Would have your IT person check it?
Hi, Karen – it’s working on this end. I don’t have anything embedded in my videos, and I don’t have ads on them, either, so they should be ok. You might need to update your flash plug in?
I can’t seem to watch any of the videos – all the ads block the video box. When I click on a title, I’m directed to the ad website rather than the video. Help! My stem stitch is a mess and I’m in desperate need of help! :}
Thanks you!! This saved my bacon on a project I am doing. I had to totally change my plans, and this tutorial has me well on my way to completion. Woo hoo!!
Thanks for a most helpful site and tutorials…..they are just great! I had to finish a project with a lot of stem stitches in an English garden & cottage scene….they formed some actual stems in the foreground flowers. I had done stem stitch before but just felt I needed a little reminder…and, there you were! I visit your site often and always feel satisfied with what I have learned or found.
Thanks again!
Glad it came in handy, Cheryl!
Hi Mary.
I just want to thank you for making this glorious page! i am learning so much and you are a very good teacher, your instructions are so easy to follow!
Thank You
In using the stem stitch, I have problems with curves. My stitch kinda “gets off the track”, so to speak at the curves. I’ve “fixed” it by taking a stitch in the middle of the stitch to pull it back in line with the shape. What is the correct answer? Thanks for your help.
Hi, Bonnie – if you shorten your stitches in the curve, it’ll help!
Hi Mary 🙂
I just wanted to thank you for your fantastic movies about embroidering. Im learning so much thanks to you 🙂
Im greatful 🙂
Thank you so much 🙂
Best regards
Ann Therese 🙂
Mary,
Your video tutorials on embroidery stitches have been such a big help. You have done an excellent job of showing and explaining each stitch. It’s very clear and easy to understand.
Thanks so much.
Hi Mary,
I have to agree with you on Stem Stitch being a favorite stitch. Mine was the chain stitch until I start my very first project and decided the stem stitch would be the correct stitch for the pattern/project. So, I took my “sample/practice” fabric and floss to practice my stitches on (great advice by the way, thank you!) and started playing around with the stem stitch and it really is a fun and pretty stitch! I did play with it a week or so ago, but I watched your video again (I have trouble remembering how to START stitches!)and spent a good hour or two practicing and trying out various stitches for my project and once I started doing the stem stitch (correctly by the way) I found it’s a very nice stitch in how it looks, but also, it’s a very fun, melodic stitch to do. I love crocheting for that reason, you get into a stitch and it’s very relaxing and so far the stem stitch is doing that for me. It’s why I love doing arts/crafts with my hands and long projects as it’s just very, I don’t know, comforting? I really can’t place a word for it, just the way it makes me feel. So, now the stem stitch is my favorite (could change, but don’t think so) and I wouldn’t know about it, or wouldn’t have really focused on it had you not spoken (okay, written, too) about it so much. So, the stem stitch and I thank you!
Happy Stitching!
P.S. I am excited and nervous about showing you my first project, but I really want you to see it when it’s done, in case there is (and there will be) some constructive criticism (that’s how we learn, right?) on what I did do right and what I can improve on. ;0-)
I have a question regarding the twist you speak of. I am using wool on linen, and I’ve just begun tests. I wish to make a line, almost like a drawn line, and I think that stemstitch will work well. I like the backstitch too, but it has so much wool on the back that I would rather not have. It’s a huge project, so I want to get it right before I begin. I have some Wool called Fine d’Aubusson, ordered from Hedgehog Handworks. I wonder, does the wool have an s or z twist too? Thank you.
Hi, Barbara – it’s an s-twist….
Mary,
Do you have a written picture by picture of doing the stem stitch in addition to the video.
The videos are GREAT but there are times where I don’t have electronic access and have forgotten the right, left etc. of the thread position for stitching squares.
I have printed out most of your other information about stem stich so I can quickly reference them.
Thanks so much for all of your continued help.
My question has to do with the start and end of the embroidery thread. In your discussions about stem stitch, you refer to s-twist and z-twist threads and how I may need to move my “loop” from the bottom to the top (assuming I’m doing the bottom of square in the video). Does this mean I have to know which end of my thread is the beginning and which is the end? Or am I making my life overly complicated?
Hi, Barb – there’s no backwards and forwards on threads, when it comes to twist. If a thread is an s-twist thread or a z-twist thread, no matter what way you turn it, it will always be s-twist or z-twist, so which end is which doesn’t matter at all. The twist doesn’t change, depending which way the thread is flipped. Take a look at this article: https://needlenthread.wpengine.com/2011/01/s-twisted-vs-z-twisted-embroidery-threads.html Now, if you take a piece of embroidery floss or perle cotton and examine it, noticing the twist, then flip it over, you’ll see that the twist is always the same. Hope that helps!
The video was very informative and I can’t wait to try this now with the voided monogram. The only question I have is how do you stitch it for the 2 colors that you show on the voided monogram?
Hmmm. Th voided monogram using stem stitch is one color – pink. The two colored one in blue and yellow is worked with a whipped chain stitch.
Just wanted to say that these videos are the most helpful embroidery how-tos on the web! I’m so grateful that you took the time to share your expertise and talents with us novices in a clear and direct way. Also, your work is beautiful! Much appreciated!
Hi! My old Mennonite aunts got me doing embroidery when I was growing up. I always enjoyed it. I did some counted cross stitch in the 80s of course. I’m just getting back into it. All my stuff is very simple, I finished some pillowcases. I’m just now doing an iron on transfer for a gift. I’m doing stem stitch wrong, but I don’t think I’ll change. My aunts told me to come up in the middle of the stitch. And in a dmc book I have they say the same. Anyway, I love your website! I am out of practice and things have changed! How do you decide on colors? The gift I’m working on was an iron transfer picture. I’m figuring out the colors, and it’s more complicated than I thought! !!
Hi Mary,
I also had trouble getting sound, but I eventually did. The problem is the usual vol. and other options at the bottom of the video frame do not appear, and there is the odd message that the “YouTube Flash API was officially deprecated on January 27th, 2015.” I’ve never seen that warning before. The usual pause and vol. buttons are convenient, of course, and I find myself having to restart the video several times so that I can watch the very first steps of this stitch. Oh well, at least and at last I finally did get the all-important sound; now I’m going to practice this stitch. I wonder if it would be worthwhile redoing this demo. or otherwise remedying the glitch. Anyway, thanks greatly for this and all the other videos and book reviews and everything else on this amazing site! –Mike
Recently I became acquainted with your website through members of my EGA chapter. Your tutorials are clear and helpful. Thank you for your contribution to the art of embroidery.
Mary,
I think you should review the voice over for the stemm stitch. I think when the demo is stitching right to left across the top of the square, there is an error, and you say “when stitching Left to right, keep the thread above the needle” I’m fairly certain you mean to say “When stitiching Right to Left”
Gayle in Maine
This was just the information I needed this morning. Thanks for being here for me!
I just skimmed the comments, so someone else might have pointed this out:
Most yarn/thread is spun Z and plied S. You can go beyond that and ply the already plied yarn back on itself with a Z twist (for a “cabled” yarn.) The organizing principle is reversing the twist at each step. It seems to me that this is exactly what is happening here. The last twist direction for the floss is S from the plying, so when you look at the stem stitch the apparent twist of the “rope” needs to be Z. I find this to be a useful way to check and be sure I’m doing it right regardless of direction.
If you end up with a Z twist thread, then you would need to end up with a S twist stem stitch.
Thank you so much for this stem stitch video – I was doing it wrong and I am delighted to know the correct way to work this stitch to create the beautiful rope like appearance. I appreciate all of your embroidery advice and your very good instructional videos.
Pauline Ann Perry
Mary,
You bring me such joy in this crazy world. Your work is colorful, neat and creative. It is so calming. I haven’t embroidered in years but I love it. When my mother and I were younger she asked me to embroider a tablecloth for her. She bought a piece of the ugliest green cotton fabric for me to use. I kept my mouth shut and went on sewing. She loved that tablecloth until she died. We all have different tastes. I was in the hospital for 8 days and I worked on that piece everyday. One night I woke up to find a few nurses holding that treasure and commenting on how beautiful it was. They told me they would sneak in every night to see my progress. That project gave great pleasure to some and outrageous laughter to me. There is a lesson to learn from the story but I am not sure I know what it is.
Thank you so much for sharing your work. I love it!!!
Jean
Very easy to follow.
Thank You.
Isobel.
Thank you for offering some assistance to those of us who forget little nuances about using the stem stitch.
Just watched the video and read about the S-twisted threads to be used. What about when using 2 strands of DMC which tend to twist and not give such a nice finish. Can anything be done other than constantly untwisting the two strands?
You could use a laying tool! Or you could “railroad” the threads (pass the needle between the two) with each stitch.
Thank you for all your great videos! I am new to hand embroidery so I wonder if there is a reason you don’t use “keeping the thread to the outside of the box”. I just did some stems and I just keeping thinking keep the stem to the outside (or away from the middle).
Thank you for your response. I taught math and I know that people figure out others ways of doing, or thinking, of how to do something. Those ways may work all the time or only sometimes.
That’s a good rule of thumb when working around the box in this direction. If you’re stitching in the other direction (around a box, or around a circle, etc.) then keeping to the outside wouldn’t work. So it really depends on the direction you’re stitching in.
Wow, now I get how to do the stem stitch properly. I watched the video twice and the 2nd time followed along with what you did, Thanks a million Mary for the video. Now onto another stitch……being half blind here embroidery is difficult at times, yet I know with your videos I will be able to do it.
Best videos I’ve ever seen for embroidery stitches I’ve ever seen! Thank you! You’ve helped me so much.
Donna Lee
Thanks, Donna! 🙂
Thank you!