


Last year in my summer embroidery classes for kids, the children embroidered notebook covers on wool felt. I learned a lot during those classes which I’m implementing in this year’s classes. For a couple projects, we’ll be using the felt again.
Wool felt is nice for embroidery – for kids or adults – for at least a couple reasons: 1. it is stiff enough to be held in hand, without a hoop; 2. In most cases, even with lighter yellows or greens, you can still get away with some thread carriage. For kids, this is important. While you do want to teach them from the very beginning the importance of keeping the back of their work neat, on small spaces if they have to start and stop a lot, they get easily frustrated or bored.
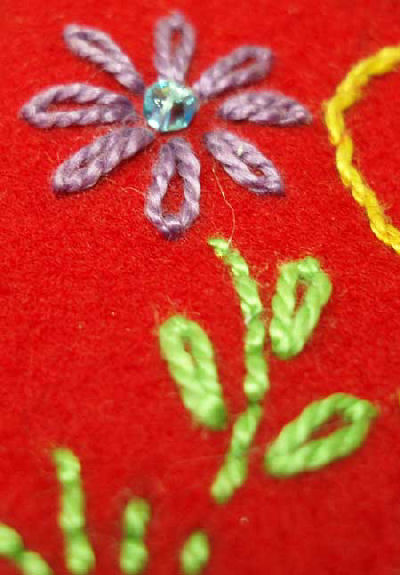
So, for example, when a kid is embroidering a purple lazy daisy daisy, carrying the purple thread from one petal to another is no big deal. On a light fabric like muslin or linen, it could very well be unsightly. On felt, not really! Who would know?!
This year, we’re making two items out of embroidered felt: a bookmark and a little coin purse. They are both very simple concepts – no sewing machine is required or really any “extra” finishing. They are also small enough to be managed in a couple classes.
The coin purse is simply a tri-fold piece of felt, with angled corners on one end (for the flap). We’ll use either a snap or velcro catch (I don’t really like the idea of using velcro with felt or embroidery), and the pouch will be lined with a coordinating calico that is fused onto the felt. The edges are stitched up with a close buttonhole stitch or overcast stitch. I’m started making the sample and it’s coming along ok – I’ll post pictures when it’s finished.
The bookmark is another question: it’s extremely simple, as there’s no folding involved, and edge stitching is not required (but could be done, if desired). The bookmarks, finished size, are about 3 inches wide and 7 inches long. Only the simplest pattern will be worked – I’ve got a couple very basic patterns that I’ll have already on the felt before the classes begin.
The problem I was running into was the backing and how to apply it. It seemed to me that an extra layer of felt made the bookmarks really thick. But if I wanted fabric beyond the edge of the embroidered front of the bookmark, it had to be something stiff, and felt seemed the only option – after all, the edges don’t require finishing. All I knew was that there absolutely had to be something to cover up the back of the booksmarks! So these were the original questions besetting me as I prepared these projects.
You can imagine how delighted I was, then, to come across an embroiderer who is actually testing the making of felt bookmarks in different ways! If you have not checked out Alicia’s blog, Curiosities 808, you really should! There are a couple things I really like about it: 1. She does some things the way I do them – like tracing a bottle cap from eye drops for circles on her fabric! 2. Her photography is really nice. And 3. She’s exploring thoroughly this question of felt bookmarks. She begins with her plan for making felt bookmarks to try out different stitches, and then she progresses through the making of them. She’ll be testing out different suggested backings, too. So that will be really interesting to me.
I’ve already decided on my mode of backing, but I’m always open to new and better ideas!! If any of you are familiar with making bookmarks on felt, what do you use for a backing? Heck, even if you’re not familiar with it, do you have any ideas?
As you can tell, my biggest preoccupation right now is the summer instruction. I hope it doesn’t bore you too much! To break the monotony, I promise something Monumentaly Interesting (!! maybe a bit of an exaggeration !!) in the next couple days. And I’ll be taking a bit of time off work shortly, so that will give me more time for photos and progress reports!
Have a terrific Thursday!
I’m following closely your summer teaching projects, as well as reviewing your kids’ projects from previous years, because my 12-year-old granddaughter is planning a visit this summer. She and I stitched together when she was about five and ten. Now she should be ready for something more “finished.”
Also, thanks for the ecclesiastical goldwork post. Magnificent work. I couldn’t tell it wasn’t the highest quality. I, too, love ecclesiastical embroidery, especially goldwork.
Great idea! Embroidery on felt is so forgiving–perfect for kids. And I love Alicia’s series of articles, too!
Denise
http://needlework.craftgossip.com
I actually was involved in teaching children embroidery and we made felt bookmarks! This is what we did (which involved in some areas 3 layers of felt, but it didn’t seem too thick at all!)
Using “Felt Wee Folk” by Salley Mavor for inspiration and in particular the owl applique pattern included in the book. The children first embellished (with fly-stitch, straight stitches, buttons for eyes) the owl shape before practicing a buttonhole stitch to attach that piece to the base piece of felt. On the base/main piece of felt was more embellishment – they stitched a squiggly line around the perimeter in chain stitch adding simple leaves, some stitched a branch on which the owl sat, some stitched lazy daisy flowers. To finish, I fused (using WonderUnder or some similar product) the embroidered piece to a larger piece of felt and trimmed the bottom piece of felt with scallop edgining scissors close to the edge of the embroidered piece – totally cute.
This might sound complicated, but we had children ranging in ages from 7 on up, some with attention issues, some who had never done any kind of crafts. Everyone was happy with their finished bookmark.
I had our class sample for the longest time, but in our last move it has gotten shuffled to some unknown place, otherwise I would have sent a photo. However, I hope you can picture this and hope it helps.
Thank you, Joey, for the run-down on how your bookmarks turned out! Amd the detailed instructions! Thanks, thanks, thanks!! I’m working up a sample this weekend, so I’ll post it. I love the idea of using scalloped scissors for the edges! Now, I just have to find some!
JoWynn – I’m sure you’re granddaughter will learn heaps under your tutelage! Glad you liked the goldwork! I’ll see if I can dig up some more for you…
Denise, “forgiving” is a good word for it! On the sample I messed up yesterday, though, I wasn’t very forgiving to the felt. Rrgh.
Mary,
What about using something like grosgrain ribbon glued on with a fabric glue or ironed on with double sided “stitch witchery” for the back of the bookmarks? It wouldn’t have to be edge to edge… a bit narrower than the width of the bookmark is better. I’ve made embroidered bookmarks with a scalloped edged aida cloth strip and finished the backs and bottoms of the bookmarks that way. The bookmarks weren’t 3″ wide though…more like 2″. Wide grosgrain is available, but not cheap.
Another idea? What about cutting the edges of the bookmarks with either a wavy or scalloped rotary blade? A bit “fancier” than just a straight edge…and for no more work….just a new blade.
Tess
Hi, Tess! Good ideas! I’ll check out some ribbon today, just to give it a try. I think I have a decorative edge scissors, somewhere, too!
Thank you!
Wow! I just discovered your site and it is wonderful. I am going to be teaching an embroidery class for our homeschool co-op this fall. I love the notebook cover idea. You said you let the students create their own designs. Did they draw them on paper and/or on the felt first, or was this completely free-hand? Either way, they turned out great. Any pointers you could give would be greatly appreciated since this will be my first time teaching embroidery.
If you’re looking for another idea: I make handkerchiefs out of bleached muslin with lace around the edges. I embroider a spray of flowers in the corner and a Bible verse. I keep one in my purse for the unexpected joys (and sorrows and sneezes)of life. They make wonderful gifts for weddings, Mother’s Day, moving, etc. I recently gave one to a friend whose husband passed away. I think a gift embroidered by hand expresses much more than a printed card ever could.
Hi, Kim!
Thanks! I’m glad to hear you like the videos!
When I work on felt, I usually free hand the design with one of those fine tipped micron art pens (.005). It’s permanent ink, but very tiny, so it’s easy to cover up the marks. I’ve also used pencil.
You can easily iron-on a design, too, if you have an iron-on transfer that you like. Felt takes iron-ons really well!
Hope that helps!
MC