


How do you keep your embroidery needles secure in one spot? Do you use a needle book? A pin cushion? A needle box, or a needle tube? I’ll show you what I use. You probably won’t be THAT impressed! But, hey. It works!
I’ve always wanted to make a Really Pretty Needlebook, one that looks nice but is comfortably functional and can hold a lot of needles and take up minimal space. I haven’t done it yet. I made that felt tool / needlebook thingy, but that’s not really what I had in mind, and that whole project was a bit of an accident, anyway. I was thinking more along the lines of something a bit more upscale, like the needlebook patterns you often see in Inspirations Magazine, or something along those lines.
Instead, my needle storage is a little… well. Haphazard, if you can call it that.
Just for reference, I’m referring to the needles I use daily – the ones I reach for when I sit down to embroider. One day, about a year ago, I was cleaning up. You know how it is when you’re cleaning up? Well, when I clean up, I get into a kind of organizing frenzy, and I generally find that I am dissatisfied with the way something or another is organized (or not organized) in the mess I’m trying to clean up! On this particular clean-up day, I was cleaning up my needlework basket. I didn’t like my needle receptacle, which was a plastic case called a Needle Safe, which has a magnetic base. All my needles invariably got dumped in there, only to become mutually attracted to each other and settle into various lumps of Magnetic Bliss. They didn’t lay out where I could see them well. No, no. I just didn’t like it.
So I improvised a little needle roll, telling myself it was only temporary, until I made my Ideal Needlebook.
For a year I’ve used this little Thirty Second Improvisation Job, and I realized the other day that I like it a lot! It has served me well.
If you’re looking for a handy way to store your daily needles, you might try it, too. This is a super-easy way to make a needle roll, it’ll take you about thirty seconds to make it, and, if you have some scraps of wool felt on hand, it won’t cost you anything – not even time!
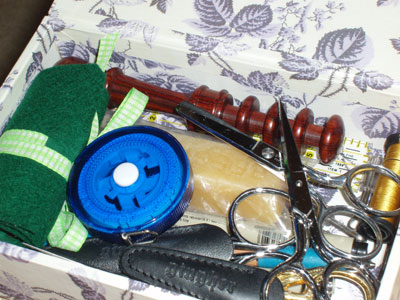
Here it is:
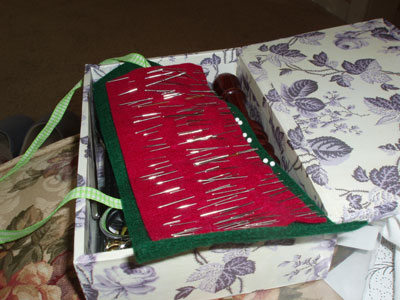
I took two scraps of wool felt in contrasting colors. I had some scraps of dark green and some scraps of a kind of cranberry color that were pretty nice, so I figured they’d do. They were both long rectangles.
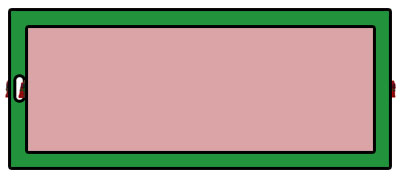
The green felt is about 3.5 inches high and 8.5 inches long, but you can make it higher or longer or shorter or whatever size you wish, as long as its height is enough to accommodate the length of your longer needles. The cranberry felt is about half an inch smaller all around than the green felt.
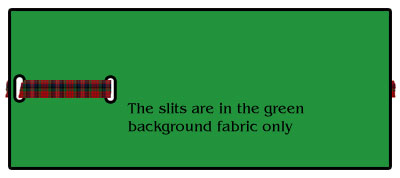
I then cut two little slits in the green felt for a ribbon (the plaid strip in the diagram above). There’s one slit on one end of the green felt, and one slit about two inches from the first slit, towards the middle of the green felt. They’re just tiny slits, for a quarter-inch ribbon. I didn’t stitch around the slits or anything. I just snipped them and ran a ribbon through them as illustrated, and that was it.
Then I placed the cranberry felt on top of the green felt. I didn’t sew it on or anything.
The way I figured it was that the friction between the cranberry and the green felt would hold the cranberry felt in place. Actually, as I stuck needles in, the needles helped secure the cranberry felt to the green by passing through a bit of the green, too, but the felt is thick enough that the needles don’t pass through the outside of the green felt.
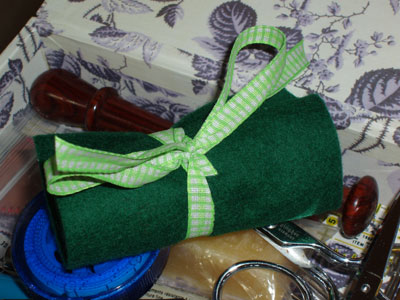
I rolled it up from the right side of the needle roll, towards the sides with the slits, and tied the ribbon around the roll.
And my needles have been happily encased in this makeshift needleroll for a year now. It’s a convenient, user-friendly roll that took about 30 seconds to put together.
It fits perfectly into my little tool box, which fits perfectly into my needlework basket!
So, how do you store your daily needles? If you’re looking for a convenient way to store them and you have some scraps of felt lying around, try this! You might like it, too!
What a great idea! That would make a nice quick gift for a special stitcher too. Up until I won a giveaway for a little felt needlekeeper recently, I always kept my needles stuck into the ends of spools of thread. Yuk. that leaves sticky on the needles which is icky to get off. What a clever solution and a great way to organize.
Thanks!
MGM
I really like this needle roll idea Mary!! It’s a fabulous invention. I have two pincushions I use – one for tiny needles and the other for bigger ones. I grab whichever one I need for a project, but if I’m on the go, the needles tend to still get lost or pushed into the centre of the cushion. This is a perfect way to make my needles more portable. I will be making one for sure!
Well. I might just be making one of those in the near future…. But you know. one fine blogging day maybe you could just lay out all the contents of your toolbox and tell us what it’s all for. I hope that’s not too creepy of me but I’m a relative beginner and still buying tools and finding out what they’re for!
I really like that! I’ve used Sudberry’s wooden needle box for years at my stitching area, but your roll would be marvelous for travel! No weight to speak of either.
I have lots of ways of keeping needles together — none outstanding. From the pretty silk needle cases to magnets, I try them all and use them all. Your roll looks fabulous. Maybe I’ll try that next.
I stockpile needles, probably because I live in a small town where you can’t buy a straight pin. My favorite way of storing all of my favorite needles is a trick I learned from a fellow stitcher. I keep them in a leather notebook which was designed to hold business cards. The plastic sheets are just the right size to hold a packet or two or three of needles. I made labels for each of the pockets and it is easy to flip through when I need to replace the needles that I use every day.
Cissie
Hi Mary!
This is a great and easy idea, indeed.
I use a small needlebook (handmade by me)made with Portuguese linen and cotton you can see here – the one on the right. I also use it as little pincushion.
Love your little needle roll. BUt now you’ve got me curious. what is *IN* your little sewing kit box? I’d love to see a blog entry telling/showing us each tidbit and tool you have in there!
I have a similar kit. I have a bone filigree needle case an ex boy friend gave me several years ago.I only had a problem with the top coming off once. I especially like that you have Gingher snips in yours. I love mine and wouldn’t give them up.
Hi,
How would you mark the needles by name in the roll. I love your idea.
Hi, Sarma – Well, I didn’t mark mine. But you could always color code sections somehow, maybe by separating them with colored ribbon or something?
Pardon me for being slow but I’m just now catching up with all the blogs you wrote before I came on the scene. My needlebook was designed by me as a quick project for my small quilt group. I bought some red, white and blue felt pieces – just the poly stuff but i’d use good wool if I did it again. I used red and blue for the covers and white for the pages.
Using my sewing machine, I stitched each quilter’s name on the front and the needle names on the pages so that each needle has it’s own page – darners, sharps, crewels, cheniles milliners, betweens and tapestrys.
Then we just stacked the whole thing together and used a chain stitch (or whatever they wanted for their own book), stitch the whole thing. I outlined my covers with a blanket stitch before I stitched the book together too.
It’s been a great needlebook for me and packs well in my sewing kit. It’s about 2 1/2″ x 3″ and about 1/2 inch thick with all the pages.
I’m now working on another needlebook by Jan Kerton, that has one page for each needle showing the needle sizes and opposite that is blank page to put your needles, I think I will divide that page for the different sizes. And I’ve used several of your stitches on that project adding some beads for glitz when I couldn’t resist!
Sounds like some great needle books, Beverly!!
Thank You SO MUCH for sharing this Beverly! I am brand spanking new to Embroidery & have been looking high and low for something like this! Most needlebooks I have come across have been so small and only have a few pages, but what you are making is EXACTLY what I am looking for! I see that this post is 5 years old, but I Thank You still for sharing this!
And I Thank You as well Mary! Your knowledge of Embroidery has helped me immensely!
I appreciate you both and hope you are well!
– Grace
I am new to embroidery and appreciate all the great information I’ve found here on your site. I’m reading all about needles and have been wondering about the best way to keep my needles organized. I think it will try and make a needle roll like you’ve described. In looking at your pictures, I do not see any markings or delineation for keeping track of the size or kind of needle. Have you added that or have any suggestions?
Hi, Michelle – No, I didn’t add anything to separate needle sizes. After a while, you kind of get a feel for the size you need, or, if you’re using a needle that seems a bit large a bit small, you end up eyeballing the size and picking a smaller one, without really paying attention to the actual size. With this needle roll, I just needed something easily transportable to hold a bunch of needles that were getting out of hand. It wasn’t really for needle organization. But if you wanted to use the same concept and organize your needles by type and size, you could always embroidery size numbers in different areas of the felt. That might help!
Thank you Mary, I may try that. As a newbie, I’ll need all the help I can give myself.
I am a old newcomer to Mary’s Marvellous Website and find it invaluable.
Found this not so long ago and it is very useful. I made several one for each type of needle. I did make a change, instead of making slits in the felt and ribbon to tie , I used knitting marker pins. Mine are on a plastic holder, 10 of 5 different coloured heart tops, almost 2inch long pins and just sharp enough to easily slip into the felt.. quick and easy to use. I also used a different colour for the outside layer and use a marker to identify the contents.
I made one of these some time ago and never thanked you for sharing your idea. It’s a great wee item. Thank you x
In the left shoulder of basically every jacket I own, and a few I don’t. In the side of the headrest of the passenger car seat. In the arm of the sofa. On a magnet on the fridge.
I have a little sewing box house my grandma bought me that has a felt chimney that is a pin cushion and that’s where most of them end up when I’ve been admonished for leaving them stuck somewhere inappropriate
Mixed feelings on magnets. Sometimes I think they are God’s gift to sewing and sometimes they drive me crazy. I recently learned that needle minders are a thing, but I don’t really get why you’d 1)spend that much for literally just a neodymium magnet with a bit of some kind of design i mean they are cute but really? 2) actually bother to carry a separate implement with you while you work to set down near you instead of just jabbing it somewhere in the nearest bit of fabric.
I also have basically a mini version of this in my emergency sewing bit kit. (Just a piece of felt with maybe 3 needles and a few pins in it)